1. Introduction
This manual provides comprehensive instructions for the installation, operation, and maintenance of your Varstrom Tongsheng TSDZ2B 48V 500W Mid Drive Electric Bike Conversion Kit. This kit is designed to transform a standard bicycle into a high-performance electric bike, offering enhanced speed and torque with an integrated sensor system.
The TSDZ2B motor features an innovative dual clutch system and an advanced torque sensor, providing a natural and responsive cycling experience. Please read this manual thoroughly before attempting installation or operation to ensure safe and correct usage.
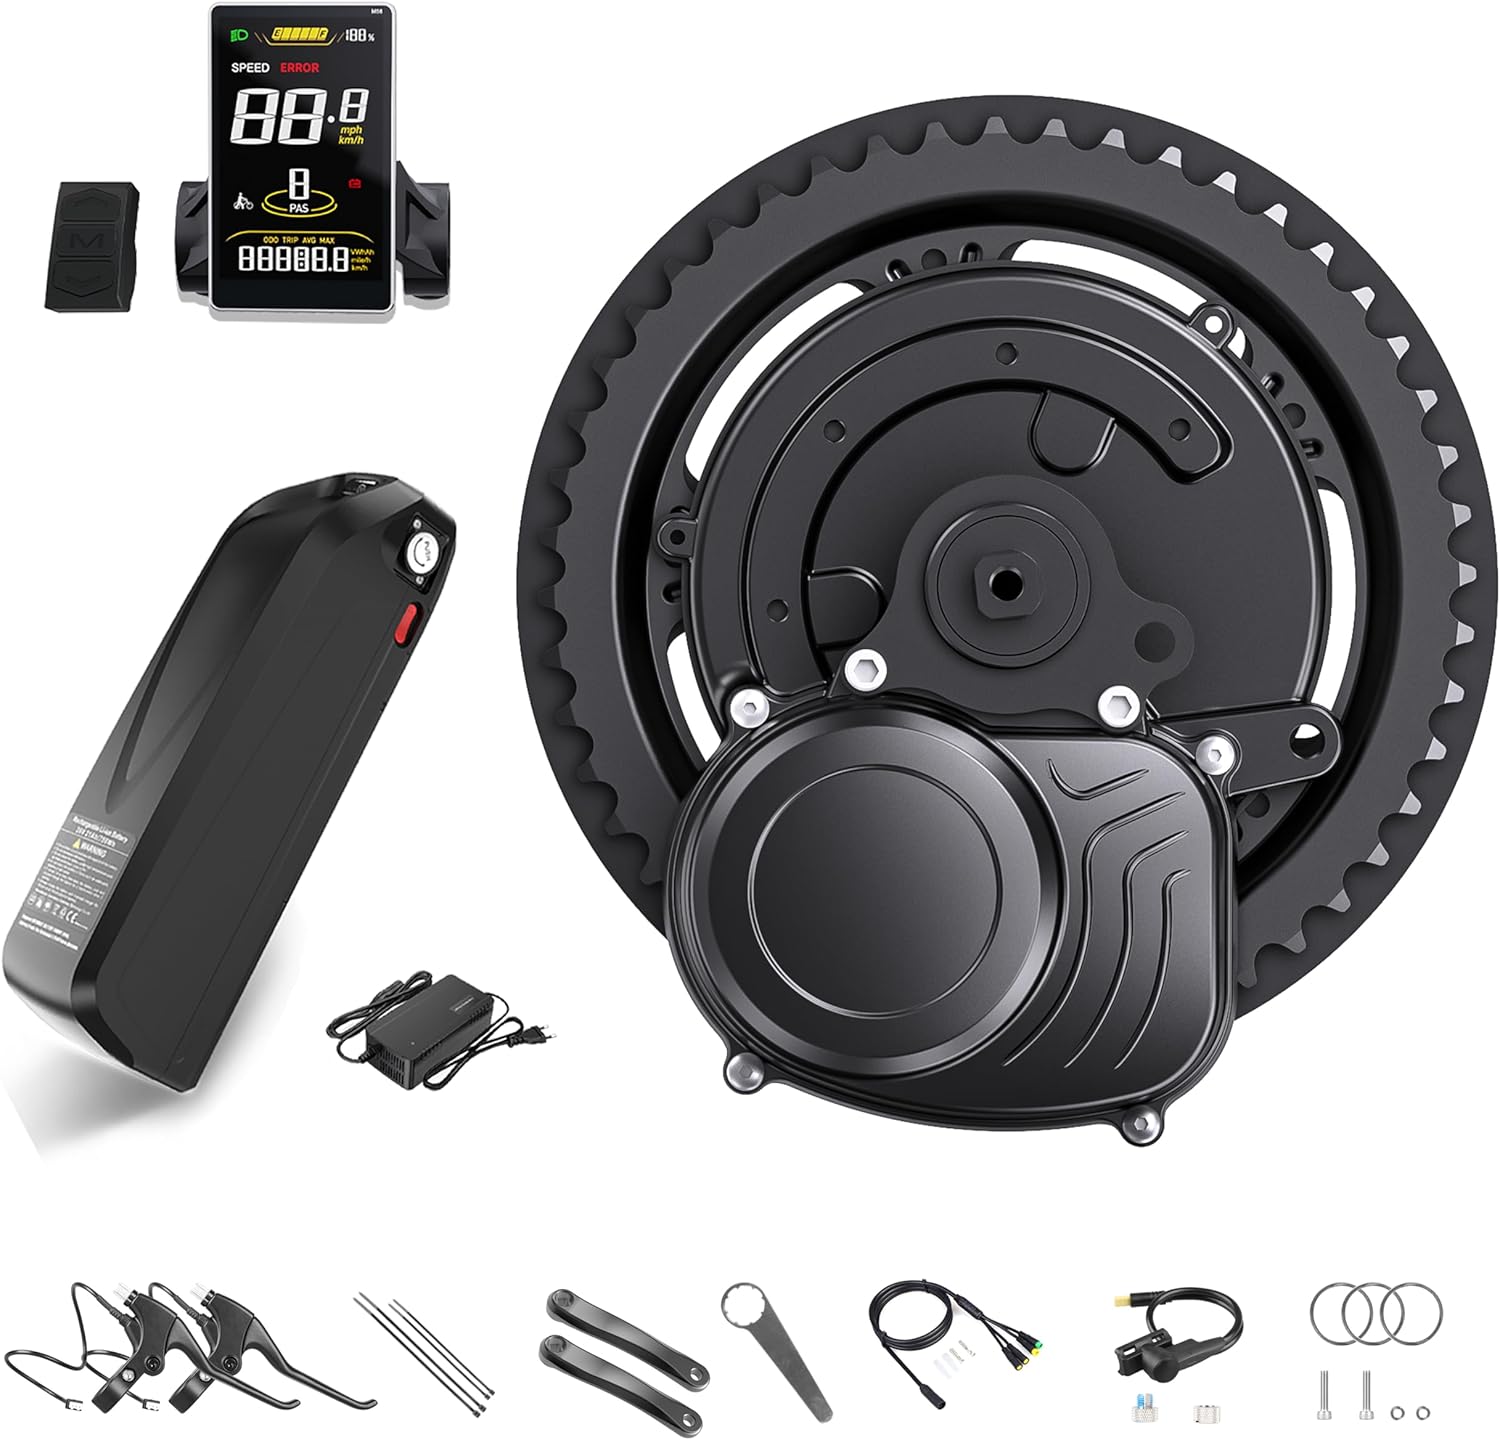
Figure 1.1: Varstrom Tongsheng TSDZ2B 48V 500W Mid Drive Electric Bike Conversion Kit with SWM58 Display and optional battery.
2. Product Components (Packing List)
The Varstrom TSDZ2B 48V 500W Mid Drive Electric Bike Conversion Kit typically includes the following components:
- TSDZ2B 48V 500W Mid Drive Motor
- SWM58 Display
- 1T4 Main Wiring Harness
- Thumb Throttle
- 42T Chainring
- Speed Sensor
- Wrench
- Pair of Brake Levers (Optional, depending on kit variant)
- Crank Arms
- Washers
- Battery (Optional, depending on kit variant)

Figure 2.1: Detailed packing list of the TSDZ2B 48V 500W Mid Drive Kit components.
3. Specifications
Key technical specifications for the TSDZ2B 48V 500W Mid Drive Motor and SWM58 Display:
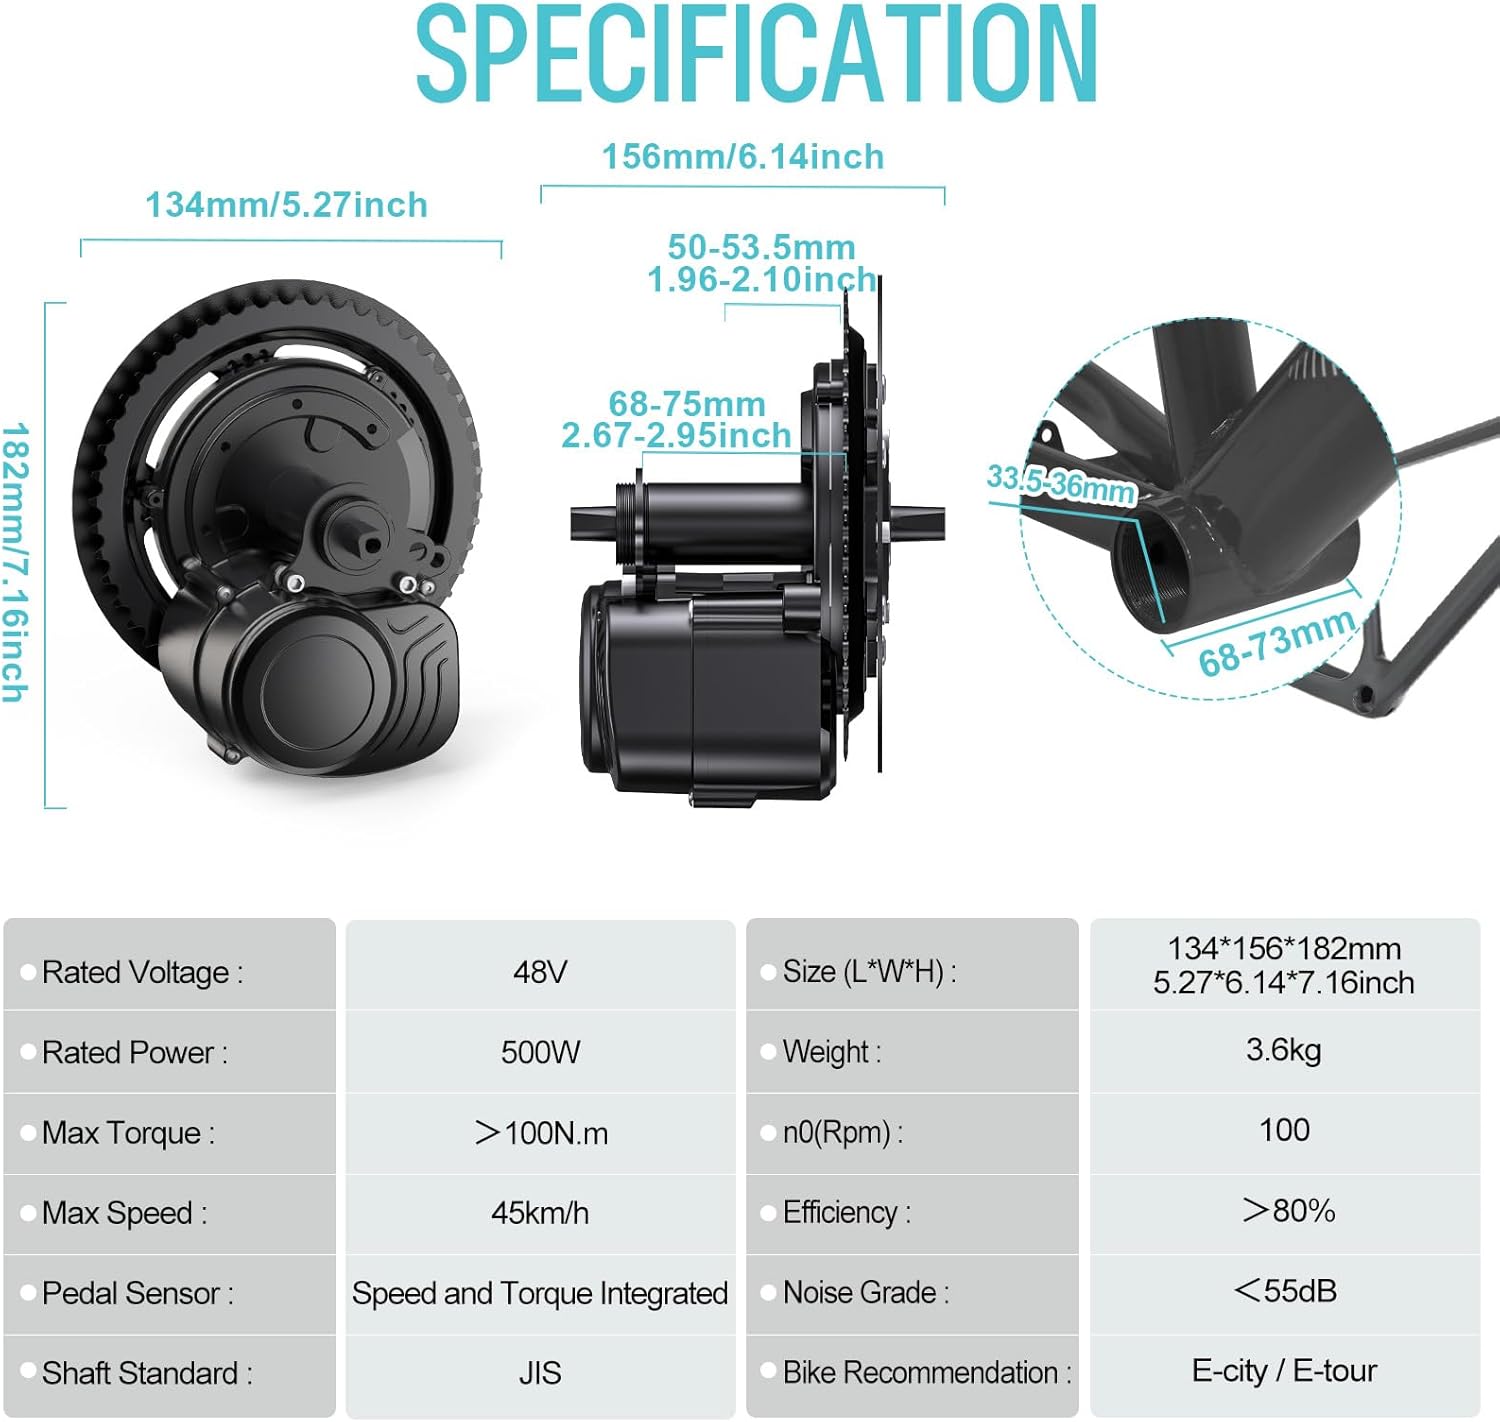
Figure 3.1: TSDZ2B Motor and SWM58 Display Specifications.
3.1. Motor Specifications
| Feature | Value |
|---|---|
| Rated Voltage | 48V |
| Rated Power | 500W |
| Max Torque | >100 N.m |
| Max Speed | 45 km/h |
| Pedal Sensor | Speed and Torque Integrated |
| Shaft Standard | JIS |
| Efficiency | >80% |
| Noise Grade | <55dB |
| Bike Recommendation | E-city / E-tour |
| Bottom Bracket Compatibility | 68-73mm in length, 33.5-36mm in inner diameter |
3.2. SWM58 Display Specifications

Figure 3.2: SWM58 Display Dimensions and Features.
| Feature | Value |
|---|---|
| Screen | 3.8 inch High-Brightness Color LCD |
| Dimensions (L*W*H) | 93.4mm x 56.4mm x 6.4mm |
| Unit of Speed | KMH/MPH |
| Operating Voltages | 24V, 36V, 48V, 52V |
| Speed Limit Setting | 0 to 100km/h |
| Handlebar Mounting Diameter | 31.8mm/25.4mm/22.2mm (Button only supports 22.2mm) |
| Assist Levels | 3, 5 |
| Wheel Diameter Configuration | Configurable |
3.3. Battery Specifications (Optional)
If your kit includes a battery, refer to the following general specifications. Specific battery models may vary.

Figure 3.3: Example Battery Specifications for Shark and Voltzx models.
4. Setup and Installation
The TSDZ2B kit is designed for DIY-friendly installation. Follow these general steps for converting your bicycle. For detailed visual guidance, refer to the wiring schematic and any provided installation videos or guides from Varstrom.
4.1. Pre-Installation Checks
- Ensure your bike's bottom bracket is compatible (68-73mm length, 33.5-36mm inner diameter).
- Gather all tools required for bicycle maintenance (crank puller, bottom bracket tool, hex keys, etc.).
- Disconnect any existing components from the bottom bracket area.
4.2. Motor Installation
- Remove your bike's existing crankset and bottom bracket.
- Carefully insert the TSDZ2B mid-drive motor into the bottom bracket shell.
- Secure the motor using the provided locking nuts and washers. Ensure it is tightly fastened to prevent rotation.
- Install the 42T chainring onto the motor's drive side.
- Attach the crank arms to the motor's spindle.
4.3. Component Wiring
Connect the various components to the motor using the 1T4 main wiring harness. Refer to the wiring schematic below for correct connections.

Figure 4.1: TSDZ2B Wiring Schematic.
- Connect the SWM58 display to the designated port on the 1T4 cable. Mount the display securely on your handlebars.
- Connect the thumb throttle to its corresponding port.
- Install the brake levers (if included) and connect their wires to the 1T4 cable. These typically cut motor power when brakes are applied.
- Attach the speed sensor to the rear chainstay and secure the magnet to a spoke on the rear wheel. Connect the sensor wire to the motor.
- Connect the battery to the motor's main power cable. Ensure a secure connection.
4.4. Post-Installation Checks
- Verify all connections are secure and properly seated.
- Ensure cables are neatly routed and secured to avoid snagging or damage.
- Check that the crank arms rotate freely without obstruction.
- Test the brakes and gear shifting before powering on the system.
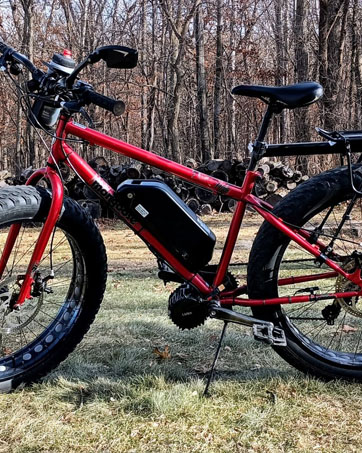
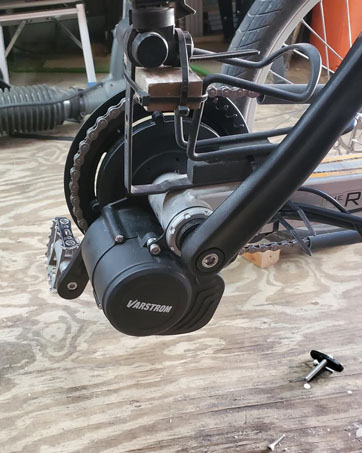
Figure 4.2: Examples of the TSDZ2B kit installed on a bicycle.
5. Operating Instructions
The TSDZ2B kit is designed for intuitive operation, providing a seamless and natural riding experience.
5.1. Powering On/Off
- Ensure the battery is securely connected and charged.
- Press and hold the power button on the SWM58 display to turn the system on.
- To turn off, press and hold the power button again.
5.2. SWM58 Display Functions
The SWM58 display provides essential riding information and allows you to control the assist levels.
- Speed Display: Shows current speed in KMH or MPH.
- Battery Level: Indicates remaining battery charge.
- Assist Level: Adjust pedal assist levels (3 or 5 levels available) using the UP/DOWN buttons. Higher levels provide more motor assistance.
- Trip Information: View trip distance, total distance (ODO), and other ride data.
- Error Codes: The display will show error codes if a system malfunction is detected.
5.3. Riding with Torque Sensor
The TSDZ2B features an advanced torque sensor that measures your pedaling effort. The motor assistance will be proportional to your pedaling power, providing a very natural and intuitive riding feel. The harder you pedal, the more assistance the motor provides.
5.4. Dual Clutch System
The innovative dual clutch technology disengages the primary gear when you stop pedaling or when the motor is off. This allows for a traditional bike feel with minimal drag, making it easy to pedal without assistance when desired.
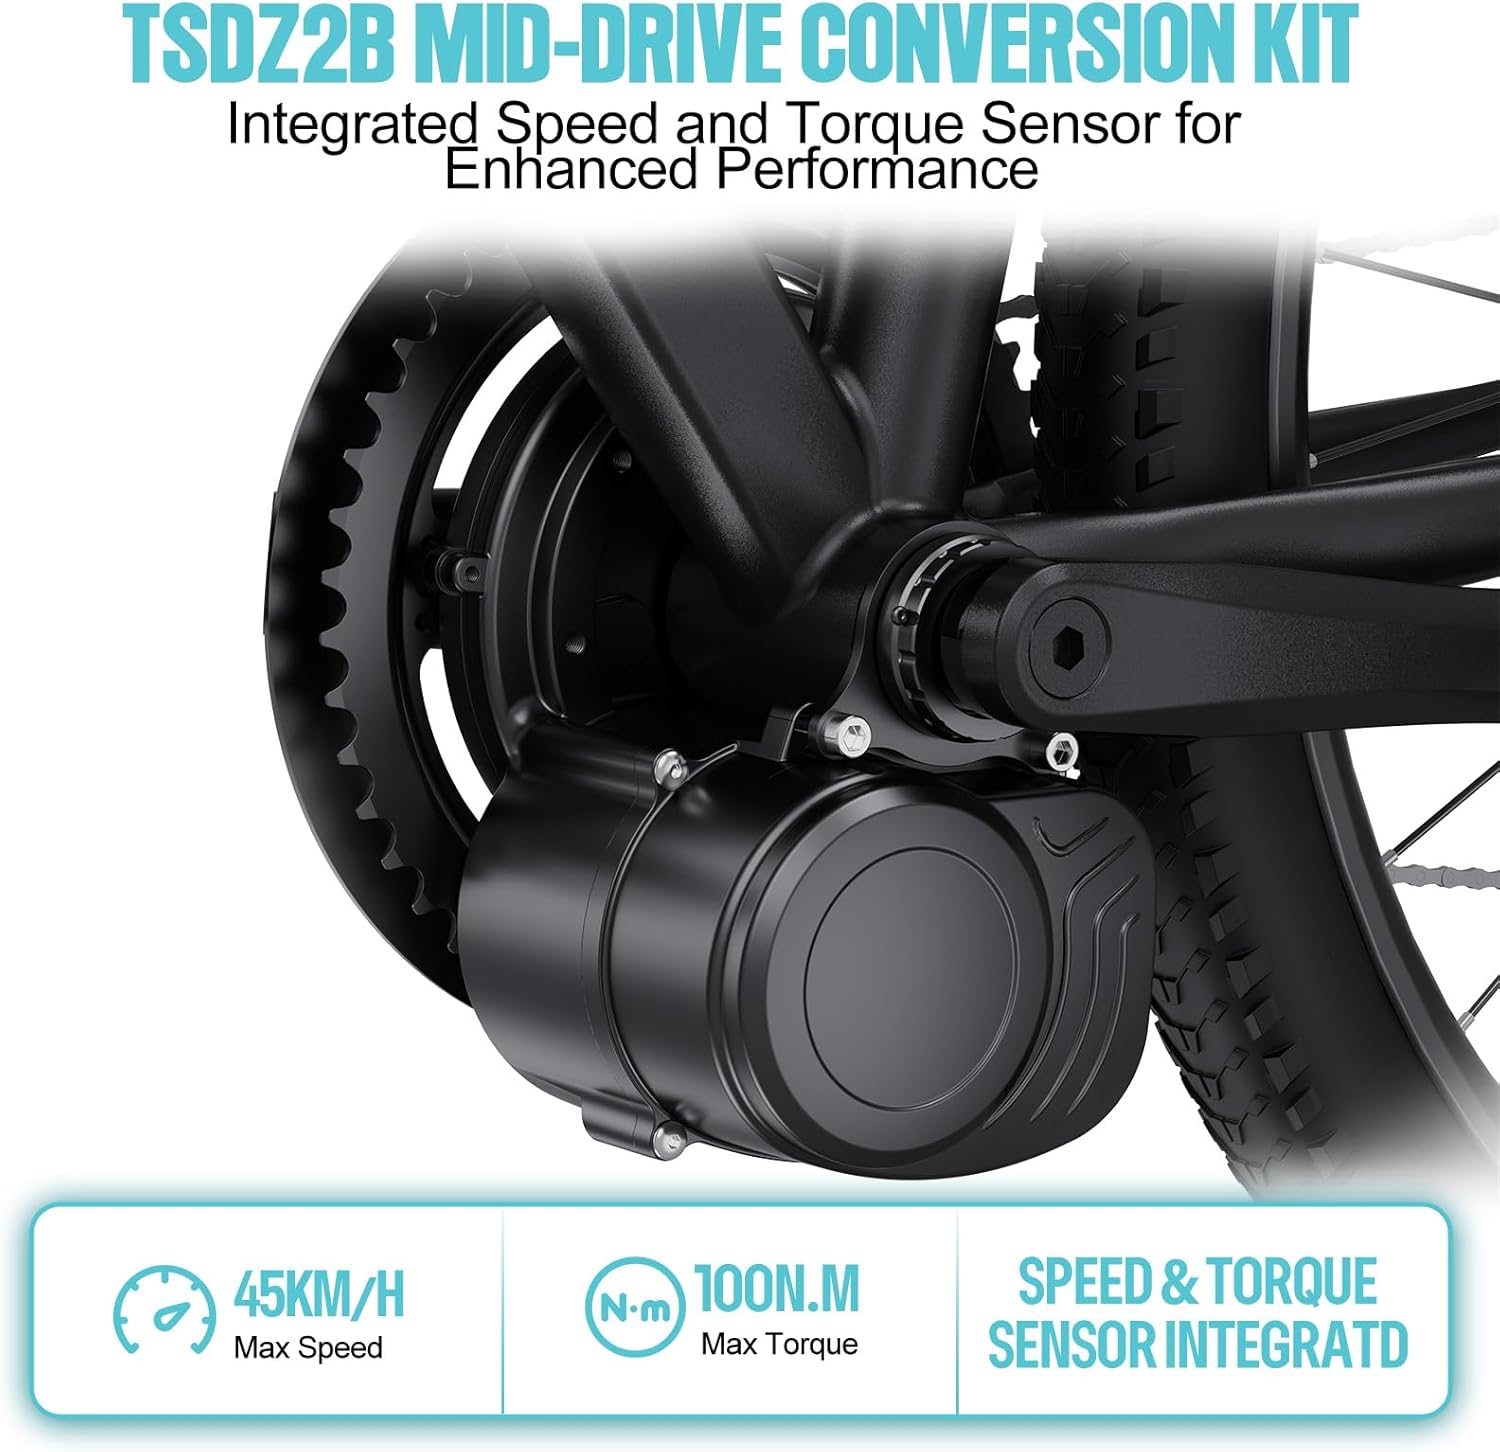
Figure 5.1: TSDZ2B Mid-Drive Motor with Integrated Speed and Torque Sensor.

Figure 5.2: Enhancements in TSDZ2B Model, including the Dual Clutch System.
6. Maintenance
Regular maintenance ensures the longevity and optimal performance of your e-bike conversion kit.
6.1. General Cleaning
- Keep the motor, display, and battery clean from dirt and debris. Use a damp cloth; avoid high-pressure washing directly on electrical components.
- Regularly clean the chainring and chain to ensure smooth operation.
6.2. Electrical Connections
- Periodically check all electrical connections for tightness and corrosion.
- Ensure the battery is securely mounted and its connections are clean.
6.3. Battery Care
- Charge the battery regularly, even if not in use, to maintain its health. Avoid fully discharging the battery.
- Store the battery in a cool, dry place, away from direct sunlight and extreme temperatures.
- Use only the charger provided with your battery.
6.4. Mechanical Checks
- Inspect the motor mounting bolts for tightness.
- Check crank arm bolts and pedal tightness.
- Ensure the speed sensor and magnet are correctly aligned and secure.
7. Troubleshooting
This section provides solutions to common issues you might encounter. For more complex problems, please contact customer support.
7.1. No Power to Display/Motor
- Check Battery: Ensure the battery is charged and properly connected to the motor.
- Check Connections: Verify all electrical connections, especially the main power cable from the battery to the motor, and the display cable.
- Power Button: Confirm the power button on the display is pressed and held correctly.
7.2. Motor Not Assisting
- Assist Level: Ensure the assist level on the SWM58 display is set above 0.
- Pedaling: The torque sensor requires pedaling effort to activate assistance. Ensure you are pedaling.
- Brake Levers: Check if the brake cut-off sensors are engaged (e.g., brake levers are slightly pulled). Adjust if necessary.
- Speed Sensor: Verify the speed sensor and magnet are correctly aligned and functioning.
7.3. Display Showing Error Code
Refer to the SWM58 display manual (if separate) or contact support with the specific error code for diagnosis.
8. Warranty and Support
Varstrom is committed to providing reliable after-sales service and technical support for your TSDZ2B conversion kit.
8.1. Technical Support
Benefit from US-based technical support for any questions or issues you may encounter. Our online assistance is at your disposal. Please refer to your purchase documentation for specific contact details or visit the official Varstrom website for support resources.
8.2. Warranty Information
Your Varstrom TSDZ2B kit comes with a manufacturer's warranty. The duration and terms of the warranty may vary. Please retain your proof of purchase for warranty claims. The warranty typically covers manufacturing defects and malfunctions under normal use. It does not cover damage from misuse, accidents, unauthorized modifications, or improper installation.
For detailed warranty terms and conditions, please refer to the documentation included with your purchase or contact Varstrom customer service.


