
GIGABYTE X870 EAGLE WIFI7
GIGABYTE X870 Eagle WIFI7 Motherboard User Manual
Model: X870 EAGLE WIFI7
1. Product Overview
The GIGABYTE X870 Eagle WIFI7 Motherboard is designed to support AMD Ryzen 9000, 8000, and 7000 Series Processors, offering a robust platform for high-performance computing. It features advanced power delivery, high-speed memory support, and comprehensive connectivity options, making it suitable for gaming, content creation, and professional applications.

Figure 1.1: GIGABYTE X870 Eagle WIFI7 Motherboard and its retail packaging.
2. Key Features
- AMD Socket AM5: Supports AMD Ryzen 9000 Series, 8000 Series, and 7000 Series Processors.
- Digital Twin 14+2+2 Phases VRM Solution: Ensures stable power delivery for high-performance components.
- Dual Channel DDR5: Features 4 DIMM slots with AMD EXPO Memory Module Support for up to 8000MHz (OC) memory speeds.
- PCIe Gen5 x16: Equipped with PCIe UD Slot X & EZ-Latch Plus for high-bandwidth expansion cards.
- Ultra-Fast Storage: Includes 3 M.2 slots, with one supporting PCIe 5.0 x4 for rapid data transfer.
- Efficient Overall Thermal: Incorporates VRM Thermal Armor Advanced & M.2 Thermal Guard for optimal heat dissipation.
- Extended Connectivity: Features Dual USB4 Type-C with DisplayPort Alternate Mode, and HDMI output.
- Fast Networking: Provides 2.5GbE LAN and Wi-Fi 7 with an ultra-high gain antenna for reliable and fast network connections.
3. Package Contents
Verify that all items are present in the package before proceeding with installation.
- GIGABYTE X870 Eagle WIFI7 Motherboard
- User Manual / Quick Start Guide
- SATA Data Cables
- Wi-Fi Antenna
- M.2 Screws and Standoffs
- Driver CD/USB Drive (if included)
4. Setup and Installation
Before beginning installation, ensure your system is powered off and unplugged from the wall outlet. Wear an anti-static wrist strap to prevent electrostatic discharge (ESD) damage to components.
4.1 Motherboard Layout

Figure 4.1: Top-down view of the GIGABYTE X870 Eagle WIFI7 Motherboard, highlighting key component locations such as the CPU socket, DIMM slots, and PCIe slots.
4.2 CPU Installation
- Locate the AM5 CPU socket on the motherboard.
- Gently push down the load lever and pull it to the side to open the socket retention frame.
- Align the triangular mark on the CPU with the mark on the socket. Carefully place the CPU into the socket without forcing it.
- Close the retention frame and push the load lever back into its locked position.
- Install your CPU cooler according to its manufacturer's instructions.
4.3 Memory (RAM) Installation
- Open the clips at both ends of the DDR5 DIMM slots.
- Align the notch on the memory module with the key in the DIMM slot.
- Insert the memory module firmly into the slot until the clips snap into place. Ensure both clips are fully closed.
- For dual-channel operation, refer to the motherboard manual for recommended slot configurations (typically A2 and B2 first).
4.4 Storage Device Installation (M.2 SSDs)
- Locate the M.2 slots on the motherboard. Some slots may have pre-installed thermal guards.
- Remove the M.2 thermal guard and the M.2 standoff/screw from the desired slot.
- Insert the M.2 SSD into the slot at a 30-degree angle.
- Gently push down the M.2 SSD and secure it with the M.2 screw or EZ-Latch Plus mechanism.
- Reinstall the M.2 thermal guard if applicable.
4.5 Graphics Card (PCIe) Installation
- Open the retention clip on the PCIe Gen5 x16 slot.
- Align your graphics card with the slot and press it down firmly until it clicks into place and the retention clip closes.
- Secure the graphics card to your PC case with screws.
- Connect any necessary PCIe power cables from your power supply to the graphics card.
4.6 Connecting Peripherals and Power
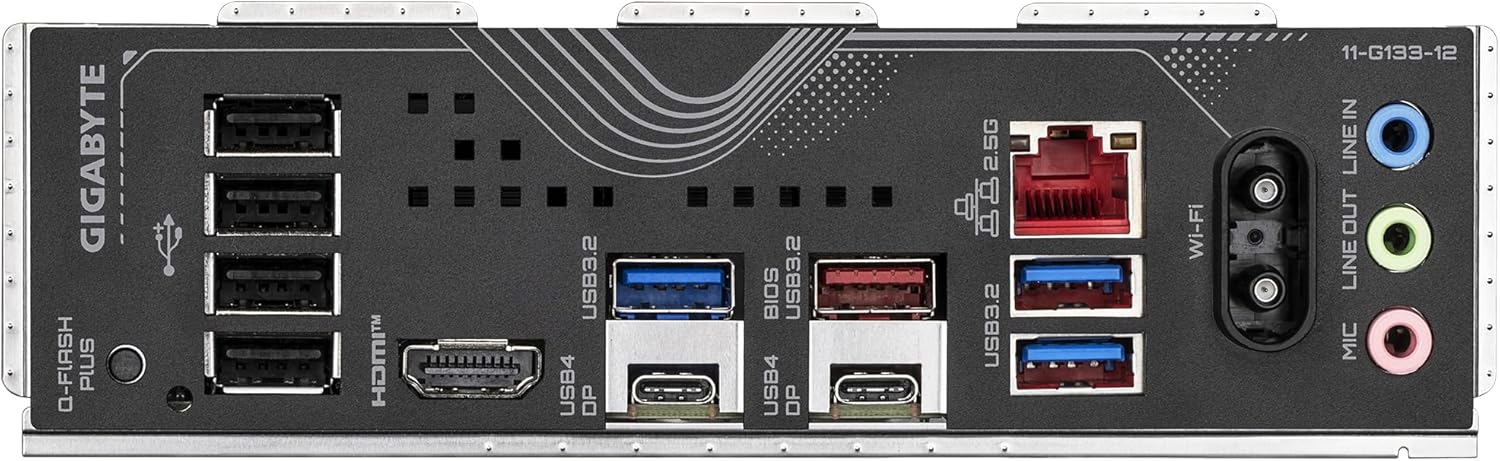
Figure 4.2: Rear I/O panel of the GIGABYTE X870 Eagle WIFI7 Motherboard, showing USB ports, HDMI, LAN, and Wi-Fi antenna connectors.
- Connect the 24-pin ATX power connector and the 8-pin (or 4+4-pin) CPU power connector from your power supply to the motherboard.
- Connect front panel headers (power button, reset button, USB, audio) to the corresponding pins on the motherboard. Refer to the motherboard's detailed manual for pin assignments.
- Attach the Wi-Fi antenna to the connectors on the rear I/O panel.
- Connect your monitor to the graphics card or the motherboard's HDMI/DisplayPort if using integrated graphics.
- Connect USB devices, Ethernet cable, and audio devices to the rear I/O panel.
5. Operating Instructions
5.1 First Boot and BIOS/UEFI Setup
- After connecting all components and power, turn on your system.
- Press the DEL key repeatedly during startup to enter the BIOS/UEFI setup utility.
- In the BIOS/UEFI, you can configure boot order, enable XMP/EXPO for memory, adjust fan curves, and set other system parameters.
- Save changes and exit the BIOS/UEFI to continue booting.
5.2 Driver Installation
After installing your operating system, it is crucial to install the latest drivers for your motherboard components to ensure optimal performance and stability.
- Visit the official GIGABYTE website for the X870 Eagle WIFI7 motherboard.
- Download and install the chipset drivers, LAN drivers, Wi-Fi drivers, audio drivers, and any other relevant utility drivers.
- Ensure your graphics card drivers are also up to date.
6. Maintenance
- BIOS/UEFI Updates: Periodically check the GIGABYTE website for new BIOS/UEFI versions. Updates can improve compatibility, stability, and performance. Follow the provided instructions carefully when updating the BIOS/UEFI.
- Cleaning: Regularly clean dust from your PC case and motherboard components using compressed air. Ensure the system is powered off and unplugged before cleaning.
- Cable Management: Ensure cables are neatly routed to improve airflow and prevent interference.
7. Troubleshooting
| Problem | Possible Cause | Solution |
|---|---|---|
| No display on monitor | Incorrect monitor connection, faulty graphics card, RAM not seated correctly, CPU issue. |
|
| System does not power on | Power supply issue, front panel connector issue, short circuit. |
|
| Operating system not detected | Incorrect boot order, faulty storage drive, OS corruption. |
|
| Frequent system crashes/instability | Overheating, unstable overclock, faulty RAM, outdated drivers. |
|
8. Specifications
| Feature | Detail |
|---|---|
| Brand | GIGABYTE |
| Model Name | X870 EAGLE WIFI7 |
| CPU Socket | Socket AM5 |
| Compatible Processors | AMD Ryzen 9000 Series, 8000 Series, 7000 Series |
| Chipset Type | AMD X670E |
| RAM Memory Technology | DDR5 |
| Memory Speed (OC) | Up to 8000 MHz |
| DIMM Slots | 4 (Dual Channel) |
| PCIe Slots | 1x PCIe Gen5 x16 (with UD Slot X & EZ-Latch Plus) |
| M.2 Slots | 3 (including 1x PCIe 5.0 x4) |
| Networking | 2.5GbE LAN, Wi-Fi 7 |
| USB Ports | Dual USB4 Type-C with DP-Alt, various USB 3.2/2.0 ports |
| Video Output | HDMI, DisplayPort (via USB4 Type-C) |
| VRM Solution | Digital twin 14+2+2 phases |
| Dimensions (LxWxH) | 12.01 x 9.61 x 1.38 inches (30.5 x 24.4 x 3.5 cm) |
| Item Weight | 2.2 pounds (1 kg) |
| Platform | Windows |
9. Warranty Information
GIGABYTE motherboards typically come with a limited manufacturer's warranty. The duration and terms of the warranty may vary by region and product. Please refer to the official GIGABYTE website or the warranty card included with your product for detailed warranty information and registration procedures.
Keep your proof of purchase (receipt or invoice) as it will be required for any warranty claims.
10. Technical Support
For technical assistance, driver downloads, BIOS updates, and further product information, please visit the official GIGABYTE support website:
https://www.gigabyte.com/Support
You may also find helpful resources and FAQs on the GIGABYTE brand store on Amazon: GIGABYTE Amazon Store
When contacting support, please have your motherboard model (X870 EAGLE WIFI7) and serial number ready.
Related Documents - X870 EAGLE WIFI7
 |
GIGABYTE X870 AORUS ELITE WIFI7 Motherboard User Manual and Specifications Concise user manual and technical specifications for the GIGABYTE X870 AORUS ELITE WIFI7 motherboard, covering installation, usage, and disposal guidelines. |
 |
GIGABYTE X870 AORUS ELITE X3D シリーズ マザーボード ユーザーズマニュアル GIGABYTE X870 AORUS ELITE X3D ICE および X870 AORUS ELITE X マザーボードの包括的なユーザーマニュアル。インストール、ハードウェア仕様、BIOS設定、OS/ドライバーインストール、規制情報などを網羅しています。 |
 |
技嘉 X870 GAMING X WIFI7 主板用户手册 技嘉科技 X870 GAMING X WIFI7 主板的官方用户手册,提供详细的硬件安装指南、产品规格、BIOS设置、操作系统安装和驱动程序安装等信息,帮助用户全面了解和配置其主板。 |
 |
X870 AORUS STEALTH ICE / X870 A STEALTH 主機板使用手冊 本使用手冊提供技嘉 X870 AORUS STEALTH ICE 和 X870 A STEALTH 主機板的詳細資訊,包括產品規格、硬體安裝指南、BIOS 設定、軟體安裝及故障排除等內容,協助使用者順利安裝與設定。 |
 |
GIGABYTE B850 AORUS ELITE WIFI7 Motherboard Installation and User Guide Comprehensive guide for the GIGABYTE B850 AORUS ELITE WIFI7 motherboard, covering installation, component connections, BIOS setup, and features. Includes technical specifications and regulatory information. |
 |
GIGABYTE B650 GAMING X AX V2 Motherboard User's Manual User's Manual for the GIGABYTE B650 GAMING X AX V2 motherboard, providing detailed hardware installation, specifications, BIOS setup, operating system, and driver installation instructions. |
Ask a question about this manual
Ask about setup, troubleshooting, compatibility, parts, safety, or missing instructions. Manuals+ will review the question and use this page’s manual context to help answer it.