1. Introduction
This manual provides detailed instructions for the safe and efficient operation of the Heltecbms HT-SW01H Battery Spot Welder. This 21 KW capacitor energy storage pulse welding machine is designed for precise spot welding of 18650, LiFePO4, and other lithium battery packs. Please read this manual thoroughly before use to ensure optimal performance and safety.
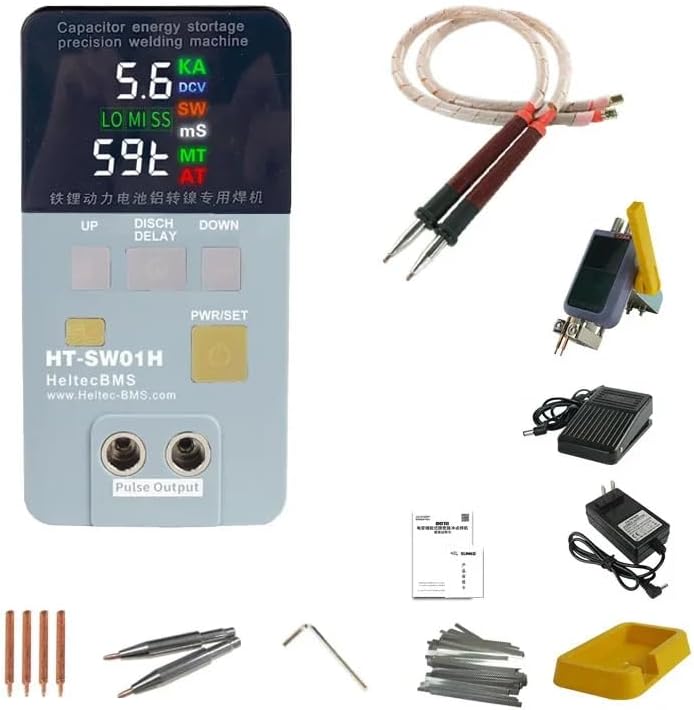
Figure 1.1: Heltecbms HT-SW01H Battery Spot Welder main unit with welding pens.
2. Safety Information
Always prioritize safety when operating welding equipment. Failure to follow safety guidelines can result in injury or damage to the equipment.
- Wear appropriate personal protective equipment (PPE), including safety glasses, gloves, and protective clothing.
- Ensure the work area is well-ventilated and free from flammable materials.
- Do not operate the welder in wet conditions or with wet hands.
- Disconnect power before performing any maintenance or changing components.
- Keep children and unauthorized personnel away from the operating area.
- The machine features low voltage supply system with CE certification, ensuring high safety with no heat generation, flammability, or explosion risk.
3. Package Contents
Verify that all items listed below are included in your package:

Figure 3.1: Overview of the package contents for the HT-SW01H spot welder.
- HT-SW01H spot welder unit
- S-75A split spot welding pen (25²)
- S73A Rocker arm down pressure welding tool
- Pedal switch
- Quick charging adapter
- Spot welder base
- Rocker arm down pressing welding pins (2 pairs)
- Welding pen electrode (1 pair)
- Hex wrench
- 0.15x8x100mm pure nickel - 20 pieces
- 0.15x10x100mm Nickel-aluminum composite sheet - 20 pieces
4. Product Features
The Heltecbms HT-SW01H offers advanced features for superior welding performance:
- Heat Protection: Designed for low heat generation, preventing overheating during extended use.
- Ergonomic Welding Pen: The welding pen is designed to prevent hand fatigue and burning during long working periods.
- Stable Welding Current: Achieves up to 3500A pulse current, ensuring stable welding without damage to the battery. The actual pulse current is displayed on the unit.
- High-Quality Welding Spots: Produces fine, uniform, and strong welding spots that do not blacken, approaching industrial-grade stored energy welder quality.
- Enhanced Safety: Features a low voltage supply system with CE certification, ensuring the machine does not generate excessive heat, is non-flammable, and non-explosive.
- Reliability and Longevity: High reliability with an internal industrial super energy storage capacitor and laser welding busbar technology, ensuring a long service life and consistent welding quality.

Figure 4.1: Key features of the HT-SW01H, including its capability for aluminum to nickel welding and high pulse current.
5. Setup
Follow these steps to set up your HT-SW01H spot welder:
- Connect Welding Pens: Insert the red and black plugs of the welding pens into the corresponding red and black "Pulse Output" ports on the front of the main unit. Ensure a secure connection.
- Connect Power Adapter: Plug the quick charging adapter into the power input port on the rear of the main unit, then connect it to a suitable AC power outlet.
- Power On: Press the 'PWR/SET' button to turn on the device. The display will illuminate.
- Attach Welding Tips: Ensure the welding tips are securely attached to the welding pens. Replace worn tips as needed.
- Position Spot Welder Base: Place the spot welder base on a stable, flat surface. This provides a secure platform for the main unit.
- Connect Pedal Switch (Optional): If using the pedal switch for operation, connect its cable to the designated port on the unit.
Video 5.1: Demonstration of connecting the welding pens to the Heltecbms HT-SW01H unit.
6. Operating Instructions
The HT-SW01H features dual-mode functionality for different welding applications.
6.1. Dual-Mode Functionality
The unit provides two primary welding modes, selectable via the AL/NI button:
- Aluminum → Nickel Dedicated Mode: For welding pure nickel to the aluminum pole of lithium iron phosphate batteries.
- Press the AL/NI button; the light will turn red.
- Welding voltage: 6V.
- Peak power: 19.8KW.
- Output Max current: 3500A.
- Starts the pre-pressure delay discharge function simultaneously.
- Nickel → Nickel Spot Welding Mode: Suitable for welding pure nickel and nickel-plated sheets of ternary lithium batteries.
- Do not press the AL/NI button.
- Welding voltage: 5.6V.
- Peak power: 18.5KW.
- Output Max current: 3200A.

Figure 6.1: Display settings for Aluminum to Nickel and Nickel to Nickel welding modes.
6.2. Welding Process
- Prepare Surfaces: Ensure the surfaces to be welded are clean, dry, and free of any contaminants.
- Select Mode: Choose the appropriate welding mode (Aluminum → Nickel or Nickel → Nickel) using the AL/NI button.
- Adjust Settings: Use the 'UP' and 'DOWN' buttons to adjust welding parameters if necessary. The display shows current, voltage, and pulse duration.
- Position Workpiece: Place the battery and nickel strip securely. For optimal results, use the S73A Rocker arm down pressure welding tool if applicable.
- Apply Pressure: Firmly press the welding pens onto the workpiece, ensuring both tips make good contact with the nickel strip and the battery terminal.
- Initiate Weld: Press the pedal switch or the 'PWR/SET' button (depending on configuration) to initiate the weld pulse.
- Inspect Weld: After welding, inspect the spot for firmness and uniformity. A good weld will be strong and not blackened.
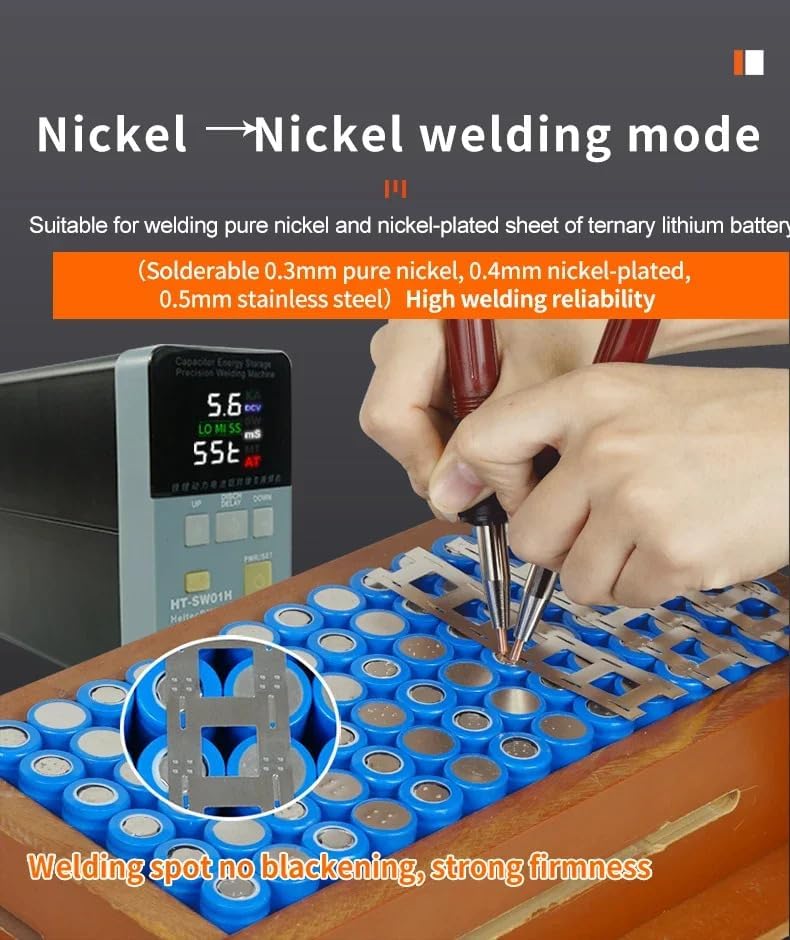
Figure 6.2: Demonstrating Nickel to Nickel welding mode on a battery pack, highlighting strong, non-blackened weld spots.
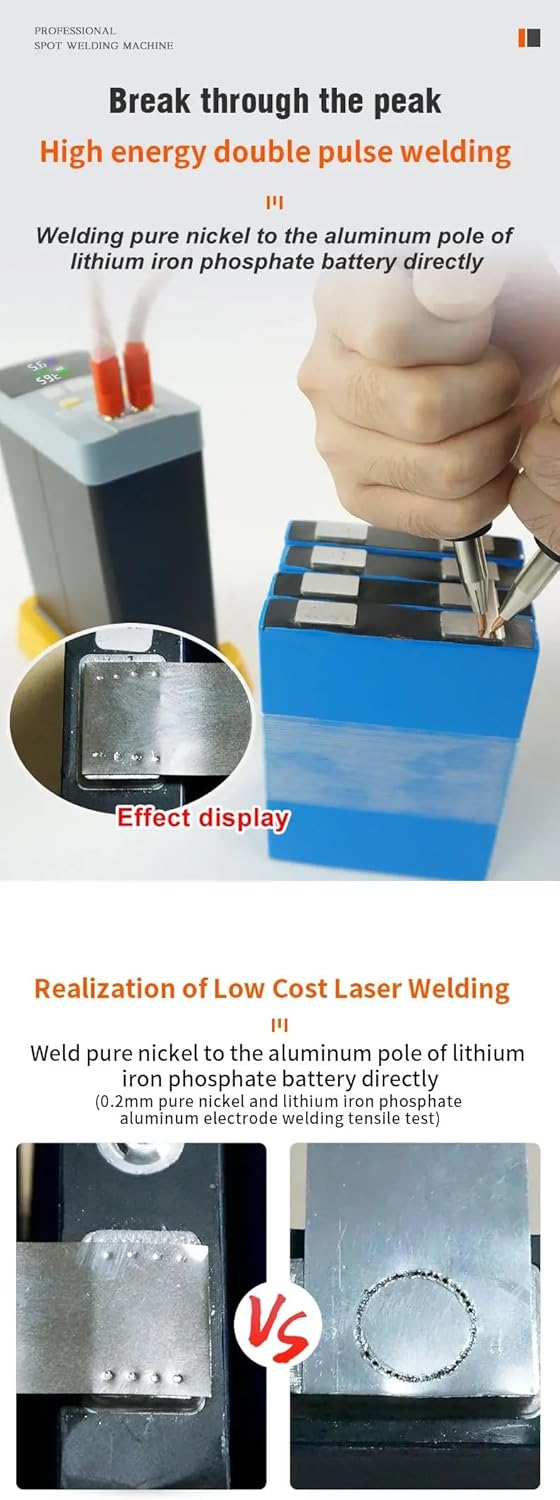
Figure 6.3: Visual comparison of welding results, showcasing the deep penetration and quality of the HT-SW01H's high-energy double pulse welding.
Video 6.1: Demonstration of the HT-SW01H's high-energy polymerization pulse welding capability, showing concentrated and small welding spots with deep molten pool penetration.
7. Maintenance
Proper maintenance ensures the longevity and performance of your spot welder:
- Clean Welding Tips: Regularly clean the welding tips to remove any residue or oxidation. Replace tips when they become worn or pitted to maintain weld quality.
- Unit Cleaning: Wipe the main unit with a dry, soft cloth. Do not use abrasive cleaners or solvents.
- Storage: Store the welder in a dry, cool place away from direct sunlight and excessive dust.
- Cable Inspection: Periodically inspect all cables and connections for signs of wear or damage. Replace damaged components immediately.
8. Troubleshooting
This section addresses common issues you might encounter:
| Problem | Possible Cause | Solution |
|---|---|---|
| Weak or inconsistent welds | Worn or dirty welding tips; Insufficient pressure; Incorrect power settings; Poor surface preparation. | Clean or replace welding tips; Increase pressure on pens; Adjust power settings (UP/DOWN buttons); Clean workpiece surfaces thoroughly. |
| Unit does not power on | Power adapter not connected; Faulty power outlet. | Ensure power adapter is securely connected; Try a different power outlet. |
| Welds are blackened | Excessive power; Insufficient pressure; Dirty tips. | Reduce power settings; Increase pressure; Clean welding tips. |

Figure 8.1: Example of a solder joint effect performance test, measuring internal resistance to assess weld quality.
9. Specifications
| Attribute | Detail |
|---|---|
| Manufacturer | heltec bms |
| Item Model Number | HT-SW01H |
| Power Source | AC |
| Included Components | Mash welder (main unit, welding pens, pedal switch, adapter, etc.) |
| First Available Date | September 3, 2024 |
10. Warranty and Support
For warranty information and technical support, please refer to the documentation included with your product or visit the official Heltec BMS website. Heltec BMS is committed to providing reliable power solutions and customer satisfaction.
You can find more information and support at the Heltec BMS Store on Amazon.


