
PowMr 45Amp MPPT Controller
Contents
PowMr 45A MPPT Solar Charge Controller User Manual
Model: 45Amp MPPT Controller (B0DFYB7MCR)
1. Introduction
Thank you for choosing the PowMr 45A MPPT Solar Charge Controller. This manual provides essential information for the safe and efficient operation of your device. Please read it thoroughly before installation and use. This controller is designed to maximize the power output from your solar panels to efficiently charge various battery types in 12V or 24V systems.

Image: Front view of the PowMr 45A MPPT Solar Charge Controller, showing its LCD display and control buttons.
2. Safety Information
Always observe the following safety precautions to prevent personal injury and damage to the controller or other components:
- Ensure all wiring is correctly sized and properly insulated.
- Always connect the battery to the controller first, and disconnect it last.
- Do not exceed the maximum PV input voltage of 100VDC.
- Install the controller in a well-ventilated area, away from flammable materials.
- Use appropriate circuit breakers or fuses for all connections.
- Avoid touching live terminals.
3. Product Overview & Features
The PowMr 45A MPPT Solar Charge Controller incorporates advanced Maximum Power Point Tracking (MPPT) technology to optimize power harvest from solar panels. Key features include:
- Advanced MPPT Technology: Up to 99% tracking efficiency and 98% peak conversion efficiency.
- Wide Battery Compatibility: Supports 12V/24V lead-acid (sealed, gel, flooded) and lithium (LiFePO4, lithium-ion) batteries.
- Multi-stage Charging: 3-stage for lead-acid (bulk, boost, float) and 2-stage for lithium (bulk, boost).
- Comprehensive Protections: Short circuit, overcurrent, reverse polarity, over-discharge, overcharge, and more.
- Backlit LCD Display: Provides real-time system data and fault codes.
- Customizable Settings: Adjustable absorption voltage, float voltage, low voltage cutoff, and load timer.
4. Setup & Installation
Follow these steps for proper installation:
- Mounting: Choose a dry, well-ventilated location. Mount the controller vertically to allow for proper heat dissipation.
- Wiring Sequence: Connect components in the following order to ensure safety and proper operation:
- Connect the battery to the controller's battery terminals. Ensure correct polarity.
- Connect the load to the controller's load terminals (if applicable). Ensure correct polarity.
- Connect the solar panels to the controller's PV terminals. Ensure correct polarity and that PV open-circuit voltage does not exceed 100V.
- Power On: The controller will automatically detect the system voltage (12V or 24V) upon battery connection.
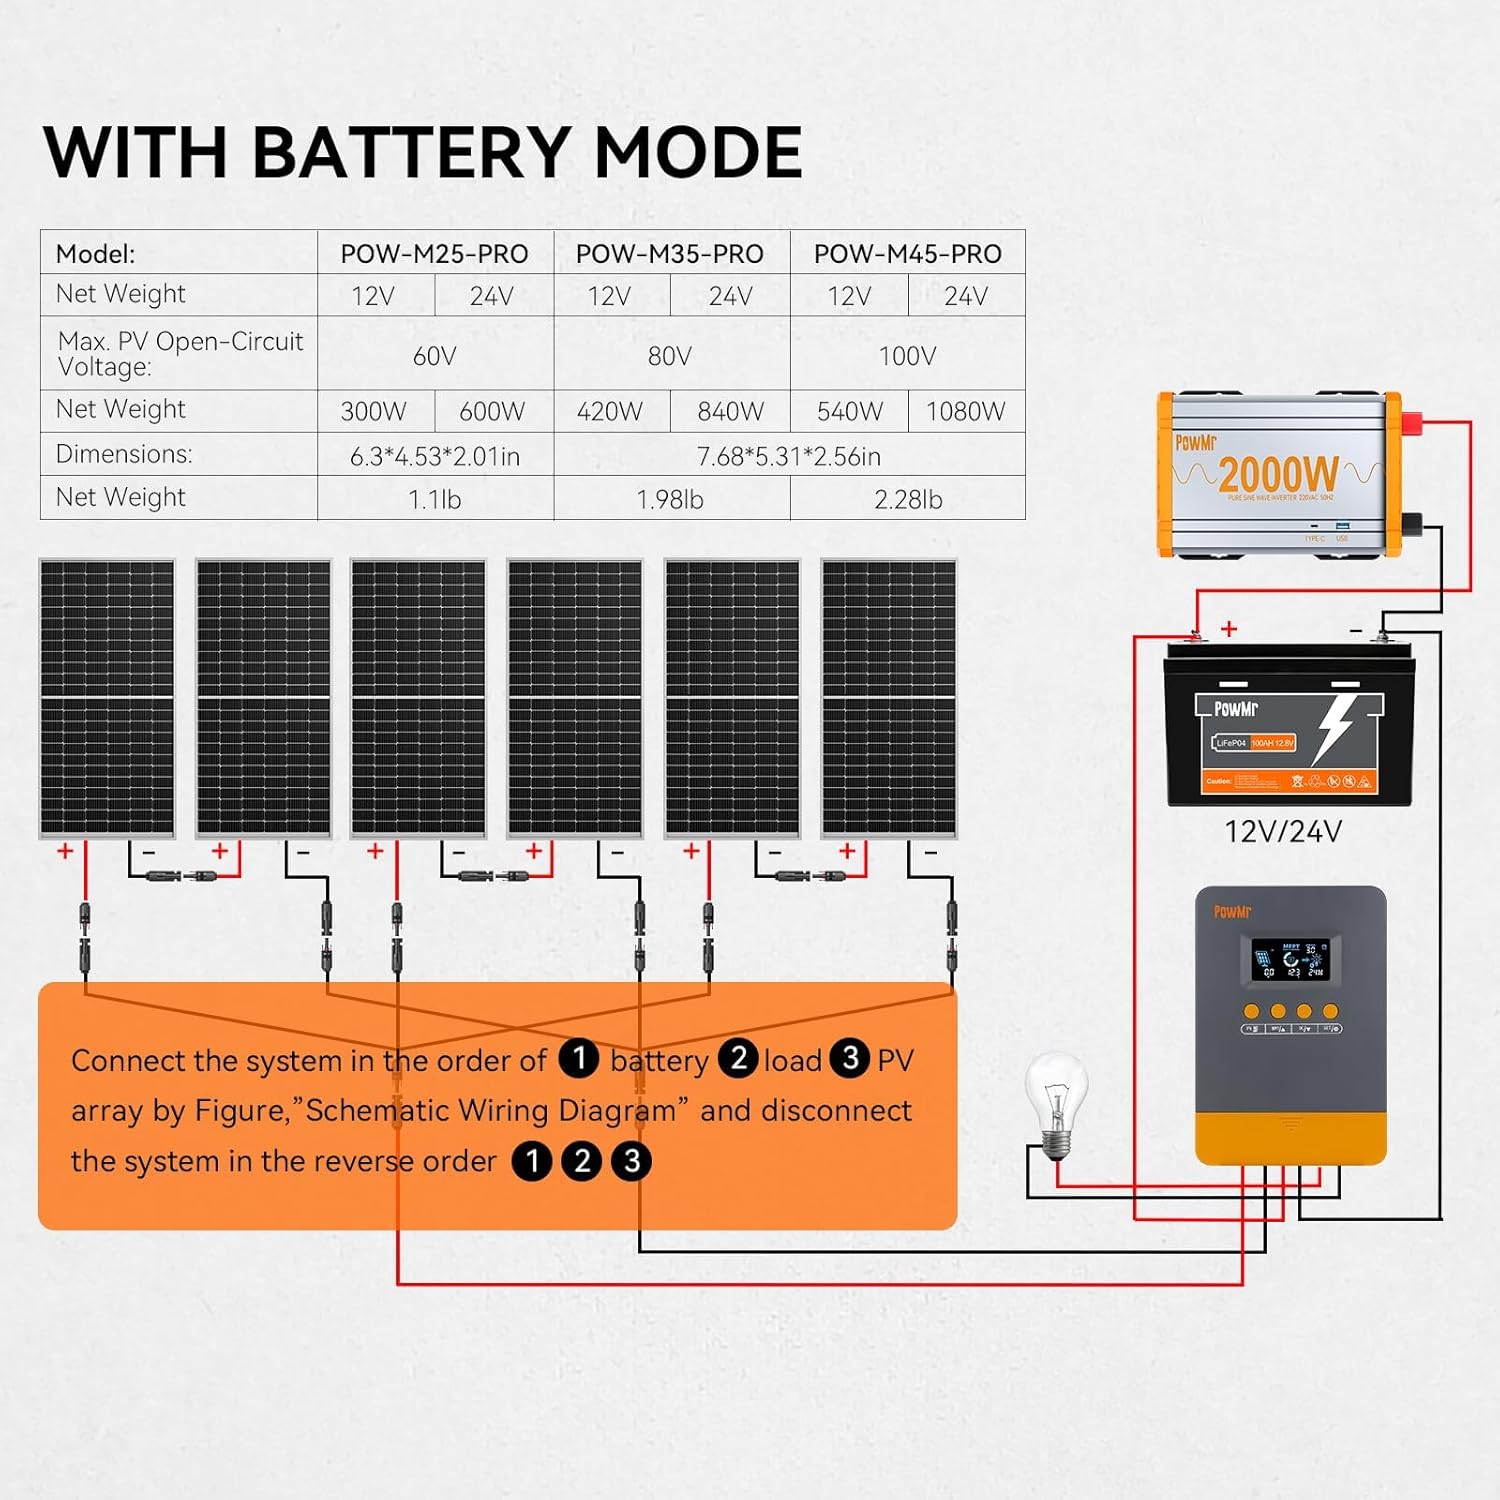
Image: Schematic diagram illustrating the correct wiring sequence for the solar charge controller, battery, solar panels, and load.
5. Operating Instructions
5.1 LCD Display & Buttons
The controller features a backlit LCD screen displaying real-time system status and parameters. Four buttons allow for navigation and setting adjustments.

Image: Detailed view of the controller's LCD screen, showing various icons and numerical readouts for system monitoring.
5.2 Battery Type Settings
The controller supports various battery types. To change the battery type:
- Long press the 'BAT/▲' key to enter the setting program.
- Use the 'BAT/▲' and 'DC/▼' keys to toggle through battery type options (e.g., Sealed, Gel, Flooded, LiFePO4, Lithium-ion, User-defined).
- Press the 'SET/★' key to save and confirm your selection.

Image: Visual representation of the controller's compatibility with different battery chemistries and the setting interface.
5.3 Load Work Modes
The controller offers multiple load work modes to manage the connected DC load:
- 00H (Load Turn OFF): The load output is always off.
- 24H (Load always Turn ON): The load output is continuously on.
- 01H~23H (Time control): The load output turns on for a set duration (1 to 23 hours) after sunset.

Image: Graphical representation of the load work modes and their corresponding settings on the controller.
6. Protections
The PowMr solar charge controller is equipped with multiple electronic protections to ensure system safety and longevity:
- PV Overcurrent Protection
- PV Short Circuit Protection
- PV Reverse Polarity Protection
- Battery Reverse Polarity Protection
- Battery Over Voltage Protection
- Battery Over Discharge Protection
- Lithium Battery Low Temperature Protection
- Load Overcurrent Protection
- Overtemperature Protection

Image: Visual summary of the nine built-in protection features of the PowMr solar charge controller.
7. Troubleshooting
The LCD display can show fault codes to indicate issues. Refer to the table below for common fault codes and their solutions:
| Fault Code | Cause | Solution |
|---|---|---|
| 18 | Input photovoltaic voltage too low | Increase the number of solar panels or connect them in series to raise the photovoltaic input voltage. |
| 60 | Overtemperature protection | Allow the equipment to cool to below the recovery temperature to resume normal charging and discharging. |
| 63 | Battery voltage too high | Measure to confirm if battery voltage exceeds rated voltage and disconnect photovoltaic array circuit breaker. |
| 65 | Battery voltage too low | Charge the battery until voltage exceeds the undervoltage recovery point. Refer to '5.7 Default Parameters for Different Battery Types' for details. |
| 71 | Input photovoltaic voltage too high | Reduce the number of photovoltaic arrays connected to the controller to lower photovoltaic input, or adjust series and parallel connections to reduce voltage or current values. |
| 73 | Overcharging current | Reduce output terminal load to ensure total load is within rated limits of the controller and battery. |
| 72 | Overdischarging current | Reduce output terminal load to ensure total load is within rated limits of the controller and battery. |
8. Specifications
| Parameter | Value |
|---|---|
| Model | 45Amp MPPT Controller |
| System Voltage | 12V/24V Auto |
| Max. PV Input Voltage | <100VDC |
| Max. PV Input Power (12V Battery) | 540W |
| Max. PV Input Power (24V Battery) | 1080W |
| Rated Charge Current | 45A |
| Tracking Efficiency | Up to 99% |
| Peak Conversion Efficiency | 98% |
| Battery Compatibility | AGM, Gel, Flooded, LiFePO4, Lithium-ion |
| Display Type | LCD |
| Item Weight | 2.2 pounds |
| Package Dimensions | 7.6 x 5.3 x 2.5 inches |
| Country of Origin | China |
9. Maintenance
To ensure optimal performance and longevity of your PowMr MPPT Solar Charge Controller, perform the following maintenance tasks:
- Regular Inspection: Periodically check all wiring connections for tightness and corrosion.
- Cleanliness: Keep the controller clean and free from dust and debris. Use a dry cloth for cleaning.
- Ventilation: Ensure that the ventilation openings are not blocked to allow for proper heat dissipation.
- Battery Health: Monitor battery voltage and condition regularly, especially for lead-acid batteries, to ensure they are within healthy operating parameters.
10. Warranty & Support
For warranty information and technical support, please refer to the documentation included with your purchase or contact PowMr customer service directly. Keep your purchase receipt as proof of purchase for warranty claims.
Ask a question about this manual
Ask about setup, troubleshooting, compatibility, parts, safety, or missing instructions. Manuals+ will review the question and use this page’s manual context to help answer it.