1. Introduction
The ECO-WORTHY Solar Tracker Power Box is designed to provide an autonomous power supply for your solar tracking system. This manual provides detailed instructions for the installation, operation, and maintenance of the Power Box and its accompanying 10W solar panel.
Key Features:
- Autonomous Power Supply: Generates its own electrical energy, eliminating the need for external power sources for the solar tracking system. A full charge provides 5-7 days of autonomous operation.
- Integrated Solar Charging: Includes a 10W monocrystalline solar panel to recharge the Power Box, ensuring continuous operation of the solar tracker.
- Robust and Weatherproof: Features an IP65 waterproof rating with reinforced ABS material, protecting against rain, snow, dust, and dirt for reliable outdoor use.
- Durable LiFePO4 Battery: Equipped with a 6 Ah, 12 V LiFePO4 battery with an integrated Battery Management System (BMS) for protection against overcurrent, overcharge, overdischarge, and short circuits. Offers a lifespan of up to 10 years with over 3000 full discharge cycles.
- Easy Installation: Designed for quick and straightforward installation with included fixing clips, brackets, and accessories.
2. What's in the Box
Please verify that all components listed below are included in your package:

Image: All components included in the ECO-WORTHY Solar Tracker Power Box package, laid out on a surface. This includes the Power Box, 10W solar panel, fixing clamps, installation brackets, connection cable, and a screw bag.
- 1x ECO-WORTHY Solar Tracker Power Box (Model: ECO-PB01)
- 1x 10W 18V Monocrystalline Solar Panel
- 1x Connection Cable
- 1x Solar Panel Fixing Bracket
- 2x Power Box Installation Brackets
- 2x Power Box Fixing Clamps
- 1x Screw Bag (containing various screws and nuts for assembly)
3. Setup and Installation
Follow these steps to correctly install your ECO-WORTHY Solar Tracker Power Box and solar panel.
3.1. Powering the Tracker System

Image: An illustration demonstrating how the 10W 18V solar panel and the Power Box (12V 6AH) connect to and power a solar tracker system. The tracker itself is not included.
The Power Box is designed to provide power to an ECO-WORTHY Solar Tracker Pro system. The 10W solar panel charges the Power Box, which in turn supplies power to the tracker, creating a self-sufficient system.
3.2. Installation Steps
The installation process involves mounting the solar panel, mounting the power box, and connecting the components. The entire process can be completed in approximately 4 steps.

Image: A three-part diagram illustrating the installation process. Part 1 shows solar panel orientation (North, South, East, West) and mounting. Part 2 shows the Power Box installation on a pole using brackets. Part 3 shows the connection between the solar panel, Power Box, and the solar tracker controller.
- Step 1: Solar Panel Installation
Mount the 10W solar panel using the provided fixing bracket. Ensure the panel is oriented to maximize sun exposure throughout the day. Typically, this means facing south in the Northern Hemisphere or north in the Southern Hemisphere, with an appropriate tilt angle for your latitude. The solar panel should be positioned to avoid shading.
- Step 2: Power Box Installation
Attach the Power Box to a suitable pole or mounting structure using the installation brackets and fixing clamps. Ensure the box is securely fastened and positioned to allow easy access to the LED indicators and power button.

Image: The ECO-WORTHY Solar Tracker Power Box mounted on a vertical pole using metal clamps, demonstrating the easy installation process.
- Step 3: Fast Connection
Connect the 10W solar panel to the Power Box using the provided connection cable. Then, connect the Power Box to your solar tracker's control unit. Ensure all connections are secure and properly sealed to maintain the IP65 rating.
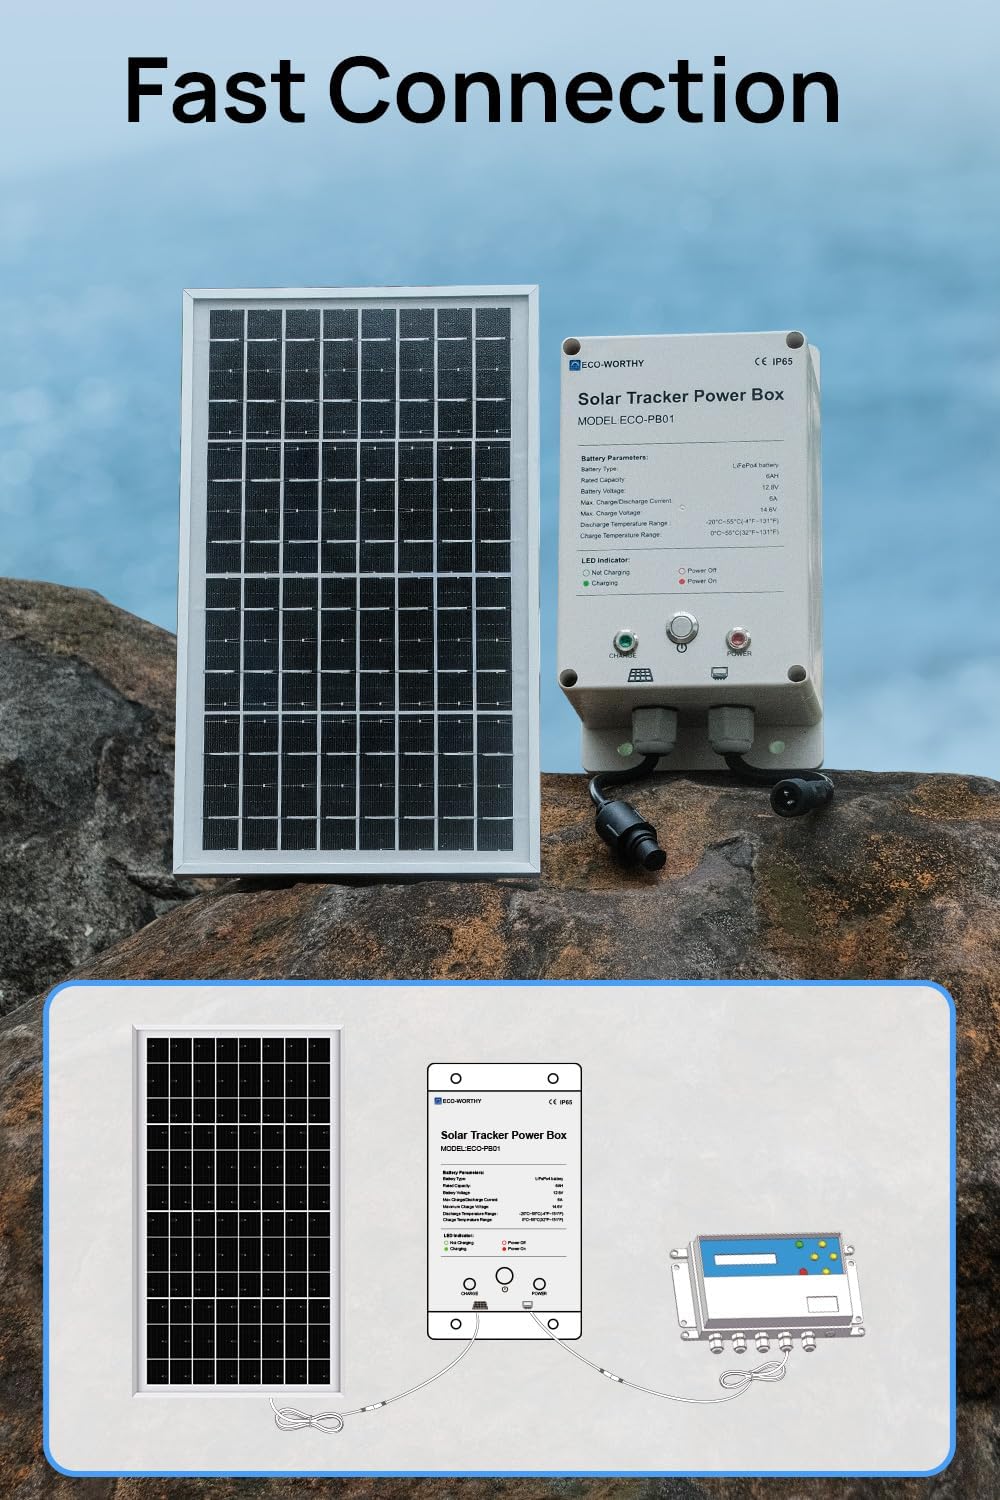
Image: The 10W solar panel and Power Box positioned on a rocky surface, with an overlay diagram illustrating the electrical connections between the solar panel, Power Box, and the solar tracker controller.
3.3. Compatibility with Solar Trackers
The Power Box is highly compatible with ECO-WORTHY Dual-Axis Solar Tracker PRO and Dual-Axis Solar Tracker systems. For Single-Axis Solar Trackers, adjustments may be necessary.

Image: A visual guide showing the compatibility of the Power Box with different ECO-WORTHY solar tracker models: Dual-Axis Solar Tracker PRO (highly compatible), Dual-Axis Solar Tracker (highly compatible), and Single-Axis Solar Tracker (may require adjustment).
3.4. Temporary Incompatibility with Single-Axis Tracker
If you are using a Single-Axis Solar Tracker, temporary adjustments might be needed for optimal mounting. Two alternative mounting options are suggested:

Image: A diagram illustrating two methods to address temporary incompatibility when mounting the Power Box with a Single-Axis Solar Tracker. Solution Method 1 suggests adding padding wood (7.5cm x ≥2cm x 2cm) to secure the box. Solution Method 2 suggests using 304 stainless steel muffler clamps (0-200mm adjustable) for mounting.
- Solution Method 1: Add padding wood (or other suitable substitutes) to the back of the Power Box and secure it to the mounting pole. Recommended dimensions for padding wood: 7.5cm x ≥2cm x 2cm.
- Solution Method 2: Utilize 304 stainless steel muffler clamps for a secure attachment. These clamps offer adjustable sizing (0-200mm) to fit various pole diameters.
4. Operating Instructions
Once installed and connected, operating the ECO-WORTHY Solar Tracker Power Box is straightforward.
4.1. Powering On/Off
Locate the power button on the front of the Power Box. Press the button to toggle the power state. The LED indicators will provide feedback on the current status.

Image: A hand pressing the power button on the ECO-WORTHY Solar Tracker Power Box. An adjacent graphic explains the LED indicators: Green circle for "Not Charging", solid Green for "Charging", Red circle for "Power Off", and solid Red for "Power On".
4.2. LED Indicators
The Power Box features LED indicators to show its operational status:
- Charging Indicator (Left LED):
- Green (Solid): The battery is currently charging from the solar panel.
- Green (Outline/Off): The battery is not currently charging.
- Power Indicator (Right LED):
- Red (Solid): The Power Box is powered ON.
- Red (Outline/Off): The Power Box is powered OFF.

Image: A clear graphic detailing the LED indicators on the Power Box. The left LED indicates charging status (Green for charging, outline for not charging). The right LED indicates power status (Red for power on, outline for power off).
4.3. Autonomous Operation
After a full charge, the Power Box can operate autonomously for 5-7 days, providing consistent power to your solar tracker without requiring manual intervention or external power sources.

Image: A solar tracker system installed in a residential garden, illustrating the independent energy use provided by the Power Box. The image emphasizes that there is no need to remove the battery for charging.
5. Maintenance
Regular maintenance ensures the longevity and optimal performance of your ECO-WORTHY Solar Tracker Power Box.
- Solar Panel Cleaning: Periodically clean the surface of the 10W solar panel to remove dust, dirt, leaves, or snow that may obstruct sunlight and reduce charging efficiency. Use a soft cloth and water; avoid abrasive cleaners.
- Connection Inspection: Annually inspect all electrical connections between the solar panel, Power Box, and solar tracker for any signs of corrosion, looseness, or damage. Ensure all seals are intact to maintain the IP65 waterproof rating.
- Physical Inspection: Check the Power Box casing and mounting brackets for any physical damage. Ensure the box remains securely mounted.
- Battery Health: The integrated BMS manages the LiFePO4 battery, but observing the charging indicator can help confirm proper operation. If the battery consistently fails to charge or hold a charge, refer to the troubleshooting section.
6. Troubleshooting
This section addresses common issues you might encounter with your ECO-WORTHY Solar Tracker Power Box.
| Problem | Possible Cause | Solution |
|---|---|---|
| Power Box not turning on. | Battery fully discharged; faulty connection; power button issue. | Ensure the solar panel is connected and exposed to sunlight to charge the battery. Check all connections. Press the power button firmly. |
| Battery not charging (Green LED not solid). | Insufficient sunlight; solar panel obstructed or dirty; faulty solar panel connection; internal battery issue. | Ensure the solar panel is in direct sunlight and free from obstructions. Clean the solar panel surface. Check the connection cable between the solar panel and Power Box. If the issue persists, contact customer support. |
| Solar tracker not receiving power. | Power Box is off; Power Box battery is low; faulty connection to tracker. | Ensure the Power Box is turned on (Red LED solid). Check the Power Box's charging status. Verify the connection cable between the Power Box and the solar tracker. |
| Water ingress into Power Box. | Improperly sealed connections; damaged casing. | Immediately disconnect power. Inspect all cable entries and the casing for damage. Ensure all connections are tightly sealed. If damage is found, contact customer support. |
7. Specifications
Detailed technical specifications for the ECO-WORTHY Solar Tracker Power Box and its included 10W solar panel.

Image: A table presenting the technical parameters for both the 6Ah Power Box and the 10W Solar Panel, including IP rating, battery type, capacity, voltage, currents, temperature ranges, weight, and dimensions.
7.1. Power Box (6Ah)
| Parameter | Value |
|---|---|
| IP Rating | IP65 |
| Battery Type | LiFePO4 battery |
| Battery Capacity | 6AH |
| Battery Voltage | 12.8V |
| Max Charge/Discharge Current | 6A |
| Max Charge Voltage | 14.6V |
| Discharge Temperature Range | -20°C~55°C (-4°F~131°F) |
| Charge Temperature Range | 0°C~55°C (32°F~131°F) |
| Weight | 1.23kg (2.71 lbs) |
| Dimensions | 20*11*9.5cm (7.9*4.3*3.7in) |
| Solar Tracker Controller Connection Cable Length | 1m (39.37in) |
7.2. 10W Solar Panel
| Parameter | Value |
|---|---|
| Nominal Power (STC) | 10W |
| Cell Type | Monocrystalline |
| Max Power Voltage (Vmp) | 18V |
| Open Circuit Voltage (Voc) | 22.4V |
| Max Power Current (Imp) | 0.56A |
| Short Circuit Current (Isc) | 0.61A |
| STC Efficiency | 22.4% |
| Extension Cable Length | 3.5 m (11.48 feet) |
| Weight | 1.09 kg (2.4 lbs) |
| Dimensions | 33.7*20*1.8cm (13.3*7.9*0.7in) |
8. Warranty and Support
ECO-WORTHY products are designed for reliability and performance. For specific warranty details regarding your Solar Tracker Power Box, please refer to the warranty card included with your purchase or visit the official ECO-WORTHY website.
If you encounter any issues that cannot be resolved using the troubleshooting guide, or if you require further assistance, please contact ECO-WORTHY customer support:
- Website: www.eco-worthy.com (or refer to your regional ECO-WORTHY website)
- Email: Refer to your product documentation for specific support email addresses.
- Phone: Refer to your product documentation for specific support phone numbers.
When contacting support, please have your product model (ECO-PB01) and purchase date available.


