1. Safety Information
Read all safety warnings and instructions before using this product. Failure to follow the warnings and instructions may result in electric shock, fire, and/or serious injury.
- Keep children and bystanders away: Do not allow children to operate the air inflator. Keep children and bystanders at a safe distance from the operating area.
- Proper ventilation: Operate the air inflator in a well-ventilated area.
- Avoid over-inflation: Do not exceed the recommended pressure for any item. Over-inflation can cause items to burst, leading to injury.
- Check for damage: Before each use, inspect the inflator for any damage. Do not use if damaged.
- Battery safety: Use only the specified charging cable. Do not expose the battery to extreme temperatures or disassemble it.
- Hot surfaces: The air hose and nozzle may become hot during prolonged use. Handle with care.
2. Product Overview
The PPNEST A1 Portable Tire Inflator is a versatile device designed for inflating car tires, motorcycle tires, bicycle tires, and various balls. It features a digital pressure gauge, auto-off function, and multiple power options.

Image: The PPNEST A1 Portable Tire Inflator shown with its air hose and various nozzles, alongside examples of items it can inflate: a car, motorcycle, bicycle, and a beach ball with a flamingo float.
Package Contents:
- PPNEST A1 Air Pump x1
- 60cm Air Hose x1
- 12V Cigarette Lighter Cable x1
- Type-C Charging Cable x1
- Charging Nozzles x4 (various adapters for different inflatables)
3. Setup and Charging
Initial Charging:
Before first use, fully charge the device. Connect the Type-C charging cable to the inflator's charging port and a suitable USB power adapter (not included). The battery indicator on the display will show charging progress.

Image: The PPNEST A1 inflator's digital display showing battery level and icons for car, motorcycle, bicycle, and ball modes. Text indicates 'Cordless Powerful Air Pump' and '2500mAh x3' battery capacity.
Connecting the Air Hose:
Screw the 60cm air hose securely into the air outlet port on the top of the inflator.
4. Operating Instructions
Follow these steps for correct inflation:
- Step 1: Power On
Press and hold the power button (⏻) for 3 seconds to turn on the device. The digital display will illuminate. - Step 2: Select Mode and Pressure Unit
Press the 'M' button to cycle through inflation modes (Car, Motorcycle, Bicycle, Ball). Each mode has a default pressure setting. Use the '+' and '-' buttons to adjust the target pressure. Press the unit button (often labeled 'PSI/BAR/KPA') to switch between pressure units. - Step 3: Connect to Item
Attach the air hose nozzle securely to the valve stem of the item you wish to inflate. For bicycle Presta valves, you may need to use the appropriate adapter and open the valve first. - Step 4: Start Inflation
Press the power button (⏻) once to start inflation. The display will show the real-time pressure. - Step 5: Auto-Off and Disconnect
The inflator will automatically stop when the preset pressure is reached. Disconnect the air hose from the item and then from the inflator.
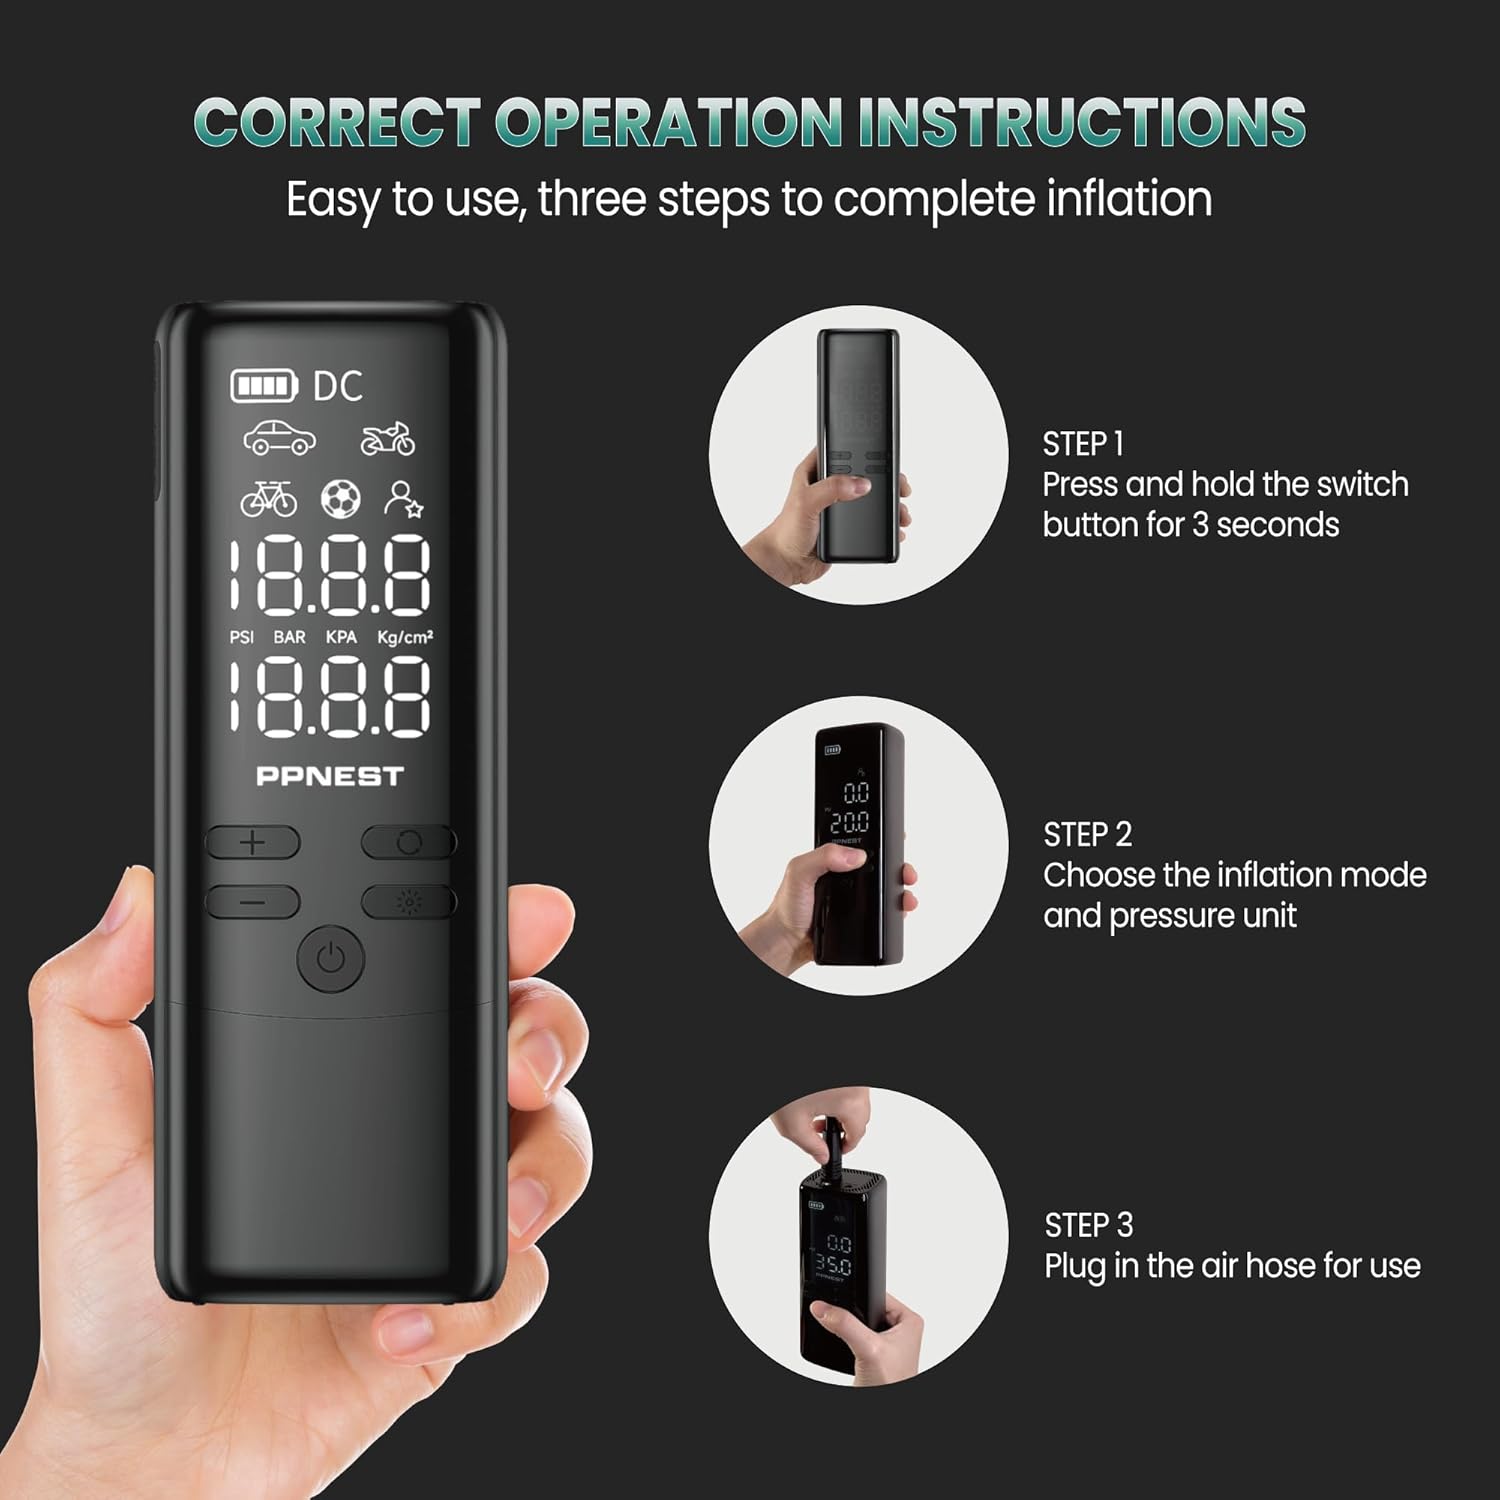
Image: A visual guide demonstrating the three main operational steps: 1) Press and hold the switch button for 3 seconds, 2) Choose the inflation mode and pressure unit, 3) Plug in the air hose for use.
Dual Power Options:
The inflator can be powered wirelessly using its internal batteries or by connecting it to a car's 12V cigarette lighter using the provided cable when the battery is depleted.

Image: The PPNEST A1 inflator connected via its 12V cigarette lighter cable to a car, actively inflating a tire. The cigarette lighter adapter is also visible.
SOS Flashlight Function:
The device includes an SOS flashlight for emergencies. Refer to the device's buttons for activating this feature.

Image: The PPNEST A1 inflator demonstrating its SOS flashlight feature and its capability to act as a power bank, charging a smartphone via a USB cable.
5. Maintenance
- Cleaning: Wipe the exterior of the inflator with a soft, damp cloth. Do not use harsh chemicals or abrasive cleaners.
- Storage: Store the inflator in a dry, cool place, away from direct sunlight and extreme temperatures. Ensure the battery is partially charged before long-term storage.
- Battery Care: Recharge the battery regularly, even if not in use, to maintain battery health. Avoid fully discharging the battery frequently.
6. Troubleshooting
- Device not turning on:
Ensure the battery is charged. If using the 12V cigarette lighter cable, ensure the car's engine is running and the connection is secure. - Inflator not inflating:
Check if the air hose is securely connected to both the inflator and the item's valve. Ensure the target pressure is set above the current pressure. Verify that the correct inflation mode is selected. - Inaccurate pressure reading:
Ensure the air hose connection is tight to prevent air leaks. Compare the reading with a known accurate pressure gauge if possible. - Device overheating:
If the inflator becomes excessively hot, stop operation and allow it to cool down before resuming. Prolonged continuous use can cause overheating.
7. Specifications
| Model Name | A1 |
| Manufacturer | PPnest |
| Maximum Pressure | 150 PSI |
| Battery Type | 3 x 12V Lithium Ion (included) |
| Capacity | 22 LPM (Liters Per Minute) |
| Sound Level | 65 Decibels |
| Item Weight | 839 g (0.84 Kilograms) |
| Parcel Dimensions | 19 x 12.7 x 7.7 cm |
8. Warranty and Support
For warranty information and customer support, please refer to the documentation included with your purchase or visit the official PPNEST website. Keep your purchase receipt as proof of purchase for warranty claims.


