
1. Introduction
This manual provides instructions for the assembly, operation, and maintenance of your PVWIIK Twin Size Montessori Floor Bed. This house-shaped floor bed is designed with a roof frame and guardrails, offering a secure and imaginative sleeping space for children. It is constructed from premium pine wood for durability and stability.
Key features include:
- Wood House Roof Frame: Provides a unique design element and a framework for decorations.
- Floor Bed with Guardrail Design: Ensures stability and safety, with an opening for easy access.
- Solid Wood Construction: Crafted from pine wood for lasting sturdiness.
- Easy Assembly: Designed for convenient setup with included hardware and instructions.
2. Safety Information
Please read and understand all safety warnings before assembly and use. Failure to follow these instructions may result in injury or damage to the product.
- Always supervise children around this floor bed.
- Ensure proper assembly of all components to prevent instability.
- Do not exceed the maximum weight capacity of 200 lbs.
- Regularly check all bolts and screws to ensure they are tight. Retighten as necessary.
- Be cautious of guardrails and the fence design to prevent entrapment. Ensure the mattress fits snugly within the frame.
- Keep small parts away from children during assembly.
- Do not use this bed if any parts are missing, damaged, or broken. Contact customer support for replacement parts.
3. Setup and Assembly
The PVWIIK Twin Size Montessori Floor Bed is designed for easy assembly. It is recommended that two adults assemble this product. Please ensure all parts are present before beginning.
3.1 Unpacking and Part Identification
Carefully unpack all components from the packaging. Lay them out on a clean, soft surface (like a carpet) to prevent scratches. Refer to the included parts list and hardware diagram to identify each piece.

Image: Various wooden components of the bed laid out, ready for assembly. This shows the individual pieces that make up the bed frame, guardrails, and roof structure.
3.2 Assembly Steps
Follow the step-by-step instructions provided in the separate assembly manual included with your product. General steps typically include:
- Assemble the Base Frame: Connect the side rails and end rails to form the rectangular base of the bed.
- Attach Guardrails: Secure the guardrail panels to the base frame using the provided hardware. Ensure the opening for access is positioned as desired.
- Install Roof Frame: Attach the vertical posts and roof beams to create the house-shaped structure.
- Tighten All Connections: Once all components are in place, carefully tighten all bolts and screws. Do not overtighten.

Image: A partially assembled bed frame, showing the base and guardrails connected, with the roof frame components ready to be attached. This illustrates an intermediate stage of assembly.
After assembly, ensure the bed is stable and all connections are secure before use.
4. Operation and Use
4.1 Mattress Placement
This floor bed does not require a box spring. Place a twin-size mattress directly onto the floor within the bed frame. The recommended mattress thickness is 6 inches or less to maintain the effectiveness of the guardrails.

Image: The assembled floor bed with a mattress, bedding, and decorative items, demonstrating its intended use. This shows how the bed looks when ready for use.
4.2 General Use
- The open design allows for easy access for children, promoting independence.
- The roof frame can be used for hanging lightweight decorations, such as fairy lights or fabric canopies, to create a personalized space. Ensure any decorations are securely attached and do not pose a choking or entanglement hazard.
- Regularly inspect the bed for any signs of wear or damage.
5. Maintenance
5.1 Cleaning
To clean the bed frame, wipe with a soft, damp cloth. Avoid using harsh chemicals, abrasive cleaners, or polishes, as these can damage the wood finish. Dry immediately with a clean cloth.
5.2 Fastener Checks
Periodically check all bolts, screws, and other fasteners to ensure they remain tight. Wood can expand and contract with changes in humidity and temperature, which may cause fasteners to loosen over time. Retighten as needed to maintain structural integrity.
5.3 Wood Care
Protect the wood from direct sunlight and extreme temperature changes to prevent warping or fading. If the wood finish becomes scratched or damaged, consider using a wood repair kit or consulting a professional.
6. Troubleshooting
This section addresses common issues you might encounter with your PVWIIK Twin Size Montessori Floor Bed.
| Problem | Possible Cause | Solution |
|---|---|---|
| Bed feels wobbly or unstable. | Loose fasteners. Uneven floor surface. | Check and tighten all bolts and screws. Move the bed to a level surface or use shims if necessary. |
| Parts are missing or damaged upon arrival. | Manufacturing defect or shipping damage. | Do not attempt to assemble. Contact the retailer or manufacturer's customer support immediately for replacement parts. |
| Difficulty during assembly. | Incorrect part orientation. Missing a step. | Refer to the detailed assembly manual. Ensure parts are oriented correctly as per diagrams. If issues persist, contact support. |
7. Specifications
Below are the technical specifications for the PVWIIK Twin Size Montessori Floor Bed:
| Feature | Detail |
|---|---|
| Product Type | House-Shaped Floor Bed with Fence |
| Size | Twin |
| Material | Pine wood, Plywood |
| Overall Product Dimensions (L x W x H) | 80.2" x 41.8" x 65.8" |
| Overall Product Weight | 43 lbs |
| Bed Weight Capacity | 200 lbs |
| Suggested Mattress Thickness | 6 inches or less |
| Assembly Required | Yes |
| Box Spring Required | No |
| Color | Grey |
| Model Number | PVWIIK |
| UPC | 742937012076 |
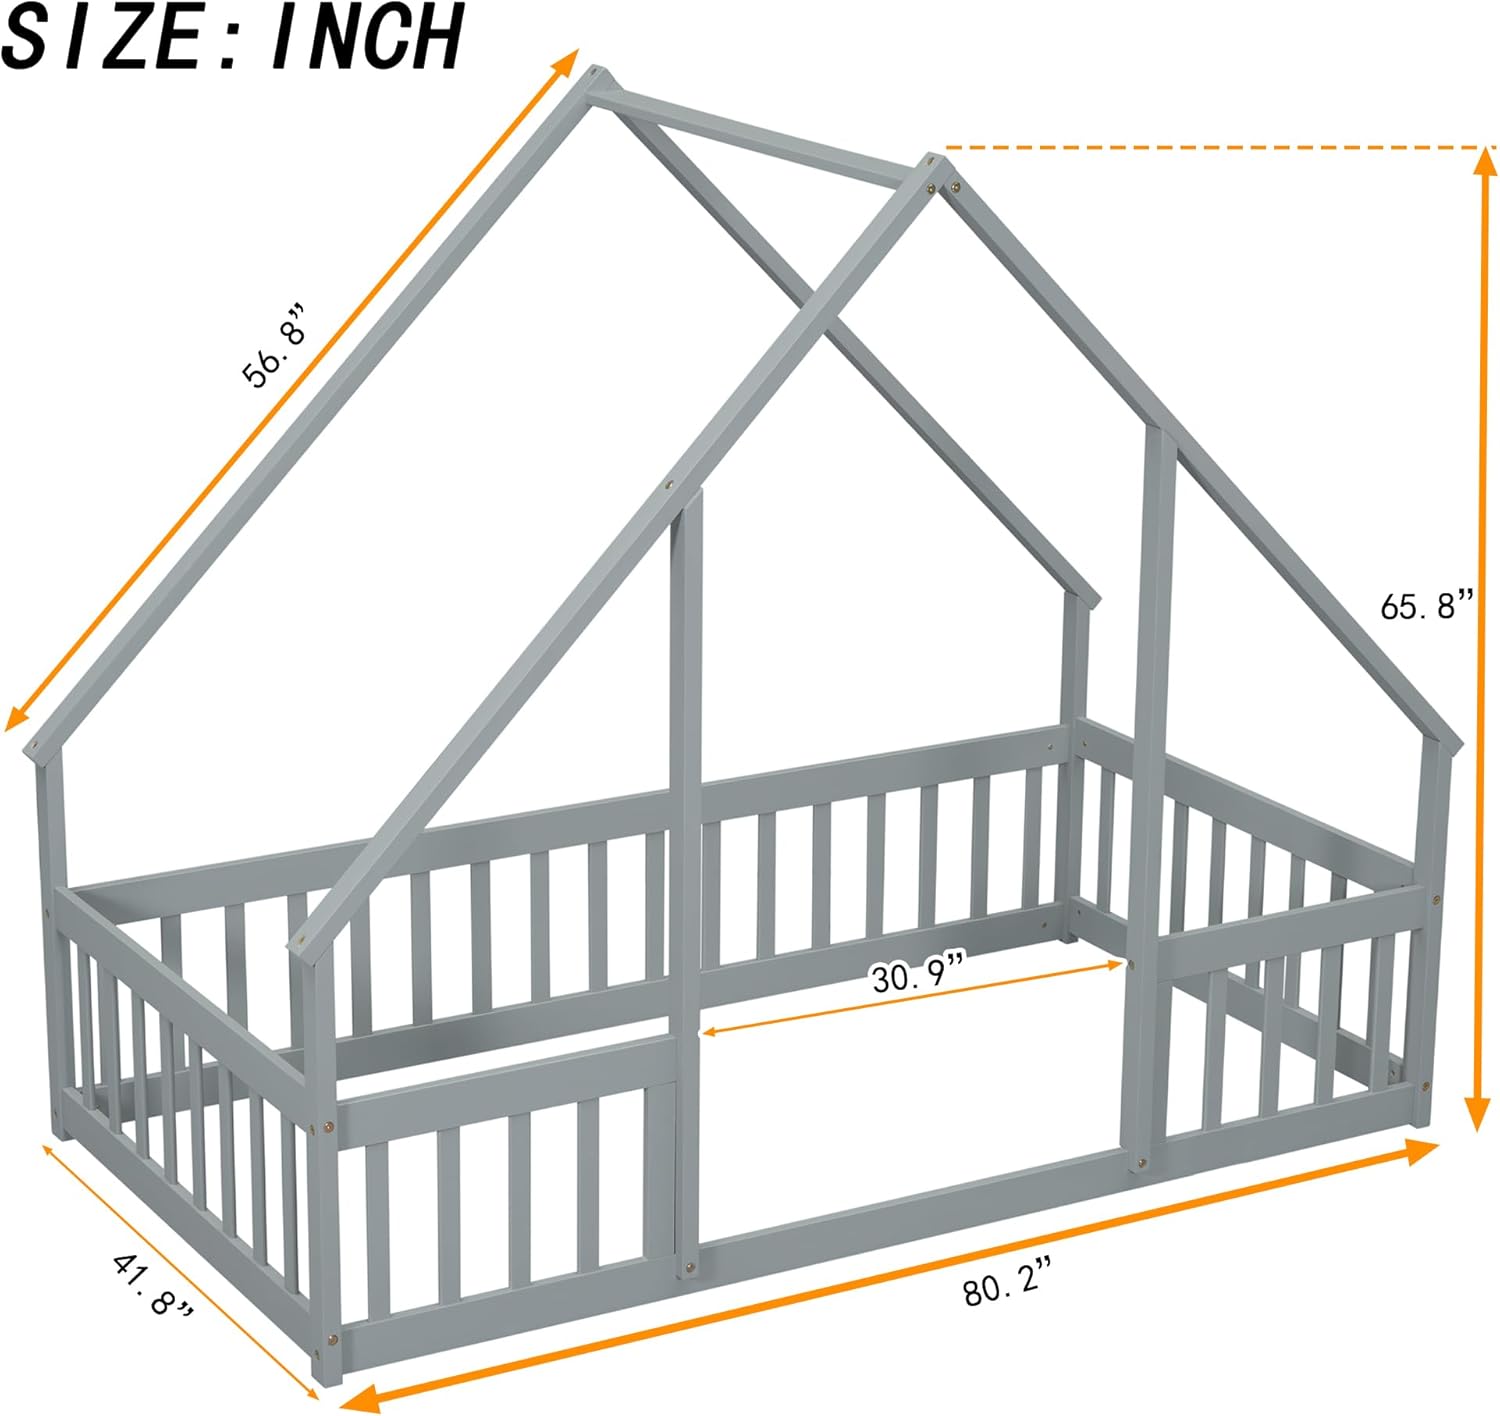
Image: A technical drawing showing the precise dimensions of the assembled bed, including length, width, and height measurements for various parts of the frame and roof.
8. Warranty Information
Specific warranty details for the PVWIIK Twin Size Montessori Floor Bed are not provided in this manual. For information regarding warranty coverage, terms, and conditions, please refer to the documentation included with your purchase or contact the retailer or manufacturer directly.
9. Customer Support
If you have any questions, require assistance with assembly, or need to report missing or damaged parts, please contact the retailer from whom you purchased this product. You may also visit the official PVWIIK brand store for additional information or support resources.
PVWIIK Brand Store: Visit Store