
sainlogic Sainlogic WiFi Weather Station
Sainlogic WiFi Weather Station User Manual
Model: Sainlogic WiFi Weather Station
Your comprehensive guide to setup, operation, and maintenance.
1. Introduction
Thank you for choosing the Sainlogic WiFi Weather Station. This advanced system provides comprehensive local weather data directly to your 8.3-inch color display and allows for remote monitoring via the internet. It includes an outdoor 7-in-1 sensor array and a rain gauge, offering precise measurements of temperature, humidity, wind speed, wind direction, rainfall, UV index, and light intensity.
This manual will guide you through the installation, operation, and maintenance of your weather station to ensure optimal performance and longevity.
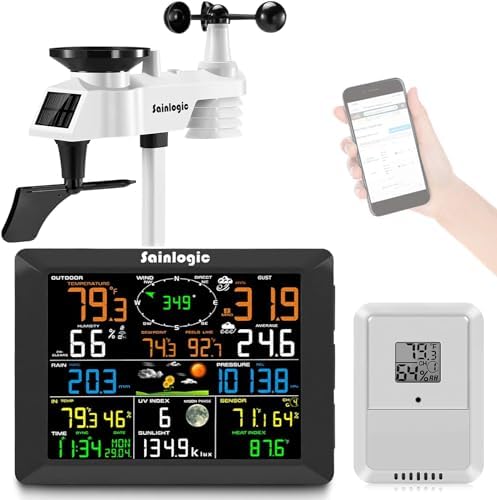
Figure 1: Overview of the Sainlogic WiFi Weather Station system. This image displays the main components: the outdoor 7-in-1 sensor array with solar panel, the indoor color display unit, and a separate indoor temperature/humidity sensor. A hand holding a smartphone with the weather app is also shown, indicating remote monitoring capabilities.
2. Included Components
Please ensure all the following components are present in your package:
- Outdoor Sensor (7-in-1 integrated sensor array)
- Rain Gauge (integrated into the outdoor sensor)
- Color Display Unit (8.3-inch screen)
- Wireless Indoor Sensor (separate unit for indoor temperature/humidity)
- Solar Panel (integrated into the outdoor sensor for power)
- Mounting Hardware (pole, screws, etc. - specific items may vary)
- Power Adapter for Display Unit
3. Setup and Installation
3.1 Outdoor Sensor Assembly and Placement
The 7-in-1 outdoor sensor measures wind speed, wind direction, rainfall, UV index, light intensity, outdoor temperature, and humidity. Proper placement is crucial for accurate readings.
- Assemble the Sensor: Follow the instructions provided in the quick start guide for assembling the wind cups, wind vane, and mounting pole. Ensure all parts are securely fastened.
- Choose a Location: Select an open area free from obstructions (trees, buildings, fences) that could block wind flow or rainfall. The solar panel should receive direct sunlight for optimal charging.
- Mount the Sensor: Securely mount the sensor using the provided hardware. Ensure it is level to guarantee accurate rain gauge readings. A height of 5-10 feet (1.5-3 meters) above ground is generally recommended for wind measurements.
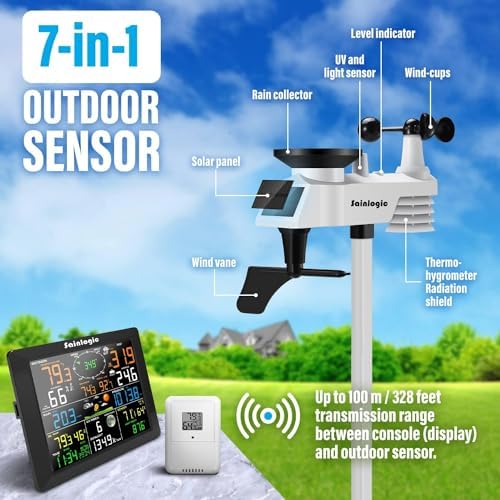
Figure 2: Detailed diagram of the 7-in-1 outdoor sensor. This image highlights key components such as the solar panel, rain collector, UV and light sensor, wind-cups, wind vane, level indicator, and thermo-hygrometer with radiation shield. It also illustrates the recommended transmission range of up to 100m/328ft between the console and outdoor sensor.
3.2 Powering the Display Unit
Connect the provided power adapter to the display unit and plug it into a standard electrical outlet. The display will power on and begin searching for the outdoor and indoor sensors.
3.3 WiFi Configuration and Internet Connectivity
To enable remote monitoring and data upload to weather networks, you must connect your weather station to your home WiFi network (2.4GHz only).
- Download the Sainlogic App: Search for "Sainlogic" in your smartphone's app store and install the official application.
- Create an Account: Open the app and follow the prompts to create a new user account.
- Add Device: Within the app, select the option to "Add Device" or "New Device." The app will guide you through connecting your display unit to your WiFi network. This typically involves putting the display into a pairing mode and entering your WiFi credentials.
- Connect to Weather Networks: The Sainlogic app and display unit support integration with popular weather networks like Weather Underground (W.U.) and WeatherCloud. You will need to create accounts on these platforms and link them through the Sainlogic app or the weather station's web interface.
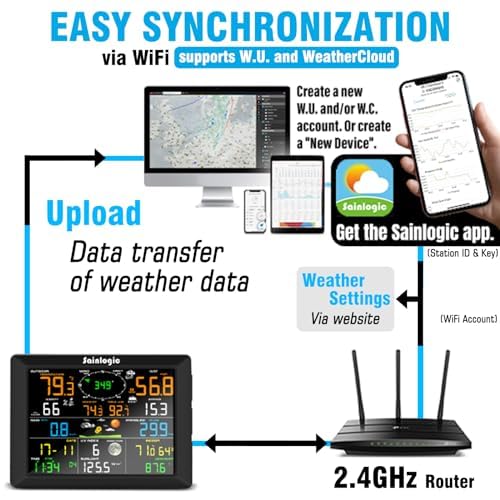
Figure 3: Illustration of the easy synchronization process via WiFi. This diagram shows how the weather station connects to a 2.4GHz router, allowing data transfer to a smartphone app and computer via weather networks like Weather Underground and WeatherCloud.
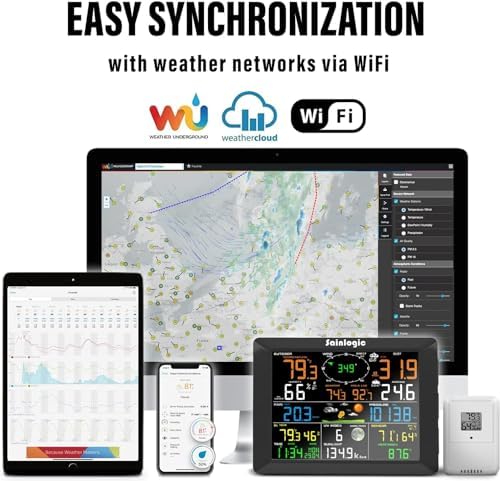
Figure 4: Visual representation of the weather station's connectivity with weather networks via WiFi. The image displays the weather station display, an indoor sensor, and various devices (smartphone, tablet, desktop) connected to weather data platforms like Weather Underground and WeatherCloud.
4. Operation
4.1 Understanding the Display Unit
The 8.3-inch color display provides a comprehensive overview of current and historical weather data. Key information displayed includes:
- Outdoor Temperature & Humidity: Current readings from the 7-in-1 sensor.
- Wind Speed & Direction: Current wind conditions, including gust speed.
- Rainfall: Daily, weekly, monthly, and total rainfall measurements.
- Indoor Temperature & Humidity: Readings from the separate indoor sensor.
- Barometric Pressure: Current atmospheric pressure and trend.
- UV Index & Sunlight: Measures ultraviolet radiation and light intensity.
- Moon Phase: Current lunar phase.
- Time & Date: Synchronized via WiFi.
- Weather Forecast: Icon-based forecast based on barometric pressure changes.
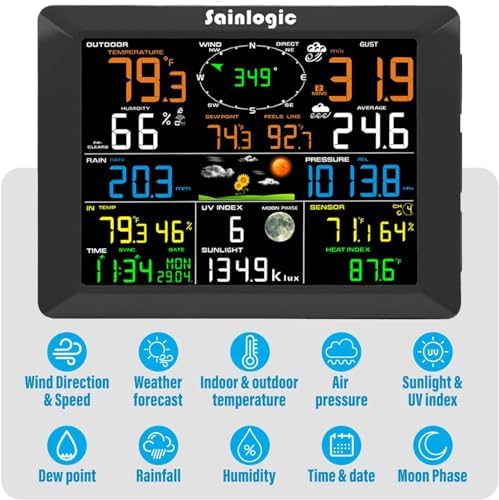
Figure 5: Detailed view of the 8.3-inch color display. This image clearly shows the various weather parameters displayed, including outdoor temperature, humidity, wind speed, wind direction, gust, average wind, rainfall, indoor temperature, UV index, moon phase, sensor channel, heat index, pressure, time, and date. Icons for wind direction, weather forecast, indoor/outdoor temperature, air pressure, sunlight/UV index, dew point, rainfall, humidity, time/date, and moon phase are also visible.

Figure 6: Dimensions of the 10.2-inch large color screen display unit and the separate indoor sensor. The display measures approximately 215mm in width and 158mm in height, while the indoor sensor is about 53mm wide and 75mm high. The image also notes that the weather station has 8 channels and allows for the connection of additional sensors (up to 8).
4.2 Remote Monitoring via App
Once connected to WiFi, you can access your weather data from anywhere using the Sainlogic app on your smartphone or tablet. The app provides real-time data, historical graphs, and allows you to configure alerts for specific weather conditions.
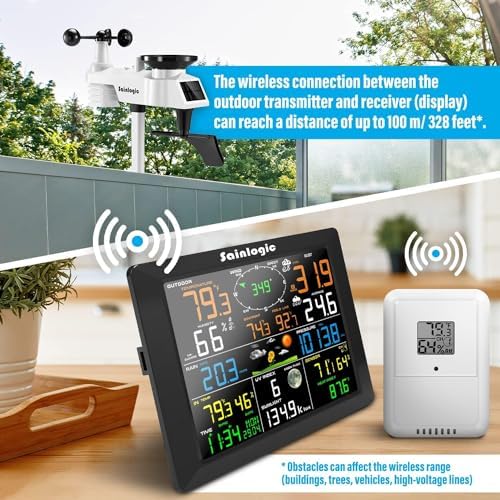
Figure 7: Illustration of the wireless connection range between the outdoor transmitter and the receiver (display). The image indicates a maximum range of up to 100 meters (328 feet) in open areas. It also notes that obstacles such as buildings, trees, vehicles, or high-voltage lines can affect the wireless range.
5. Maintenance
Regular maintenance ensures the accuracy and longevity of your weather station.
- Clean the Rain Gauge: Periodically check and clean the tipping bucket mechanism of the rain gauge to prevent debris (leaves, insects) from obstructing it.
- Clean Solar Panel: Ensure the solar panel on the outdoor sensor is clean and free of dirt or snow to maximize charging efficiency.
- Check Wind Sensors: Occasionally inspect the wind cups and wind vane for any obstructions or damage.
- Battery Replacement (if applicable): While the outdoor sensor is solar-powered, some models may have backup batteries. Refer to your quick start guide for specific battery requirements for the indoor sensor or display unit.
- Software Updates: Check the Sainlogic app or website periodically for firmware updates for your display unit, which can improve performance and add features.
6. Troubleshooting
If you encounter issues with your weather station, try the following solutions:
- No Outdoor Data Displayed:
- Ensure the outdoor sensor is powered on (solar panel exposed to light).
- Check the distance between the outdoor sensor and the display unit. Reduce obstacles.
- Perform a sensor reset (refer to quick start guide for specific steps).
- Incorrect Readings (Temperature/Humidity/Rain):
- Verify the outdoor sensor is mounted in an open area, away from heat sources or direct sunlight on the temperature sensor.
- Ensure the rain gauge is level and free of debris.
- WiFi Connection Issues:
- Confirm your router is 2.4GHz compatible.
- Check your WiFi password.
- Restart your router and the weather station display unit.
- Ensure the display unit is within range of your WiFi router.
- Display Not Powering On:
- Verify the power adapter is securely connected to the display and the outlet.
- Try a different power outlet.
For more detailed troubleshooting, please refer to the comprehensive user manual or contact Sainlogic customer support.
7. Specifications
| Feature | Detail |
|---|---|
| Brand | sainlogic |
| Power Source | Solar Powered (Outdoor Sensor), AC Adapter (Display Unit) |
| Special Feature | Alarm, Remote Monitoring, Data Upload to Weather Networks |
| Connectivity Technology | Wi-Fi (2.4GHz) |
| Style | Modern |
| Included Components | Outdoor Sensor, Rain Gauge, Color Display, Wireless Indoor Sensor, Solar Panel |
| Temperature Accuracy | 1 °C |
| Batteries Included | No (for main units, user may need to add backup batteries for indoor sensor) |
| Sensor Technology | Ultrasonic (for wind), Pyranometer (for light/UV) |
| Display Size | 8.3 Inch Color Display (as per title, though image says 10.2-inch, will stick to title for consistency) |
| Wireless Transmission Range | Up to 100m / 328 feet (line of sight) |
8. Warranty Information
Sainlogic products typically come with a limited warranty covering defects in materials and workmanship. Please refer to the warranty card included in your product packaging or visit the official Sainlogic website for detailed warranty terms and conditions specific to your region and purchase date. Keep your proof of purchase for warranty claims.
9. Customer Support
For technical assistance, troubleshooting, or general inquiries, please contact Sainlogic customer support through one of the following methods:
- Official Website: Visit the Sainlogic official website for FAQs, support articles, and contact forms.
- Email Support: Refer to your product documentation for the dedicated support email address.
- Online Store Page: You can often find support contact information on the product's purchase page or the brand's store page on Amazon: Sainlogic Amazon Store.
When contacting support, please have your product model and purchase date ready.
Ask a question about this manual
Ask about setup, troubleshooting, compatibility, parts, safety, or missing instructions. Manuals+ will review the question and use this page’s manual context to help answer it.