1. Product Overview
The ATOTO S8 PN Android Car Stereo is a 12.3-inch high-definition touchscreen unit designed to upgrade the infotainment system in specific BMW 3 Series models while retaining original vehicle functions. It offers advanced features such as wireless CarPlay, Android Auto, 4G LTE connectivity, GPS tracking, and dual Bluetooth capabilities.
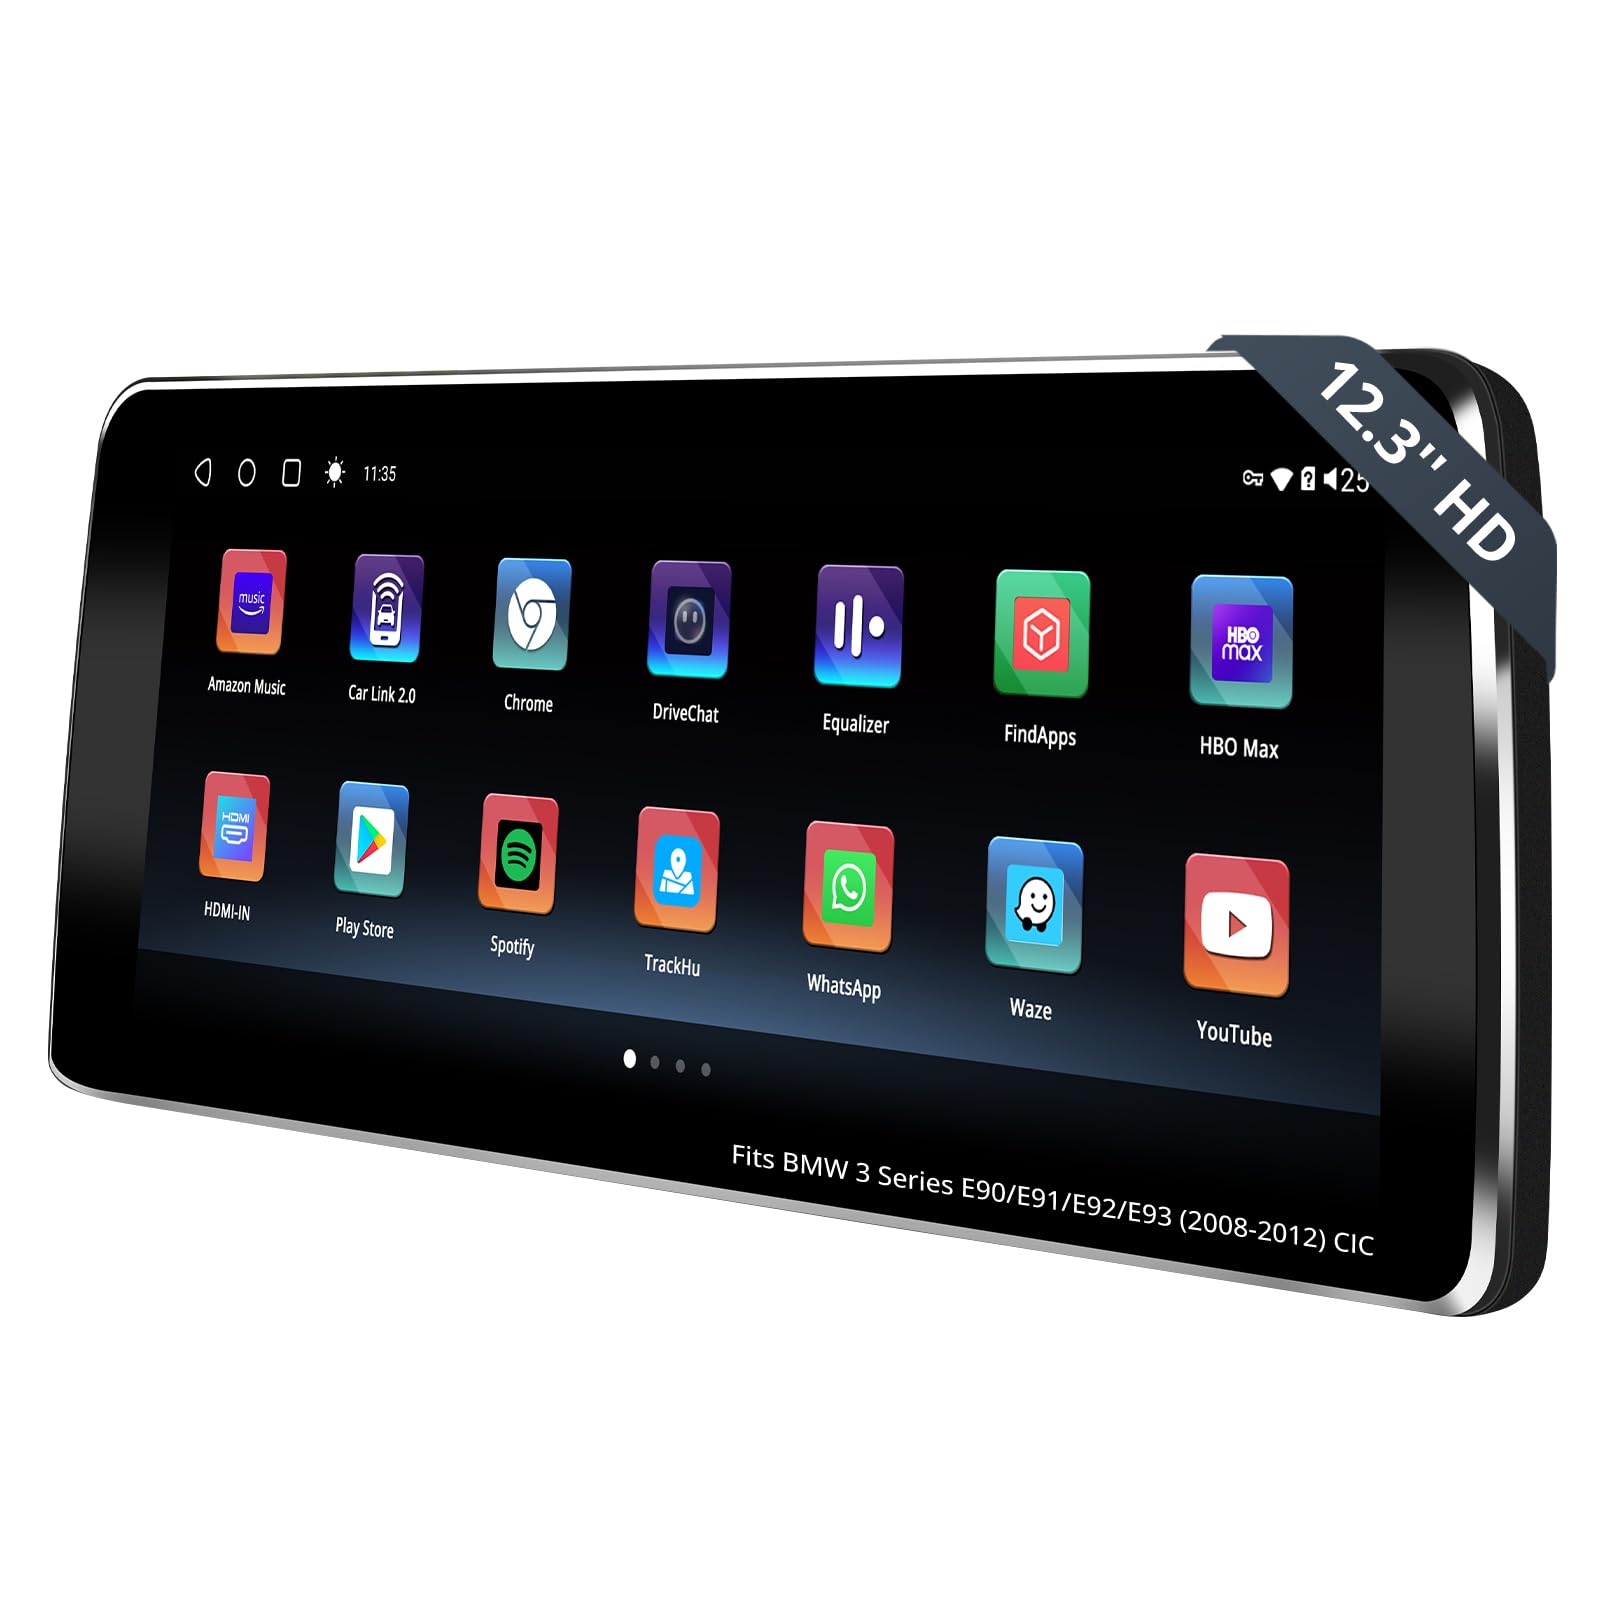
Figure 1.1: ATOTO S8 PN Android Car Stereo Main Unit
2. Key Features
- Compatibility: Specifically designed for BMW 3 Series E90, E91, E92, E93 (2008-2012) with CIC original 4 PIN LVDS system, preserving all original vehicle functions.
- DriveChat AI Co-Pilot: An integrated AI assistant for hands-free task assistance and information retrieval while driving.
- High-Performance Touchscreen: Features a 12.3-inch HD 1920x720p IPS screen, powered by an efficient 12nm SoC and ARM Cortex Octa-Core processor with 4GB RAM + 64GB storage.
- Wireless Connectivity: Supports wireless CarPlay, Android Auto, and Mirror Link for seamless smartphone integration.
- Multiple Internet Options: Offers 4G, Wi-Fi, USB, and Dual Bluetooth for versatile online access and device pairing.
- GPS Tracking: Includes TrackHU, ATOTO's GPS tracking app, with real-time tracking, 4-satellite positioning, and geofence alerts.
- Advanced Audio: Equipped with DSP (Digital Signal Processor) for cinematic audio and a 32-band Equalizer for sound customization.
3. Compatibility Check
Before installation, it is crucial to confirm your BMW 3 Series (E90, E91, E92, E93) model (2008-2012) has the CIC system. This unit is not compatible with NBT, CCC, or EVO systems. Verify the following three features:
- iDrive UI: Check the appearance of your iDrive user interface.
- Start/Stop Switch: Confirm the type of start/stop switch in your vehicle.
- LVDS Connector: Locate the 4-PIN LVDS connector at the rear of your OEM display.
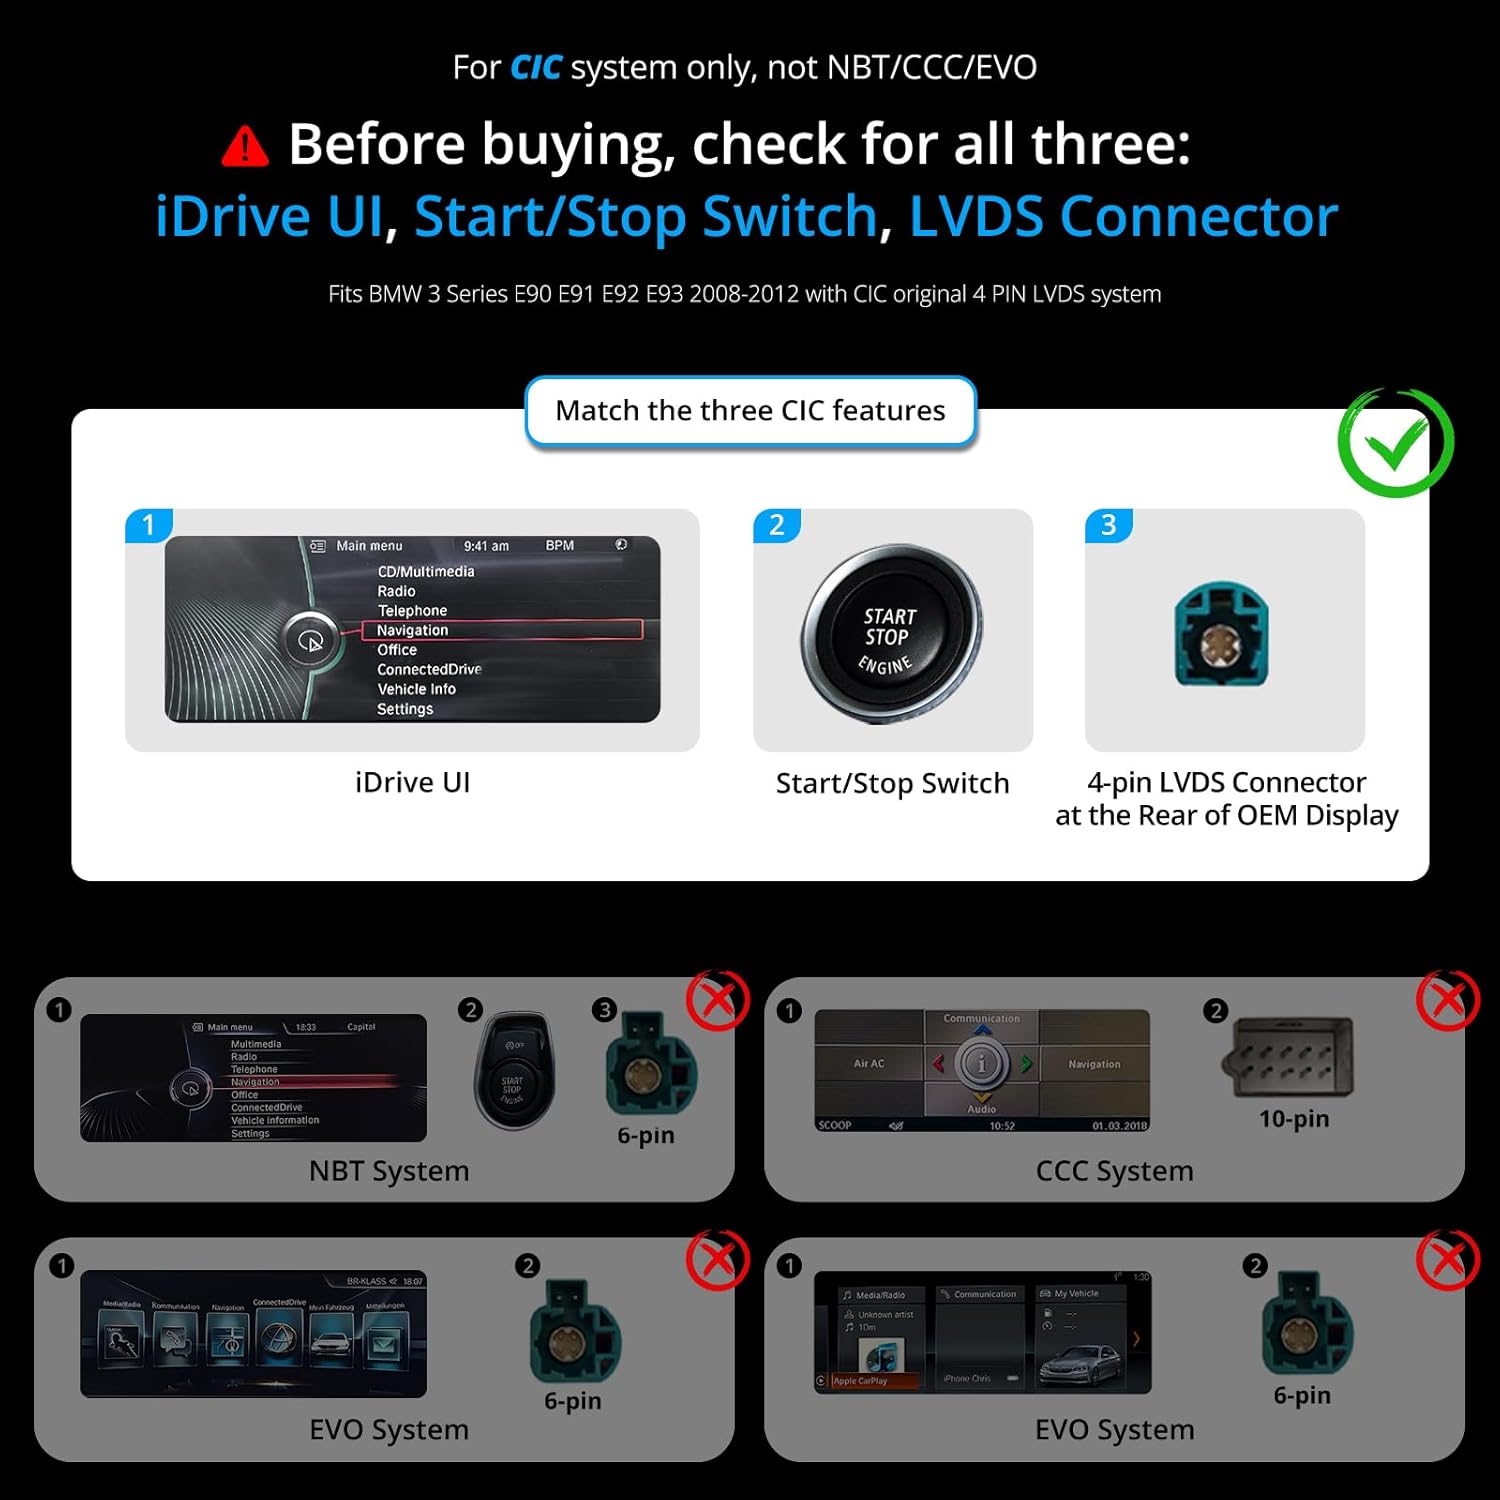
Figure 3.1: Visual guide for identifying CIC system compatibility

Figure 3.2: How to confirm your car's system type
4. Packing List
The following items are included in your ATOTO S8 PN package:

Figure 4.1: ATOTO S8 PN Packing List and Accessories
- 12.3 inch Display Unit
- BMW Power Cable Harness
- Mounting Bracket
- Locking Brackets
- Mounting Screws
- Can Bus Decoder (For CCC/CIC)
- Small Speaker
- GPS Antenna
- 4G Antenna
- USB to 4 Pin Cable
- USB to 6 Pin Cable
- RCA Cable
- Rear-View Camera Cable
- 9.84 FT/3M Lavalier Microphone
- Online Resources Quick Guide
- Product Care Online Support Information
5. Installation Guide
This section provides a general overview of the installation process. For detailed visual instructions, please refer to the installation video below.
Video 5.1: BMW Integrated Adaptive Head Unit Installation Guide
This video demonstrates the step-by-step process of installing the ATOTO S8 PN Android Car Stereo in a BMW 3 Series (E90) vehicle.
5.1. Wiring Diagram
Refer to the following diagram for proper wiring connections:

Figure 5.1: ATOTO S8 PN Wiring Diagram
5.2. General Installation Steps
- Remove Original Components: Carefully remove the air conditioning vents, climate control module, original CD player, and the original car display using appropriate pry tools. Disconnect all power connectors and the LVDS connector.
- Connect Fiber Optic Cable: Press the small buckle on the original ISO wire head with tweezers and remove the 2P green optical fiber cable. Connect this cable to the Android ISO female end, ensuring correct alignment.
- Connect ISO Plug: Connect the ISO plug from the original host to the male connector of the Android ISO harness.
- Reinstall Original Host: Reinstall the original host, ensuring it is properly seated, then lock and secure it in place.
- Reconnect Climate Control Module: Reconnect the plugs on the back of the climate control module and reinstall it.
- Install Side Cover: Install the side cover of the storage box after tucking excess harness into the gap above the storage box.
- Reconnect Air Conditioning Vents: Reconnect the plug on the back of the air conditioning vents and reinstall them.
- Connect Accessories to New Screen: Connect the 4G antenna, GPS antenna, Wi-Fi antenna, rear-view camera, external storage, phone link, Can Bus Decoder, and audio output cables to the new screen.
- Attach Bezel: Snap the bezel securely onto the screen.
- Install New Display: Align the four clips on the back of the S8 PN with the four clip slots on the mounting bracket and press down gently to secure the S8 PN.
Note: Make sure to insert the LVDS cable first before inserting the power cable during the wiring process.
6. Initial Setup
After physical installation, perform the initial setup to ensure optimal display and functionality.
Video 6.1: Setting the Screen Resolution
This video demonstrates how to correctly set the screen resolution after installation.
6.1. Screen Resolution, Sound, and Camera Setup
Proper configuration of screen resolution, audio output, and camera settings is essential for the best user experience.

Figure 6.1: Setup Steps for Screen Resolution, Sound, and Camera
- Set Screen Resolution: Navigate to the display settings and select the appropriate screen resolution for your specific iDrive system to ensure proper display.
- Configure Sound Output: To ensure the Android system audio plays through your car's original speakers, adjust the sound settings. Switch to manual mode, enter the original iDrive system, and select "AUX front" under "Multimedia" > "External Devices". Ensure the volume is turned up in the AUX Front menu.
- Setup Camera: If your car is equipped with an original backup camera, turn off the "Local Reverse Switch" option in the settings to enable the factory camera. If installing an aftermarket backup camera, ensure this option is off.
7. Operating Instructions
This section covers the various functionalities and how to operate your ATOTO S8 PN Android Car Stereo.
7.1. Switching Between Systems
Easily switch between the Android system and your original iDrive system.
Video 7.1: Switching the Screen System
This video demonstrates how to switch between the Android system and the original car system.

Figure 7.1: Switching Systems and Theme Selection
7.2. Wireless CarPlay & Android Auto
Enjoy seamless integration with your smartphone for navigation, music, calls, and more.

Figure 7.2: Wireless Connectivity Features
7.3. DriveChat AI Co-Pilot
Utilize the integrated AI co-pilot for voice-activated assistance and information.

Figure 7.3: DriveChat AI Co-Pilot Interface
7.4. DSP Audio Customization
Tailor your audio experience with the built-in Digital Signal Processor and 32-band equalizer.

Figure 7.4: DSP Audio Settings
7.5. Dual Bluetooth Functionality
Connect multiple Bluetooth devices simultaneously for calls, streaming, and hotspot functionality.

Figure 7.5: Multitasking with Dual Bluetooth
7.6. Split Screen Multitasking
Manage multiple applications simultaneously without switching between them.

Figure 7.6: Split Screen Multitasking
7.7. 4G LTE & Wi-Fi Connectivity
Stay connected on the go with various internet options.

Figure 7.7: 4 Internet Options
7.8. GPS Tracking (TrackHU)
Utilize the TrackHU app for real-time GPS tracking and security features.

Figure 7.8: Infotainment and TrackHU GPS Tracking
8. Optional Accessories
Enhance your driving experience with these optional accessories (not included in the standard package):

Figure 8.1: Explore More with Essential Accessories
- AC-FCR04W Front View Camera: Improves driving precision by spotting obstacles and tight spaces.
- AC-RCR04W Rear View Camera: Assists with reversing and parking.
- AC-AHV68 USB to HDMI Video Out Adaptor: Connects to external displays for an immersive viewing experience.
- AC-HBV86 HDMI-to-USB Adapter: Connects favorite HDMI devices like TV boxes, Chromecast, Switch, etc.
- AC-UTP1 USB Tire Pressure Monitor: Monitors tire pressure for safety.
- 1080P USB DVR Camera: Records driving footage.
- AC-4450 Bluetooth OBD II: For vehicle diagnostics.

Figure 8.2: Front and Rear View Camera Accessories

Figure 8.3: HDMI Adapter Accessories
9. Specifications
| Feature | Detail |
|---|---|
| Item Weight | 5.6 pounds |
| Package Dimensions | 14.7 x 9.4 x 6.8 inches |
| Item Model Number | S8 PN |
| Display Size | 12.3 Inches |
| Voice Command | Touchscreen |
| Brand | ATOTO |
| Vehicle Service Type | Car |
| Connectivity Technology | Wireless, Bluetooth, Auxiliary, 4G LTE, Wi-Fi |
| Map Type | Road |
| Audio Output Mode | Surround |
| Operating System | Android |
| Memory Storage Capacity | 64 GB |
| Touch Screen Type | Capacitive |
10. Troubleshooting
If you encounter any issues during installation or operation, please consider the following general troubleshooting steps:
- Review Installation Steps: Double-check all wiring connections and ensure they match the provided wiring diagram. Verify that all original components were reinstalled correctly.
- Confirm Compatibility: Re-verify that your vehicle's system is indeed a CIC system as outlined in Section 3.
- Check Power Connections: Ensure all power cables are securely connected and receiving power.
- Screen Resolution: Confirm the screen resolution is set correctly according to your iDrive system (refer to Section 6.1).
- Audio Output: If there is no sound, ensure the AUX input is selected in your original iDrive system and the volume is adjusted.
- Software Updates: Check for available firmware updates as these often resolve known issues.
For more specific troubleshooting guides and solutions, please refer to the online resources mentioned in the Warranty and Support section.
11. Warranty and Support
ATOTO provides comprehensive support for its products.

Figure 11.1: Online Resources and Product Care
- Product Care: A 12-month warranty is included from the purchase date. This can be extended for an additional 6 months, totaling 18 months. Details for extension are available in the online resource quick guide.
- Online Resources: Scan the QR code on the product box to access Eproductcare for quick guides and support in multiple languages.
- Customer Support: The customer care team is available around the clock on workdays. Refer to package details for contact information.
- Firmware Updates: ATOTO regularly provides system firmware updates. Users can obtain the latest firmware to ensure a smooth user experience.