Introduction
The PULUZ 60cm Photography Light Box is a portable photo studio designed for capturing high-quality images of products. This light tent features integrated LED lighting, multiple shooting angles, and a variety of backdrops to enhance your photography. Its foldable design ensures easy setup, storage, and transport, making it suitable for both amateur and professional use.
Package Contents
Please verify that all the following items are included in your package:
- Main Studio Box x 1
- Light Board x 2 (each with 60 LED PCS)
- Power Supply x 1 (Input: AC 110-240V 1.3A; Output: 12V 3A)
- Soft Cloth (Diffuser) x 1
- Black Backdrop x 1
- White Backdrop x 1
- Orange Backdrop x 1
- Blue Backdrop x 1
- Red Backdrop x 1
- Green Backdrop x 1
- Small Holder x 1
- Mobile Phone Clamp x 1
- User Manual x 1

Figure 1: All components included in the package.
Setup Instructions
- Unfold the Studio Box: Carefully unfold the main studio box. The design utilizes hook-and-loop fasteners for quick and tool-free assembly. Ensure all sides are securely attached to form the cubic structure.
- Install LED Light Boards: Attach the two LED light boards to the designated positions inside the top of the light box. These boards are typically secured with hook-and-loop fasteners or clips. Ensure they are positioned to provide even illumination. The light bars are movable and rotatable for flexible shooting.
- Connect Power Supply: Connect the power supply to the LED light boards and then plug the power adapter into a standard US electrical outlet (AC 110-240V).
- Select and Install Backdrop: Choose one of the six colored backdrops (black, white, orange, blue, red, green) and gently place it inside the light box, securing it to the top and bottom hooks or clips to create a seamless background.
- Optional: Install Soft Cloth: For softer, more diffused lighting and to reduce reflections, attach the soft cloth (diffuser) inside the top of the light box, below the LED lights.

Figure 2: Light box fully assembled with LED lights and a product inside.
Operating Instructions
- Power On and Adjust Brightness: Once the power supply is connected, turn on the light box. Use the integrated power control knob to adjust the brightness of the LED lights to your desired level. The 5500K color temperature provides natural, daylight-balanced lighting.
- Place Product: Carefully place the item you wish to photograph inside the light box, ensuring it is centered and positioned appropriately against the chosen backdrop.
- Utilize Multi-Angle Shooting: The light box offers various shooting angles:
- Front Window: Use the main front opening for horizontal shooting.
- Top Hole: Utilize the circular opening on the top for 90-degree vertical or overhead shooting.
- Optimize Lighting with Diffuser: If reflections or harsh shadows are present, ensure the soft cloth diffuser is installed. This will soften the light and help create more even illumination, reducing glare and hot spots.
- Experiment with Backdrops: Use the various colored backdrops to complement your product and achieve different visual effects.
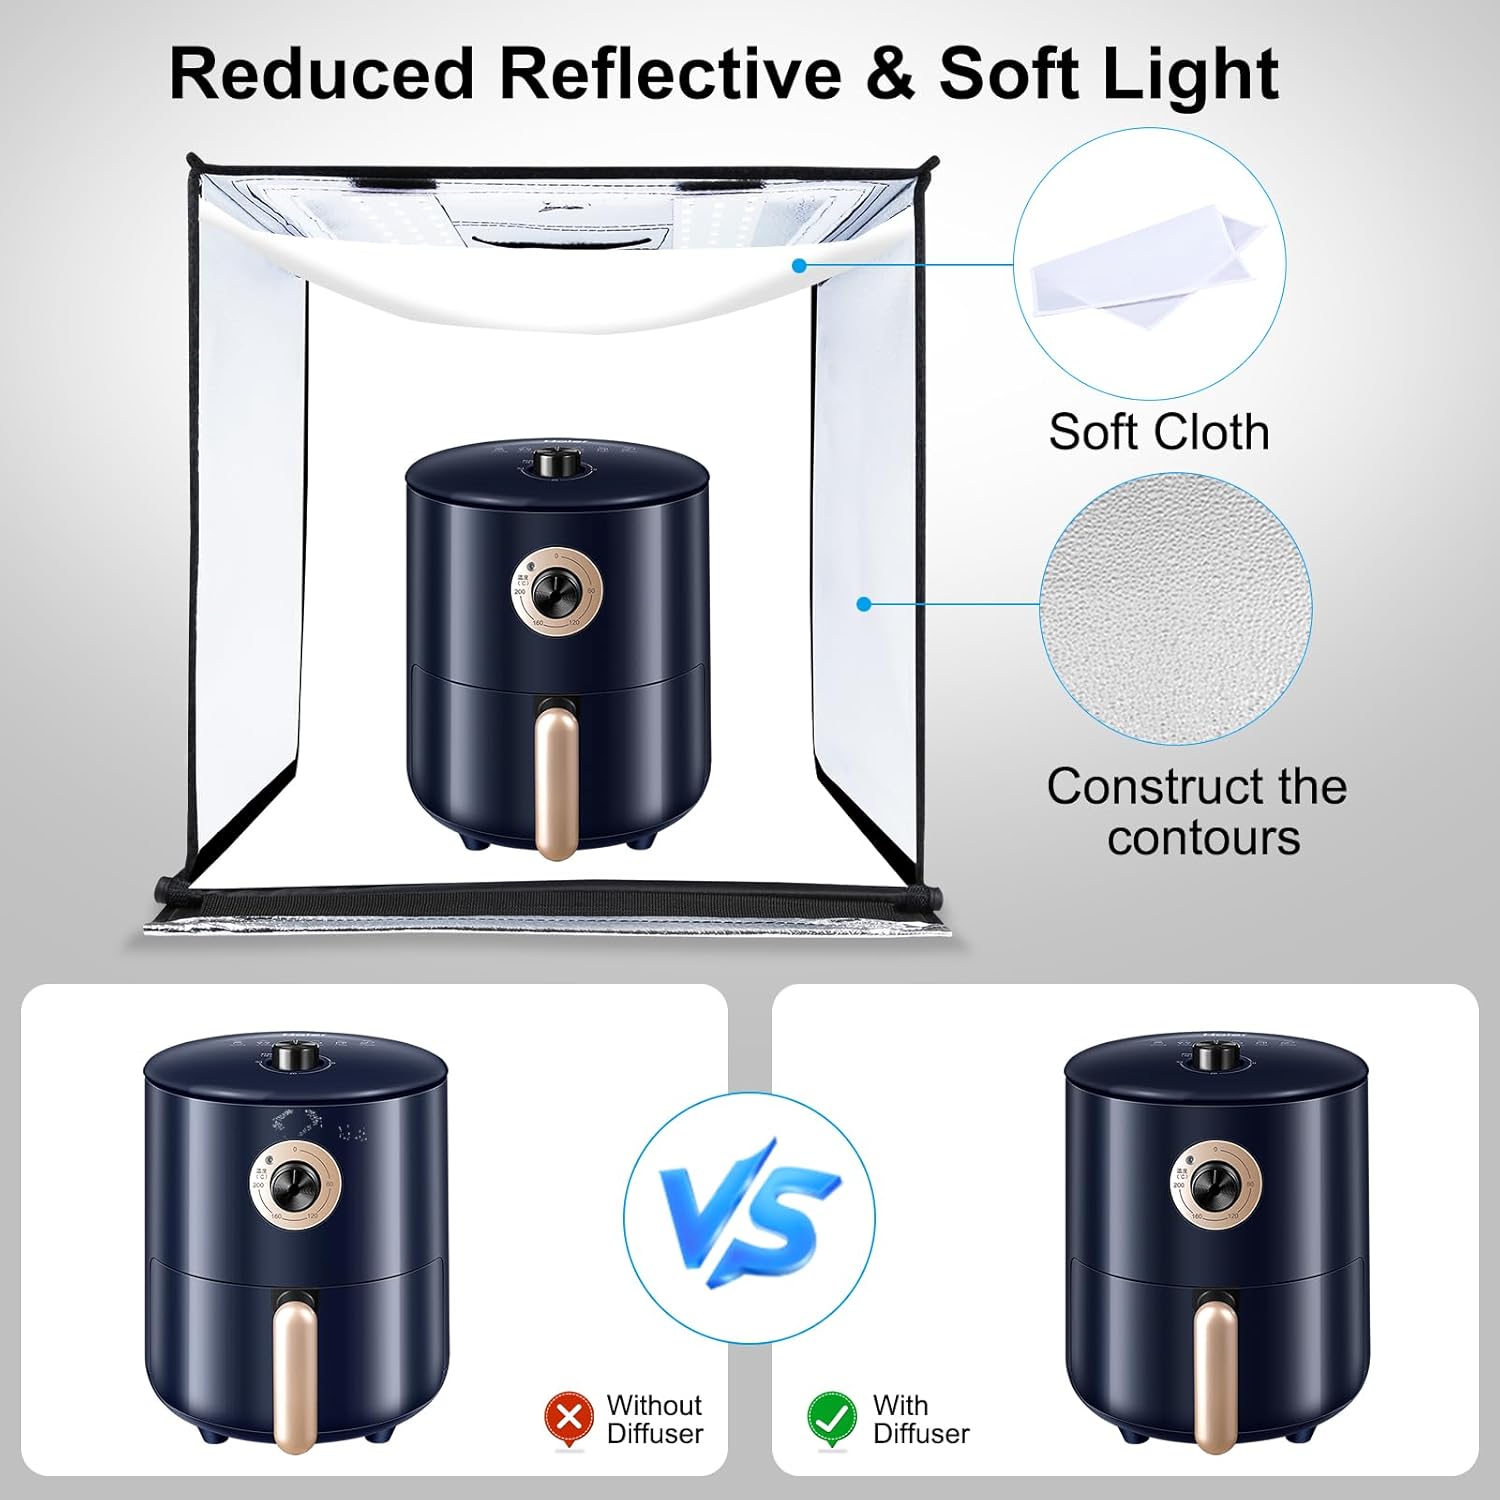
Figure 3: Examples of multi-angle shooting capabilities.

Figure 4: Comparison of product photography with and without the soft cloth diffuser.

Figure 5: The six color backdrops and their application.
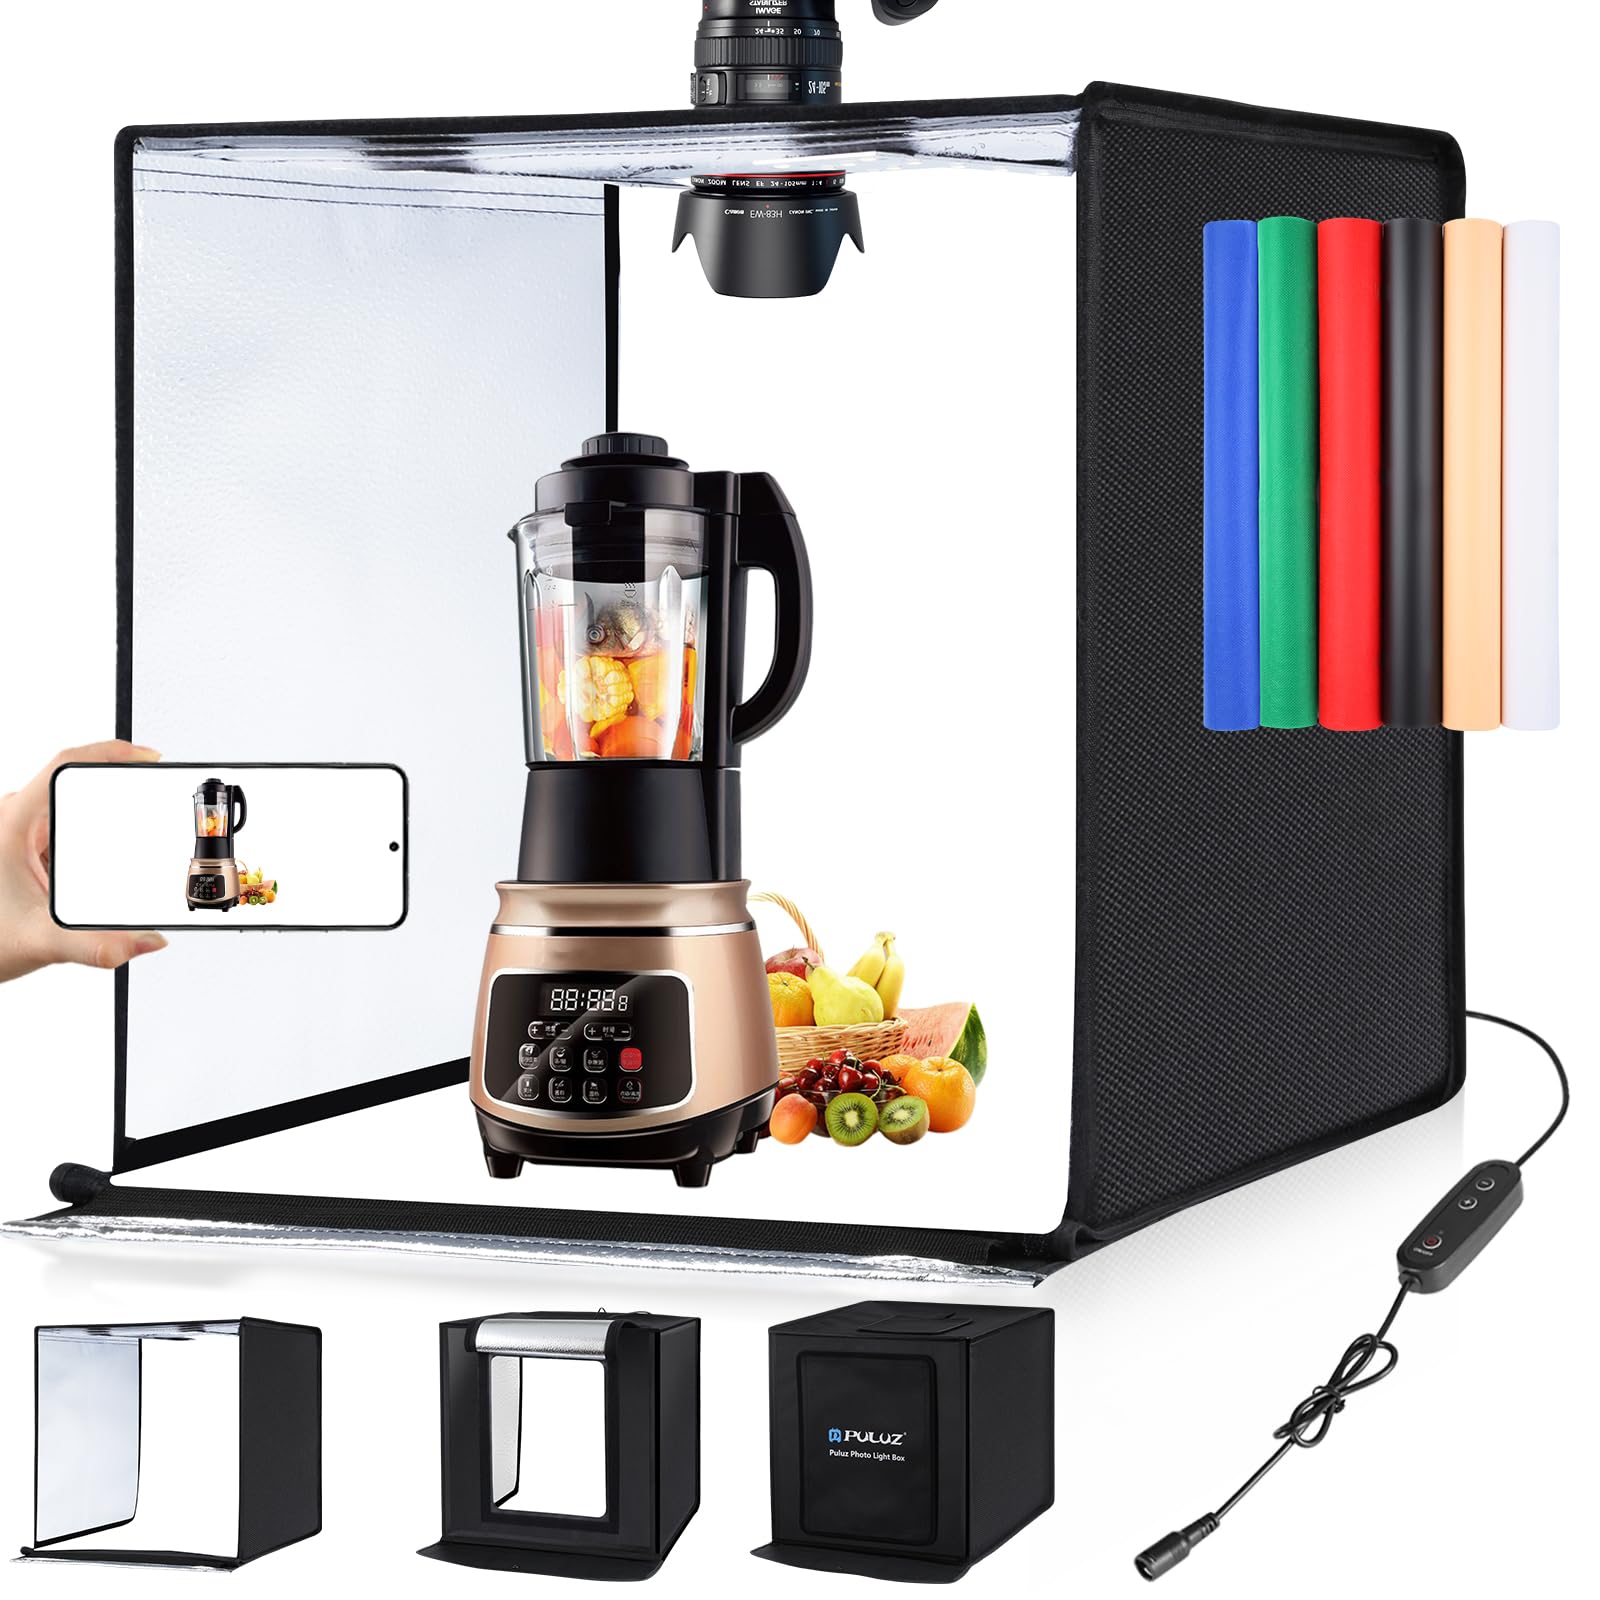
Figure 6: Power control and lighting specifications.
Maintenance
- Cleaning: To clean the nylon cloth studio box, gently wipe it with a soft, damp cloth. Avoid using harsh chemicals or abrasive cleaners. For the LED light boards, use a dry, soft cloth to remove dust.
- Storage: When not in use, disconnect the power supply and carefully fold the studio box back into its compact form. Store it in a dry, cool place away from direct sunlight. The special fold-storage design allows for easy and space-saving storage.
- Handling: Avoid applying excessive force to the light box structure or LED components. Handle the power supply and cables with care to prevent damage.
Troubleshooting
- Lights Not Turning On:
- Ensure the power supply is securely connected to both the LED light boards and the electrical outlet.
- Verify that the power outlet is functional.
- Check the power control knob to ensure it is not set to the minimum brightness.
- Uneven Lighting:
- Ensure both LED light boards are properly installed and functioning.
- Adjust the position of the movable light bars to direct light evenly.
- Confirm the soft cloth diffuser is correctly installed to spread light more uniformly.
- Light Boards Not Staying in Place:
- Ensure the hook-and-loop fasteners on the light boards and the studio box are clean and making full contact.
- Re-attach the light boards firmly.
Specifications
| Material | Nylon Cloth |
| LED Quantity | 2 x 60 PCS (120 total) |
| Lumen | 2 x 1690LM (3380LM total) |
| Color Temperature | 5500K |
| Power Supply Input | AC 110-240V 1.3A |
| Power Supply Output | 12V 3A |
| Power | 36W |
| Unfolded Size | 60 x 60 x 60 cm (24 x 24 x 24 inches) |
| Folded Size | 60 x 60 x 2.8 cm (24 x 24 x 1.1 inches) |
| Manufacturer Reference | zy5060 |
Warranty and Support
For warranty information, technical support, or service inquiries, please refer to the documentation provided with your purchase or contact the retailer/manufacturer directly. Keep your proof of purchase for any warranty claims.


