
1. Introduction
This manual provides detailed instructions for the installation, operation, and maintenance of your Voilamart Electric Bicycle Conversion Kit. This kit is designed to transform a standard 26-inch pedal bicycle into an electric bicycle (Ebike) with a powerful 48V 1000W rear hub motor. Please read this manual thoroughly before beginning installation or operation to ensure safe and correct usage.

Figure 1: Voilamart 26-inch Electric Bicycle Conversion Kit components.
2. Safety Information
- Always wear a helmet and appropriate safety gear when riding an electric bicycle.
- Ensure all connections are secure and properly insulated before operation.
- The kit is CE and EN15194 approved, ensuring compliance with safety and quality standards.
- The brake levers include a motor power cut-off function. Ensure these are correctly installed and functioning to prevent motor overheating and conserve energy.
- By default, the kit is restricted to 750W and 24 mph (38 km/h) for road-legal use. For off-road use, the 1000W full power output (up to 28 mph / 45 km/h) can be enabled by disconnecting the blue cable. Be aware of local regulations regarding e-bike power and speed limits.
- Regularly inspect your bicycle and the conversion kit components for wear, damage, or loose parts.
- A torque arm is highly recommended for safe installation of hub motors to prevent axle rotation and dropout damage. This is not included in the kit and should be purchased separately.
3. Package Contents
The Voilamart Electric Bicycle Conversion Kit typically includes the following components:
- 26-inch Rear Hub Motor Wheel (pre-assembled with tire)
- Motor Controller
- Twist Throttle with Integrated Power Display
- Brake Levers (with motor cut-off sensors)
- Pedal Assist System (PAS) Sensor
- Freewheel (7-speed)
- Freewheel Spacer (41.6 / 35.0mm Dia, 2mm thick)
- Controller Bag
- Wire Winding Pipe
- Zip Ties
- User Manual (this document)
Note: A 48V battery is required for operation and is not included in this kit.

Figure 2: Detailed view of included kit components.
4. Specifications
| Feature | Specification |
|---|---|
| Brand | Voilamart |
| Model Name | EBK48V1KWRN |
| Part Number | EBK-26I48V1KWRN |
| Wheel Type | Rear Wheel |
| Motor Type | Brushless Gearless Hub Motor |
| Power | 1000W / 48V (750W / 48V for road-legal mode) |
| Max Speed | 28 mph (45 km/h) / 24 mph (38 km/h) in road-legal mode |
| Max Load Capacity | 440 lbs (200 kg) |
| Max Torque | 50 N.M |
| Max Rotating Speed | 680 rpm |
| Wheel Size | 26 Inches |
| Rim Width | 0.75 Inches |
| Tire Width | 1.97 Inches (5 cm) |
| Rear Dropout Compatibility | 135 mm |
| Compatible Disc Diameter | 160 mm (44 mm 6-bolt type) |
| Spokes | Steel, 12G x 2.6 mm |
| Item Weight (Wheel) | 22 Pounds |
| Certification | CE, EN15194 |

Figure 3: Wheel dimensions and specifications.

Figure 4: 1000W Brushless Gearless Motor details.
5. Setup and Installation
The Voilamart conversion kit is designed for universal fit on 26-inch bike frames with a 135mm rear dropout. Installation involves replacing your bicycle's rear wheel with the motor wheel and connecting the various electronic components.
5.1. Pre-Installation Checks
- Ensure your bicycle frame is compatible with a 26-inch rear wheel and has a 135mm rear dropout.
- Confirm you have all components listed in Section 3.
- Acquire a compatible 48V battery (not included).
- Consider purchasing and installing a torque arm for added safety and to protect your bike's dropouts.
5.2. Installation Steps (Overview)
- Remove Existing Rear Wheel: Disconnect your bike's existing rear wheel and remove any associated components like the freewheel/cassette.
- Install Freewheel: Attach the included 7-speed freewheel to the motor wheel. Use the freewheel spacer if necessary for proper chain alignment.
- Install Motor Wheel: Mount the motor wheel into your bike's rear dropouts. Ensure it is centered and securely fastened. If using a torque arm, install it according to its manufacturer's instructions.
- Install Brake Levers: Replace your existing brake levers with the new ones, ensuring the motor cut-off wires are routed correctly.
- Install Twist Throttle: Mount the twist throttle on the handlebar.
- Install PAS Sensor: Attach the Pedal Assist System sensor to your bike's bottom bracket area, ensuring the magnet disc is correctly positioned.
- Mount Controller and Bag: Place the controller in the provided controller bag and secure the bag to your bike frame.
- Wiring Connections: Connect all components to the controller according to the wiring diagram. Use the wire winding pipe and zip ties for neat and secure cable management. Ensure all connections are firm and waterproof.
- Connect Battery: Once all other components are connected, connect your 48V battery to the controller.

Figure 5: Accessories installation example on a bicycle.
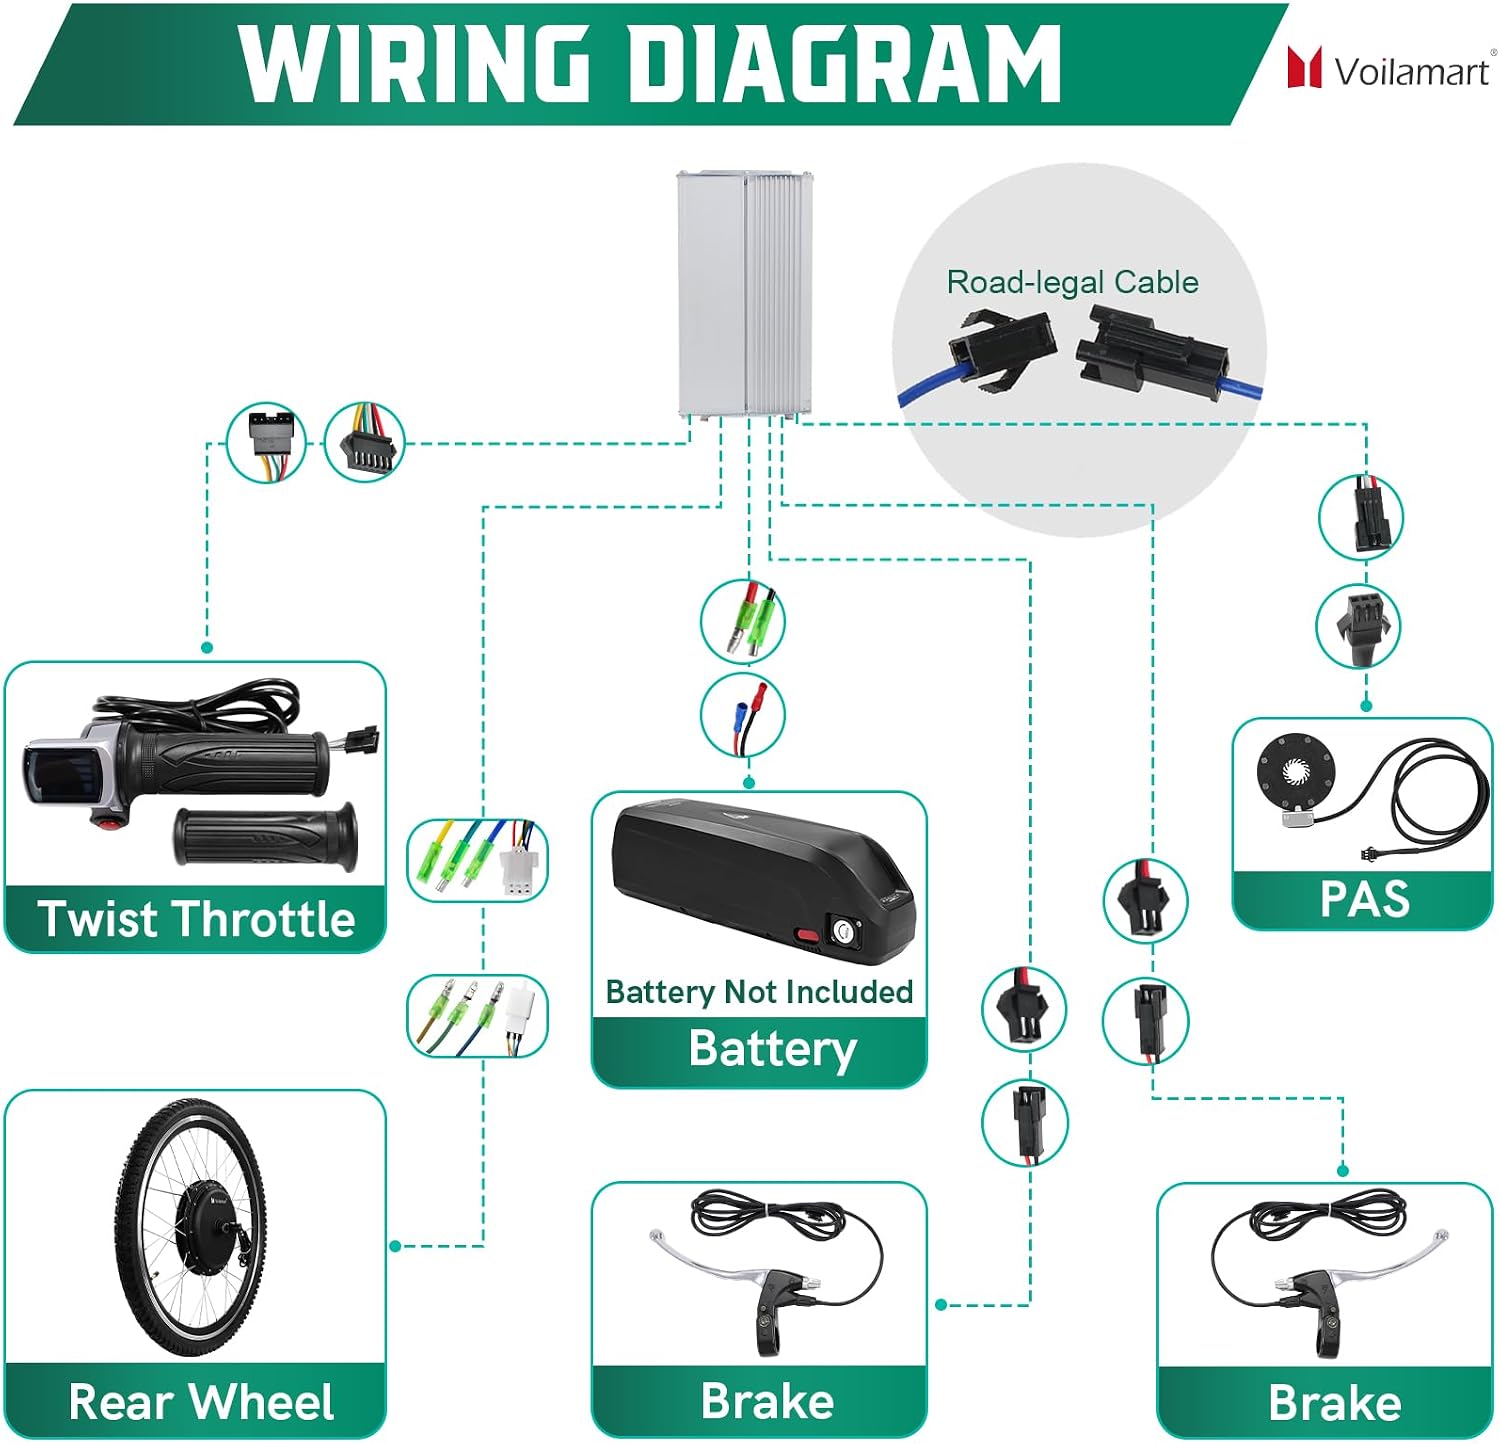
Figure 6: Wiring diagram for the conversion kit.
6. Operation
6.1. Powering On/Off
To power on the system, ensure the battery is connected and press the power button on the twist throttle display. To power off, press and hold the power button.
6.2. Riding Modes
The kit offers three primary riding modes:
- Throttle Mode: Use the twist throttle to control speed directly, similar to a motorcycle. The integrated power display shows battery level.
- Pedal Assist System (PAS) Mode: The PAS function provides motor assistance as you pedal. You can switch between different assist levels (e.g., 1-5) to adjust the amount of power provided. This mode reduces fatigue and is ideal for longer trips.
- Manual Mode: Ride the bicycle without any motor assistance, like a traditional pedal bike.
6.3. Road-Legal vs. Off-Road Mode
The kit is configured by default for road-legal operation at 750W and a maximum speed of 24 mph (38 km/h). To switch to the full 1000W power output for off-road use, which allows speeds up to 28 mph (45 km/h), disconnect the blue cable from the controller. Reconnect the blue cable to revert to road-legal mode.

Figure 7: E-bike in outdoor riding scenario.

Figure 8: E-bike in commuting scenario.
7. Maintenance
Regular maintenance ensures the longevity and safe operation of your electric bicycle conversion kit.
- Routine Cleaning: Keep the motor, controller, and electrical connections clean and free from dirt and moisture.
- Check Connections: Periodically inspect all electrical connections for tightness and signs of corrosion or damage.
- Brake System: Ensure brake levers are functioning correctly and the motor cut-off engages when brakes are applied. Regularly check brake pads and cables. Consider upgrading to disc brakes if your bike uses rim brakes, especially for higher speeds.
- Spoke Tension: Check the tension of the spokes on the motor wheel regularly, especially after the first few rides. Loose spokes can affect wheel integrity and ride quality.
- Tire Pressure: Maintain correct tire pressure for optimal performance and safety.
- Battery Care: Follow the manufacturer's instructions for your 48V battery regarding charging, storage, and discharge cycles.
- General Bicycle Maintenance: Continue with standard bicycle maintenance practices, including chain lubrication, gear adjustments, and frame inspection.
8. Troubleshooting
This section addresses common issues you might encounter with your conversion kit.
| Problem | Possible Cause | Solution |
|---|---|---|
| Motor not engaging / No power | Loose battery connection, discharged battery, faulty controller, faulty throttle. | Check battery connection and charge level. Inspect all wiring connections to the controller. Test throttle functionality. |
| PAS not working | PAS sensor incorrectly installed, loose PAS connection, faulty PAS sensor. | Ensure PAS sensor and magnet disc are correctly aligned and installed. Check PAS wiring connection to the controller. |
| Display shows "ERROR 10" | Communication error between LCD display and controller. | Check all connections between the display and controller. Disconnect and reconnect to ensure a firm connection. If the error persists, the display or controller may be faulty and require replacement. |
| Motor makes unusual noise | Loose spokes, internal motor issue, foreign object. | Check spoke tension. Inspect the motor for any obstructions. If noise persists, contact customer support. |
| Brakes feel insufficient at high speeds | Rim brakes not adequate for e-bike speeds, worn brake pads. | Consider upgrading to hydraulic disc brakes for improved stopping power. Replace worn brake pads. |
9. Warranty and Support
9.1. Warranty Information
The Voilamart Electric Bicycle Conversion Kit comes with a 6-month warranty provided by Voilamart. Please retain your proof of purchase for warranty claims.
9.2. Customer Support
Voilamart offers 7x24 hour customer service to assist with any technical questions or issues you may encounter. For support, please follow these steps:
- Navigate to the product page on Amazon.
- Click on the seller's name (e.g., "wisdominthebox").
- On the seller's page, click "Ask a question."
- Select "An item for sale" and then "Something else" to describe your issue.

Figure 9: Steps to contact customer support.