1. Introduction
This manual provides comprehensive instructions for the safe and effective use of the HORIBA LAQUA EC-2000 conductivity meter. The EC-2000 is a compact and powerful benchtop instrument designed for precise water quality analysis, offering simplicity and excellent usability for daily laboratory tasks. Please read this manual thoroughly before operating the device and keep it for future reference.
2. Safety Information
To ensure safe operation and prevent damage to the instrument, observe the following precautions:
- Always use the instrument in a stable, level environment, away from direct sunlight, extreme temperatures, and high humidity.
- Avoid exposing the instrument to strong vibrations or impacts.
- Do not disassemble or modify the instrument. Refer all servicing to qualified personnel.
- Ensure that the power supply used matches the specifications required by the instrument.
- Keep the instrument and its accessories out of reach of children.
- Handle electrodes and calibration solutions with care, following their respective safety data sheets.
3. Product Overview
The HORIBA LAQUA EC-2000 is a benchtop conductivity meter designed for accurate measurements. Familiarize yourself with its components and controls.
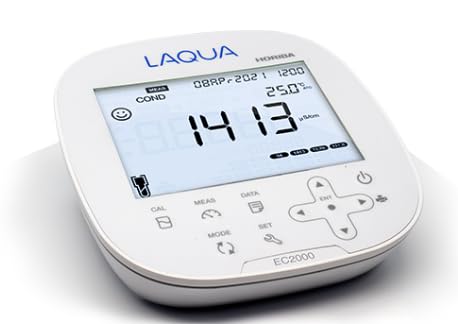
Figure 3.1: HORIBA LAQUA EC-2000 Conductivity Meter
This image displays the HORIBA LAQUA EC-2000 benchtop meter. It features a large digital display showing a conductivity reading of "1413 µS/cm" and a temperature of "25.0°C". Below the display are several control buttons: "CAL" for calibration, "MEAS" for measurement, "DATA" for data functions, "SET" for settings, and "MODE" for changing modes. A directional pad with an "ENT" (Enter) button is located on the right, alongside a power button. The device is white with blue "LAQUA" branding and "HORIBA" in smaller text.
3.1. Key Components and Controls
- Display: Large LCD showing measurement values (e.g., conductivity, temperature), battery status, and operational icons.
- CAL Button: Initiates the calibration process.
- MEAS Button: Starts or stops a measurement.
- DATA Button: Accesses stored data or data logging functions. The meter has a built-in data memory for 2000 items.
- SET Button: Enters the system settings menu for configuration.
- MODE Button: Switches between different measurement modes or display options.
- Directional Pad (Up, Down, Left, Right) with ENT Button: Used for navigation within menus and confirming selections.
- Power Button: Turns the instrument on or off.
- Input Ports: (Not visible in image, but implied) For connecting electrodes and power adapter.
4. Setup
4.1. Unpacking and Inspection
- Carefully remove the EC-2000 meter and all accessories from the packaging.
- Verify that all items listed in the packing list are present. The product includes the meter.
- Inspect the instrument for any visible damage that may have occurred during shipping. If damage is found, contact your supplier immediately.
4.2. Power Connection
Connect the provided AC adapter to the power input port on the rear of the meter, then plug it into a suitable power outlet. Ensure the connection is secure.
4.3. Electrode Connection
Connect the conductivity electrode to the designated input port on the meter. Ensure the connector is fully inserted and secured.
5. Operating Instructions
5.1. Powering On/Off
- To Power On: Press and hold the Power button until the display illuminates.
- To Power Off: Press and hold the Power button until the display turns off.
5.2. Calibration
Regular calibration is essential for accurate measurements. Refer to the specific instructions for your conductivity electrode and calibration solutions.
- Prepare the appropriate conductivity calibration standards.
- Rinse the electrode thoroughly with deionized water and blot dry.
- Immerse the electrode in the first calibration standard.
- Press the CAL button. Follow the on-screen prompts to complete the calibration.
- Repeat for additional calibration points as required.
5.3. Measurement
- Ensure the meter is calibrated.
- Rinse the electrode with deionized water and blot dry.
- Immerse the electrode into the sample solution. Ensure the sensor part of the electrode is fully submerged.
- Press the MEAS button. The display will show the conductivity reading (e.g., "COND" and "1413 µS/cm") and temperature.
- Wait for the reading to stabilize before recording the value.
5.4. Data Handling
The EC-2000 features a built-in data memory capable of storing up to 2000 measurement items.
- Storing Data: After a stable measurement, press the DATA button to save the current reading. Follow any on-screen prompts.
- Recalling Data: Press the DATA button and use the directional pad to navigate through stored records.
- Connecting to a Computer: The meter can be connected to a computer to collect measurement data. Refer to the separate software manual (if applicable) for detailed instructions on data transfer.
5.5. System Settings
Press the SET button to access system settings. Use the directional pad and ENT button to adjust parameters such as temperature compensation, units, date/time, and other instrument configurations.
6. Maintenance
6.1. Cleaning the Meter
Wipe the exterior of the meter with a soft, damp cloth. Do not use abrasive cleaners or solvents. Ensure no liquid enters the instrument.
6.2. Electrode Care
Proper electrode maintenance is crucial for accuracy and longevity. Always rinse the electrode with deionized water after each use. Store the electrode according to the manufacturer's instructions, typically in a storage solution or wet cap.
6.3. Storage
When not in use for extended periods, store the EC-2000 in a dry, cool place, away from direct sunlight and extreme temperatures. Disconnect the power adapter and ensure the electrode is properly stored.
7. Troubleshooting
This section addresses common issues you may encounter. If the problem persists, contact HORIBA technical support.
| Problem | Possible Cause | Solution |
|---|---|---|
| Meter does not power on. | No power supply or faulty connection. | Check power adapter connection and power outlet. Ensure the power button is pressed correctly. |
| Unstable or inaccurate readings. | Electrode dirty, damaged, or not calibrated. | Clean the electrode. Perform a fresh calibration. Check electrode for damage and replace if necessary. |
| Cannot save data. | Memory full or incorrect operation. | Check available memory. Follow data saving instructions carefully. Consider transferring data to a computer to free up space. |
8. Specifications
Key specifications for the HORIBA LAQUA EC-2000 meter:
- Model: EC-2000
- Manufacturer: HORIBA
- Function: Conductivity Meter
- Data Memory: Built-in, stores up to 2000 items.
- Connectivity: Allows connection to a computer for data collection.
- ASIN: B0DFHNG91Q
- First Available: August 28, 2024
9. Warranty and Support
For warranty information, technical support, or service inquiries, please contact your local HORIBA representative or visit the official HORIBA website. Keep your purchase receipt and product serial number handy when contacting support.
HORIBA Website: www.horiba.com


