Introduction
Thank you for purchasing the fgfgkijbhgmsedfod 40L Multi-Function Electric Oven. This manual provides essential information for the safe and efficient operation, maintenance, and troubleshooting of your new appliance. Please read this manual thoroughly before first use and keep it for future reference.
Important Safety Instructions
When using electrical appliances, basic safety precautions should always be followed to reduce the risk of fire, electric shock, and/or injury to persons, including the following:
- Read all instructions before using the oven.
- Do not touch hot surfaces. Use handles or knobs. Always use oven mitts or potholders when handling hot items.
- To protect against electric shock, do not immerse cord, plugs, or the appliance in water or other liquid.
- Close supervision is necessary when any appliance is used by or near children.
- Unplug from outlet when not in use and before cleaning. Allow to cool before putting on or taking off parts.
- Do not operate any appliance with a damaged cord or plug, or after the appliance malfunctions or has been damaged in any manner.
- The use of accessory attachments not recommended by the appliance manufacturer may cause injuries.
- Do not use outdoors.
- Do not let cord hang over edge of table or counter, or touch hot surfaces.
- Do not place on or near a hot gas or electric burner, or in a heated oven.
- Extreme caution must be used when moving an appliance containing hot oil or other hot liquids.
- To disconnect, turn any control to "off", then remove plug from wall outlet.
- Do not use appliance for other than intended use.
- Ensure adequate ventilation around the oven during operation. Do not block ventilation slots.
Product Overview
Components
The fgfgkijbhgmsedfod 40L Multi-Function Electric Oven includes the following main components:
- Oven Unit with Glass Door
- Temperature Control Knob
- Function Control Knob
- Timer Control Knob
- Power Indicator Light
- Baking Pan
- Baking Net (Wire Rack)
- Handle for accessories
- Internal Heating Elements (Top and Bottom)
- Ventilation Slots
- Non-slip Rubber Feet
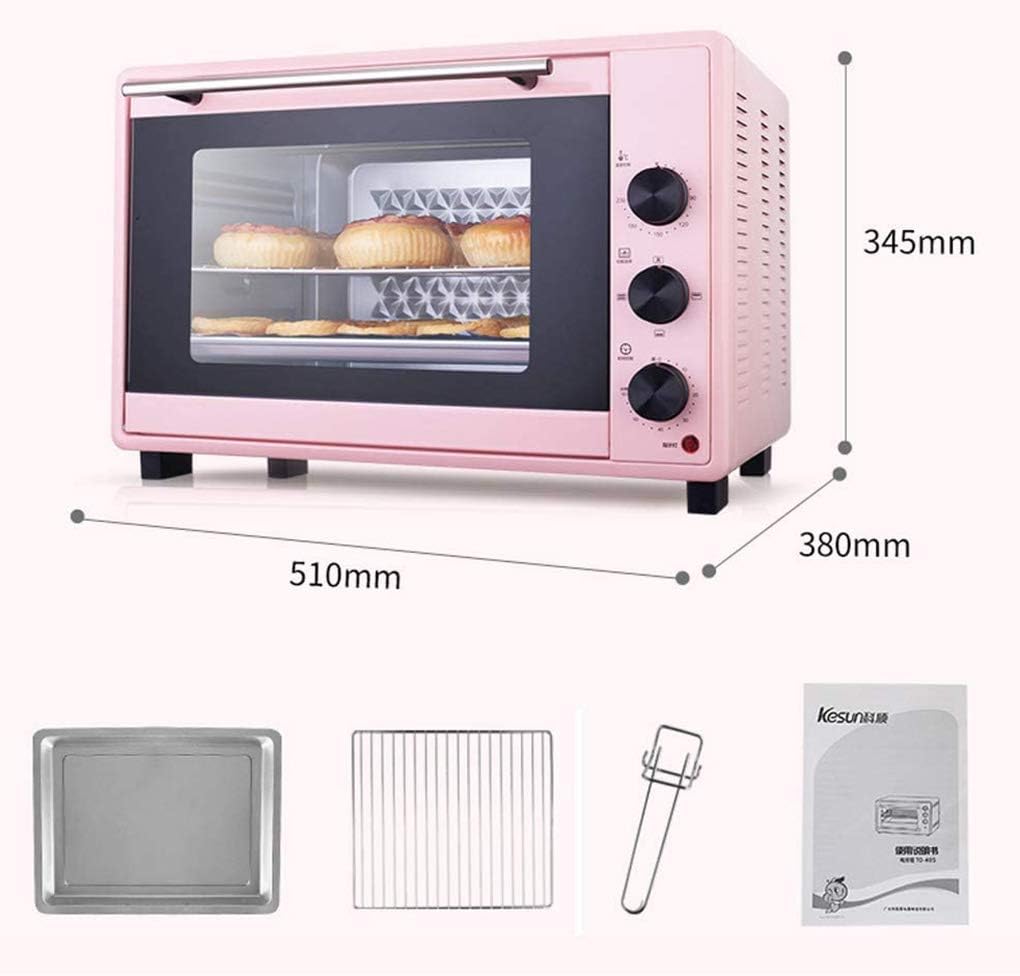
Figure 1: Oven Components and Dimensions. This image illustrates the external dimensions of the oven (510mm x 380mm x 345mm) and shows the included baking pan, baking net, and accessory handle.
Control Panel
The oven features three easy-to-understand knobs for operation:
- Temperature Control Knob: Adjusts the cooking temperature from 90°C to 230°C.
- Function Control Knob: Selects the heating mode (top heat, bottom heat, top and bottom heat, circulating air, or combination with rotisserie).
- Timer Control Knob: Sets the cooking time from 0 to 60 minutes. An audible alarm will sound when the set time expires.

Figure 2: Control Panel. This image shows the three control knobs on the side of the oven, demonstrating how a user would interact with them to set temperature, function, and time.
Setup
Unpacking
- Carefully remove the oven and all accessories from the packaging.
- Remove any protective films, stickers, or packing materials from the oven and its accessories.
- Inspect the oven for any signs of damage. If damaged, do not operate and contact customer support.
Placement
- Place the oven on a stable, flat, heat-resistant surface.
- Ensure there is adequate space (at least 10-15 cm) around all sides of the oven for proper ventilation. Do not place it directly against a wall or under cabinets that could be damaged by heat.
- Keep the oven away from flammable materials such as curtains, tablecloths, or paper.
Initial Cleaning and First Use
- Before first use, wipe the interior and exterior of the oven with a damp cloth and mild detergent. Wash the baking pan, baking net, and handle in warm, soapy water. Dry thoroughly.
- Plug the oven into a suitable electrical outlet (AC 220-240V, 50/60 Hz). Note: This device comes with a licensed EU to UK converter plug attached for your convenience.
- For the first use, it is recommended to run the oven empty for about 15 minutes at the maximum temperature (230°C) to burn off any manufacturing residues. A slight odor or smoke may be present; this is normal and will dissipate. Ensure the area is well-ventilated during this process.
Operating Instructions
Preheating the Oven
For best cooking results, it is often recommended to preheat the oven before placing food inside.
- Place the baking net or pan at the desired baking position (the oven supports five-layer baking positions).
- Turn the Temperature Control Knob to the desired cooking temperature (e.g., 180°C).
- Turn the Function Control Knob to the desired heating mode (e.g., top and bottom heat).
- Turn the Timer Control Knob to a preheating time (e.g., 10-15 minutes). The power indicator light will illuminate.
- Once the preheating time has elapsed, the oven is ready for use.
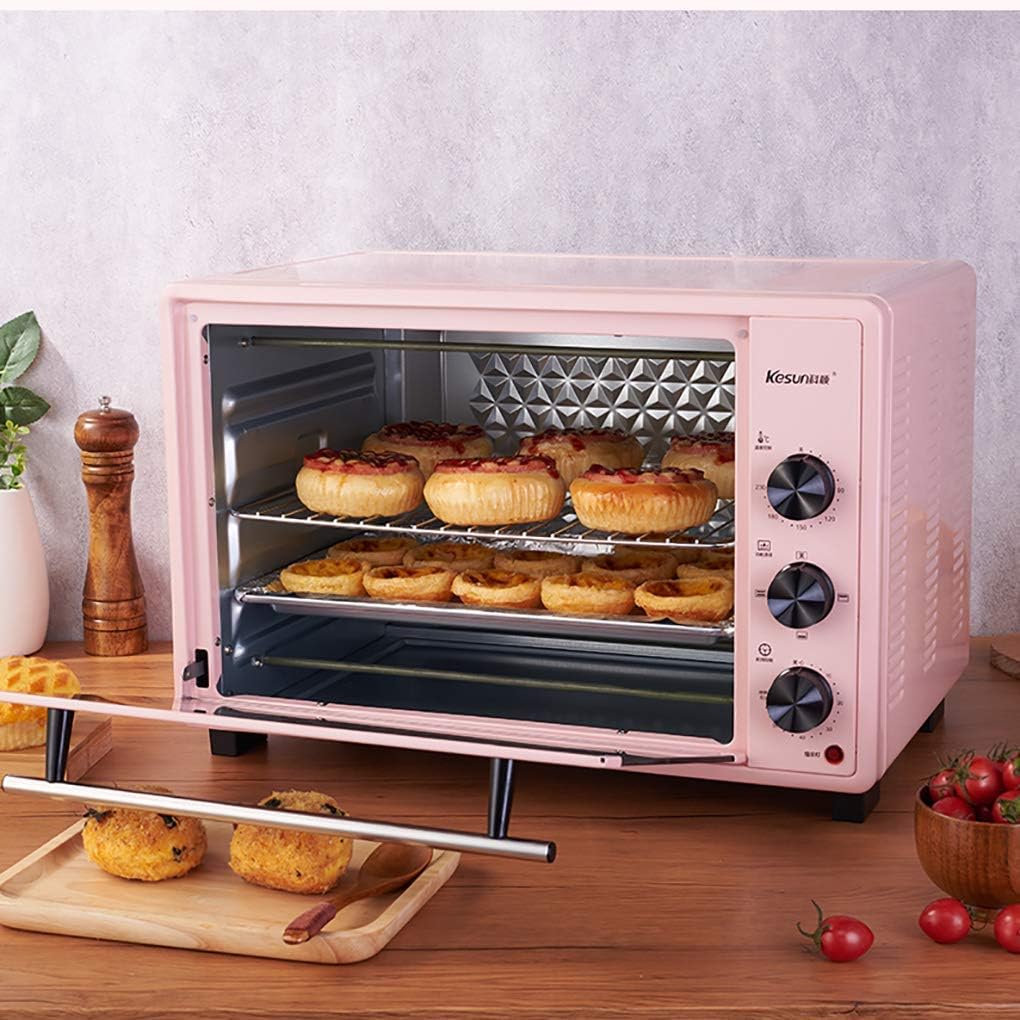
Figure 3: Five-Layer Baking Positions. This image demonstrates the spacious interior of the 40L oven, highlighting its capacity and the flexibility of placing baking trays at different heights.
Cooking Modes and Functions
The oven offers various cooking functions to suit different recipes:
- Top Heat: Ideal for browning the top of dishes.
- Bottom Heat: Suitable for baking items that require more heat from the bottom, like pies or pizzas.
- Top and Bottom Heat: Standard baking mode for most dishes, providing even heat distribution.
- Circulating Air (Convection): Uses a fan to distribute heat evenly throughout the oven, reducing cooking time and ensuring consistent results.
- Rotisserie (Grill Skewer): When activated, the rotisserie skewer rotates, allowing for even roasting of items like chicken, gyro skewers, or roasts, resulting in a juicy interior and crispy exterior.

Figure 4: Heat Distribution and Cooking Versatility. This image demonstrates the internal heat circulation for even cooking and showcases examples of dishes that can be prepared, such as waffles, steak, roasted chicken, Swiss rolls, and cookies.
Setting the Timer
The 0-60 minute timer allows for precise cooking control. Once the set time has elapsed, an audible beep will sound, and the oven will turn off the heating elements.
- After setting the temperature and function, turn the Timer Control Knob clockwise to the desired cooking duration.
- The oven will begin heating, and the power indicator light will be on.
- When the timer reaches "0", the oven will automatically turn off, and the alarm will sound.
- To stop cooking before the timer expires, turn the Timer Control Knob counter-clockwise to the "OFF" position.

Figure 5: Roasting Example. This image shows the oven in operation, demonstrating its capability to roast a whole chicken, highlighting the internal illumination and the cooking process.
Cleaning and Maintenance
Regular cleaning and proper maintenance will ensure the longevity and optimal performance of your oven.
- Always unplug the oven from the power outlet and allow it to cool completely before cleaning.
- Interior Cleaning: Wipe the interior surfaces with a damp cloth and mild detergent. For stubborn stains, a non-abrasive cleaner designed for ovens can be used. The oven features a drilling surface reflective cavity and rhomboid liner for improved heat reflection and easier cleaning.
- Exterior Cleaning: Wipe the exterior with a soft, damp cloth. Do not use abrasive cleaners or scouring pads, as they may scratch the surface.
- Accessories: The baking pan, baking net, and handle can be washed in warm, soapy water. Rinse thoroughly and dry completely before storing or re-using.
- Ventilation: Ensure the multidimensional cooling holes and ventilation slots are not blocked by debris or dust. Clean them periodically if necessary.
- Do not immerse the oven unit in water or any other liquid.
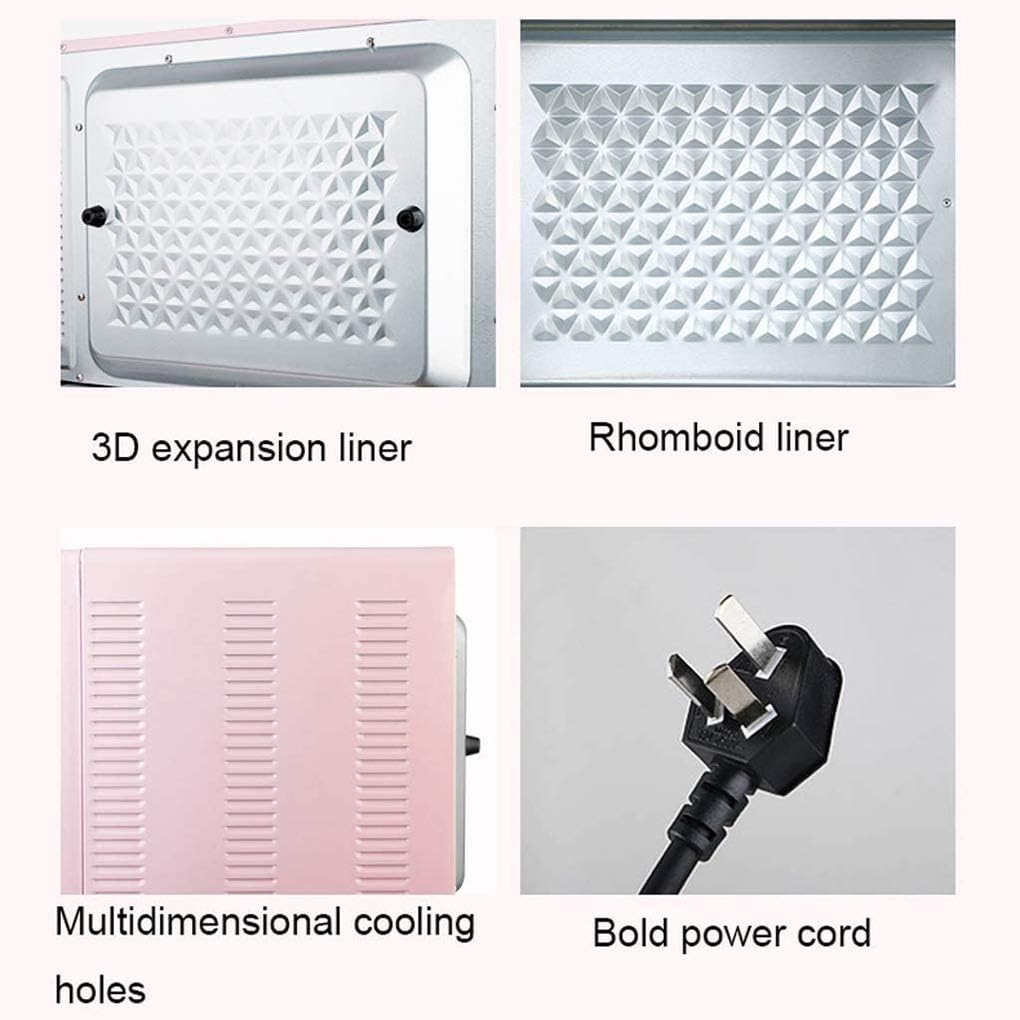
Figure 6: Internal Features and Design. This image highlights the oven's interior design elements like the 3D expansion liner and rhomboid liner, which contribute to efficient cooking and ease of cleaning. It also shows the multidimensional cooling holes and the robust power cord.
Troubleshooting
If you encounter any issues with your oven, please refer to the following common problems and solutions:
| Problem | Possible Cause | Solution |
|---|---|---|
| Oven does not turn on. | Not plugged in; power outlet malfunction; timer not set. | Ensure the power cord is securely plugged into a working outlet. Check the household fuse/circuit breaker. Turn the Timer Control Knob to a desired time. |
| Oven not heating properly. | Temperature or function knob not set correctly; door not closed properly. | Verify that the Temperature and Function Control Knobs are set to the desired settings. Ensure the oven door is fully closed. |
| Excessive smoke during first use. | Manufacturing residues burning off. | This is normal for the first use. Ensure good ventilation. If smoke persists after initial burn-off, contact support. |
| Timer alarm does not sound. | Timer knob not set correctly. | Ensure the timer knob was turned past the "OFF" position to set a time. |
If the problem persists after trying these solutions, please contact customer support.
Specifications
| Feature | Specification |
|---|---|
| Model | 40L Multi-Function Electric Oven |
| Brand | fgfgkijbhgmsedfod |
| Capacity | 40 Litres |
| Rated Power | 1600W |
| Temperature Range | 90°C - 230°C |
| Timer | 0-60 minutes with alarm |
| Function Controller | Top heat, bottom heat, top and bottom heat, circulating air |
| Baking Positions | Five-layer |
| Power Supply | AC 220-240V, 50/60 Hz |
| External Dimensions (L x W x H) | 510mm × 380mm × 345mm |
| Baking Pan Size | 375mm × 280mm |
| Baking Net Size | 375mm × 280mm |
Warranty and Support
For any questions, concerns, or technical assistance regarding your fgfgkijbhgmsedfod 40L Multi-Function Electric Oven, please contact our customer support team. We are committed to answering your questions within 12 hours.
Please refer to your purchase documentation for specific warranty terms and conditions.


