1. Introduction and Overview
The HC-900 Pro US Infrared Outdoor Camera is a high-performance 4G cellular trail camera designed for wildlife monitoring, hunting, and surveillance. It captures stunning 4K video at 30 frames per second and high-resolution 30-megapixel still images. Equipped with advanced infrared technology, it provides clear night vision without disturbing wildlife. Its 4G cellular connectivity allows for live video streaming and remote access via a dedicated mobile application, ensuring you stay connected to your monitoring area from anywhere.

Figure 1.1: The HC-900 Pro US Infrared Outdoor Camera, showcasing its compact design and external antenna.
2. Product Features
- High Resolution Imaging: Captures 4K (3840x2160) video at 30FPS and still images up to 30 Megapixels (also supports 16MP, 12MP).
- 4G Cellular Connectivity: Enables real-time live video streaming and remote photo/video retrieval via mobile network.
- Mobile APP Control: Manage camera settings, view live feed, and access captured media directly from your smartphone.
- Advanced Night Vision: Integrated infrared LEDs provide clear black-and-white images and videos in low-light conditions without a visible flash.
- PIR Motion Detection: Passive Infrared sensor with a 120-degree detection angle triggers recording upon detecting movement.
- Durable and Weatherproof: Rated IP65/IP66 for protection against dust and water ingress, suitable for outdoor use in various weather conditions.
- Long Battery Life: Optimized power consumption for extended field deployment.

Figure 2.1: Visual representation of key camera features, including 4G connectivity, 120° PIR detection, mobile app support, IP65 waterproofing, and adjustable photo resolutions.

Figure 2.2: Demonstrates the camera's capability to capture high-quality 4K video and 30MP photos, with examples of wildlife.
3. Package Contents
Please check the package carefully to ensure all items are present and undamaged.
- HC-900 Pro US Camera Unit
- 4G Antenna
- Mounting Strap
- USB Cable
- USB Card Reader
- User Manual
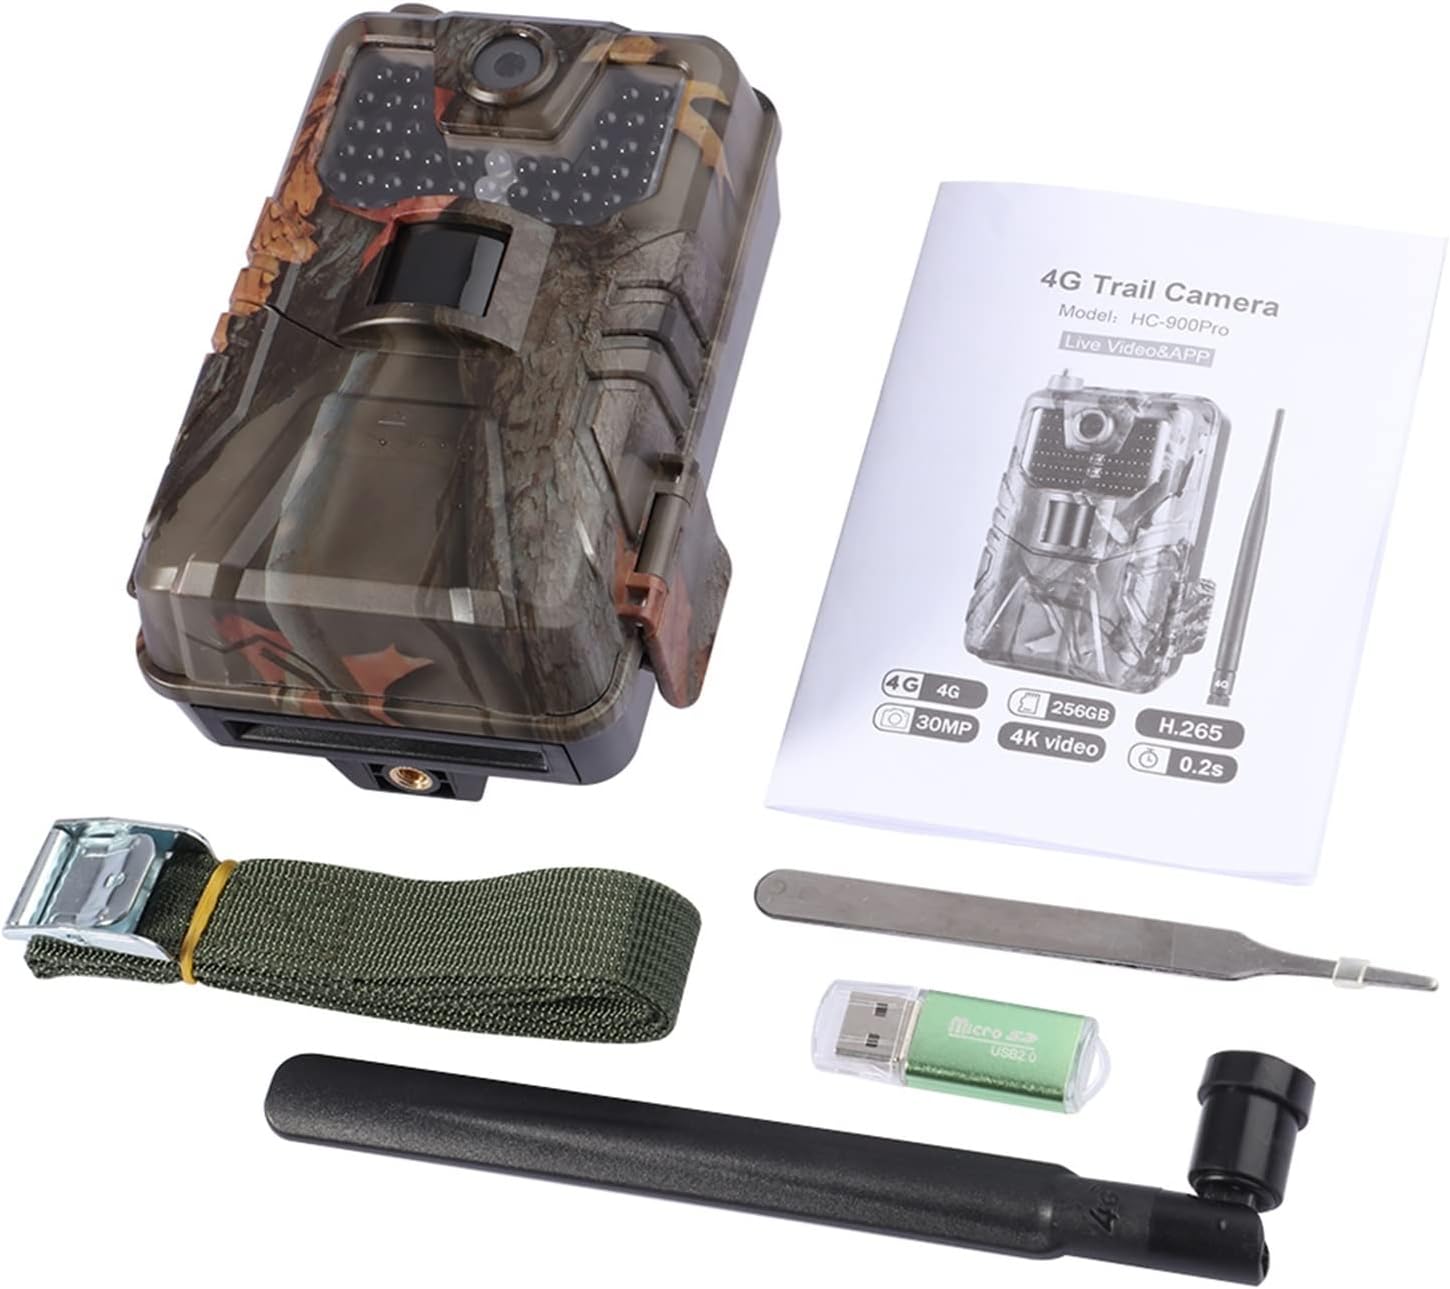
Figure 3.1: Contents of the HC-900 Pro US package, including the camera, antenna, mounting strap, USB cable, USB card reader, and user manual.
4. Product Diagram and Components
Familiarize yourself with the various parts of your HC-900 Pro US camera.

Figure 4.1: Detailed diagram illustrating the main components and ports of the HC-900 Pro US camera, including the lens, control buttons, and card/SIM slots.
- 4K HD Camera: Main lens for capturing images and videos.
- Menu Button: Accesses camera settings.
- Shutter Button: Manually captures photos or videos in TEST mode.
- Battery and Eject Button: Releases the battery tray.
- Micro Jack: For external power or data connection.
- Memory Card Slot: Insert Micro SD card for storage.
- SIM Card Slot: Insert 4G SIM card for cellular connectivity.
- OFF TEST ON Switch: Power control and mode selection.
5. Setup
5.1. Battery Installation
- Press the battery eject button to open the battery compartment.
- Insert the required number of AA batteries (not included) into the tray, ensuring correct polarity (+/-).
- Slide the battery tray back into the camera until it clicks securely.
5.2. SIM Card Installation
- Locate the SIM card slot inside the camera.
- Insert a activated 4G cellular SIM card into the slot with the gold contacts facing down, ensuring it is fully seated.
5.3. Memory Card Installation
- Locate the Micro SD card slot.
- Insert a Micro SD card (up to 256GB, Class 10 or higher recommended) into the slot until it clicks.
- It is recommended to format the Micro SD card using the camera's menu before first use.
5.4. Antenna Attachment
- Screw the provided 4G antenna onto the antenna port at the top of the camera until it is finger-tight.
5.5. Initial Power On and App Setup
- Slide the power switch from OFF to TEST mode. The camera screen will light up.
- Download the official mobile application. You can scan the QR code provided in the manual or on the product packaging, or visit http://app.appurl.me/79814428341.
- Follow the in-app instructions to register an account and add your camera. This typically involves scanning a QR code on the camera or entering its serial number.
- Configure camera settings (e.g., photo/video resolution, PIR sensitivity, time-lapse) via the app or the camera's internal menu in TEST mode.
6. Operating Instructions
6.1. Camera Modes
- OFF: Camera is powered off.
- TEST: Used for setup, viewing images/videos, and testing motion detection. The screen is active.
- ON: Operational mode. The screen turns off after a few seconds, and the camera begins monitoring based on your settings.
6.2. Motion Detection and Recording
In ON mode, the camera's PIR sensor continuously monitors for movement. When motion is detected within the sensor's range, the camera will automatically capture photos or record videos according to your configured settings (e.g., photo burst, video length, delay).
6.3. Live Video and Remote Access
With a properly configured 4G SIM card and active data plan, you can access live video streaming from the camera via the mobile application. This allows you to view the camera's field of view in real-time. You can also remotely trigger photo/video capture and retrieve captured media.
6.4. Night Vision Operation
The camera automatically switches to night vision mode in low-light conditions. The infrared LEDs illuminate the area, allowing the camera to capture clear black-and-white images and videos without a visible flash, ensuring discreet operation.

Figure 6.1: Illustrates the camera's day and night vision capabilities as seen on a smartphone screen, demonstrating clear imaging in both lighting conditions.
7. Maintenance
- Cleaning: Regularly clean the camera lens and PIR sensor window with a soft, lint-free cloth. Avoid abrasive materials or harsh chemicals.
- Battery Check: Monitor battery levels via the app or camera screen. Replace batteries when low to ensure continuous operation.
- Memory Card Management: Periodically format the Micro SD card to maintain optimal performance and prevent data corruption. Back up important files before formatting.
- Waterproof Seals: Ensure the rubber seals around the battery compartment and ports are clean and properly seated to maintain the camera's IP65/IP66 waterproof rating.
- Firmware Updates: Check the manufacturer's website or app for any available firmware updates to improve performance or add new features.
8. Troubleshooting
8.1. Camera Not Powering On
- Check if batteries are inserted correctly with proper polarity.
- Ensure batteries have sufficient charge. Try new batteries.
- Verify the power switch is set to TEST or ON.
8.2. No Images/Videos Captured
- Ensure the camera is in ON mode.
- Check if the Micro SD card is inserted correctly and has sufficient free space.
- Format the Micro SD card.
- Adjust PIR sensitivity settings; it might be too low for the environment.
- Ensure there is actual motion within the detection range.
8.3. Poor Image/Video Quality
- Clean the camera lens.
- Check resolution settings in the camera menu or app.
- Ensure the camera is mounted securely to prevent shaking.
8.4. Cellular Connectivity Issues
- Verify the SIM card is active and has a data plan.
- Check cellular signal strength in the camera's location. Move the camera to an area with better reception if needed.
- Ensure the antenna is securely attached.
- Confirm APN settings are correct for your cellular provider (usually configured automatically, but can be manually set in advanced settings).
9. Specifications
| Feature | Specification |
|---|---|
| Video Capture Resolution | 4K (3840x2160) |
| Frame Rate | 30 fps |
| Effective Still Resolution | 30 MP, 16 MP, 12 MP |
| Wireless Communication Technology | Wi-Fi, 4G Cellular |
| Connectivity Protocol | Wi-Fi |
| Focus Type | Manual Focus |
| Zoom Type | Optical Zoom |
| Alert Type | Motion Only |
| Video Capture Format | MPEG-4 |
| International Protection Rating | IP65, IP66 |
| Special Features | Night Vision, Image Sensor, Noise Reduction, Brightness Control, Time-Lapse |
| Compatible Devices | Smartphone |
| Mounting Type | Wall Mount |

Figure 9.1: Physical dimensions of the HC-900 Pro US camera.
10. Warranty and Support
This product comes with a standard manufacturer's warranty. For specific warranty terms, technical support, or service inquiries, please refer to the contact information provided on the product packaging or the manufacturer's official website. Please retain your proof of purchase for warranty claims.


