Introduction
Welcome to your new Povanje Biometric Fireproof Safe. This manual provides detailed instructions for the safe's setup, operation, and maintenance to ensure optimal security and longevity for your valuable documents, jewelry, money, and other important items. Please read this manual thoroughly before using your safe.
Important Safety Information
- Always keep emergency keys in a secure location, separate from the safe itself, and ensure only trusted individuals have access.
- Do not store the external Type-C emergency power box inside the safe.
- Ensure the safe is securely mounted to a wall or floor using the provided hardware to prevent unauthorized removal or theft.
- Keep the safe away from children and unauthorized individuals to prevent accidental access or injury.
- This safe is designed to be fireproof, but it is not water-resistant. For additional protection of sensitive documents against water damage, utilize the included fireproof and waterproof A4 document bag.
Package Contents
Please verify that all items listed below are included in your package:
- 1 x Extra large Biometric Fireproof Home Safe
- 1 x User Manual
- 4 x Mounting Screws (Expansion Bolts)
- 1 x Fireproof Waterproof Document A4 Bag
- 2 x Emergency Keys
- 1 x External Type-C Emergency Power Box
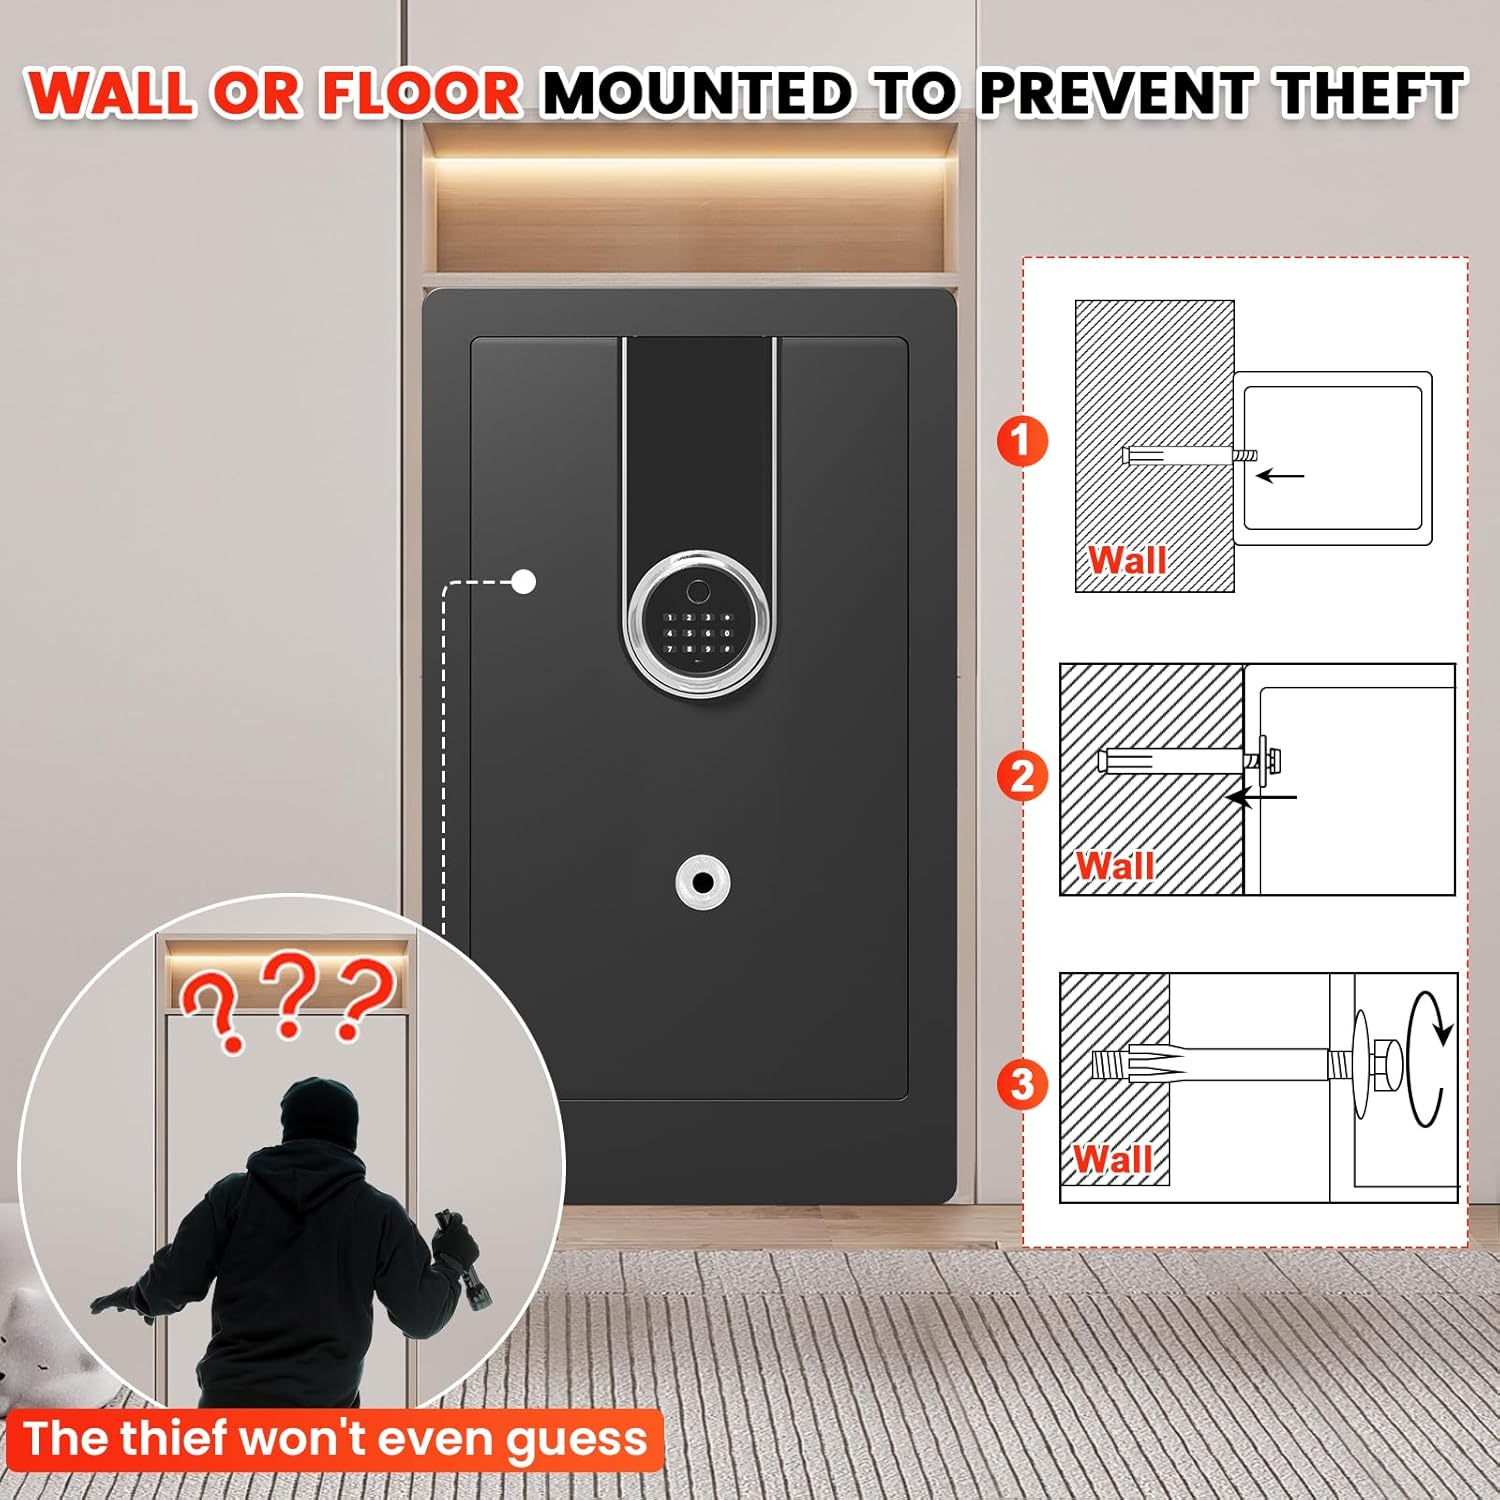
Figure 1: Included Accessories for the Povanje Safe. This image displays all components that should be present in your package, including the user manual, mounting hardware, fireproof document bag, emergency keys, and the external emergency power box.
Product Specifications
| Brand | Povanje |
| Product Dimensions (D x W x H) | 15.7"D x 14.6"W x 27.6"H |
| Lock Type | Biometric, Electronic Combination Lock, Key |
| Color | Black |
| Capacity | 6.5 Cubic Feet |
| Material | Low Carbon Steel |
| Special Features | Biometric Fingerprint, Sensor Light, Anti-Theft, Removable Shelf, Fire Resistant |
| Mounting Type | Wall and Floor Mount |
| Control Type | Biometric |
| Item Weight | 54 Pounds |
| Alarm | Vibration and Audible |
| Water Resistance Level | Not Water Resistant |
| Chamber Depth | 14.37 Inches |
| Chamber Height | 27.16 Inches |
| Chamber Width | 16.14 Inches |
| Item Model Number | home safes water and fireproof 70ZQ |
| Batteries Required? | Yes (Batteries not included) |

Figure 2: Exterior Dimensions of the Safe. This image illustrates the overall size of the safe, emphasizing its spacious design.

Figure 3: Interior Configuration with Removable Shelves. This image demonstrates the versatile interior space, showing how the two removable shelves can be used to organize different types of valuables.

Figure 4: Enhanced Thick Gauge Metal Construction. This image highlights the robust construction of the safe, featuring anti-drilling and anti-prying capabilities, along with strong solid lock bolts for enhanced security.
Setup and Installation
1. Unpacking
Carefully remove the safe from its packaging. Inspect the safe for any signs of damage during transit. Retain the packaging materials for future transport or if a return is necessary.
2. Battery Installation
Locate the battery compartment, typically found on the inside of the safe door. Insert the required batteries (e.g., 4 AA batteries, not included) ensuring correct polarity. The safe will not operate without power.
3. Initial Access (Using Emergency Key)
For the first time opening the safe, or if you forget your code/fingerprint, use one of the provided emergency keys. The keyhole is usually concealed. Insert the key and turn it to open the safe door.
4. Mounting the Safe
To maximize security and prevent theft, it is highly recommended to securely mount the safe to a wall or floor using the included mounting hardware.
- Choose a Location: Select a discreet and secure location for your safe, preferably near a structural stud or solid floor.
- Mark Drilling Points: With the safe in its desired position, use the pre-drilled holes on the back or bottom of the safe as a template to mark the drilling points on the wall or floor.
- Drill Pilot Holes: Drill pilot holes at the marked locations using an appropriate drill bit size for the expansion bolts.
- Secure the Safe: Align the safe with the drilled holes. Insert the mounting screws (expansion bolts) through the safe's holes and into the wall/floor. Tighten them securely to firmly anchor the safe.

Figure 5: Wall or Floor Mounting for Anti-Theft. This image demonstrates the process of securing the safe to a wall or floor using the provided expansion bolts, significantly reducing the risk of theft.
Operating Your Safe
Unlocking Methods
Your Povanje safe offers four convenient ways to access your valuables:
1. Biometric Fingerprint Unlock
The safe supports quick access (0.1S) using registered fingerprints. Up to 29 different fingerprints can be stored.
- Place your registered finger firmly on the fingerprint sensor.
- The safe will unlock if the fingerprint is recognized.
2. Digital Keypad Unlock
Use your personal code to unlock the safe.
- Enter your 3-8 digit personal code on the keypad.
- Press the "#" key to confirm.
3. Emergency Key Unlock
In situations where batteries are depleted or you have forgotten your code/fingerprint, the emergency keys provide direct access.
- Locate the hidden keyhole on the safe.
- Insert and turn the emergency key to open the safe door.
4. External Emergency Power Box
If the safe's internal batteries are completely dead and you do not have access to the emergency keys, you can use the external Type-C emergency power box.
- Connect the Type-C cable from the emergency power box to the emergency port on the safe's keypad.
- Once powered, you can use the keypad to enter your personal code and open the safe.

Figure 6: Effortless Access Methods. This image illustrates the four convenient ways to unlock your safe, providing multiple options for quick and reliable access.
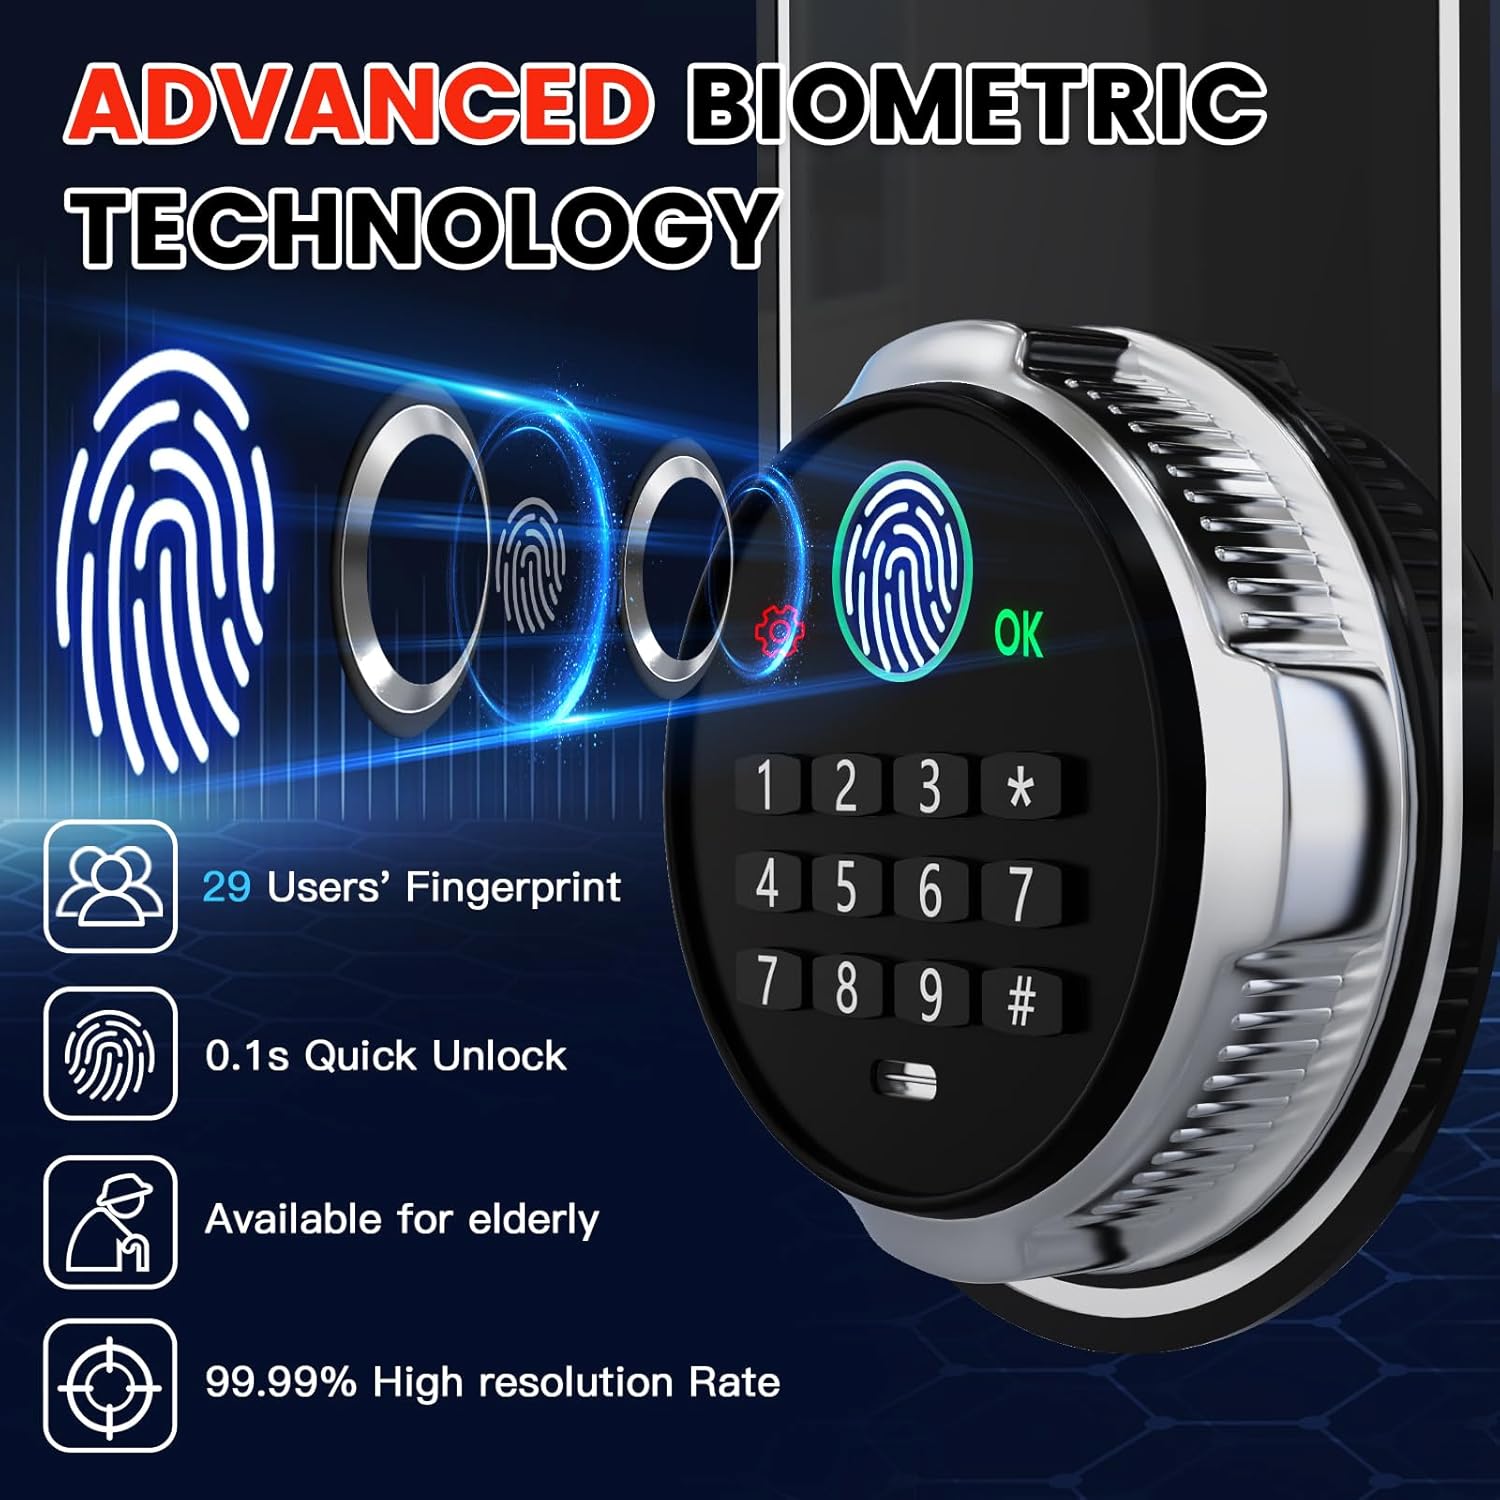
Figure 7: Advanced Biometric Technology. This image details the capabilities of the safe's biometric system, including its speed and accuracy.

Figure 8: Emergency USB-C Port. This image demonstrates the location and function of the emergency USB-C port, providing a crucial backup power option.
Setting Passwords and Fingerprints
The factory initial code for the safe is 1234#. It is highly recommended to change this immediately upon first use.
Setting Your Personal Password
- Press the red resetting button located behind the safe door (on the inside).
- Enter your desired 3-8 digit personal code on the keypad and press "#" to confirm.
- Re-enter the same personal code and press "#" again to confirm and save.
Adding Fingerprints
- Press the red resetting button located behind the safe door.
- Place your finger on the fingerprint sensor and lift it, repeating this action 3 times in a row.
- Once successfully registered, open the door using the newly added fingerprint to verify.

Figure 9: Setting Password & Fingerprint. This image provides a visual guide for programming your personal access code and registering fingerprints.
Anti-Theft Alert System
Your safe is equipped with a dual smart alert system designed to deter unauthorized access:
- Continuous Wrong Entry: If an incorrect password or fingerprint is entered 6 consecutive times, the alarm will activate.
- Violent Vibration: Any attempt at violent vibration or tampering with the safe will trigger the alarm.
When triggered, the alarm will sound to alert you of potential unauthorized activity.
Figure 10: Anti-Theft Dual Smart Alert. This image demonstrates the visual alert of the safe's alarm system when triggered by unauthorized attempts.
Mute Mode
To operate the safe silently, preventing disturbance to others, you can activate the mute mode.
- Press "3#" on the keypad to toggle between sound and mute modes.

Figure 11: Interior Features. This image highlights practical internal features such as handgun pockets, key hooks, and the protective velvet lining.
Interior Light & Power Display
- The safe features an interior LED light that illuminates when opened, providing clear visibility of contents.
- The keypad includes a power display to indicate the current battery level, allowing you to replace batteries before they fully deplete.
Video 1: Heavy Duty Large Biometric Document Safe Box Overview. This video provides a comprehensive visual overview of the safe's features, including its biometric access, robust construction, anti-theft alerts, and spacious interior.
Maintenance
Proper maintenance will ensure the long-term performance and security of your Povanje safe:
- Battery Replacement: Regularly check the battery level indicator on the keypad. Replace all batteries promptly when they are low to avoid being locked out.
- Fingerprint Sensor Cleaning: Keep the fingerprint sensor clean and dry. Use a soft, lint-free cloth to gently wipe away any dust or smudges for optimal recognition performance.
- Exterior Cleaning: Clean the safe's exterior with a soft, damp cloth. Avoid using abrasive cleaners, solvents, or harsh chemicals, as these can damage the finish.
- Door Seals: Periodically inspect the door seals for any debris or damage. Ensure they are clean and intact to maintain the safe's fire-resistant properties.
- Internal Organization: Utilize the removable shelves and internal pockets to keep your valuables organized and prevent items from obstructing the locking mechanism.
Troubleshooting
If you encounter any issues with your safe, please refer to the following table for common problems and their solutions:
| Problem | Possible Cause | Solution |
|---|---|---|
| Safe does not open with fingerprint. | Fingerprint not registered, sensor dirty, or incorrect finger placement. | Re-register fingerprint, clean the sensor with a soft cloth, or try another registered finger. Ensure your finger covers the sensor completely. |
| Safe does not open with personal code. | Incorrect code entered, batteries low/dead. | Re-enter the correct code carefully. Replace batteries or use the external Type-C emergency power box. |
| Alarm sounds unexpectedly. | Tampering attempt, or accidental strong vibration. | Check for signs of forced entry. If a false alarm, ensure the safe is stable and not subject to accidental impacts. |
| Keypad is unresponsive. | Batteries are completely dead. | Use the emergency keys to open the safe, or connect the external Type-C emergency power box to power the keypad. |
| Interior light not working. | Batteries low/dead, or LED issue. | Replace the batteries. If the issue persists after battery replacement, contact customer support. |
Warranty and Customer Support
Povanje is committed to providing high-quality products and excellent customer service. Your Povanje safe comes with the following:
- 5-Year Warranty: We offer a 5-year return or exchange warranty from the date of purchase.
- Lifetime Technical Support: Enjoy lifetime technical support for any operational or technical queries you may have.
- Free Parts Replacement: All parts can be replaced for free if needed.
- Fire Replacement Policy: In the unfortunate event of a fire, you can receive a free new safe box by providing your order number and pictures of the damaged safe.
For any questions, concerns, or technical assistance, please do not hesitate to contact us. We are here to help.

Figure 12: Povanje Customer Service Promise. This image outlines our commitment to customer satisfaction, including quick response times, flexible returns, and ongoing support.


