1. Introduction
The AYWHP Nano V3.0 Board is a compact, complete, and breadboard-friendly microcontroller board based on the ATmega328P. It is designed for ease of use in various electronic projects, offering a cost-effective solution compatible with the Arduino Nano ecosystem. This board features a CH340G USB-to-serial converter, a Mini USB port for connectivity, and a 16MHz clock speed.

Image 1: The AYWHP Nano V3.0 Board with included Mini USB cable.
2. Product Overview
The Nano V3.0 board is equipped with essential components for microcontroller development. Its small form factor makes it ideal for projects where space is a constraint.
Key Features:
- Microcontroller: ATmega328P
- USB-to-Serial Chip: CH340G
- Operating Voltage: 5V
- Input Voltage (Recommended): 7-12V
- Digital I/O Pins: 14 (6 provide PWM output)
- Analog Input Pins: 8
- Flash Memory: 32 KB (ATmega328P), 2 KB used by bootloader
- SRAM: 2 KB
- EEPROM: 1 KB
- Clock Speed: 16 MHz
- USB Connector: Mini USB
- Dimensions: Approximately 43 mm x 18 mm

Image 2: Detailed views of the Nano V3.0 board, highlighting the Mini USB port, ATmega328P chip, and other components.
3. Technical Specifications
| Specification | Value |
|---|---|
| Microcontroller | ATmega328P |
| USB to Serial Chip | CH340G |
| Operating Voltage | 5V |
| Input Voltage (Recommended) | 7-12V |
| Input Voltage (Limit) | 6-20V |
| Digital I/O Pins | 14 (6 PWM outputs) |
| Analog Input Pins | 8 |
| DC Current per I/O Pin | 40 mA |
| Flash Memory | 32 KB (ATmega328P), 2 KB used by bootloader |
| SRAM | 2 KB (ATmega328P) |
| EEPROM | 1 KB (ATmega328P) |
| Clock Speed | 16 MHz |
| USB Connector | Mini USB |
| Dimensions | 43 mm x 18 mm (1.69 x 0.71 inches) |
| Weight | Approximately 7g (0.25 oz) |

Image 3: Physical dimensions of the Nano V3.0 board and its accompanying Mini USB cable.
4. Pinout Information
Understanding the pinout is crucial for connecting sensors, actuators, and other components to your Nano V3.0 board. The board provides digital I/O pins, analog input pins, power pins, and communication pins.
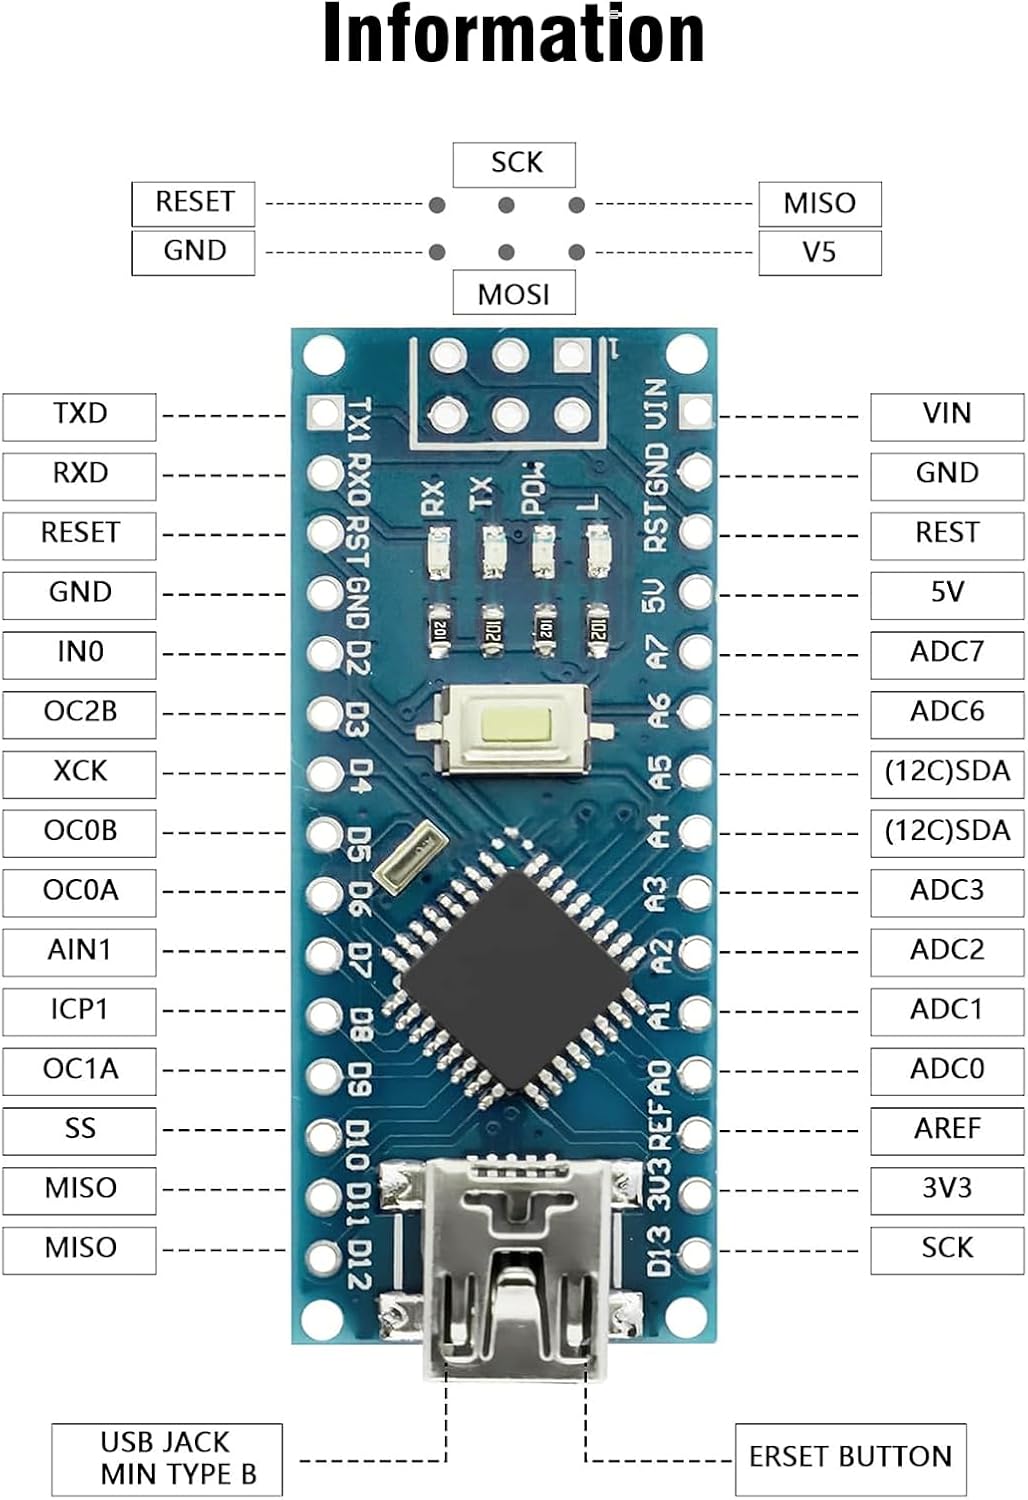
Image 4: A clear diagram illustrating the pin assignments and functions on the Nano V3.0 board.

Image 5: Color-coded pinout diagram providing a legend for different pin types (Power, GND, Digital, Analog, Communication, etc.).
5. Getting Started: Setup
5.1. Driver Installation (CH340G)
The AYWHP Nano V3.0 uses the CH340G chip for USB communication. On most modern operating systems (Windows 10/11, macOS, Linux), the driver may install automatically. If not, you may need to manually install the CH340G driver. Search online for "CH340G driver" and download from a reputable source.
5.2. Connecting the Board
- Connect one end of the provided Mini USB cable to the Mini USB port on the Nano V3.0 board.
- Connect the other end of the Mini USB cable to an available USB port on your computer.
- The power LED on the board should illuminate, indicating it is receiving power.

Image 6: The Nano V3.0 board connected to a computer using the Mini USB cable.
5.3. Arduino IDE Configuration
- Download and install the latest Arduino IDE from the official Arduino website (www.arduino.cc/en/software).
- Open the Arduino IDE.
- Go to Tools > Board and select "Arduino Nano".
- Go to Tools > Processor and select "ATmega328P (Old Bootloader)". If you experience issues, try "ATmega328P".
- Go to Tools > Port and select the COM port associated with your Nano V3.0 board (it might appear as "USB-SERIAL CH340" or similar).
6. Basic Operation
6.1. Uploading a Sketch
A "sketch" is the program you write for the Arduino board. Here's how to upload a basic blink sketch:
- Open the Arduino IDE.
- Go to File > Examples > 01.Basics > Blink. This will open a new window with the Blink sketch.
- Ensure your board and port are correctly selected under Tools.
- Click the "Upload" button (right arrow icon) in the Arduino IDE.
- The RX/TX LEDs on the Nano board will blink during upload. Once complete, the onboard LED (usually connected to pin D13) should start blinking.
6.2. Powering the Board
The Nano V3.0 board can be powered in several ways:
- Mini USB Connection: Provides 5V power directly from your computer or a USB power adapter.
- Unregulated External Power Supply (VIN pin): Connect 6-12V DC to the VIN pin. The onboard voltage regulator will convert it to 5V.
- Regulated External Power Supply (5V pin): Connect a regulated 5V DC supply to the 5V pin.
The board automatically detects and switches to the power source with the higher potential.
7. Example Applications
The AYWHP Nano V3.0 board is versatile and suitable for a wide range of projects, including:
- Robotics and automation
- Home automation systems
- Sensor data logging
- Wearable electronics
- Educational projects
- Prototyping embedded systems
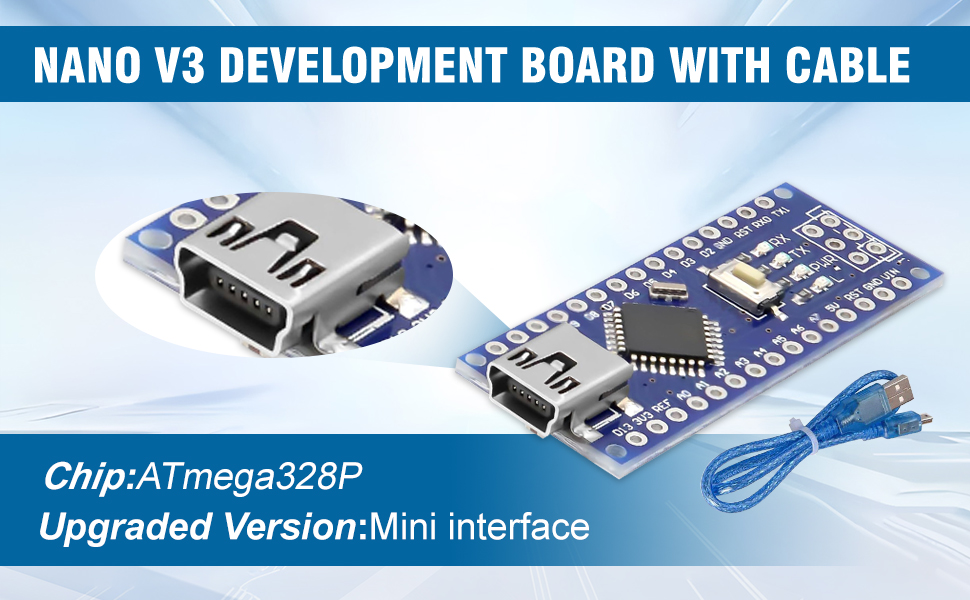
Image 7: Examples of the Nano V3.0 board being used in different electronic projects, such as controlling displays and sensors.
8. Troubleshooting
- Board not recognized / Driver issues:
Ensure the CH340G driver is correctly installed. Check Device Manager (Windows) or `ls /dev/tty*` (Linux/macOS) for the serial port. Try a different USB cable or port.
- Upload errors:
Verify that the correct board ("Arduino Nano") and processor ("ATmega328P (Old Bootloader)") are selected in the Arduino IDE. Confirm the correct COM port is selected. Ensure no other software is using the serial port.
- Power LED not on:
Check USB cable connection. Try a different USB port or power source. Inspect the board for any visible damage.
- Sketch uploads but doesn't run:
Double-check your code for logical errors. Ensure external components are wired correctly. Verify power supply to external components.
9. Care and Maintenance
- Handle with Care: Avoid dropping the board or applying excessive force to components.
- Static Discharge: Always handle the board in a static-safe environment to prevent damage to sensitive electronic components.
- Storage: Store the board in an anti-static bag when not in use, away from dust and moisture.
- Cleaning: If necessary, gently clean the board with a soft, dry brush or compressed air. Avoid liquids.
- Power Supply: Always ensure your power supply voltage is within the recommended limits (7-12V for VIN, 5V for 5V pin).
10. Warranty and Support
For specific warranty information and technical support, please refer to the product packaging or contact AYWHP customer service directly. Keep your purchase receipt for warranty claims.


