Geevon B0DFGT9GX6
Geevon Weather Station User Manual
Model: B0DFGT9GX6
Product Overview
The Geevon Wireless Indoor Outdoor Weather Station with Atomic Clock is designed to provide comprehensive environmental data for your home. It features a large color VA display for clear readability of time, date, indoor/outdoor temperature and humidity, barometric pressure, moon phases, and a 12-hour weather forecast. This device also includes an atomic alarm clock with snooze and a USB charging port.

Image: The Geevon Weather Station main display unit and its accompanying wireless outdoor sensor.
Key features include:
- Large 7.8-inch Color VA Display for clear visibility.
- Atomic Clock (WWVB) for precise time and date synchronization with Daylight Saving Time (DST) support.
- Indoor and Outdoor Temperature and Humidity Monitoring with Max/Min records and trend arrows.
- Air Comfort Level Indicator.
- 12-hour Weather Forecast.
- Barometric Pressure display.
- Moon Phases.
- Customizable Temperature Alerts.
- Digital Alarm Clock with Snooze Function.
- Extra USB Charging Port for mobile devices.
- Supports up to 3 remote sensors (one TX19 sensor included).
- 5-Level Adjustable Backlight.
- Two power modes: AC adapter for continuous backlight, or 3 AAA batteries for temporary backlight.
- Versatile placement: Desk clock with built-in stand or wall-mountable.

Image: An illustrative diagram highlighting the key functions of the weather station, such as temperature, humidity, barometric pressure, alarm, and moon phase display.
Package Contents
Please check the package contents upon unboxing:
- 1 x Geevon Digital Weather Station Atomic Clock (Main Unit)
- 1 x TX19 Wireless Outdoor Sensor
- 1 x AC Power Adaptor
- 1 x User Instructions Manual (this document)
Setup
1. Powering the Main Unit
The main unit can be powered by the included AC power adaptor or by 3 AAA batteries (not included). For continuous backlight, the AC adaptor is required.
- AC Power: Insert the AC power adaptor into the DC IN port on the back of the main unit, then plug it into a standard wall outlet.
- Battery Power: Open the battery compartment on the back of the main unit and insert 3 new AAA batteries, observing the correct polarity (+/-). When powered by batteries only, the backlight will illuminate for 10 seconds after a button press to conserve power.

Image: Illustration of the two power options: using the AC adapter for constant backlight or AAA batteries for temporary backlight.
2. Installing the Wireless Outdoor Sensor (TX19)
The TX19 sensor requires 2 AA batteries (not included). Ensure the batteries are inserted with correct polarity.
- Open the battery compartment on the back of the TX19 sensor.
- Insert 2 new AA batteries, ensuring correct polarity.
- Close the battery compartment securely.
- Place the sensor outdoors in a shaded area, away from direct sunlight and rain, to ensure accurate readings. The sensor is IP44 waterproof, but direct exposure to harsh elements can affect accuracy and longevity.
- The sensor should be within 200 feet (60 meters) of the main unit in an open area for optimal transmission.

Image: Depiction of the outdoor sensor's placement and its wireless transmission range to the main unit.
3. Initial Synchronization and Atomic Clock Setup
Once both units are powered, the main unit will automatically attempt to connect with the outdoor sensor and receive the WWVB atomic clock signal.
- The outdoor temperature and humidity should appear on the main unit's display within a few minutes. If not, press the "CHANNEL" button on the main unit to re-establish connection.
- The atomic clock will automatically attempt to synchronize. Ensure you set the correct time zone. The clock supports 7 time zones: AST(-4), EST(-5), CST(-6), MST(-7), PST(-8), AKST(-9), HST(-10).
- Leave the clock plugged in overnight after setting the time zone; it will automatically sync to the correct time during the night.
- Note: The backlight will temporarily turn off when the clock receives the RCC (Radio Controlled Clock) signal.
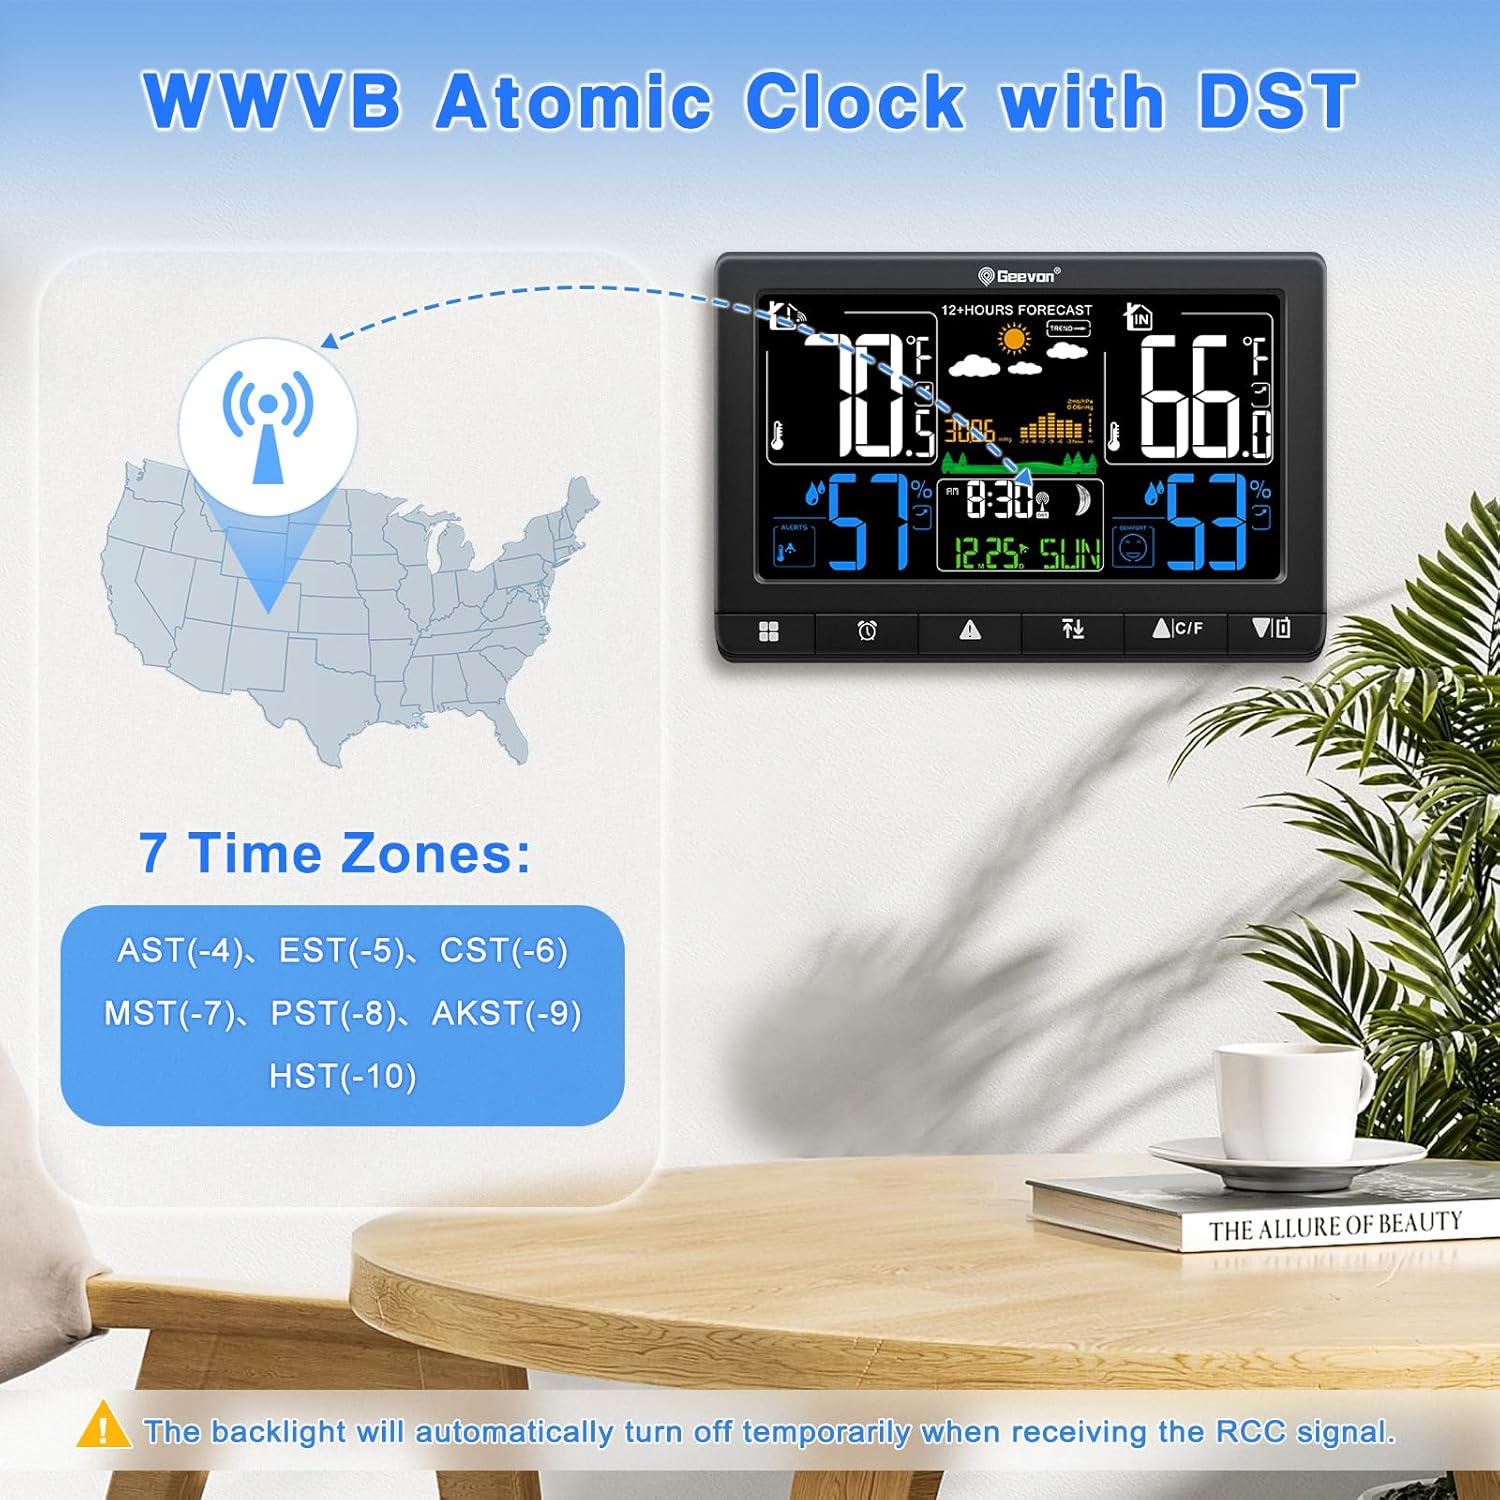
Image: Visual representation of the WWVB atomic clock signal reception and the available time zones for setup.
4. Placement Options
The main unit can be placed on a desk using its built-in stand or mounted on a wall using the hanging hole.

Image: Examples of how the weather station can be positioned, either on a flat surface or hung on a wall.
Operating Instructions
Display Overview
The large VA display shows various information simultaneously:
- Top Left: Indoor Temperature and Humidity with trend arrows and Max/Min records.
- Top Center: 12-Hour Weather Forecast icons (sunny, cloudy, rainy, etc.) and barometric pressure trend.
- Top Right: Outdoor Temperature and Humidity with trend arrows and Max/Min records.
- Bottom Center: Atomic Clock time, date, day of week, and moon phase.
- Bottom Left/Right: Comfort Indicator and customizable alerts.
Image: A close-up of the weather station's display, illustrating the various data points presented.
Adjusting Backlight Brightness
When powered by the AC adaptor, the display backlight has 5 adjustable levels (100%, 80%, 50%, 20%, 0%). Press the "LIGHT" button to cycle through brightness levels.

Image: Visual demonstration of the five adjustable backlight brightness settings.
Alarm Clock and Snooze Function
The weather station includes a digital alarm clock with a 5-minute snooze function.
- Setting Alarm: Refer to the detailed instructions in the included paper manual for specific button presses to set the alarm time.
- Snooze: When the alarm sounds, press the "SNZ/LIGHT" button to activate the 5-minute snooze.
- Stop Alarm: Press any other button (except "SNZ/LIGHT") to stop the alarm.

Image: Illustration of using the snooze function and stopping the alarm.
USB Charging Port
An extra USB charging port (Output Voltage: 5V/1A) is located on the side of the main unit. This port can be used to charge your mobile phone, tablet, or other electronic devices.

Image: The weather station's USB port in use, charging a smartphone.
Multi-Sensor Support
The main unit can connect with up to 3 remote sensors. This allows you to monitor temperature and humidity in different locations, such as a garden, greenhouse, or garage. Only one sensor is included in the package. Additional sensors can be purchased separately (ASINs: B0BMTNC9DR, B0C3VSXW7F, B0963DKBQP).
Image: The outdoor sensor transmitting data to the main unit, illustrating the multi-sensor capability.
Maintenance
- Battery Replacement: Replace batteries in both the main unit and the outdoor sensor when the low battery indicator appears on the display. Always use new batteries of the specified type (AAA for main unit, AA for sensor).
- Sensor Placement: Periodically check the outdoor sensor's placement to ensure it remains in a shaded area, protected from direct sunlight and heavy rain, to maintain accuracy and prolong its lifespan.
- Cleaning: Wipe the main unit and sensor with a soft, dry cloth. Do not use abrasive cleaners or immerse the units in water.
Troubleshooting
| Problem | Possible Cause | Solution |
|---|---|---|
| No outdoor temperature/humidity reading. | Sensor out of range, low sensor battery, interference, or sensor not linked. |
|
| Atomic clock not syncing. | Weak WWVB signal, incorrect time zone, or temporary interference. |
|
| Backlight not staying on. | Unit is running on battery power only. |
|
| Inaccurate outdoor temperature/humidity. | Sensor exposed to direct sunlight, rain, or heat sources. |
|
Specifications
| Feature | Detail |
|---|---|
| Brand | Geevon |
| Model | B0DFGT9GX6 |
| Display Type | Color VA Display |
| Indoor Temperature Range | 14°F ~ 122°F (-10°C ~ 50°C) |
| Outdoor Temperature Range | -40°F ~ 158°F (-40°C ~ 70°C) |
| Temperature Accuracy | +/- 2°F |
| Humidity Range | 1% to 99% RH |
| Wireless Transmission Range | Up to 200ft (60m) in open area |
| Power Source (Main Unit) | AC Power Adaptor (included) or 3 x AAA Batteries (not included) |
| Power Source (Sensor) | 2 x AA Batteries (not included) |
| USB Charging Port Output | 5V/1A |
| Material | Acrylonitrile Butadiene Styrene (ABS), Glass, Metal, Plastic |
| Special Features | Adjustable Brightness, Alarm, Atomic Clock, Customizable Alert, Large Display |
Warranty and Support
Geevon offers the following support for this product:
- Money-Back Guarantee: 30-day money-back policy.
- Warranty: 12-month warranty from the date of purchase.
- Consulting Services: Lifetime consulting services are available for product support.
For further assistance or inquiries, please refer to the contact information provided in your product packaging or visit the official Geevon store on Amazon.
Related Documents - B0DFGT9GX6
 |
Geevon W22146 Color Weather Station User Manual Comprehensive user manual for the Geevon W22146 Color Weather Station, detailing features, setup, operation, and technical specifications for indoor and outdoor temperature, humidity, and weather forecasting. |
 |
GEEVON W22146 Color Weather Station User Manual This user manual provides comprehensive instructions for the GEEVON W22146 Color Weather Station, covering setup, features, placement guidelines, and technical specifications for accurate indoor and outdoor environmental monitoring. |
 |
Geevon W22145 Color Atomic Clock User Manual - Time, Temperature, Humidity, Alarm User manual for the Geevon W22145 Color Atomic Clock. Learn how to set up, use features like radio-controlled time, temperature/humidity display, alarm, snooze, and backlight. Includes technical specifications and placement guidelines. |
 |
Smart Color Display Weather Station with Touch Keys User Manual User manual for the Geevon Smart Color Display Weather Station (Model No: 208667), detailing features, setup, operation, and troubleshooting for indoor and outdoor temperature, humidity, weather forecasting, and alarm functions. |
 |
Geevon Smart Color Weather Station W208665 User Manual User manual for the Geevon Smart Color Weather Station (Model W208665). Learn how to set up, operate, and troubleshoot your weather station, including temperature, humidity, weather forecasting, and alarm features. |
 |
Smart Color Weather Station User Manual - Model 246250 Comprehensive user manual for the Geevon Smart Color Weather Station (Model 246250), detailing setup, operation, features, troubleshooting, and specifications for indoor/outdoor temperature and humidity monitoring, weather forecasts, and alarms. |