
1. Introduction
Thank you for choosing the Silumen Solar LED Projector 10W IP65 CCT. This product is designed to provide efficient and eco-friendly outdoor lighting. Featuring solar technology and adjustable brightness, it is ideal for illuminating various outdoor spaces while conserving energy. This manual provides essential information for the safe installation, operation, and maintenance of your solar projector.

Image 1: Overview of the Silumen Solar LED Projector, including the main light unit, solar panel, and remote control.
2. Safety Information
- Electrical Disconnection: Always ensure the electricity is disconnected at the main electrical panel before any installation or maintenance work.
- Professional Installation: The product must be installed under the supervision of a qualified professional and in strict compliance with all safety instructions and local electrical codes.
- Manufacturer Responsibility: Failure to adhere to these safety guidelines will void the manufacturer's responsibility for product malfunction or any resulting risks.
- Outdoor Use: This projector is designed for outdoor use with an IP65 rating, ensuring resistance against dust and water jets. Do not submerge the unit.
- Solar Panel Placement: Ensure the solar panel is placed in a location that receives direct sunlight for optimal charging.
3. Package Contents
Verify that all components are present in the package:
- Solar LED Projector Unit
- Solar Panel with connecting cable
- Remote Control
- Mounting Bracket
- Screws and Wall Plugs for installation
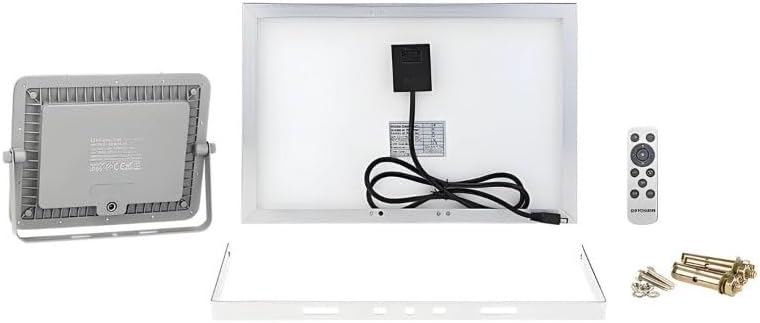
Image 2: All components included in the package, showing the back of the projector, solar panel, remote, mounting bracket, and installation hardware.
4. Specifications
| Feature | Specification |
|---|---|
| Power | 10W |
| Luminosity | 1000 lumens |
| Color Temperature (CCT) | Variable (3000K - 6000K) |
| Incandescent Equivalent | 80W |
| Protection Rating | IP65 |
| Solar Function | Yes |
| Autonomy | 10 - 12 hours |
| Charging Time (Solar) | 4 - 5 hours |
| Voltage | 3.2V DC |
| Dimensions (L x W x H) | 222 x 160 x 23.5 mm |
| Weight | 636 g |
| Average Lifespan | 25,000 Hours |
| Color Rendering Index (CRI) | 80.00 |
5. Installation
The installation of this solar projector is designed to be straightforward and does not require electrical wiring. Follow these steps:
- Choose Location: Select a desired location for the projector and the solar panel. The solar panel must be positioned to receive maximum direct sunlight throughout the day for efficient charging. The projector can be mounted in a shaded area if necessary, as long as its cable can reach the solar panel.
- Mounting the Projector: Use the provided mounting bracket, screws, and wall plugs to securely fix the projector unit to the chosen surface (wall, pole, etc.). Ensure the projector is aimed correctly to illuminate the desired area.
- Mounting the Solar Panel: Securely attach the solar panel to its chosen location using the provided hardware. Angle the panel to optimize sun exposure.
- Connect Solar Panel: Connect the cable from the solar panel to the input port on the projector unit. Ensure the connection is firm and waterproof.
- Initial Charge: Allow the solar panel to charge the projector's internal battery for at least 4-5 hours in direct sunlight before first use.
Recommended Installation Areas: Gardens, pathways, parking areas, courtyards, and other outdoor spaces requiring autonomous lighting.
6. Operating Instructions
Once installed and sufficiently charged, the projector operates automatically:
- Automatic Activation: The projector will automatically activate at dusk and deactivate at dawn, providing convenient and autonomous lighting.
- Color Temperature Adjustment (CCT): Use the provided remote control to adjust the color temperature of the light between 3000K (warm white) and 6000K (cool white) to suit your preference or specific lighting needs. Refer to the remote control's specific buttons for CCT adjustment.
- Brightness Adjustment: The remote control may also offer options to adjust the brightness level of the projector.
7. Maintenance
To ensure optimal performance and longevity of your solar LED projector, follow these maintenance guidelines:
- Clean Solar Panel: Regularly clean the surface of the solar panel with a soft, damp cloth to remove dust, dirt, or debris that may reduce charging efficiency. Do not use abrasive cleaners.
- Clean Projector Unit: Periodically wipe the projector's lens and housing to ensure clear light output and prevent dirt buildup.
- Inspect Connections: Annually check all connections, especially the solar panel cable, for any signs of wear, damage, or loose fittings.
- Battery Care: The internal battery is designed for long-term use. Avoid prolonged storage of the unit in a completely discharged state. If storing for an extended period, ensure the battery is fully charged.
8. Troubleshooting
If you encounter issues with your solar LED projector, consider the following common solutions:
- Projector Not Turning On at Night:
- Ensure the solar panel is receiving sufficient direct sunlight during the day (4-5 hours minimum).
- Check for any obstructions (leaves, dirt) on the solar panel.
- Verify that the solar panel cable is securely connected to the projector.
- Confirm there are no strong light sources near the projector that might trigger its daylight sensor.
- Short Illumination Time:
- The battery may not be fully charged. Ensure optimal solar panel placement and clean the panel surface.
- Consider environmental factors like cloudy weather or shorter daylight hours in winter.
- Remote Control Not Working:
- Check if the remote control's battery needs replacement.
- Ensure there is no obstruction between the remote and the projector's sensor.
9. Warranty and Support
This product is subject to the manufacturer's warranty conditions. Please retain your proof of purchase.
- Installation Responsibility: The manufacturer disclaims all responsibility for product malfunction and associated risks if the product is not installed under professional supervision and in compliance with safety instructions.
- Contact Support: For technical assistance, warranty claims, or further inquiries, please contact your retailer or visit the official Silumen website for support information.
