1. Product Overview
The Laviniar A26Q10 is a versatile bedside device combining an alarm clock, a 10W fast magnetic wireless charger, and an adjustable night light. It features a clear LCD display showing time, date, day, and temperature.

Figure 1: Front view of the Laviniar A26Q10 Alarm Clock, displaying time, date, day, and temperature.
Package Contents:
- Laviniar A26Q10 Alarm Clock
- Power Adapter
- User Manual
2. Setup
2.1 Power Connection
- Connect the provided power adapter to the DC IN port on the back of the alarm clock.
- Plug the power adapter into a standard wall outlet.
- The display will light up, indicating the device is powered on.
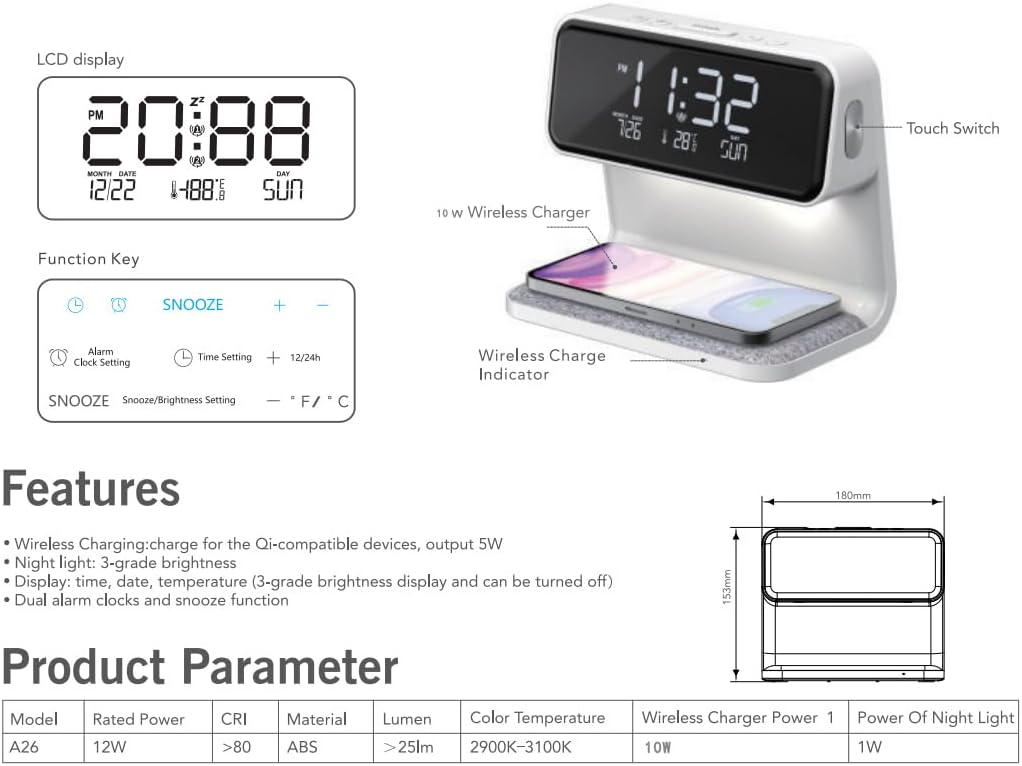
Figure 2: Back view of the alarm clock, highlighting the power input port.
2.2 Initial Time and Date Setting
Upon first power-on or after a power interruption, you may need to set the correct time and date. Refer to the 'Operating Instructions' section for detailed steps on setting the time and date.
3. Operating Instructions
3.1 Control Buttons Overview

Figure 3: Diagram illustrating the LCD display, function keys, and touch switch.
3.2 Setting Time and Date
- Press the Time Setting button (often indicated by a clock icon) once to enter time setting mode. The hour digits will flash.
- Use the + and - buttons to adjust the hour.
- Press the Time Setting button again to move to minute setting. Use + and - to adjust minutes.
- Continue pressing the Time Setting button to cycle through year, month, and day settings, adjusting each with the + and - buttons.
- After setting the day, press the Time Setting button one last time to exit setting mode.
3.3 Setting Alarms
The device supports dual alarms. Each alarm can be set independently.

Figure 4: Illustration of the dual alarm function, allowing separate settings for weekdays and weekends.
- Press the Alarm Clock Setting button (often indicated by an alarm icon) once to set Alarm 1. The alarm hour digits will flash.
- Use the + and - buttons to adjust the alarm hour.
- Press the Alarm Clock Setting button again to move to alarm minute setting. Use + and - to adjust minutes.
- Press the Alarm Clock Setting button again to confirm and activate Alarm 1.
- Repeat steps 1-4 for Alarm 2 by pressing the Alarm Clock Setting button a second time to select Alarm 2.
3.4 Snooze Function
When an alarm sounds, press the SNOOZE button to temporarily silence the alarm for 10 minutes. The alarm will sound again after the snooze period. You can typically snooze up to three times.

Figure 5: Illustration of the snooze function, allowing for 10-minute intervals.
3.5 Wireless Charging
The integrated 10W wireless charger supports Qi-compatible devices.
- Place your Qi-compatible smartphone or device on the fabric charging pad at the base of the alarm clock.
- Ensure the device is centered on the charging pad for optimal charging.
- A charging indicator light (if available) or your device's screen will confirm that charging has begun.

Figure 6: A smartphone placed on the wireless charging pad of the alarm clock.
3.6 Night Light Operation
The night light features three dimming levels.
- Locate the touch switch for the night light, usually on the side of the device.
- Tap the touch switch once for the lowest brightness level.
- Tap again for medium brightness.
- Tap a third time for the brightest setting.
- Tap a fourth time to turn the night light off.

Figure 7: The night light demonstrating its three adjustable brightness levels.
3.7 Temperature Display
The alarm clock automatically displays the ambient temperature. No user action is required for this feature.
3.8 Video Guide: Time and Night Light Settings
Video 1: A demonstration of setting the time and operating the night light on the Laviniar A26Q10 alarm clock.
4. Maintenance
4.1 Cleaning
- Ensure the device is unplugged before cleaning.
- Wipe the display and plastic surfaces with a soft, dry, or slightly damp cloth.
- Do not use abrasive cleaners, solvents, or chemical sprays, as these may damage the surface.
- For the fabric charging pad, gently brush off dust or use a lint roller. Avoid getting the fabric wet.
4.2 Storage
If storing the device for an extended period, unplug it and keep it in a cool, dry place away from direct sunlight and extreme temperatures.
5. Troubleshooting
- Device not powering on:
Ensure the power adapter is securely connected to both the device and a working wall outlet. Try a different outlet. - Wireless charging not working:
Verify your device is Qi-compatible. Ensure your device is centered on the charging pad. Remove any thick phone cases that might interfere with charging. Check if the alarm clock is properly powered. - Display is too bright/dim:
Use the SNOOZE/Brightness Setting button to adjust the display brightness. - Alarm not sounding:
Check if the alarm is activated and set to the correct time. Ensure the volume is not set to zero (if applicable). - Incorrect time/date:
Follow the 'Setting Time and Date' instructions to manually adjust.
6. Specifications
| Brand | Laviniar |
| Model Number | A26Q10 |
| Color | White |
| Display Type | Analog (Digital Display) |
| Special Features | Adjustable Brightness, Calendar Display, Charging Station, Large Display |
| Product Dimensions | 5.94"W x 5.7"H (151x106x145mm) |
| Power Source | Corded Electric |
| Material | Acrylonitrile Butadiene Styrene (ABS) |
| Wireless Charger Power | 10W |
| Night Light Power | 1W |
| Number of Items | 1 |
| Item Weight | 2 pounds |
7. Warranty and Support
7.1 Warranty Information
This product is covered by a standard manufacturer's warranty. Please refer to the product packaging or the seller's website for specific warranty terms and duration.
7.2 Customer Support
For technical assistance, troubleshooting not covered in this manual, or warranty claims, please contact Laviniar customer support through the retailer where the product was purchased or visit the official Laviniar website for contact information.