1. Product Overview
The ZLPOWER 43-inch Digital Signage Display Kiosk is an interactive floor-standing commercial totem featuring a Full HD 1080P IPS LCD touch screen. It operates on an Android 11 system, designed for displaying various media content in commercial environments. This kiosk is equipped with a commercial-grade LCD panel, offering a high-resolution IPS display with 400 nits luminance and a 178° ultra-wide viewing angle for clear visibility.

Figure 1: ZLPOWER 43-inch Digital Signage Display Kiosk
2. Unboxing and Package Contents
Carefully unpack the digital signage kiosk and verify all contents against the list below. Ensure no items are missing or damaged.

Figure 2: Package Contents
2.1. Included Items:
- Display Body (LCD screen part)
- Base
- Remote Controller (with AAA batteries)
- USB Flash Drive
- Power Cord
- Screwdriver and screws for base installation
- Allen wrench for base installation
- Keys (2) for back door
- WiFi Antenna
- Wheels (4)
- User Manual (this document)
2.2. Unboxing Video Guide
Video 1: Unboxing and Installation Overview
This video provides a visual guide for unboxing the digital signage kiosk and identifying all included components, as well as a brief overview of the installation process.
3. Setup and Installation
Follow these steps to assemble and set up your ZLPOWER Digital Signage Kiosk.
3.1. Base Assembly
- Carefully remove all accessories from the package.
- Place the main display unit onto the cardboard box for stability during base installation.
- Align the base with the bottom of the display unit.
- Secure the base to the display unit using the provided screws and screwdriver.
- Attach the four wheels to the base using the provided screws and Allen wrench.
- Carefully stand the assembled kiosk upright.
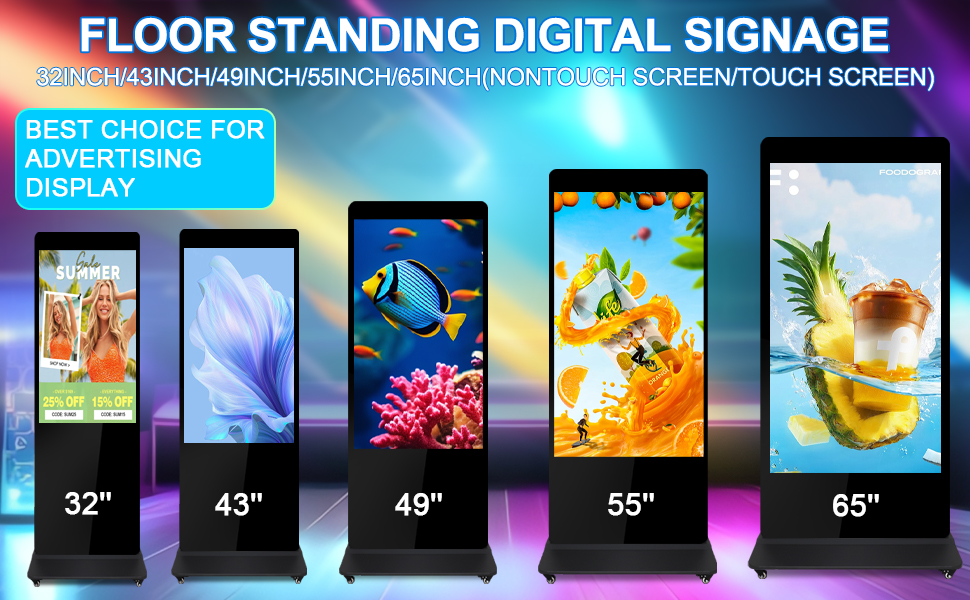
Figure 3: Step-by-step Installation Guide
3.2. Power Connection
Connect the power cord to the kiosk's power input and then to a suitable power outlet. Turn on the power switch located near the power input.
3.3. External Media Player Installation (Optional)
If you wish to use an external media player, the kiosk provides an internal compartment for installation.
- Unlock and open the back door of the kiosk.
- Place your external media player into the designated holder inside the compartment.
- Connect the media player's power adapter to the internal power plug.
- Connect an HDMI cable from your media player to the HDMI input on the kiosk's motherboard.
- Arrange cables neatly and close the back door, securing it with the key.
Video 2: How to Install an External Media Player
This video demonstrates the process of installing an external media player within the kiosk's internal compartment.
4. Operating Instructions
The kiosk offers various methods for content playback and management.
4.1. Remote Control and Basic USB Playback
The kiosk comes with a remote control for easy navigation and content management. It features a pre-installed autoplay application for direct media playback from a USB flash drive.
- Insert AAA batteries into the remote control.
- Prepare your USB flash drive with desired media content (pictures, videos) in the root directory.
- Plug the USB flash drive into the kiosk's USB port. The kiosk will automatically play the media content.
Video 3: USB Disk Operation Guide
This video illustrates how to use a USB flash drive for direct media playback on the digital signage kiosk.
4.2. Copy Mode for Internal Storage
To play content without the USB drive constantly plugged in, use the copy mode feature.
- On the kiosk, navigate to the 'Autoplay' application using the remote control.
- Go to 'General Settings' within the Autoplay application.
- Select 'Copy Mode' and click 'Submit'.
- Create a folder named 'AutoPlayFile' on your USB flash drive and copy your media content into this folder.
- Plug the USB flash drive into the kiosk. The content will be copied to the kiosk's internal memory.
- Once copying is complete, you can remove the USB flash drive. The kiosk will play content from its internal memory.
Video 4: Autoplay Application Usage Guide
This video details how to configure the autoplay application, including setting up copy mode for internal content storage.
4.3. HDMI Input Source Selection
If an external media player is connected via HDMI, you can switch the kiosk's input source.
- Using the remote control, press the 'Source' button.
- Select 'HDMI' from the input source options.
- Alternatively, you can configure the kiosk to automatically switch to HDMI input on power-on:
- Navigate to 'Auto Start Settings' on the kiosk.
- Select 'HDMI Input' as the auto-start option.
The kiosk will now display content from the HDMI input source.
4.4. Intelligent Split-Screen Playback
The kiosk supports intelligent split-screen functionality, allowing simultaneous display of various content types (images, videos, animations) in customizable zones.
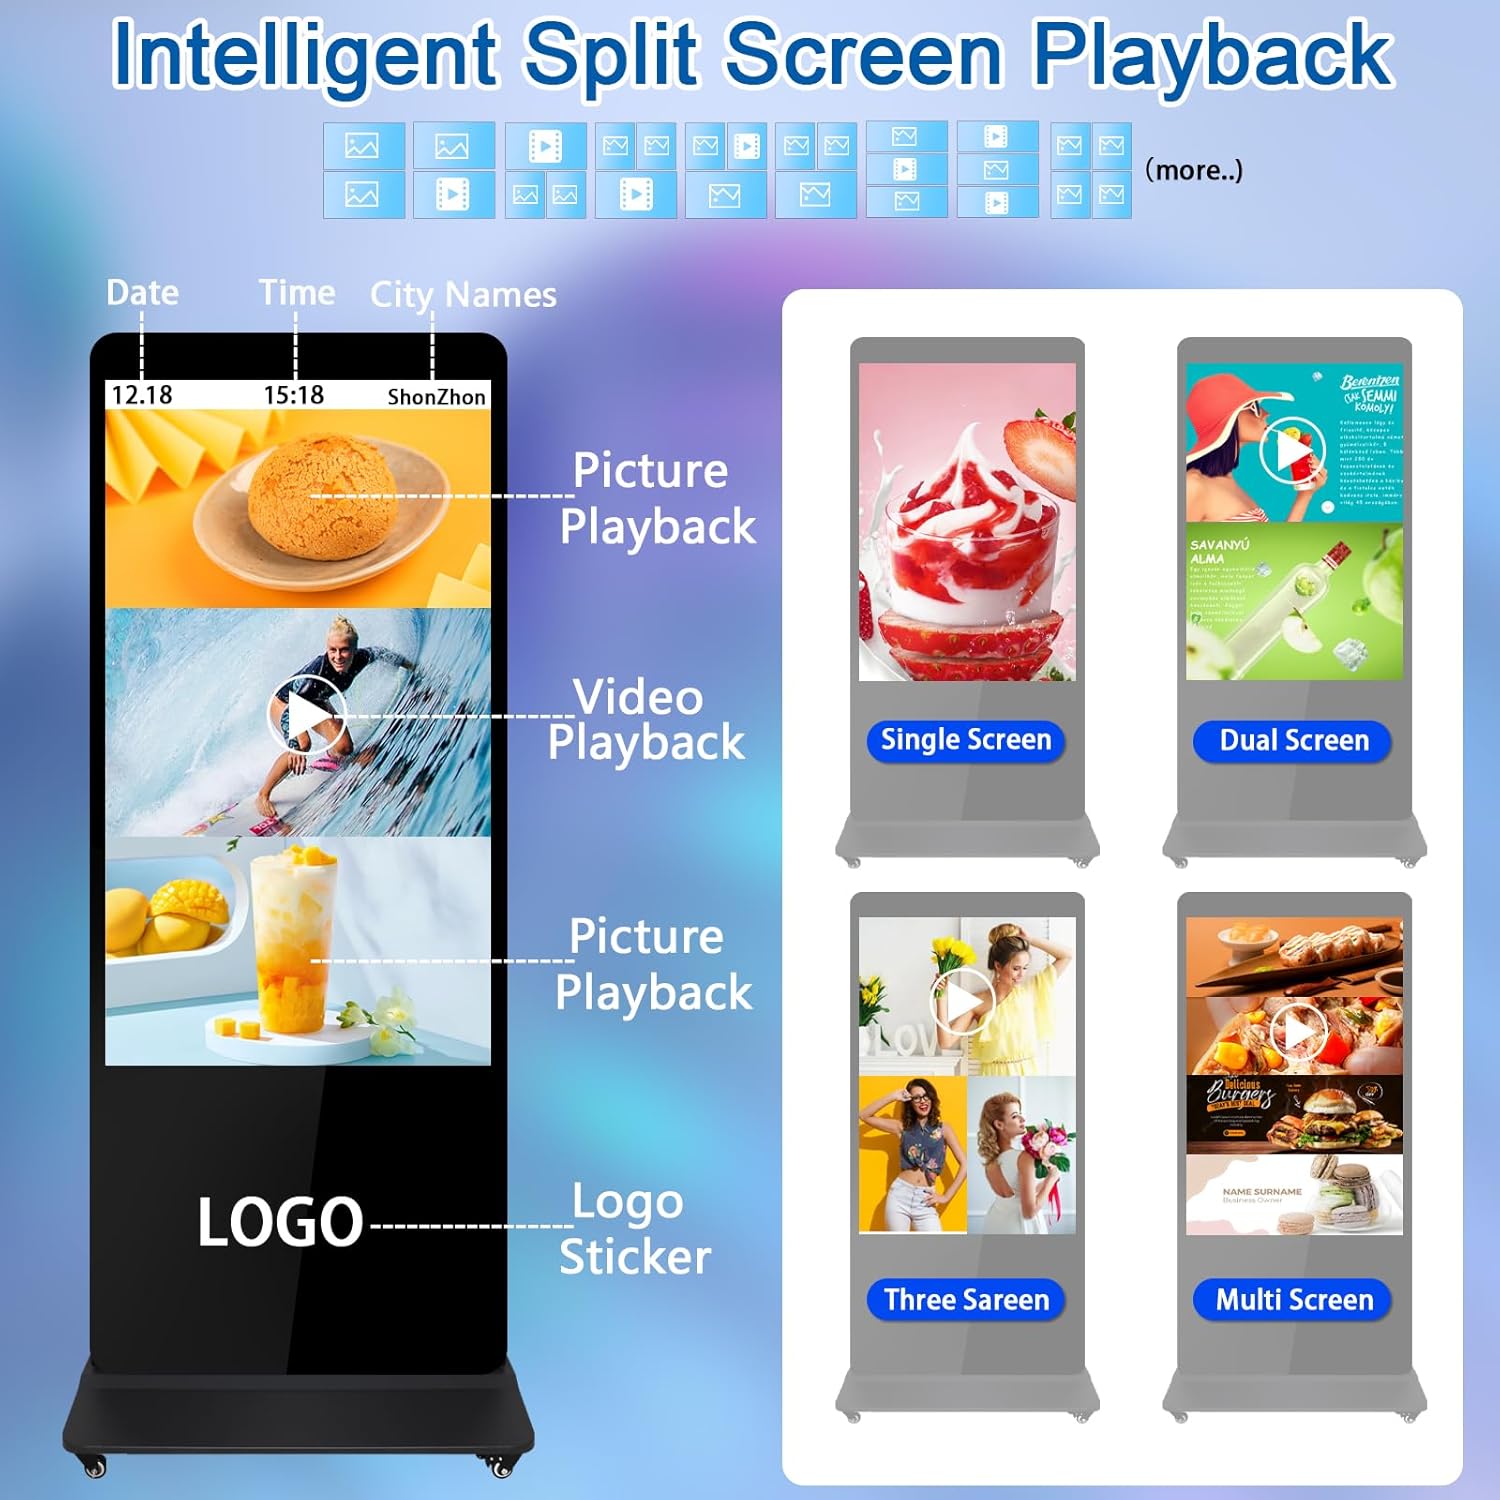
Figure 4: Split-Screen Layout Options
- Access the 'Autoplay' application.
- Navigate to 'Screen Direction' or 'Setting Mode' (depending on firmware version).
- Choose from various multi-screen display layouts (e.g., pictures on top, videos on bottom, multiple individual screens).
- Ensure your media content is designed with appropriate aspect ratios (e.g., 9:16 for vertical full screen, 16:9 for landscape sections within split screen).
- Select your desired layout and click 'Submit' or 'Play'.
Video 5: Smart Split-screen Function
This video demonstrates how to configure and utilize the smart split-screen feature for dynamic content presentation.
4.5. Cloud Management System
The kiosk supports a Cloud Management System (CMS) for multi-terminal management and content updates via Wi-Fi or network connection. This allows for remote control operations, including volume control and scheduled on/off settings.

Figure 5: Cloud Management System
Video 6: Cloud Operation Instruction
This video provides instructions on how to manage the digital signage kiosk using the cloud management system.
5. Specifications
| Feature | Detail |
|---|---|
| Brand | ZLPOWER |
| Model Number | 0768556810022 |
| Screen Size | 43 Inches |
| Display Resolution | 1920x1080 (FHD 1080p) |
| Display Technology | IPS LCD |
| Human Interface Input | Touchscreen |
| Operating System | Android 11 System |
| Connectivity Technologies | HDMI, Wi-Fi, Network capabilities |
| Special Features | Built-In Speakers (8Ω 5W), Intelligent Split-Screen, Remote Control, Scheduled On/Off |
| Product Dimensions | 71 x 24 x 71 inches |
| Item Weight | 77 pounds |
6. Maintenance
To ensure the longevity and optimal performance of your digital signage kiosk, follow these maintenance guidelines:
- Cleaning: Use a soft, lint-free cloth to gently wipe the screen. For stubborn smudges, lightly dampen the cloth with a screen-safe cleaner. Avoid abrasive materials or harsh chemicals.
- Ventilation: Ensure the kiosk's ventilation slots are clear of obstructions to prevent overheating.
- Software Updates: Regularly check for and install any available software updates for the Android system to maintain security and performance.
- Power Management: When not in use for extended periods, it is recommended to power off the kiosk to conserve energy and prolong component life.
7. Troubleshooting
If you encounter issues with your digital signage kiosk, refer to the following common troubleshooting steps:
- No Power: Check if the power cord is securely connected to both the kiosk and the power outlet. Ensure the power switch is in the 'ON' position.
- No Display: Verify that the correct input source is selected (e.g., USB, HDMI). If using an external player, ensure it is powered on and connected correctly.
- Content Not Playing: For USB playback, ensure media files are in a compatible format and placed in the root directory or the 'AutoPlayFile' folder if using copy mode.
- Touchscreen Unresponsive: Restart the kiosk. If the issue persists, check for any physical obstructions on the screen.
- Remote Control Not Working: Replace the AAA batteries in the remote control. Ensure there are no obstructions between the remote and the kiosk's IR receiver.
For further assistance, please contact customer support.
8. Warranty and Support
The ZLPOWER 43" Digital Signage Display Kiosk includes a 4-Year Limited Warranty.
For any inquiries, technical support, or warranty claims, please contact ZLPOWER customer service. You can scan the QR code below for direct communication or visit the official ZLPOWER store on Amazon.
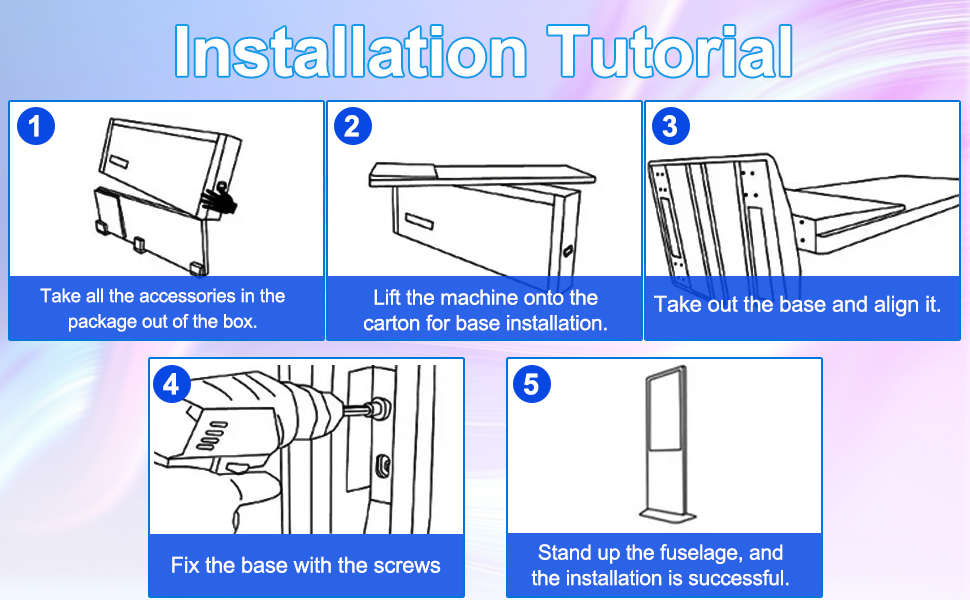
Figure 6: Scan for Customer Support
Direct link: https://wa.me/qr/FSBCSX7ZPZC3B1
We are committed to providing excellent customer service and support for your ZLPOWER product.

