
VILTROX DC-V1
VILTROX DC-V1 5.5-inch 4K HDMI Touchscreen Camera Monitor User Manual
Model: DC-V1
1. Introduction
Thank you for choosing the VILTROX DC-V1 5.5-inch 4K HDMI Touchscreen Camera Monitor. This monitor is designed to enhance your filmmaking and photography experience by providing a clear, detailed, and versatile external display for your DSLR or mirrorless camera. Featuring a 5.5-inch IPS panel with Full HD 1920x1080 resolution, 4K HDMI input/output, and advanced functions like 3D LUT support and touchscreen control, the DC-V1 offers professional monitoring capabilities.
This manual provides detailed instructions on how to set up, operate, and maintain your VILTROX DC-V1 monitor. Please read it thoroughly before use to ensure optimal performance and longevity of your device.
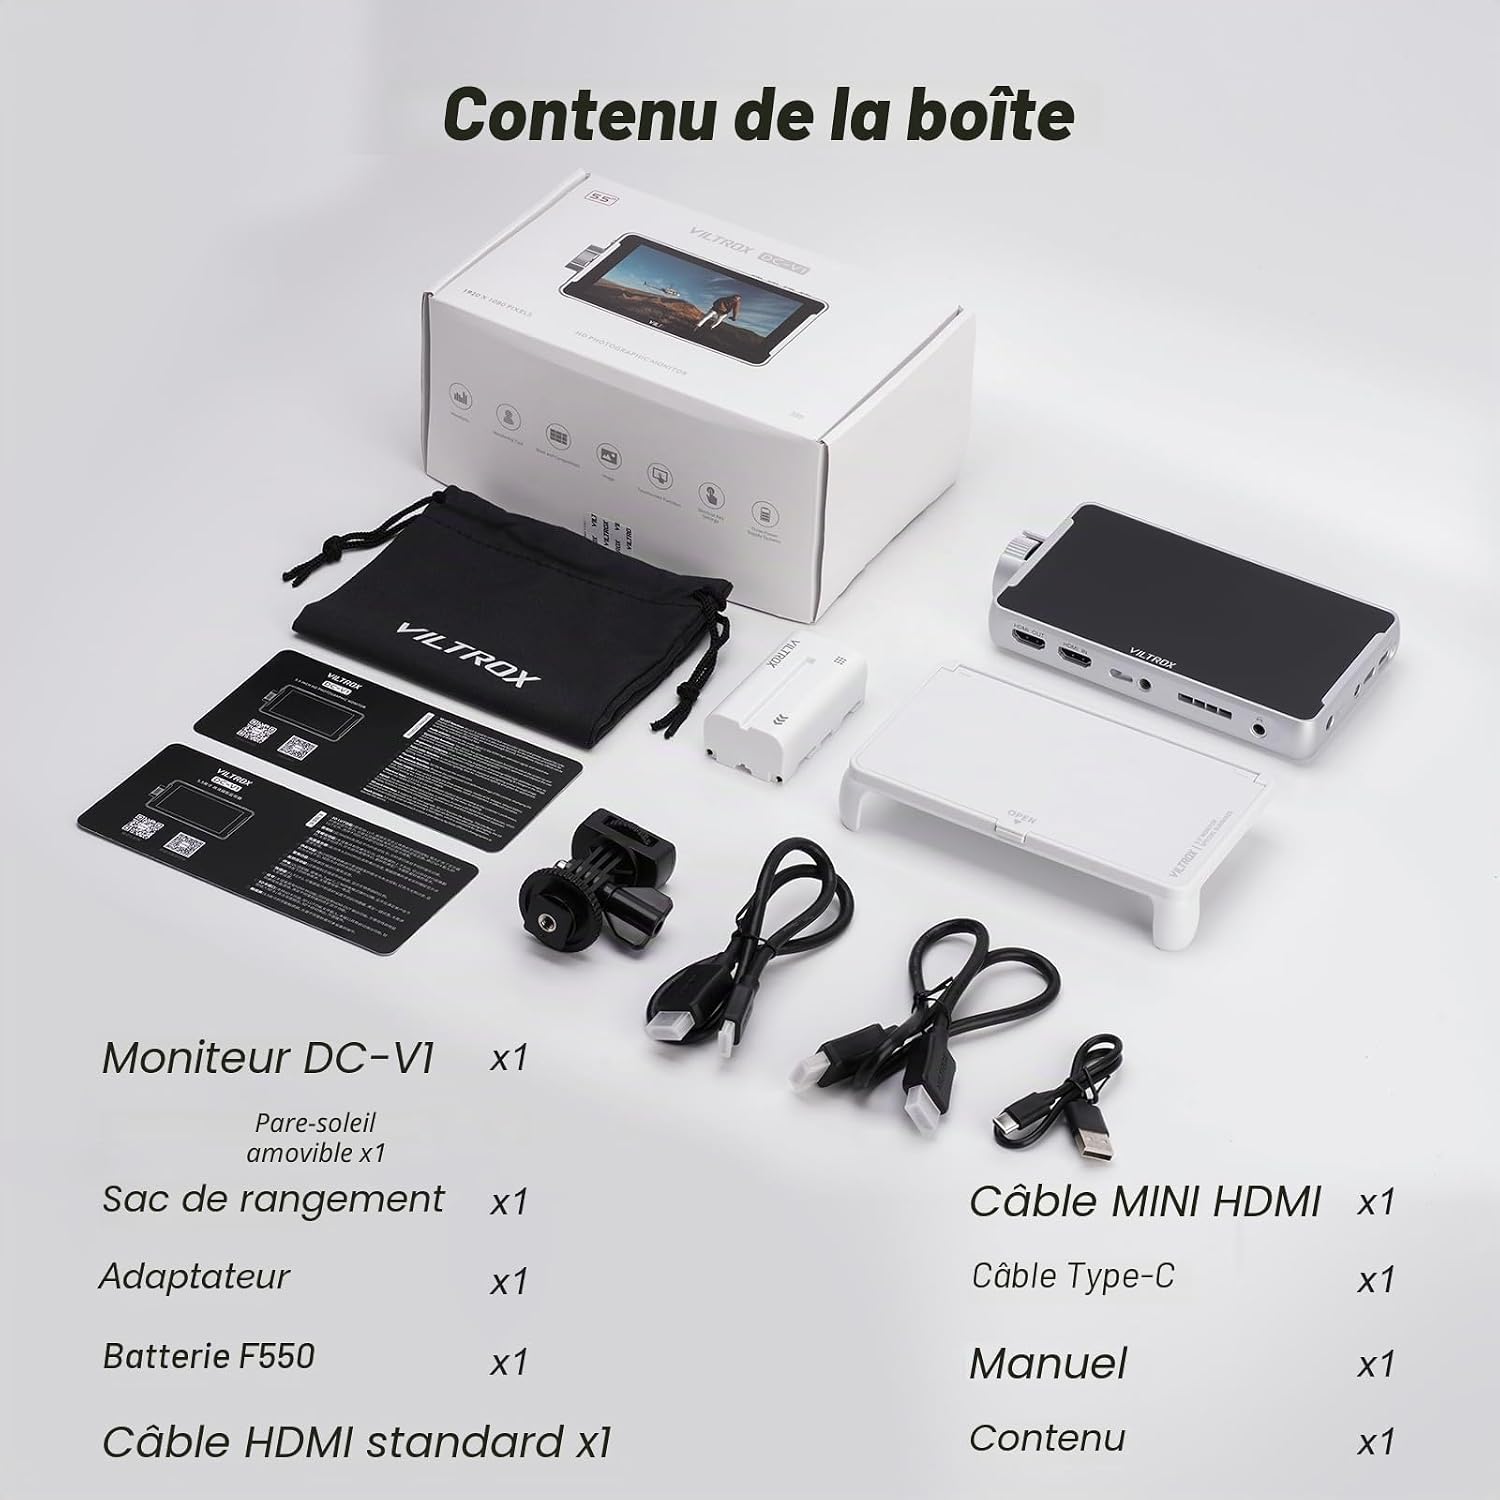
2. Package Contents
Please check the contents of your package to ensure all items are present:
- VILTROX DC-V1 Monitor x1
- Quick-release Sunhood x1
- Storage Bag x1
- Adapter x1
- F550 Battery x1
- Standard HDMI Cable x1
- Mini HDMI Cable x1
- Type-C Cable x1
- User Manual x1
3. Product Overview
Familiarize yourself with the various parts and interfaces of your VILTROX DC-V1 monitor:

- SD Card Cover: Protects the SD card slot.
- Shortcut Keys (F1/F2/F3): Customizable function buttons for quick access to features.
- Return Button: Navigates back in menus.
- Display Screen: The 5.5-inch IPS touchscreen display.
- Power Button: Turns the monitor on/off.
- Control Knob: Rotary dial for menu navigation and adjustments.
- USB Type-C Port: For external power input (5V 3A) and firmware updates.
- Locating Hole: For mounting accessories.
- 1/4 inch Screw Hole: Standard mounting point for cameras, cages, or tripods.
- DC Power Input: For external DC power (12-18V).
- HDMI Output: Connects to another display or device.
- HDMI Input: Connects to your camera's HDMI output.
- Locating Hole: For mounting accessories.
- 1/4 inch Screw Hole: Standard mounting point.
- Fan Outlet: For heat dissipation.
- Headphone Jack: 3.5mm stereo output for audio monitoring.
- Battery Release Button: Releases the NP-F series battery.
- Cooling Air Inlet: For heat dissipation.
4. Setup Guide
4.1 Powering the Monitor
The DC-V1 monitor offers multiple power options:
- NP-F Series Battery: Insert a compatible NP-F series battery (e.g., NP-F550, NP-F750, NP-F970) into the battery slot on the back of the monitor.
- DC IN (12-18V): Connect an external DC power adapter to the DC IN port.
- USB Type-C (5V 3A): Connect a USB Type-C power source to the USB Type-C port.

4.2 Mounting the Monitor
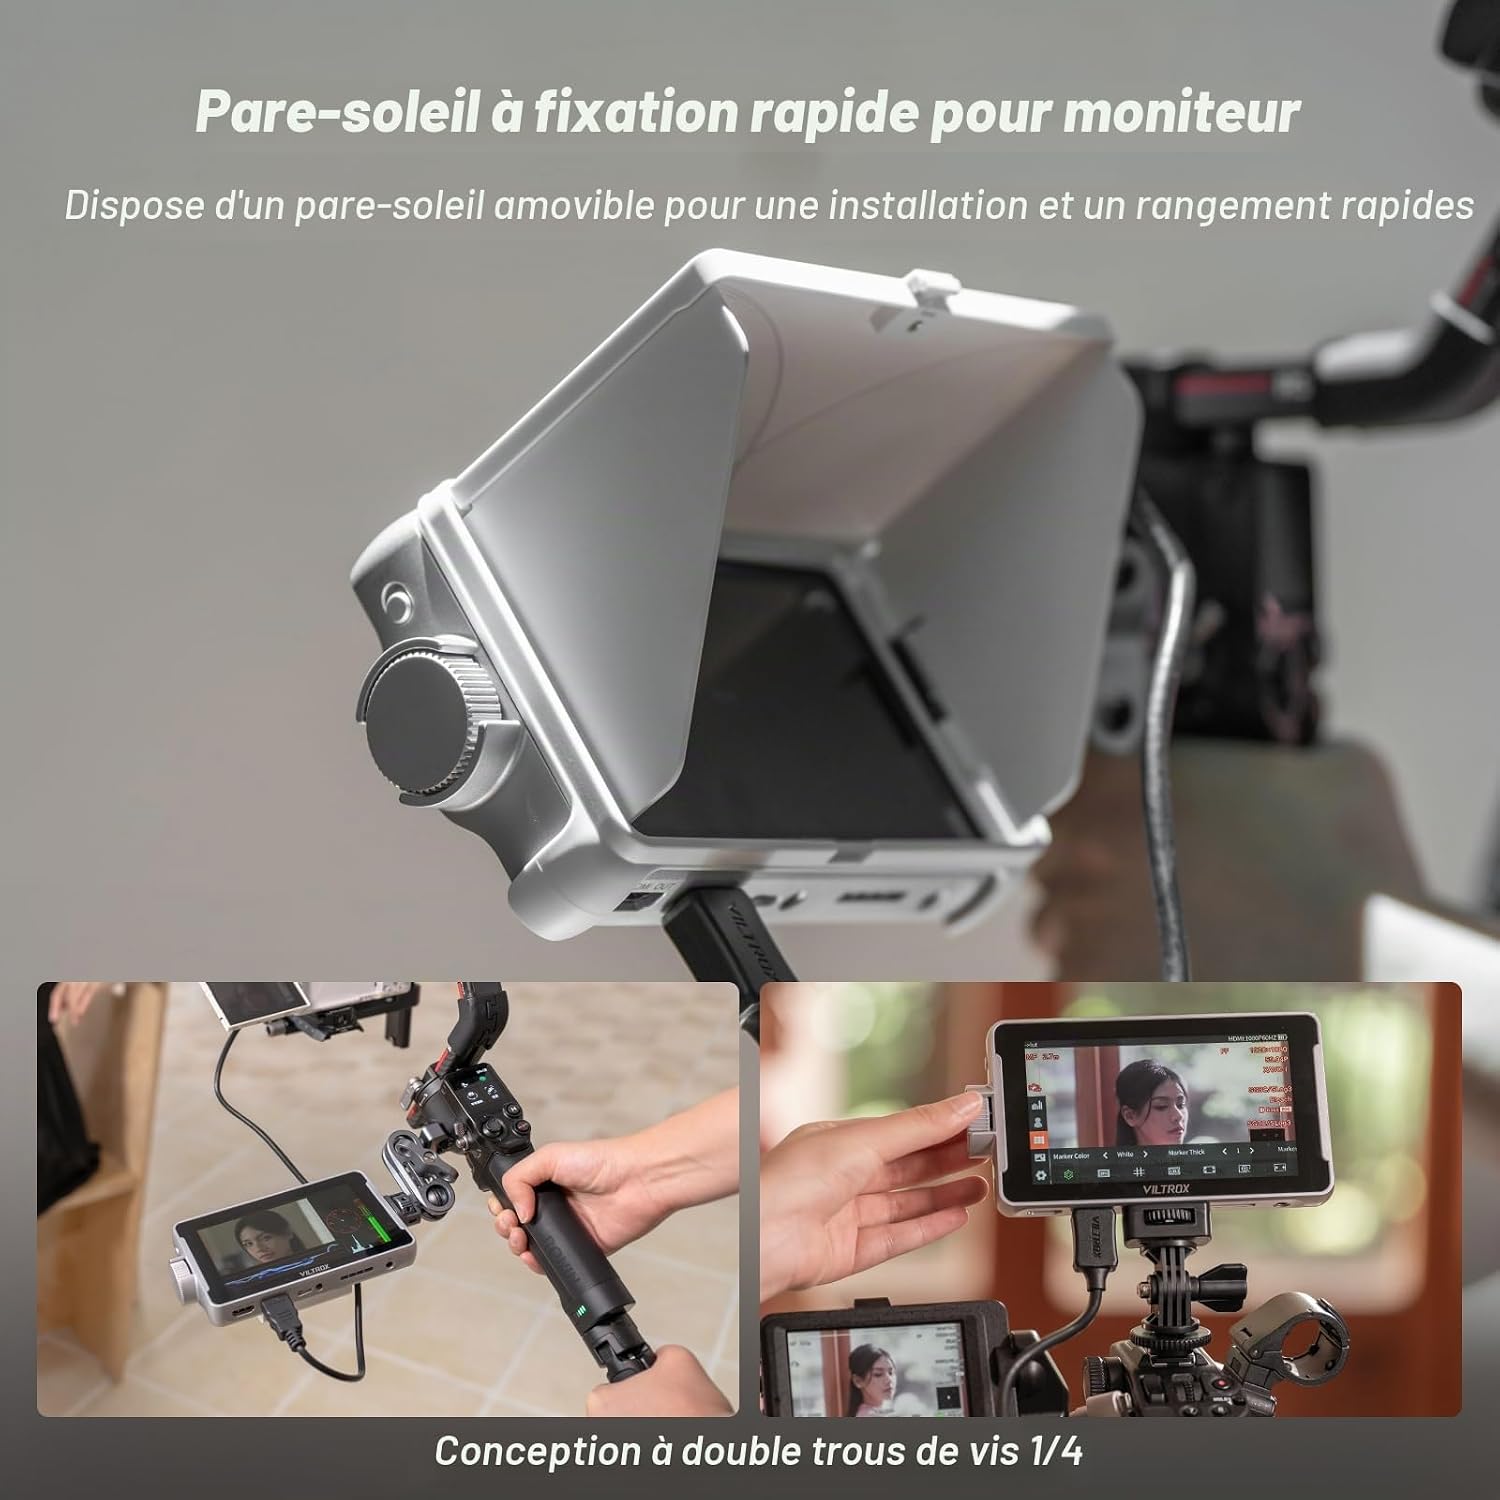
The monitor can be easily mounted to your camera, camcorder, or tripod using the two 1/4 inch screw holes and the included mini hot shoe adapter.
- Attach the mini hot shoe adapter to your camera's hot shoe mount.
- Screw the monitor onto the adapter using one of the 1/4 inch screw holes.
- Adjust the angle for optimal viewing.
4.3 Connecting to a Camera
Connect your camera's HDMI output to the monitor's HDMI Input port using the provided HDMI cable. The monitor supports HDMI signals up to 4K 30Hz (3840x2160p, 4096x2160p at 30/25/24Hz).
For audio monitoring, plug your headphones into the 3.5mm headphone jack.
5. Operating Instructions
5.1 Power On/Off
Press and hold the Power Button (5) to turn the monitor on or off.
5.2 Menu Navigation and Control
The DC-V1 offers both touchscreen and physical button control for menu navigation:
- Touchscreen Control: Tap, swipe, and pinch-to-zoom gestures allow intuitive navigation through menus and settings.
- Control Knob: Press the Control Knob (6) to enter menus and confirm selections. Rotate the knob to scroll through options and adjust values.
- Shortcut Keys (F1/F2/F3): These customizable buttons provide quick access to frequently used functions.

5.3 Professional Monitoring Functions
The DC-V1 includes a suite of professional tools to assist with precise focus and exposure:
- 3D LUT: Import custom 3D LUTs via SD card for creative color effects during shooting and post-production.
- Waveform Parade: Visualizes the luminance and chrominance levels of your video signal.
- Vector Scope: Displays color information, including hue and saturation.
- Brightness Histogram: Shows the distribution of brightness levels in your image.
- Focus Peaking: Highlights in-focus areas for accurate manual focusing.
- Audio Column: Displays audio levels.
- Image Flip: Flips the image horizontally or vertically.
- False Color: Helps evaluate exposure by displaying different exposure levels as distinct colors.
- Zoom: Magnifies a portion of the image for critical focus.


5.4 Firmware Update
The monitor supports firmware updates via an SD card. Please visit the official VILTROX website for the latest firmware and instructions.
6. Maintenance
6.1 Cleaning
- Use a soft, dry cloth to clean the monitor's body.
- For the screen, use a microfiber cloth specifically designed for electronics. If necessary, lightly dampen the cloth with a screen cleaning solution.
- Avoid using harsh chemicals, solvents, or abrasive materials, as these can damage the screen or casing.
6.2 Storage
- When not in use, store the monitor in its protective storage bag in a cool, dry place, away from direct sunlight and extreme temperatures.
- Remove the battery if the monitor will not be used for an extended period.
7. Troubleshooting
If you encounter issues with your VILTROX DC-V1 monitor, please refer to the following common problems and solutions:
| Problem | Possible Cause | Solution |
|---|---|---|
| Monitor does not power on. | Low or depleted battery; incorrect power connection. | Ensure the battery is charged or replace it. Check that the DC or USB-C power adapter is correctly connected and supplying adequate power. |
| No image displayed. | HDMI cable not connected properly; incorrect input source selected; camera output settings. | Verify the HDMI cable is securely connected to both the camera and monitor. Check your camera's HDMI output settings. Ensure the monitor's input source is set to HDMI. |
| Image is distorted or flickering. | Faulty HDMI cable; resolution mismatch. | Try a different HDMI cable. Ensure the camera's output resolution is compatible with the monitor (up to 4K 30Hz). |
| Touchscreen is unresponsive or slow. | Temporary software glitch; screen protector interference. | Restart the monitor. Ensure the screen is clean. If a screen protector is used, ensure it is properly applied or try removing it. Use the physical control knob as an alternative. |
| No audio from headphone jack. | Headphones not fully plugged in; audio settings. | Ensure headphones are fully inserted. Check the monitor's audio settings and volume level. |
If the problem persists after trying these solutions, please contact VILTROX customer support.
8. Specifications
| Feature | Detail |
|---|---|
| Brand | VILTROX |
| Model | DC-V1 (us-dc-v1-tbue-1511) |
| Display Size | 5.5 inches |
| Panel Type | IPS Touchscreen |
| Resolution | 1920 x 1080 (Full HD) |
| Brightness | 400 nits |
| Contrast Ratio | 1000:1 |
| Viewing Angle | 160° (H/V) |
| HDMI Input/Output | Supports up to 4K 30Hz (3840x2160p, 4096x2160p) |
| Audio Output | 3.5mm Headphone Jack |
| Power Input | NP-F Battery, DC IN (12-18V), USB Type-C (5V 3A) |
| Dimensions | 17 x 10 x 3 cm |
| Weight | 350 grams |
| Color Calibration | REC-709 |

9. Warranty and Support
9.1 Warranty Information
The VILTROX DC-V1 monitor comes with a 1-year manufacturer's warranty from the date of purchase. This warranty covers defects in materials and workmanship under normal use. It does not cover damage caused by misuse, accidents, unauthorized modifications, or improper maintenance.
Please retain your proof of purchase for warranty claims.
9.2 Customer Support
For technical assistance, warranty claims, or any other inquiries regarding your VILTROX DC-V1 monitor, please contact VILTROX customer support through their official website or the retailer where you purchased the product.
You can find more information and support resources on the official VILTROX website: www.viltrox.com
Related documentsDC-V1


Ask a question about this manual
Ask about setup, troubleshooting, compatibility, parts, safety, or missing instructions. Manuals+ will review the question and use this page’s manual context to help answer it.