1. Product Overview
The IFOOTAGE Cobra 3 Strike Monopod A150S is a versatile camera support system designed for photographers and videographers. It features a unique one-press lifting mechanism, a patented foot pedal for angle adjustments, and a quick-release system for seamless transitions between various setups. This monopod can transform into a standard monopod, a low-angle tripod, and a trekking pole, offering adaptability for diverse shooting environments.
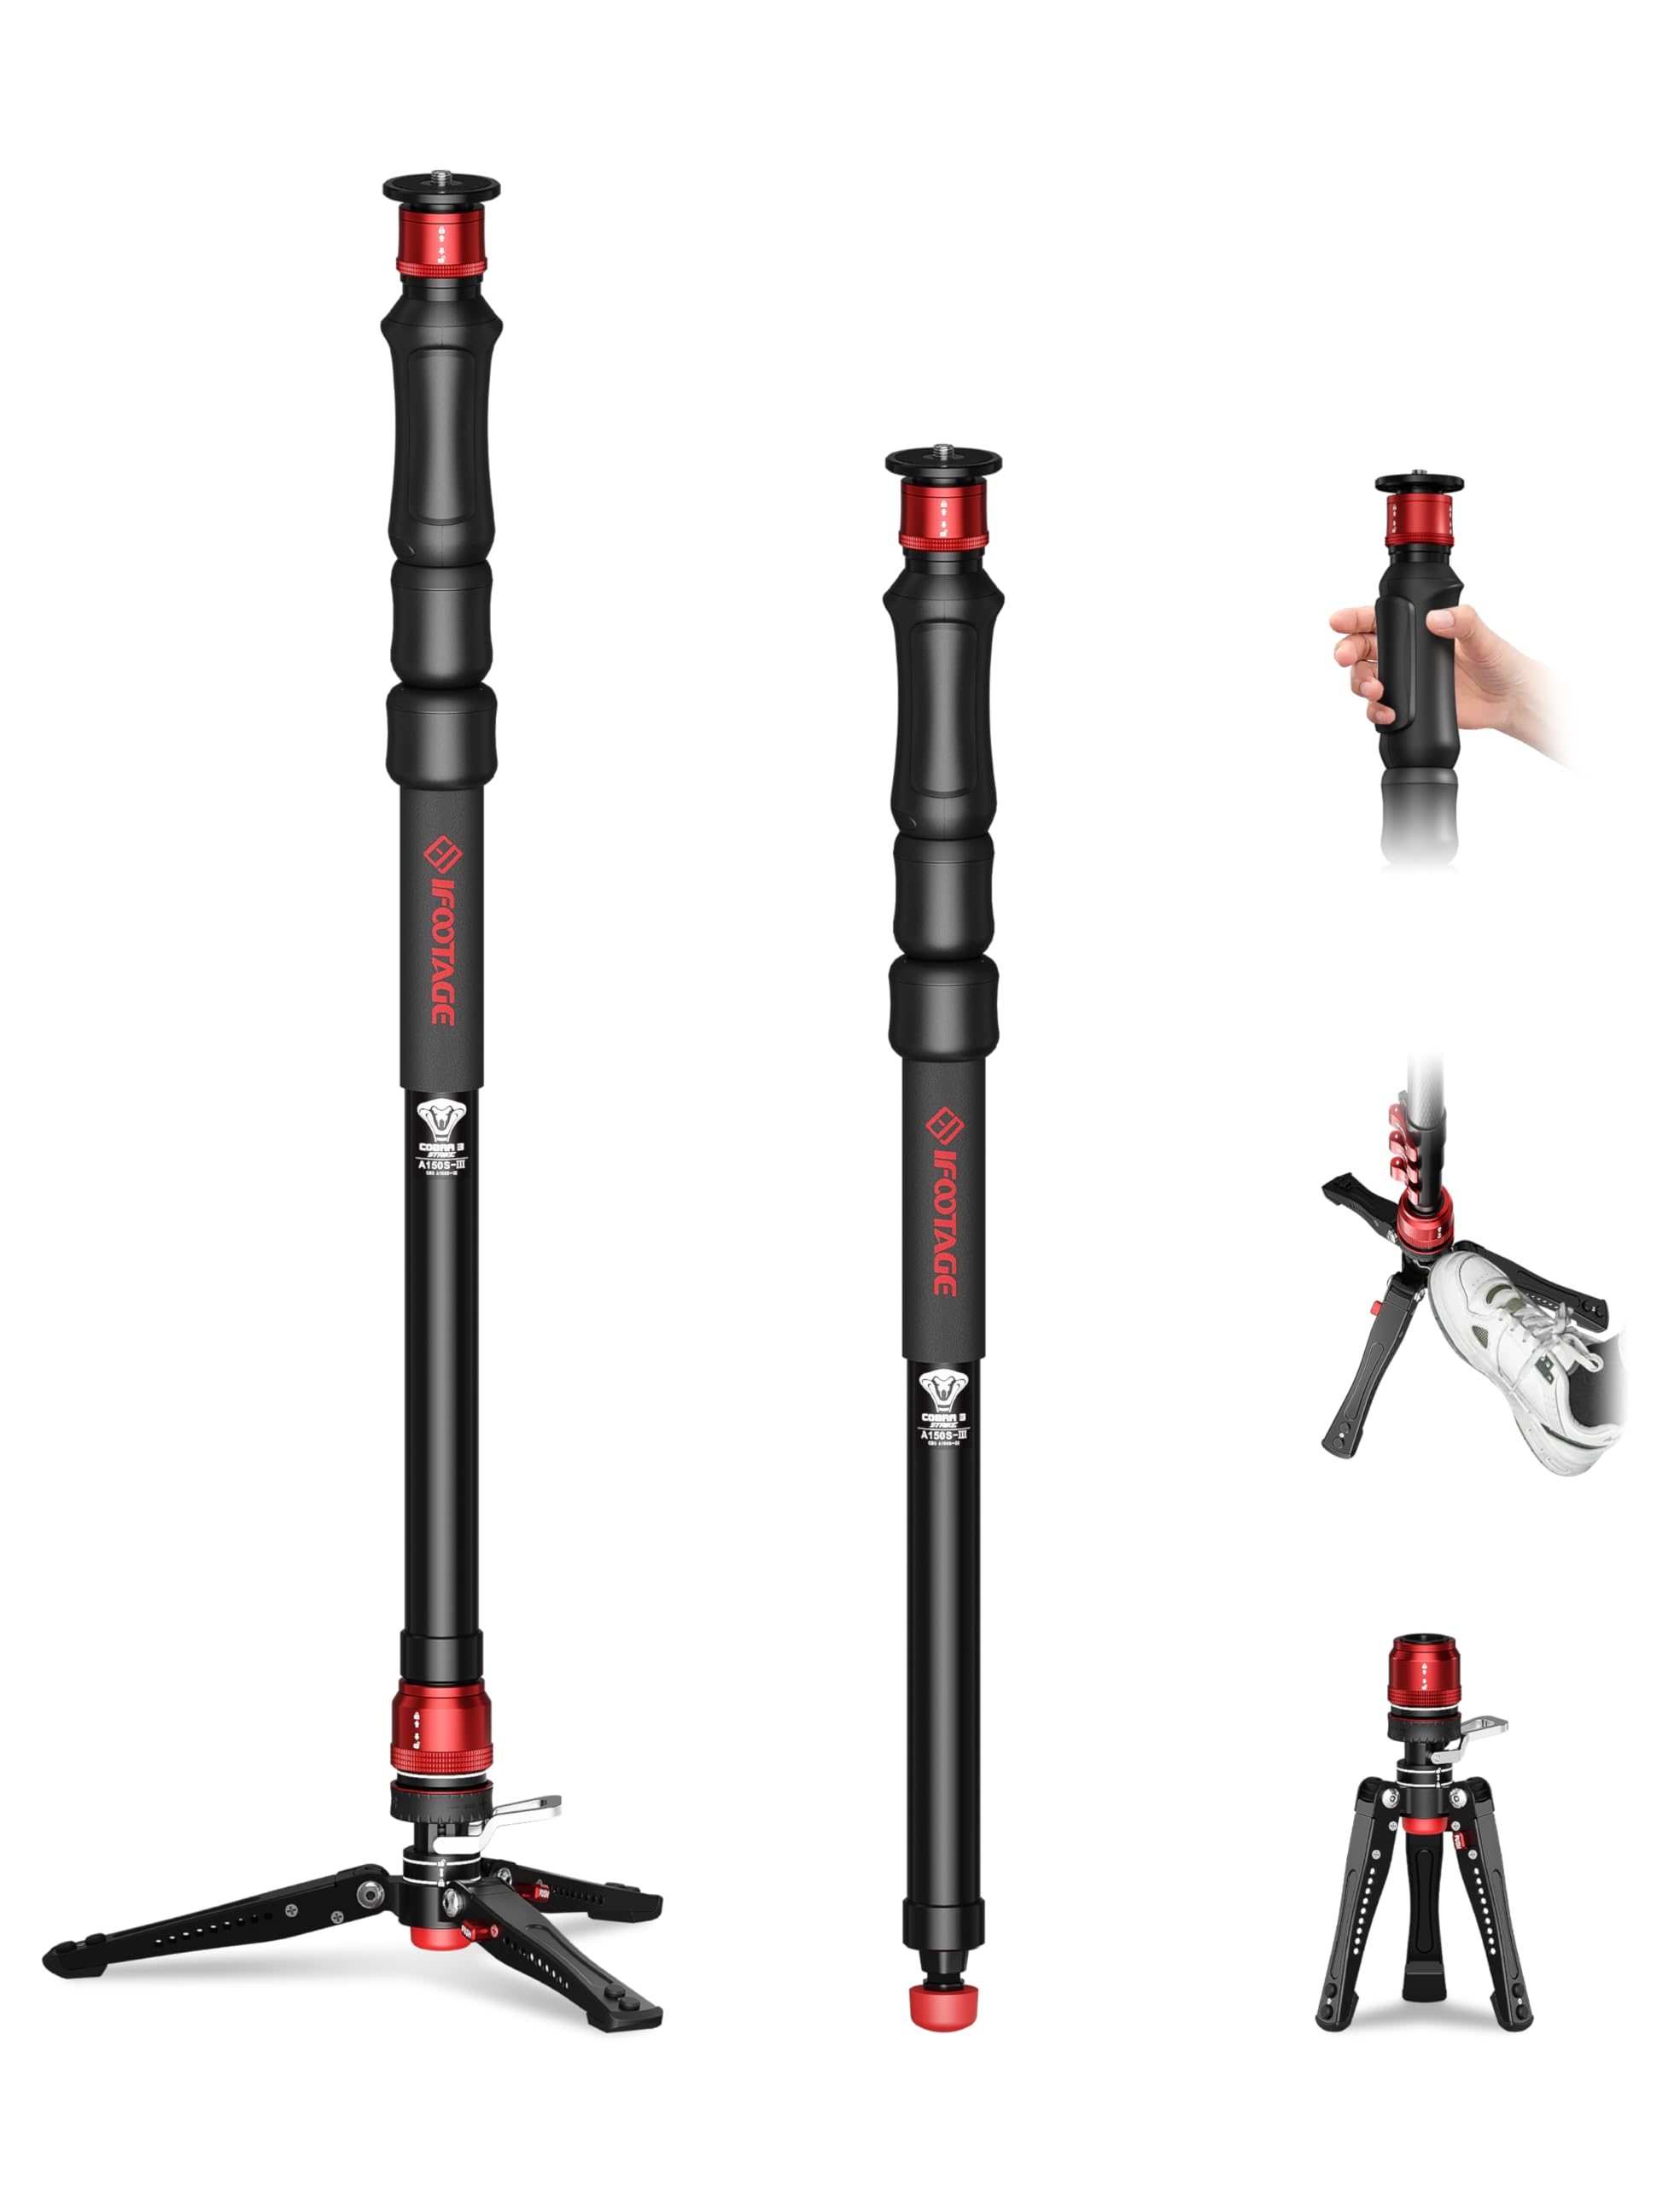
Figure 1: The IFOOTAGE Cobra 3 Strike Monopod A150S in use, showcasing its one-touch height adjustment feature for quick setup in dynamic environments.
2. Setup and Assembly
2.1 Unboxing and Initial Inspection
Upon receiving your IFOOTAGE Cobra 3 Strike Monopod A150S, carefully unbox the product and inspect all components for any signs of damage. The monopod comes with a durable carrying case for protection and portability.
Video 1: An overview of the IFOOTAGE Cobra 3 Strike Monopod A150S, demonstrating its features and components.
2.2 Attaching the Quick-Release Plate to Your Camera
The monopod features a quick-release system on its top plate. This plate is equipped with a 1/4" and 3/8" auto-convertible screw, compatible with most cameras, camcorders, smartphones (with adapter), and gimbals.
- Press down the auto-locking sleeve on the monopod's top plate.
- Lift the quick-release head to detach it from the monopod.
- Screw the quick-release plate securely onto the base of your camera or fluid head.
- Insert the camera with the attached plate back into the monopod's top receiver until it clicks into place.

Figure 2: Step-by-step guide for attaching a camera or fluid head using the quick-release system.
2.3 Attaching/Detaching the Tripod Base
The monopod's base features a quick-release system allowing it to be detached and used independently as a mini tripod or for low-angle shots.
- To detach, press down the auto-locking sleeve on the monopod's base and pull the main monopod shaft upwards.
- To attach, align the monopod shaft with the base receiver and push down until it clicks securely.

Figure 3: The quick-release system on the monopod's base allows for easy attachment and detachment of the mini tripod legs.
3. Operating Instructions
3.1 One-Press Height Adjustment
The monopod features a one-press lifting mechanism for rapid height adjustment. This allows you to extend or retract the monopod smoothly with one hand, from 33" (84 cm) to 59.2" (150 cm).
- To extend: Hold the monopod firmly and press the button on the handle. The monopod will extend automatically.
- To retract: Press the button on the handle and gently push the monopod down to collapse it.
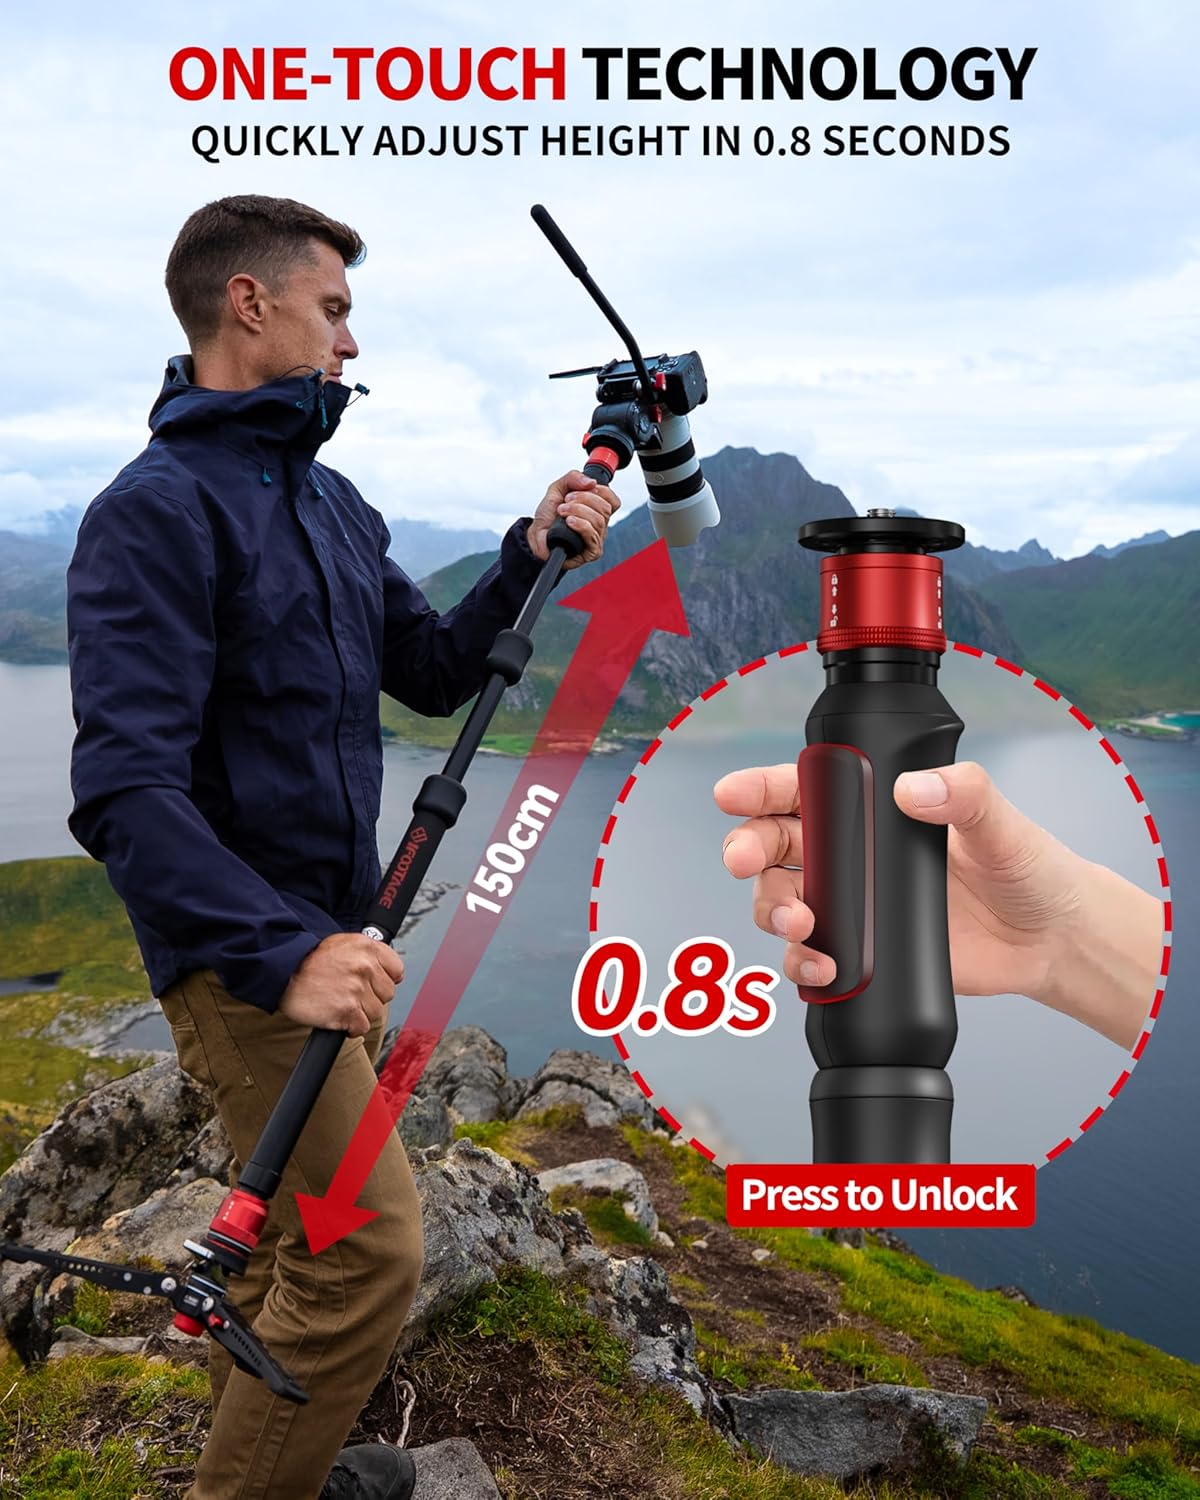
Figure 4: The monopod extends or retracts with a single press of a button for quick height adjustments.
3.2 Patented Foot Pedal for Angle Adjustment
The monopod's base includes a patented foot pedal for quick and easy angle adjustments, eliminating the need to bend down or rotate knobs.
- To unlock for 360° swiveling or angle adjustment: Gently press the "Pedal Locking Control" with your foot.
- To lock: Release the pedal, and the monopod will lock into its vertical position or the desired angle.

Figure 5: The foot pedal allows for hands-free adjustment of the monopod's angle and 360° swivel.
3.3 Versatile 3-in-1 Modes
The Cobra 3 Strike Monopod can be configured into three modes:
- Standard Monopod: Use the full monopod with the quick-release plate for extended reach and stability.
- Low-Angle Tripod: Detach the main shaft and use the base as a mini tripod for ground-level shots. The legs are adjustable to 22°, 50°, or 78°.
- Trekking Pole: The monopod can also serve as a sturdy trekking pole for outdoor activities.

Figure 6: The monopod's modular design allows for quick conversion into a trekking pole, monopod with base, or mini tripod.
Video 2: Demonstrates the one-press lifting mechanism for quick height adjustments and the versatility of the Cobra 3 Strike Monopod.
4. Maintenance
4.1 Cleaning
Regularly wipe down the monopod with a soft, dry cloth to remove dust and debris. For stubborn dirt, use a slightly damp cloth and ensure all parts are dry before storage.
4.2 Tightening Clamps
If the monopod's leg clamps become loose over time, use the provided tool (often integrated into the monopod's design) to tighten them. This ensures continued stability and smooth operation.

Figure 7: The monopod's design includes features for easy maintenance and adjustment of components like clamps.
4.3 Storage
Store the monopod in its provided carrying case when not in use to protect it from dust, moisture, and physical damage. Ensure the monopod is fully retracted and all components are securely fastened before placing it in the case.
5. Troubleshooting
5.1 Quick-Release Plate Stiffness
If the quick-release plate is stiff or difficult to detach/attach, ensure the auto-locking sleeve is fully pressed down. A small amount of silicone lubricant can be applied to the mechanism if stiffness persists, but avoid over-lubrication.
5.2 Monopod Instability
If the monopod feels unstable, check the following:
- Ensure all telescopic sections are fully extended and locked.
- Verify that the quick-release plate is securely attached to both the camera and the monopod.
- When using the tripod base, ensure the legs are spread to an appropriate angle for the terrain and weight of your equipment.
6. Specifications
| Feature | Specification |
|---|---|
| Product Dimensions | 11.81 x 11.81 x 59.06 inches |
| Item Weight | 3.52 pounds (1.6 Kilograms) |
| Material | Aluminum |
| Weight Limit | 11 Pounds |
| Maximum Height | 59 Inches |
| Compatible Devices | Camcorder, Camera, Smartphone |
| Special Features | Detachable 3-in-1 Design, Innovative Pedal Lock, One-Click Quick-Release, One-Press Quick Height Adjusting |
7. Warranty and Support
For warranty information and customer support, please refer to the documentation included in your product packaging or visit the official IFOOTAGE website. Keep your purchase receipt as proof of purchase for any warranty claims.


