
1. Introduction
This manual provides detailed instructions for the setup, operation, and maintenance of your SZELAM GH0717 11.5-inch Digital Wall Alarm Clock. Please read this manual thoroughly before using the product to ensure proper function and longevity.

Image 1.1: Front view of the SZELAM GH0717 Digital Wall Alarm Clock.
2. Package Contents
Carefully unpack the box and ensure all the following items are present:
- SZELAM GH0717 Digital Wall Alarm Clock
- Remote Control
- USB Power Adapter (Output: DC 5V/1A)
- USB Power Cable (Length: 9.84ft / 3m)
- CR2032 Battery (for time memory backup)
- Adhesive Hooks (for wall mounting)
- Trace Nail (for wall mounting)
- User Manual
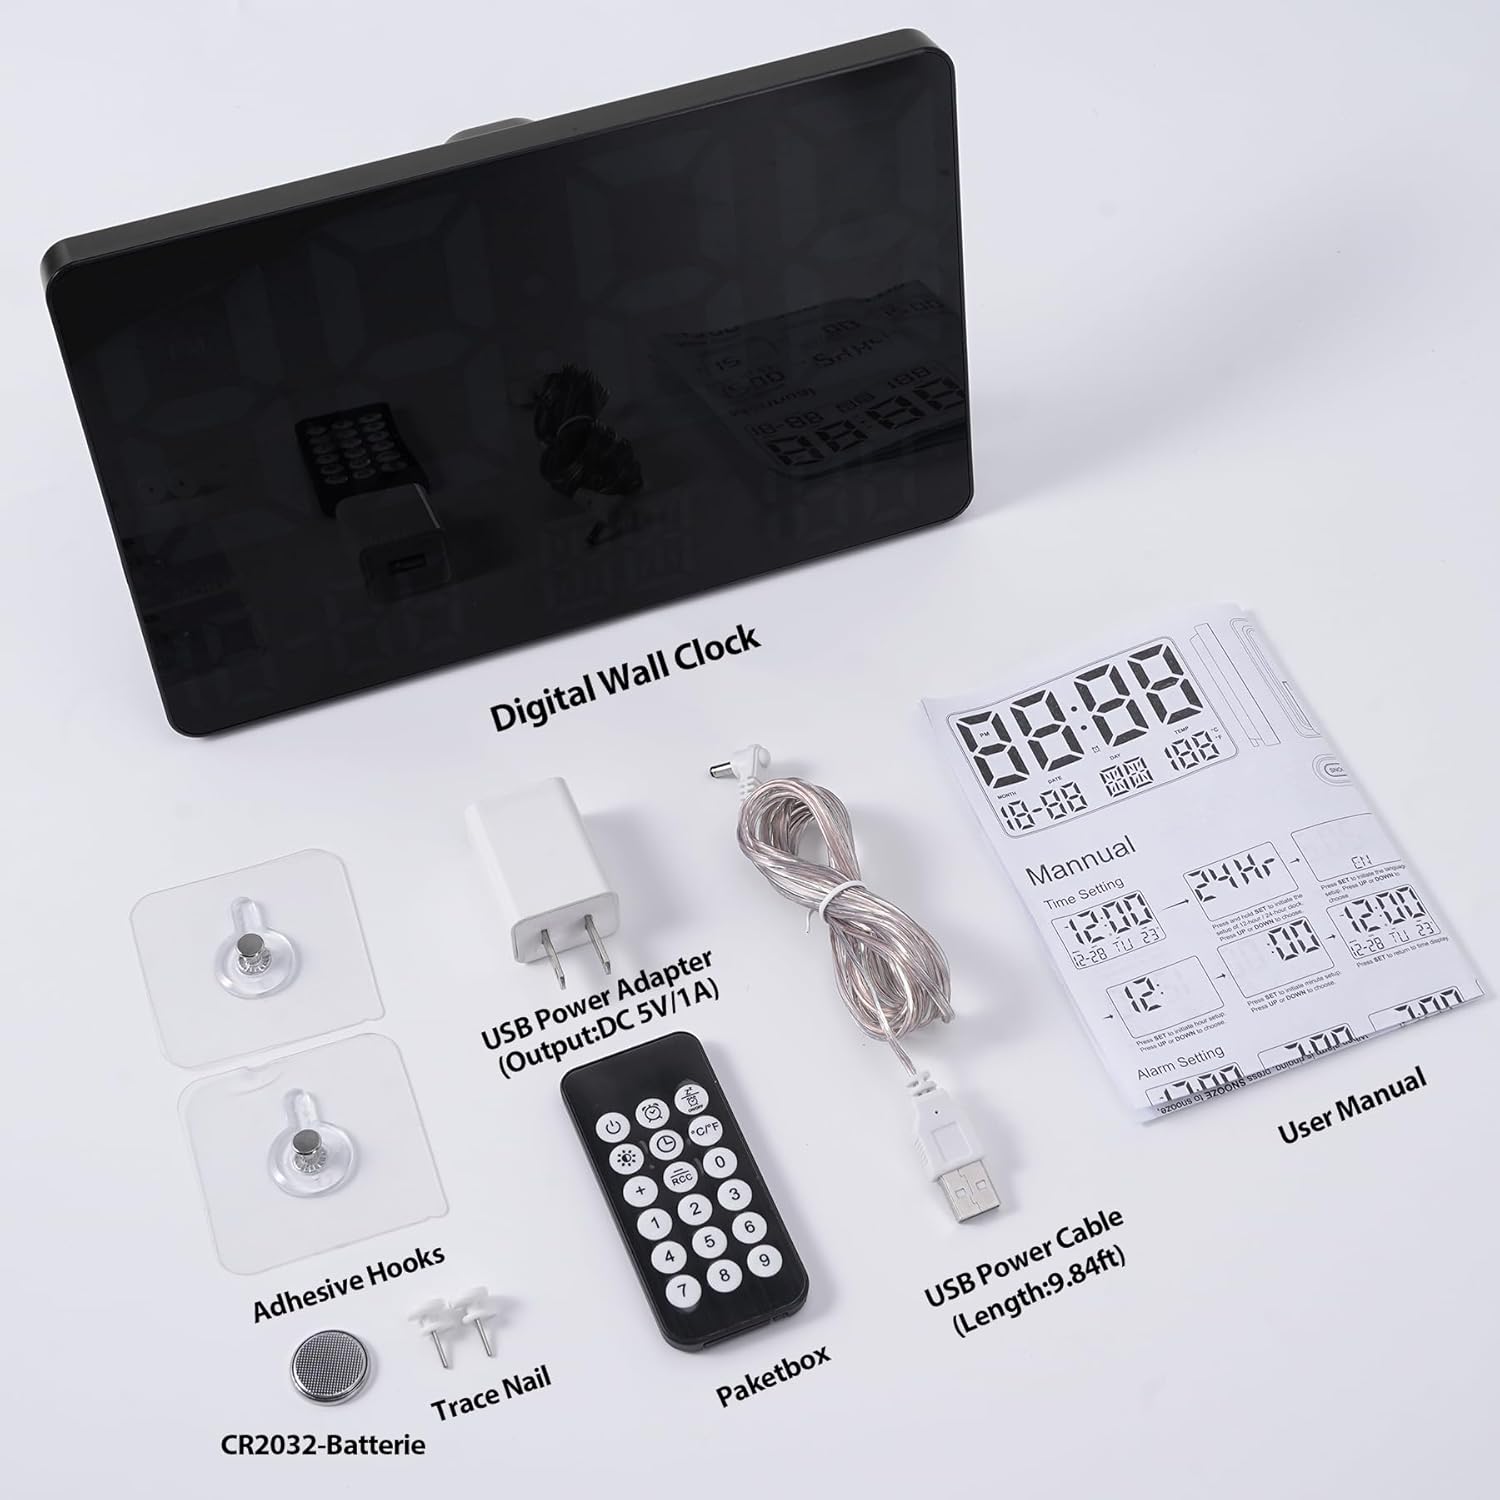
Image 2.1: Contents of the product package.
3. Product Overview
3.1 Front Display
The 11.5-inch large LED display shows time, date (month, day, day of week), and temperature. The digits feature a multi-color design for enhanced visibility.

Image 3.1: Front display features and indicators.
3.2 Back Panel and Buttons
The back of the clock features control buttons and connection ports.
- SNOOZE & LIGHT: Short press for snooze, long press to activate/deactivate auto light-sensitive function.
- DOWN & 12/24H: Adjusts values downwards, switches between 12-hour and 24-hour time format.
- UP & °C/°F: Adjusts values upwards, switches between Celsius and Fahrenheit temperature display.
- ALARM: Enters alarm setting mode.
- TIME SET: Enters time setting mode.
- USB CABLE: Power input port.
- CR2032 (Battery Compartment): For time memory backup battery.
- WALL MOUNT HOLE: For hanging the clock on a wall.

Image 3.2: Back panel with buttons and ports.
3.3 Remote Control
The included remote control allows for convenient adjustment of settings from a distance.

Image 3.3: Remote control in use.
4. Setup
4.1 Power Connection
The clock is a plug-in device and requires continuous power via the USB cable and adapter. It is not battery-powered for primary operation.
- Connect the USB power cable to the USB port on the back of the clock.
- Plug the USB power adapter into a standard electrical outlet.

Image 4.1: Power connection for the clock.
4.2 Battery Backup
A CR2032 battery is included for time memory backup. This battery ensures that time settings are retained during a power outage, but it does not power the display.
- Open the CR2032 battery compartment on the back of the clock.
- Insert the CR2032 battery with the correct polarity.
- Close the battery compartment.
4.3 Placement
The clock can be placed on a desktop using its integrated folding bracket or mounted on a wall.
- Desktop Placement: Extend the folding bracket on the back of the clock to stand it upright on a flat surface.
- Wall Mounting: Use the wall mount hole on the back of the clock with the provided adhesive hooks or trace nail. Ensure the mounting surface is suitable and secure.

Image 4.2: Desktop and wall mounting options.
5. Operating Instructions
5.1 Setting Time and Date
Use the remote control or the buttons on the back of the clock to set the time and date.
- Press the TIME SET button on the back of the clock or the corresponding button on the remote.
- Use the UP and DOWN buttons (or remote arrows) to adjust the hour, minute, year, month, and day.
- Press TIME SET again to confirm each setting and move to the next.
5.2 12/24 Hour Mode
To switch between 12-hour and 24-hour time formats:
- Press the DOWN & 12/24H button on the back of the clock or the 12/24H button on the remote control.
- In 12-hour mode, a 'PM' indicator will appear for afternoon hours.
5.3 Alarm Setting
The clock features an alarm function with a 5-minute snooze.
- Press the ALARM button on the back of the clock or the remote.
- Use the UP and DOWN buttons (or remote arrows) to set the desired alarm hour and minute.
- Press ALARM again to confirm.
- To activate/deactivate the alarm, press the ALARM button once outside of setting mode. An alarm icon will appear/disappear on the display.
- When the alarm sounds, press the SNOOZE & LIGHT button (or remote snooze button) for a 5-minute snooze. This can be repeated up to 4 times.
5.4 Brightness Adjustment
The clock offers 4 levels of adjustable brightness and an automatic dimming function.
- Manual Adjustment: Use the brightness buttons on the remote control to cycle through the 4 brightness levels.
- Automatic Dimming: Long press the SNOOZE & LIGHT button on the clock to activate the "auto light-sensitive function." The clock will then adjust its brightness based on ambient light. When this function is active, manual brightness adjustment via the remote is disabled. Long press again to deactivate.

Image 5.1: Four levels of brightness adjustment.
5.5 Temperature Display (°C/°F)
To switch between Celsius and Fahrenheit temperature units:
- Press the UP & °C/°F button on the back of the clock or the °C/°F button on the remote control.

Image 5.2: Temperature display in Fahrenheit and Celsius.
5.6 Language Setting
The digital date and time display supports 7 languages:
- English
- German
- French
- Spanish
- Italian
- Dutch
- USA (English)
Refer to the specific language setting instructions in the included paper manual for detailed steps on how to change the display language.
6. Maintenance
To ensure the longevity and proper functioning of your digital clock, follow these maintenance guidelines:
- Cleaning: Use a soft, dry cloth to wipe the display and casing. Avoid abrasive cleaners, solvents, or chemical sprays that may damage the surface.
- Placement: Place the clock in a stable location, away from direct sunlight, extreme temperatures, and high humidity.
- Power: Ensure the USB power cable is securely connected and not strained.
- Battery: Replace the CR2032 backup battery annually or if you notice time settings are lost during power interruptions.
7. Troubleshooting
If you encounter any issues with your SZELAM GH0717 Digital Wall Alarm Clock, please refer to the following common problems and solutions:
| Problem | Possible Cause | Solution |
|---|---|---|
| Display is blank or not turning on. | No power connection or faulty power adapter/cable. | Ensure the USB cable is securely connected to both the clock and the power adapter, and the adapter is plugged into a working outlet. Try a different USB port or adapter if available. |
| Time/Date is incorrect after a power outage. | CR2032 backup battery is dead or missing. | Replace the CR2032 battery in the battery compartment. Reset the time and date manually. |
| Remote control is not responding. | Remote battery is dead or line of sight is blocked. | Replace the battery in the remote control. Ensure there are no obstructions between the remote and the clock's sensor. |
| Brightness cannot be adjusted manually. | Automatic dimming function is active. | Long press the SNOOZE & LIGHT button on the clock to deactivate the "auto light-sensitive function." Then, manual brightness adjustment will be available via the remote. |
| Alarm does not sound. | Alarm is not activated. | Press the ALARM button on the clock or remote to ensure the alarm icon is displayed, indicating it is active. |
8. Specifications
- Brand: SZELAM
- Model Number: GH0717
- Display Type: Digital LED
- Product Dimensions: 12"W x 6.7"H
- Power Source: Corded Electric (USB)
- Backup Battery: 1 x CR2032 (included, for time memory only)
- Brightness: 4 levels adjustable, with auto light-sensitive function
- Alarm: Yes, with 5-minute snooze (up to 4 times)
- Time Format: 12/24H selectable
- Temperature Display: °C/°F selectable
- Languages: 7 (English, German, French, Spanish, Italian, Dutch, USA)
- Mounting Type: Wall Mount, Tabletop
- Frame Material: Acrylonitrile Butadiene Styrene
- Item Weight: 1.23 pounds
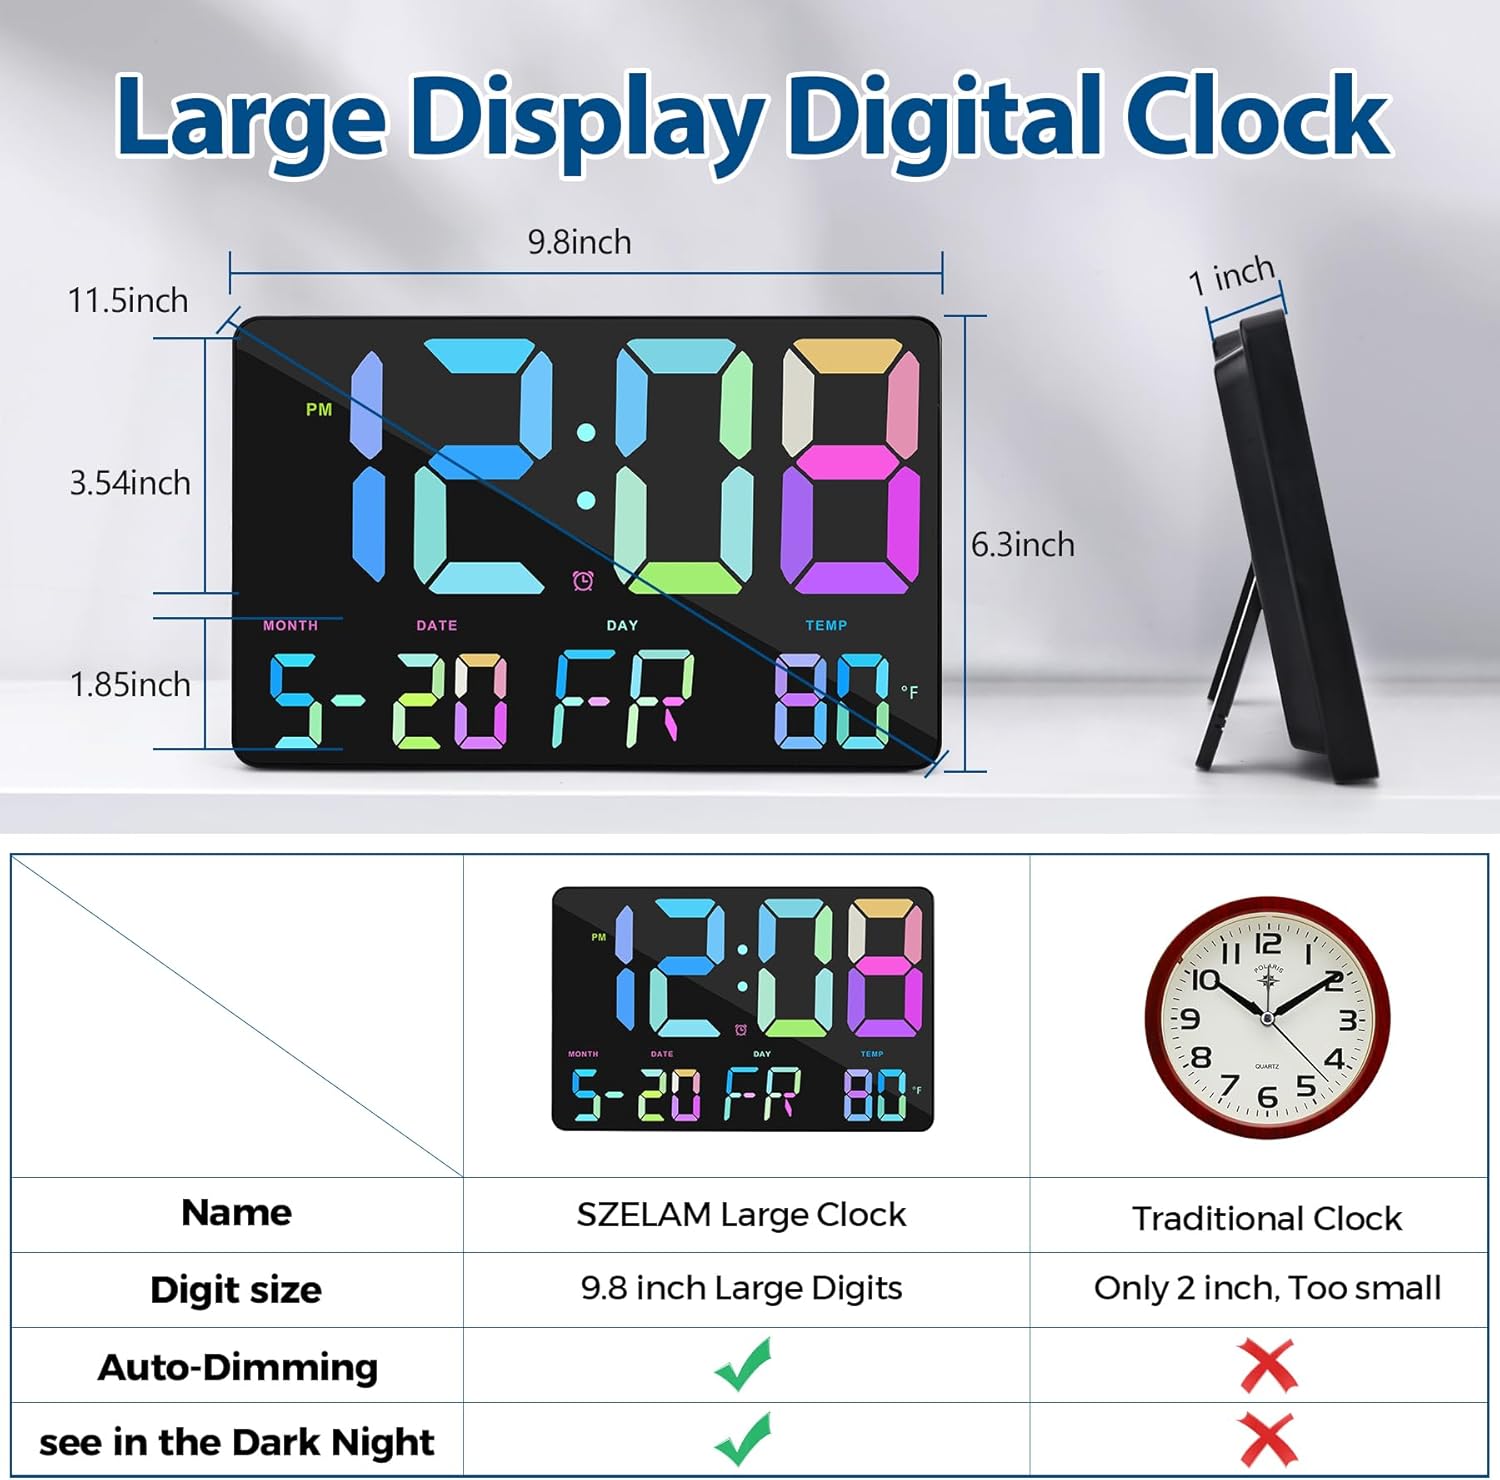
Image 8.1: Product dimensions.
9. Official Product Video
Video 9.1: An overview of the SZELAM Digital Desk Clock, demonstrating its features and functionality, including time setting, alarm, and brightness adjustments.
10. Warranty and Support
Specific warranty information for the SZELAM GH0717 Digital Wall Alarm Clock is not provided in this document. For warranty details, technical support, or further assistance, please refer to the contact information provided in the product packaging or visit the official SZELAM website.