Introduction
This manual provides essential information for the safe and efficient operation of your Danby DBMW1126BBS 1.1 cu. ft. Countertop Microwave. Please read these instructions thoroughly before using your appliance and retain them for future reference. This microwave combines a sleek design with powerful performance, offering 1.1 cubic feet of capacity and 900 watts of cooking power across 10 adjustable power levels.
Important Safety Instructions
When using electrical appliances, basic safety precautions should be followed, including the following:
- Read all instructions before using the appliance.
- Do not attempt to operate this oven with the door open as this can result in harmful exposure to microwave energy.
- Do not place any object between the oven front face and the door or allow soil or cleaner residue to accumulate on sealing surfaces.
- Do not operate the oven if it is damaged. It is particularly important that the oven door closes properly and that there is no damage to the: (1) door (bent), (2) hinges and latches (broken or loosened), (3) door seals and sealing surfaces.
- The oven should not be adjusted or repaired by anyone except properly qualified service personnel.
- Do not heat liquids or other foods in sealed containers since they are liable to explode.
- Only allow children to use the oven without supervision when adequate instructions have been given so that the child is able to use the oven in a safe way and understands the hazards of improper use.
- Always ensure the turntable and roller ring are correctly positioned before operation.
Product Overview
The Danby DBMW1126BBS microwave oven is designed for convenient and efficient cooking. Familiarize yourself with its components and features.

Front view of the Danby DBMW1126BBS microwave oven, showcasing its black exterior and stainless steel accents.
Control Panel
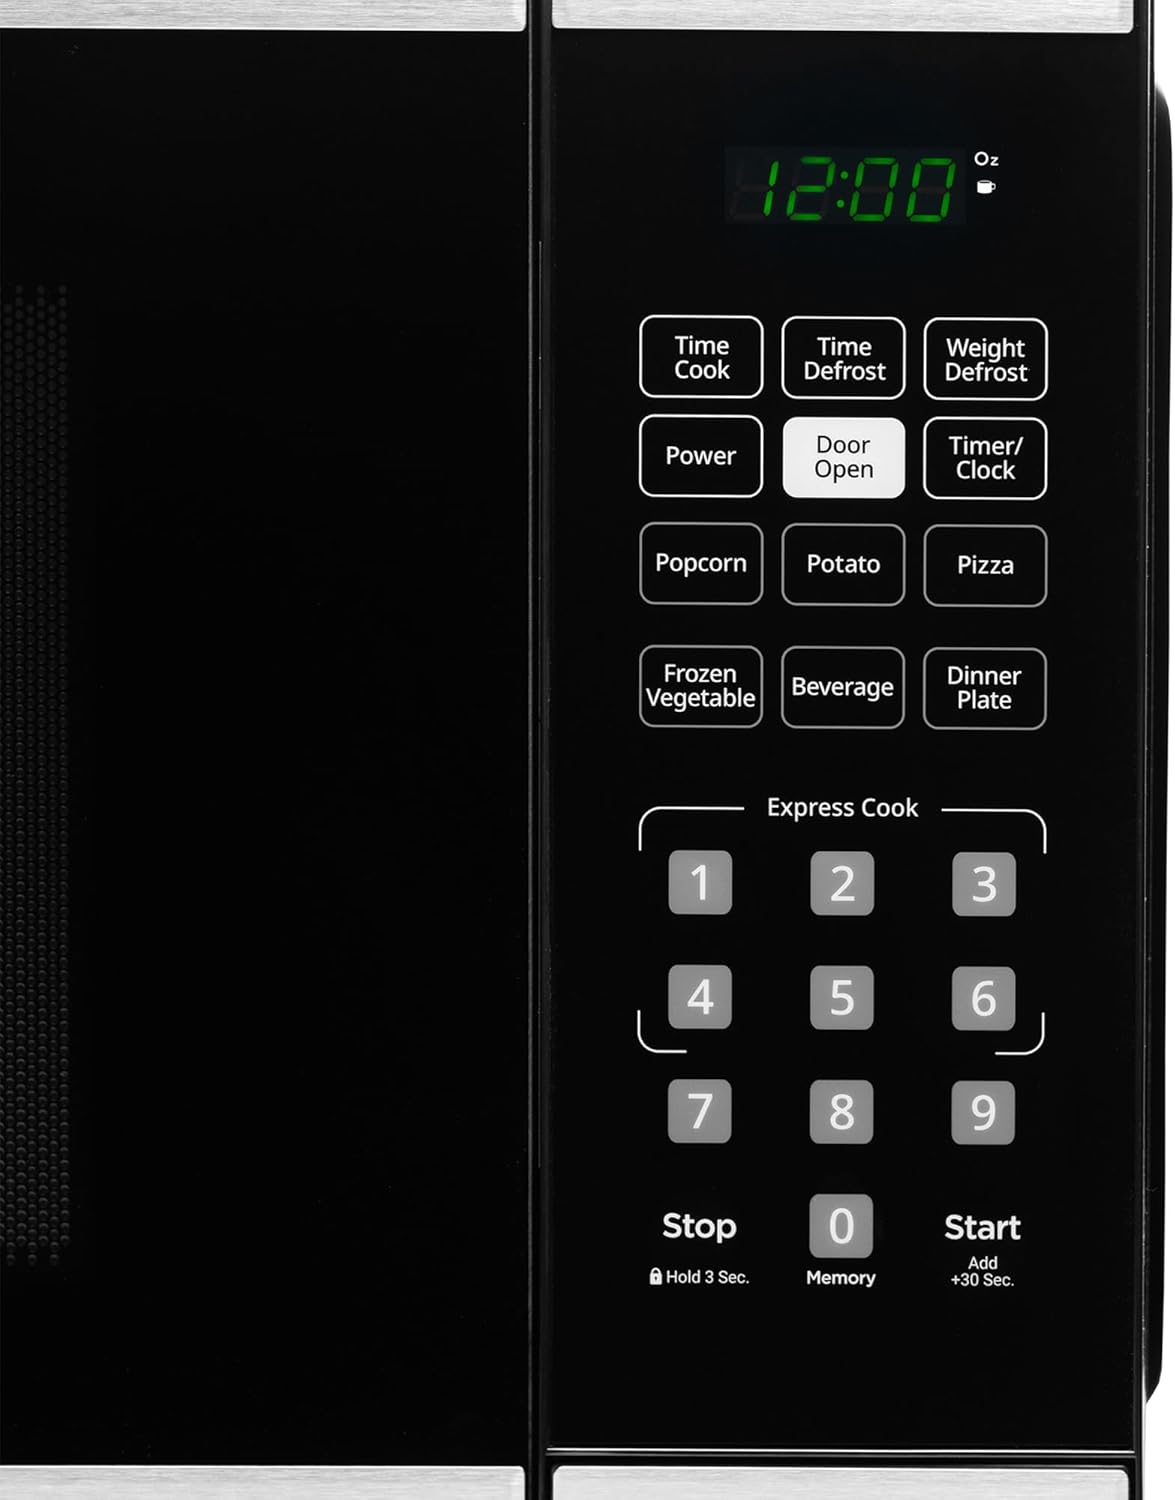
Detailed view of the microwave's control panel, featuring the digital display, function buttons, and numerical keypad.
Key Features
- Capacity: 1.1 cu. ft.
- Power: 900 Watts with 10 adjustable power levels.
- Auto Cook Options: 6 preset options for Popcorn, Potato, Pizza, Frozen Vegetables, Beverage, and Dinner Plate.
- Express Cook: Quick cooking from 1 to 6 minutes.
- Add 30 Seconds: Easily extend cooking time.
- Auto Defrost: Options to defrost by time or weight.
- Time Cook: Manual setting for precise cooking duration.
- Child Safety Lock: Locks the control panel for safety.
Setup and Installation
Unpacking
Carefully remove the microwave oven from its packaging. Remove all packing materials, including the turntable, roller ring, and instruction manual. Inspect the oven for any damage, such as dents or a misaligned door. Do not operate the oven if it is damaged. Contact customer service if damage is found.
Placement
Place the microwave oven on a flat, stable surface that is strong enough to hold the oven and the food being cooked. Ensure there is adequate ventilation around the unit. Maintain a minimum of 4 inches (10 cm) of space on the top, sides, and rear of the oven for proper airflow. Do not block air vents.

Rear view of the microwave, illustrating the ventilation requirements for proper operation.
Electrical Requirements
The microwave oven requires a standard 115 Volt, 60 Hz AC outlet with a dedicated 15-amp circuit. Do not use an extension cord. Ensure the electrical outlet is properly grounded. If you are unsure about the grounding, consult a qualified electrician.
Operating Your Microwave
Setting the Clock
- Press the TIMER/CLOCK button once.
- Use the number pad to enter the current time (e.g., 1-2-3-0 for 12:30).
- Press the TIMER/CLOCK button again to confirm.
Basic Microwave Cooking (Time Cook)
- Place food in the microwave-safe container on the turntable.
- Press the TIME COOK button.
- Enter the desired cooking time using the number pad (e.g., 1-0-0 for 1 minute).
- Press START.
Adjusting Power Levels
To cook at a power level lower than 100%:
- Press the TIME COOK button.
- Enter the desired cooking time.
- Press the POWER button.
- Enter the desired power level (1-10, where 10 is 100% power).
- Press START.
Express Cook
For quick cooking, simply press a number button (1-6) to cook for that many minutes at 100% power.
- Press 1 for 1 minute.
- Press 2 for 2 minutes, and so on, up to 6 minutes.
Add 30 Seconds
To add 30 seconds to an ongoing cooking cycle or to start cooking for 30 seconds at 100% power, press the START/+30 SEC. button.
Auto Cook Menus
The microwave features 6 convenient auto cook options:
- Press the desired auto cook button (e.g., POPCORN, POTATO, PIZZA, FROZEN VEGETABLE, BEVERAGE, DINNER PLATE).
- Follow the display prompts to select the quantity or size if applicable.
- Press START.
Defrosting
Your microwave offers two defrosting methods:
- Time Defrost: Press TIME DEFROST, enter the desired defrosting time, then press START.
- Weight Defrost: Press WEIGHT DEFROST, enter the weight of the food in pounds (e.g., 1.0 for 1 pound), then press START.
Child Safety Lock
To prevent unintended operation, activate the child safety lock:
- To Lock: Press and hold the STOP button for 3 seconds. A lock indicator will appear on the display.
- To Unlock: Press and hold the STOP button for 3 seconds again. The lock indicator will disappear.
- 2-Step Door Safety Lock: For an additional safety measure, press 7, 9, and then the DOOR OPEN button.
Care and Maintenance
Regular cleaning and maintenance will ensure the longevity and optimal performance of your microwave oven.
Cleaning the Exterior
Wipe the exterior surfaces with a soft, damp cloth. Avoid using abrasive cleaners or harsh chemicals that could damage the finish.
Cleaning the Interior
Clean the interior cavity regularly. For light spills, wipe with a damp cloth. For stubborn food residue, place a bowl of water with lemon slices inside and microwave for 2-3 minutes. The steam will loosen the residue, making it easier to wipe away. Ensure the oven is unplugged before cleaning.

The interior of the microwave, showing the removable glass turntable and roller ring for easy cleaning.
Cleaning the Turntable and Roller Ring
The glass turntable and roller ring can be removed for cleaning. Wash them in warm, soapy water or in the dishwasher. Ensure they are completely dry before placing them back in the oven.
Troubleshooting
If you experience issues with your microwave, consult the table below for common problems and solutions.
| Problem | Possible Cause | Solution |
|---|---|---|
| Oven will not start | Power cord not plugged in; Door not closed properly; Fuse blown or circuit breaker tripped; Child safety lock activated. | Plug in power cord; Close door firmly; Check household fuse/circuit breaker; Deactivate child safety lock. |
| Food not cooking evenly | Food not stirred or turned; Incorrect power level or cooking time; Turntable not rotating. | Stir or turn food during cooking; Adjust power level/time; Ensure turntable and roller ring are correctly placed. |
| Light inside oven not working | Bulb needs replacement. | Contact qualified service personnel for bulb replacement. |
| Excessive steam or condensation | High moisture content in food; Normal operation. | This is normal for foods with high moisture. Ensure adequate ventilation. |
Specifications
Detailed specifications for the Danby DBMW1126BBS microwave oven.

Dimensional diagram of the Danby DBMW1126BBS microwave, indicating its height, width, and depth.
| Feature | Detail |
|---|---|
| Model Number | DBMW1126BBS |
| Capacity | 1.1 Cubic Feet |
| Wattage | 900 watts |
| Voltage | 115 Volts |
| Product Dimensions (D x W x H) | 14.96"D x 20.35"W x 11.81"H (38 cm D x 51.7 cm W x 30 cm H) |
| Item Weight | 30.8 Pounds |
| Color | Black and Stainless Steel |
| Material | Stainless Steel |
| Installation Type | Countertop |
| Special Feature | Child Safety Lock |
Warranty and Customer Support
Warranty Information
Your Danby DBMW1126BBS microwave oven is covered by a 12-month warranty on parts and labor with carry-in service from the date of purchase. This warranty covers defects in material and workmanship under normal use. Please retain your proof of purchase for warranty claims.
Customer Support
For technical assistance, warranty service, or to order replacement parts, please contact Danby Customer Service. Have your model number and proof of purchase ready when contacting support.
Danby Customer Service:
Website: www.danby.com
Phone: Refer to your regional Danby website for local contact numbers.


