
1. Introduction
This manual provides detailed instructions for assembling, setting up, and operating your Irfora DS3231 DIY Digital Dot Matrix LED Alarm Clock Kit. This kit allows you to build a functional clock with high accuracy, featuring time, date, temperature, and week display capabilities. It includes a transparent case to protect the components and offers various customizable display options.

Image 1.1: The fully assembled Irfora DS3231 Digital Dot Matrix LED Alarm Clock Kit, showcasing its blue LED display.
2. Kit Contents
Before beginning assembly, please verify that all components listed below are present in your kit.
- Main Circuit Board (PCB)
- Dot Matrix LED Display Modules
- Transparent Acrylic Case Panels (Top, Bottom, Sides)
- DS3231 High Accuracy Clock Chip
- Microcontroller Unit (MCU)
- Touch Keys
- Light Sensor
- Microphone (for voice control)
- Resistors, Capacitors, Diodes, and other small electronic components
- USB Power Cable
- Mounting Hardware (screws, nuts, standoffs)

Image 2.1: An overview of all components included in the DIY kit, featuring the PCB, LED matrix, acrylic panels, and various electronic parts.
3. Assembly Instructions
Follow these steps carefully to assemble your digital clock kit. Basic soldering skills are required.
- Prepare Components: Carefully unpack all components. Remove the protective film from both sides of the transparent acrylic case panels.
- Solder Small Components: Begin by soldering the smaller electronic components (resistors, capacitors, diodes, IC sockets if applicable) onto the main circuit board (PCB) according to the markings on the PCB.
- Solder ICs and Sensors: Solder the DS3231 clock chip, microcontroller, touch keys, light sensor, and microphone onto their designated positions on the PCB. Ensure correct orientation for polarized components.
- Attach LED Display Modules: Carefully align and solder the dot matrix LED display modules to the PCB. Ensure all pins make good contact.
- Assemble Acrylic Case: Once all electronic components are soldered, mount the assembled PCB into the bottom acrylic panel using the provided standoffs and screws. Then, attach the side panels and finally the top acrylic panel, securing them with the remaining screws. Ensure the USB port and touch keys are accessible through the case openings.

Image 3.1: Peeling off the protective film from the acrylic case panels before assembly.
4. Setup and Initial Configuration
After assembly, connect the clock to a power source and perform initial setup.
- Power Connection: Connect the provided USB cable to the clock's USB interface and plug the other end into a standard USB power adapter (not included) or a computer USB port. The clock will power on and display default settings.
- Initial Time/Date Setting: Upon first power-up, you may need to set the current time and date. Use the touch keys (usually located on the sides or top of the case) to navigate through the settings menu.
- Navigation: Typically, one touch key is for 'Mode' or 'Select', and another for 'Adjust' or 'Next'. Refer to the on-screen prompts for specific navigation.
- Set Time: Enter the time setting mode. Adjust hours, then minutes. Confirm each setting.
- Set Date: Enter the date setting mode. Adjust year, month, then day. Confirm each setting.
- Temperature Unit: Select between Celsius (°C) and Fahrenheit (°F) for temperature display.
- Time Format: Choose between 12-hour (with AM/PM) or 24-hour format.

Image 4.1: The USB port on the back of the clock for power connection.
5. Operating Instructions
Your clock offers various display modes and functions. Use the built-in touch keys to access and configure them.
5.1 Basic Display Modes
Press the 'Mode' key to cycle through the primary display modes:
- Time Display: Shows current time (12H/24H format).
- Date Display: Shows current date (Year/Month/Day).
- Temperature Display: Shows current ambient temperature (°C/°F).
- Week Display: Shows the current day of the week.

Image 5.1: Examples of the clock displaying time, date, and other information in various LED colors.
5.2 Alarm Clock Function
To set the alarm:
- Enter the alarm setting mode using the 'Mode' key.
- Use the 'Adjust' key to set the desired alarm hour and minute.
- Confirm the alarm setting. You can usually enable or disable the alarm from this menu.
5.3 Display Customization
The clock allows customization of font, display effects, and animation effects. Access these options through the settings menu (refer to on-screen prompts for navigation).
- Font Selection: Choose from available font styles for the display.
- Display Effects: Select different ways information transitions on the screen.
- Animation Effects: Enable or disable various animations.
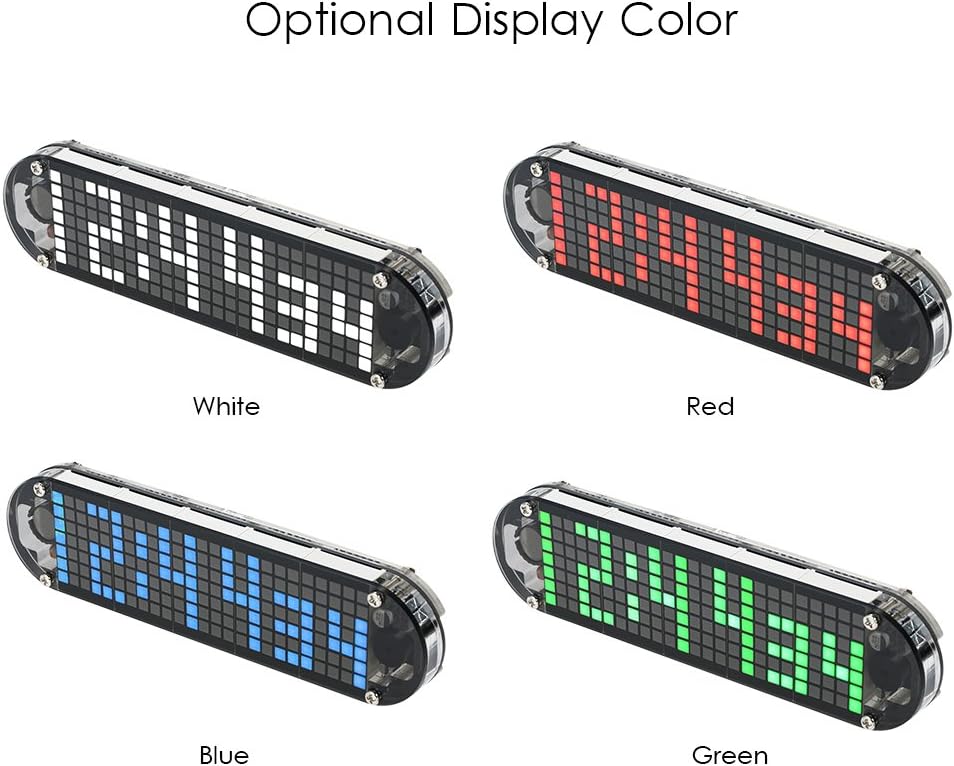
Image 5.2: The clock is available with various LED display colors, including White, Red, Blue, and Green.
5.4 Brightness Adjustment
The clock can automatically adjust brightness based on ambient light using its built-in light sensor. You can also manually set the brightness level through the settings menu.
5.5 Voice Control and Countdown
The clock includes voice control capabilities and a countdown function. Refer to the on-screen menu for activation and configuration of these features.
6. Maintenance
To ensure the longevity and proper functioning of your clock:
- Cleaning: Use a soft, dry cloth to clean the acrylic case. Avoid abrasive cleaners or solvents that could damage the material.
- Power Supply: Always use a stable 5V USB power source.
- Backup Battery: The DS3231 chip includes temperature compensation and maintains accurate time even if the main power is disconnected, thanks to its internal backup battery (not user-replaceable). This ensures time settings are preserved during power outages.
- Environment: Operate the clock indoors and avoid exposure to extreme temperatures, humidity, or direct sunlight.
7. Troubleshooting
If you encounter issues with your clock, refer to the following common problems and solutions:
- Clock does not power on:
- Ensure the USB cable is securely connected to both the clock and a working power source.
- Verify the power adapter is functioning correctly.
- Check for any visible soldering errors on the PCB.
- Display is dim or flickering:
- Check the brightness settings in the menu.
- Ensure the light sensor is not obstructed if automatic brightness is enabled.
- Inspect connections to the LED display modules for loose contacts.
- Time is inaccurate:
- Re-set the time and date.
- The DS3231 chip is highly accurate; significant inaccuracy might indicate a component issue or improper soldering.
- Touch keys are unresponsive:
- Ensure the touch key components are correctly soldered and not obstructed by the case.
- Restart the clock by disconnecting and reconnecting power.
8. Specifications
| Feature | Specification |
|---|---|
| Brand | Irfora |
| Model | DS3231 |
| Display Type | Digital Dot Matrix LED |
| Display Color (Kit) | Blue (Other colors may be available in different product variations) |
| Power Supply | USB Interface (5V DC) |
| Clock Chip | DS3231 (High Accuracy with Temperature Compensation) |
| Case Material | Transparent Acrylic |
| PCB Material | FR4 |
| Acrylic Board Size | 16.6 cm x 4.2 cm (6.54 in x 1.65 in) |
| Dot Matrix Module Size (1pc) | 2.8 cm x 4.2 cm (1.10 in x 1.65 in) |
| Item Weight | Approximately 140g (4.9 ounces) |
| Features | Time, Date, Temperature, Week Display, Alarm, Voice Control, Countdown, Auto/Manual Brightness, 12H/24H, °C/°F |
| Indoor/Outdoor Usage | Indoor |
| Batteries Included | No (Internal backup battery for clock chip is not user-replaceable) |

Image 8.1: Detailed dimensions of the individual dot matrix LED module and the main circuit board.
9. Warranty and Support
This DIY kit is intended for hobbyists and requires assembly. Due to the nature of DIY kits, specific warranty terms may vary. Please refer to your purchase documentation or contact the seller directly for information regarding warranty coverage and technical support.
For further assistance or inquiries, please reach out to the Irfora customer support team through the platform where you purchased this product.