1. Introduction
The Geevon Weather Station Model 86250T is a comprehensive indoor and outdoor thermometer and hygrometer designed to provide accurate environmental data. Featuring a 5.7-inch color VA display, it monitors indoor and outdoor temperature and humidity, offers a 12-hour weather forecast, displays moon phases, and includes an alarm clock with snooze functionality. This manual provides detailed instructions for setup, operation, and maintenance to ensure optimal performance of your device.
2. Package Contents
Please verify that all items are present in the package:
- 1 x Geevon Weather Station (Main Unit)
- 1 x Outdoor Sensor
- 1 x USB Cable
- 1 x User Instructions Manual
3. Key Features
The Geevon Weather Station offers a range of functionalities:
- Upgraded 5.7-inch HD Color VA Display: Provides clear indoor/outdoor temperature and humidity, weather forecast, comfort indicator, heat index, dew point, moon phases, time, and calendar.
- Wireless 3-Channel Temperature & Humidity Monitor: Supports up to 3 remote sensors (one included) with a 200ft/60m transmission range in open areas.
- Air Comfort Indicator & High/Low Temperature Alert: Monitors air conditions and allows setting customizable temperature alerts.
- Alarm Clock with Customizable Snooze: Functions as an alarm clock with a 3-20 minute adjustable snooze.
- Two Power Modes & 3-Level Backlight: Operates via USB cable for continuous backlight or 3 x AAA batteries (not included) for temporary backlight.
- Versatile Placement: Designed for both wall mounting and desk placement.
4. Setup Instructions
4.1. Remote Outdoor Sensor Setup
- Select Channel: Open the battery compartment of the outdoor sensor. Select a channel (1, 2, or 3) using the switch inside. If using multiple sensors, assign a unique channel to each.
- Install Batteries: Insert 2 x AAA batteries (not included) into the remote sensor, ensuring correct polarity.
- Placement: Mount the sensor vertically in a location that avoids direct sunlight and rain. The sensor is IPX4 splash-proof but not fully waterproof. Ensure it is within 200ft/60m of the main unit in an open area and at least 3ft (1m) away from electronics to prevent interference.
The image below illustrates the simple operation steps for the sensor and main unit, including battery installation and proper sensor placement.

Image: Simple Operation Guide
The outdoor sensor transmits data wirelessly to the main unit. For optimal signal, ensure no major obstructions between the sensor and the main unit.

Image: Wireless Sensor Transmission Range and Placement
4.2. Main Unit Setup
- Install Batteries: Insert 3 x AAA batteries (not included) into the main unit's battery compartment, observing polarity. These batteries provide backup power and enable temporary backlight.
- Connect USB Power: For continuous backlight and stable operation, connect the provided USB cable to the main unit and plug it into a DC 5V power adapter (not included).
The weather station offers two power modes: battery-powered for portability with temporary backlight, and USB-powered for continuous backlight.
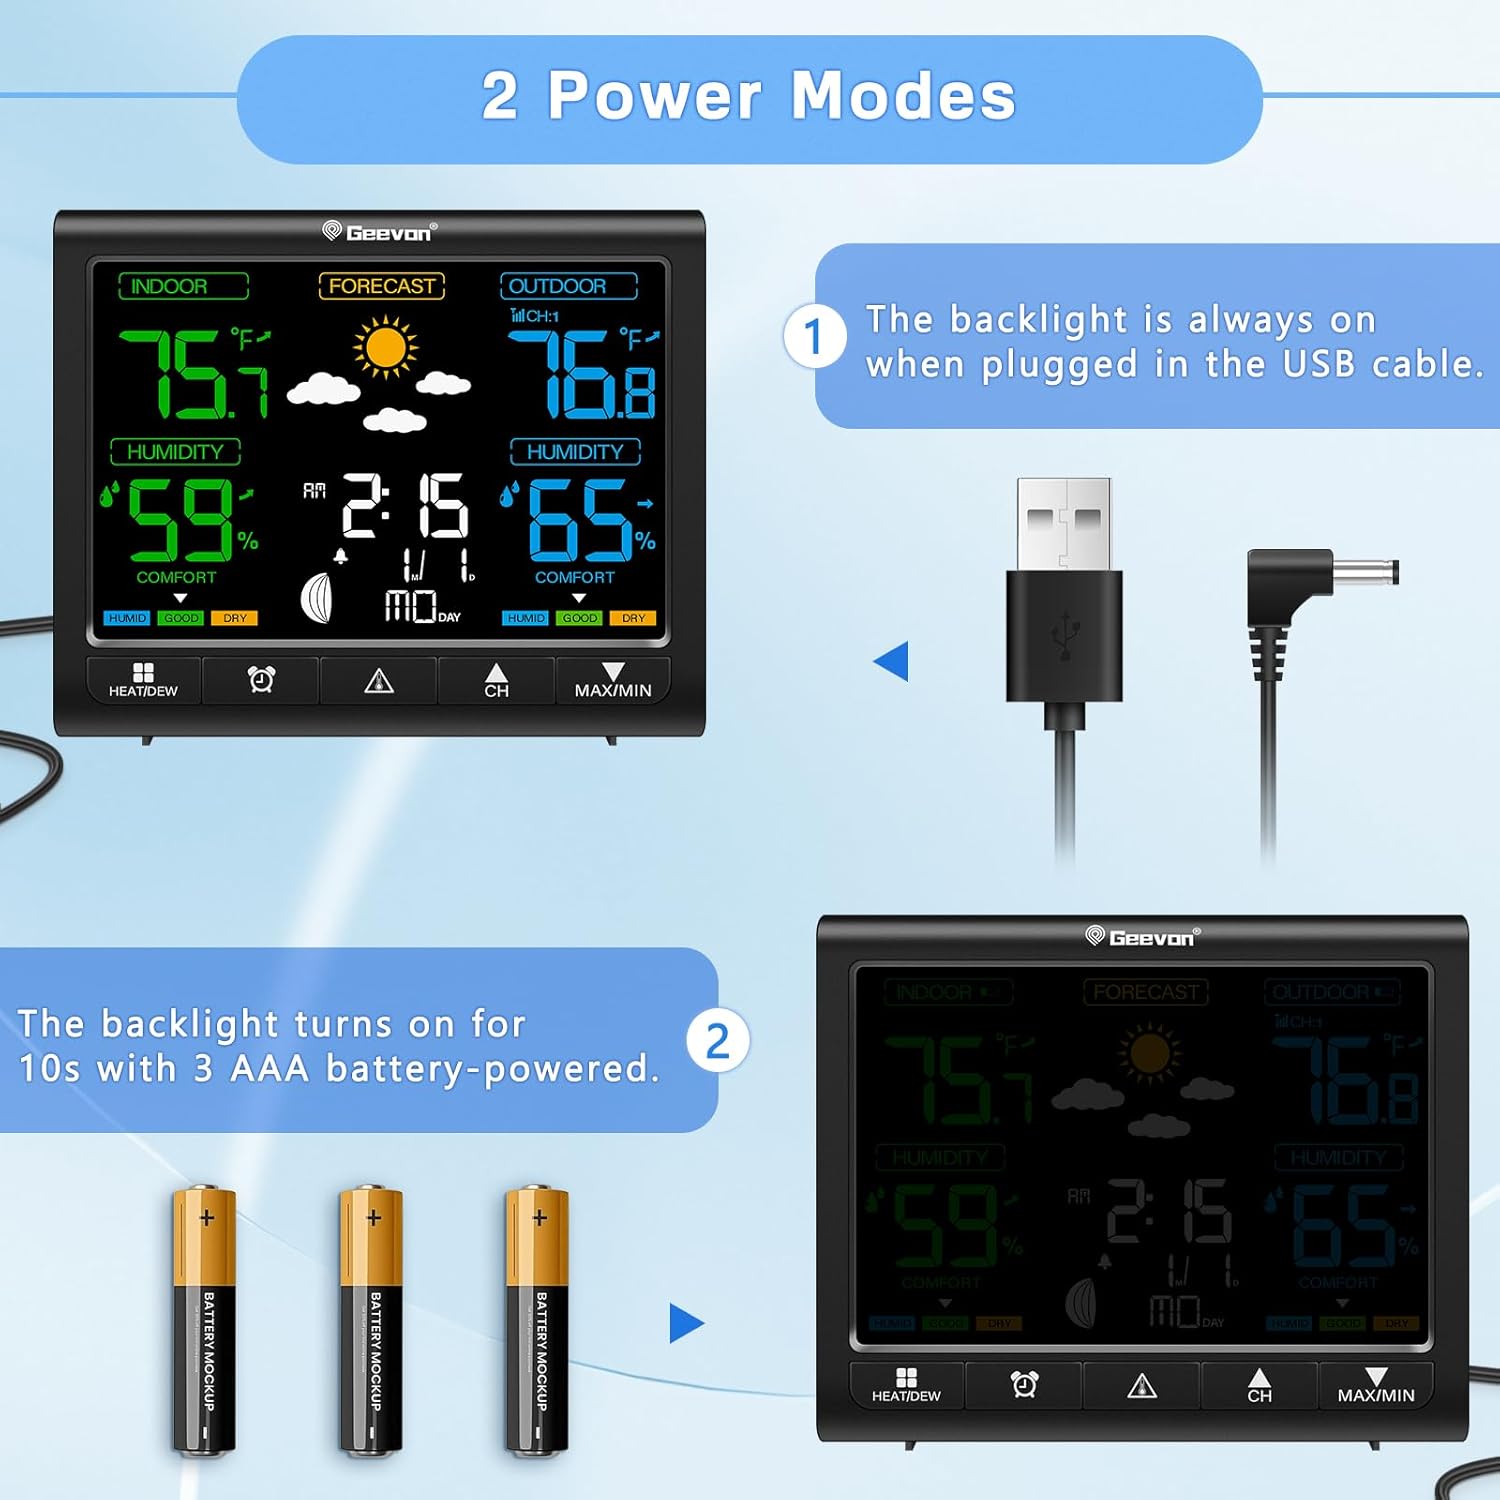
Image: Two Power Modes
4.3. Initial Synchronization
After powering on both the main unit and the outdoor sensor, the main unit will automatically search for the sensor signal. This process may take a few minutes. Once connected, the outdoor temperature and humidity will appear on the display. If the connection is not established, ensure the sensor is within range and re-insert batteries in both units to restart the synchronization process.
5. Operating Instructions
5.1. Display Overview
The 5.7-inch color VA display presents various information clearly. It is divided into sections for indoor data, outdoor data, weather forecast, time, and calendar.

Image: Geevon Weather Station Display
The display offers a 350° wide viewing angle for readability from various positions.

Image: Color HD Display with Wide Viewing Angle
5.2. Time and Date Setting
Refer to the detailed instructions in the included user manual for setting the time, date, and 12/24-hour format. Typically, a 'SET' button or similar will allow you to cycle through settings and adjust values using '+' or '-' buttons.
5.3. Alarm Clock and Snooze Function
To set the alarm, locate the 'ALARM' or 'MODE' button and follow the on-screen prompts. When the alarm sounds, press the 'SNZ/LIGHT' button to activate the snooze function. The snooze duration can be customized from 3 to 20 minutes by pressing and holding the 'SNZ/LIGHT' button for approximately 3 seconds in normal display mode. Pressing any other button will stop the alarm.

Image: Digital Alarm Clock with Customizable Snooze
5.4. Backlight Adjustment
The display features 3 levels of adjustable brightness. If the unit is powered by the USB cable, the backlight will remain continuously on. When powered by 3 x AAA batteries only, the backlight will illuminate for 10 seconds after a button press to conserve power.

Image: 3-Level Adjustable Brightness
5.5. Air Comfort Indicator & Temperature Alerts
The comfort indicator displays 'HUMID', 'GOOD', or 'DRY' based on current humidity levels, helping you maintain a comfortable indoor environment. You can set customizable high/low temperature alerts for both indoor and outdoor readings to be notified of significant changes.

Image: Air Comfort Level Indicator
5.6. Weather Forecast
The weather station provides a 12-hour weather forecast using icons such as Sunny, Partly Sunny, Cloudy, and Rainy. This forecast is based on changes in barometric pressure detected by the main unit and is not connected to internet weather services. Therefore, it provides a localized prediction.

Image: 12-Hour Weather Forecast
6. Maintenance
- Cleaning: Wipe the main unit and sensor with a soft, damp cloth. Do not use abrasive cleaners or solvents.
- Battery Replacement: Replace batteries in both the main unit and the outdoor sensor when the low battery indicator appears on the display. Ensure correct polarity during installation.
- Storage: If storing the device for an extended period, remove all batteries to prevent leakage.
7. Troubleshooting
| Problem | Possible Cause | Solution |
|---|---|---|
| No display or blank screen | Low or dead batteries; USB cable not connected or faulty. | Replace batteries in both units. Ensure USB cable is securely connected to a working power source. |
| Outdoor sensor not connecting/displaying data | Sensor out of range; interference; incorrect channel; low sensor battery. | Move sensor closer to the main unit. Check for obstructions. Ensure sensor channel matches main unit setting. Replace sensor batteries. Re-synchronize by removing and re-inserting batteries in both units. |
| Inaccurate temperature/humidity readings | Sensor exposed to direct sunlight/rain; placed near heat/cold sources; interference. | Relocate the outdoor sensor to a shaded, well-ventilated area away from direct weather elements and heat/cold sources. Ensure proper indoor unit placement away from drafts or direct heat. |
| Weather forecast is incorrect | Forecast is based on local barometric pressure changes, not internet data. | Understand that the forecast is a local prediction based on atmospheric pressure trends and may not always align with official weather reports. Allow time for the unit to establish a pressure trend. |
| Backlight turns off too quickly | Unit is running on batteries only. | Connect the unit to a USB power source for continuous backlight. When using batteries, the backlight is designed to turn off after 10 seconds to save power. |
8. Specifications
| Feature | Detail |
|---|---|
| Product Dimensions | 1 x 5.5 x 4.5 inches (Main Unit) |
| Item Model Number | 86250T |
| Main Unit Batteries | 3 AAA batteries required (not included) |
| Outdoor Sensor Batteries | 2 AAA batteries required (not included) |
| Power Source | Battery Powered & Corded Electric (USB) |
| Connectivity Technology | Wireless (unspecified frequency), USB |
| Indoor Temperature Range | 32°F ~ 122°F (0°C ~ 50°C) |
| Outdoor Temperature Range | -40°F ~ 158°F (-40°C ~ 70°C) |
| Temperature Accuracy | +/- 1.8°F (+/- 1°C) |
| Humidity Range | 10% ~ 99% RH |
| Humidity Accuracy | +/- 5% RH |
| Wireless Transmission Range | 200ft / 60m (open area) |
| Display Type | 5.7-inch HD Color VA Display |
| Special Features | Adjustable Brightness, Alarm, Clock, Customizable Alert, Pre-Calibrated |
| Material | Acrylonitrile Butadiene Styrene (ABS), Metal, Plastic |
| Color | Black |
9. Warranty and Support
Geevon offers a 30-day money-back guarantee and a 12-month warranty for the Weather Station Model 86250T. Additionally, lifetime consulting services are available for product support. For any inquiries or assistance, please refer to the contact information provided in your product packaging or visit the official Geevon support website.