1. Introduction
Thank you for choosing the Empisal EES200 Electronic Sewing Machine. This machine is designed to provide a versatile and user-friendly sewing experience, suitable for a wide range of projects. It features 100 built-in stitches, 8 one-step buttonholes, and various convenient functions to assist you in your creative endeavors. Please read this manual thoroughly before operating the machine to ensure safe and efficient use.
2. Important Safety Instructions
When using an electrical appliance, basic safety precautions should always be followed, including the following:
- Read all instructions before using this sewing machine.
- Keep these instructions in a convenient place near the machine.
- Always unplug the machine from the electrical outlet immediately after using and before cleaning, removing covers, lubricating, or making any other user servicing adjustments mentioned in the instruction manual.
- Do not allow to be used as a toy. Close attention is necessary when this machine is used by or near children.
- Use this appliance only for its intended use as described in this manual.
- Never operate this sewing machine if it has a damaged cord or plug, if it is not working properly, or if it has been dropped or damaged.
- Never drop or insert any object into any opening.
- Do not use outdoors.
- Do not operate where aerosol (spray) products are being used or where oxygen is being administered.
- To disconnect, turn all controls to the off position, then remove plug from outlet.
- Never operate with any air openings blocked. Keep air openings of the sewing machine and foot controller free from the accumulation of lint, dust, and loose cloth.
- Keep fingers away from all moving parts. Special care is required around the sewing machine needle.
- Always use the proper needle plate. The wrong plate can cause the needle to break.
- Do not use bent needles.
- Do not pull or push fabric while stitching. This may deflect the needle causing it to break.
- Wear safety glasses when operating the sewing machine.
3. Product Overview
The Empisal EES200 is an electronic sewing machine equipped with features designed for ease of use and versatility. Familiarize yourself with the main components of your machine.
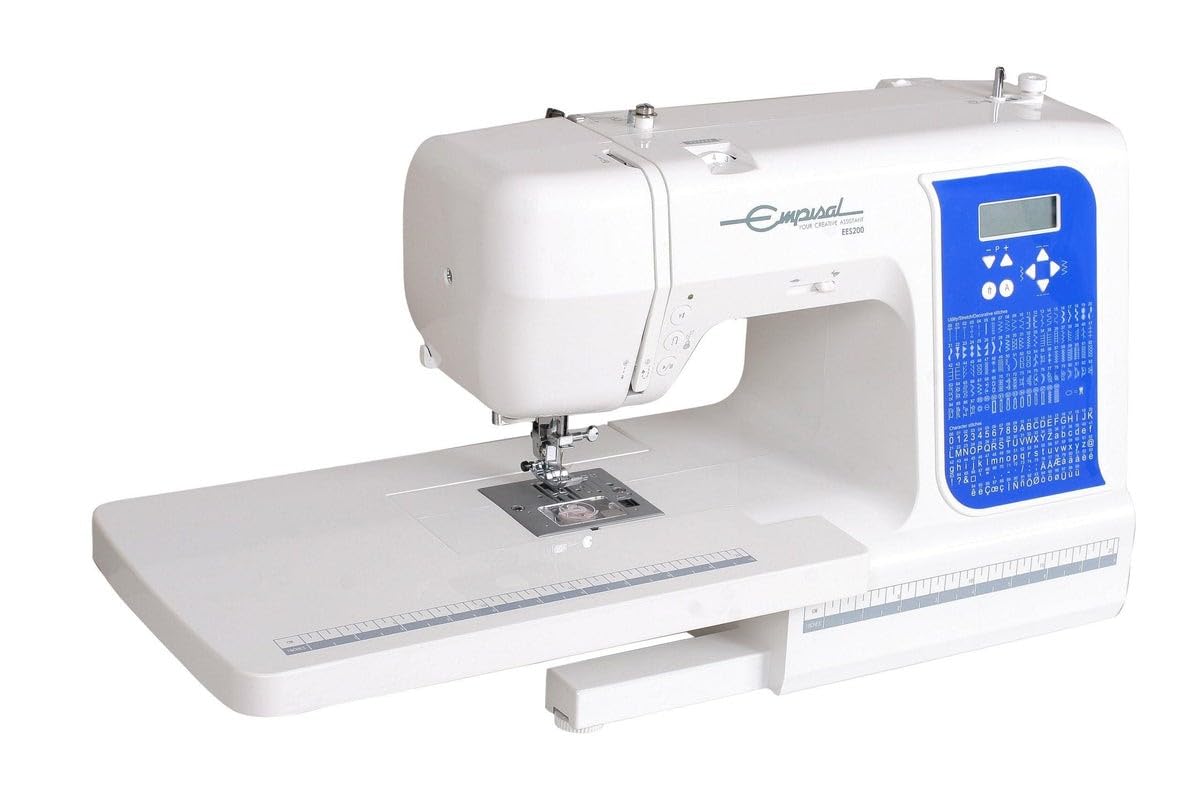
Figure 3.1: Front view of the Empisal EES200 Electronic Sewing Machine. This image displays the main body of the machine, including the needle area, presser foot, stitch selection panel, and the free arm base.
Key Features:
- 100 Built-in Stitches: Offers a wide range of decorative, utility, and stretch stitches.
- 8 One-step Buttonholes: For quick and consistent buttonhole creation.
- Rotary Hook and Drop-in Bobbin: Ensures smooth operation and easy bobbin access.
- Free Arm: Facilitates sewing cuffs, sleeves, and other small, circular items.
- Needle Threader: Simplifies the threading process.
- Thread Cutter: Conveniently located for quick thread trimming.
- Number Display Screen: Provides clear stitch information.
- Horizontal and Vertical Spool Pins: Accommodates various thread types and sizes.
- Double Presser Foot Lift: Allows for sewing thicker fabrics.
- Clip-on Feet: For easy changing of presser feet.
- Wide Table: Provides an extended work surface for larger projects.
- Plastic Dust Cover: Protects the machine when not in use.
4. Setup
4.1 Unpacking and Placement
- Carefully remove the machine from its packaging.
- Place the machine on a stable, flat surface.
- Ensure there is adequate lighting and space for comfortable operation.
4.2 Power Connection
- Connect the power cord to the machine's power input jack.
- Plug the power cord into a suitable electrical outlet.
- Connect the foot controller to its designated jack on the machine.
4.3 Winding the Bobbin
- Place a spool of thread on the horizontal or vertical spool pin.
- Guide the thread through the bobbin winding tension disc.
- Place an empty bobbin onto the bobbin winder spindle.
- Wind the thread a few times manually around the bobbin.
- Push the bobbin winder spindle to the right.
- Press the foot controller or start/stop button to begin winding.
- The machine will stop automatically when the bobbin is full.
- Cut the thread and push the bobbin winder spindle back to the left.
4.4 Inserting the Bobbin
- Ensure the needle is in its highest position.
- Open the bobbin cover plate.
- Insert the wound bobbin into the bobbin case with the thread unwinding counter-clockwise.
- Guide the thread through the tension spring and into the thread guide slot.
- Pull out approximately 10-15 cm of thread.
- Replace the bobbin cover plate.
4.5 Threading the Upper Thread
- Raise the presser foot lever.
- Place a spool of thread on the spool pin.
- Guide the thread through the upper thread guide.
- Follow the numbered threading path down to the tension discs and up to the take-up lever.
- Thread the take-up lever from right to left.
- Continue guiding the thread down through the lower thread guides.
- Use the needle threader to thread the needle eye, or thread it manually from front to back.
- Pull about 15 cm of thread through the needle eye.
4.6 Bringing Up the Bobbin Thread
- Hold the upper thread lightly with your left hand.
- Turn the handwheel towards you to lower the needle, then raise it again.
- The needle thread will catch the bobbin thread, forming a loop.
- Pull the loop up with the upper thread, then pull both threads under the presser foot and towards the back of the machine.
5. Operation
5.1 Selecting Stitches
The Empisal EES200 offers 100 built-in stitches. Use the control panel to select your desired stitch.

Figure 5.1: Close-up of the control panel and stitch selection chart. The display screen shows the selected stitch number, and the buttons allow for navigation and adjustment of stitch parameters.
- Turn on the machine.
- Refer to the stitch chart on the machine body.
- Use the stitch selection buttons (usually marked with '+' and '-') to navigate through the stitch numbers on the display screen.
- The machine will automatically set the recommended stitch length and width for the selected stitch.
5.2 Adjusting Stitch Length and Width
While the machine suggests optimal settings, you can adjust stitch length and width for specific fabrics or desired effects.
- Use the dedicated length and width adjustment buttons on the control panel.
- Increase the stitch length for basting or thicker fabrics.
- Decrease the stitch length for finer, stronger seams.
- Adjust stitch width for zigzag or decorative stitches.
5.3 Basic Sewing
- Place your fabric under the presser foot, aligning the edge with a seam guide.
- Lower the presser foot lever.
- Slowly press the foot controller or the start/stop button to begin sewing.
- Guide the fabric gently; do not pull or push it.
- To secure the beginning and end of a seam, use the reverse stitch button.
- When finished, stop the machine, raise the needle to its highest position, and lift the presser foot.
- Pull the fabric away from the machine and cut the threads using the built-in thread cutter.
5.4 Using the Free Arm
The free arm feature allows you to sew cylindrical items such as cuffs, sleeves, and pant hems with ease.

Figure 5.2: Side view of the Empisal EES200 with the accessory box removed, exposing the free arm. This feature is useful for sewing small, tubular items.
- Remove the accessory box from the front of the machine to expose the free arm.
- Slip the cylindrical item over the free arm.
- Proceed with sewing as usual.
5.5 Using the Wide Table (Optional Accessory)
For larger projects, the optional wide table provides an extended work surface.

Figure 5.3: The Empisal EES200 with the wide extension table attached. This accessory provides a larger, flat work area, ideal for quilting or handling larger fabric pieces.
- Slide the wide table onto the free arm base until it clicks into place.
- Ensure it is securely attached before beginning to sew.
5.6 One-Step Buttonholes
The machine features 8 different one-step buttonhole styles for various fabric types and button sizes.
- Attach the appropriate buttonhole foot.
- Place your button in the buttonhole foot's button holder.
- Select the desired buttonhole stitch from the control panel.
- Position your fabric and lower the presser foot.
- The machine will automatically sew the buttonhole to the correct size.
6. Maintenance
6.1 Cleaning Your Machine
Regular cleaning ensures optimal performance and extends the life of your sewing machine.
- Always unplug the machine before cleaning.
- Remove the needle, presser foot, needle plate, and bobbin case.
- Use a small brush to remove lint and dust from the feed dogs and bobbin area.
- Wipe the exterior of the machine with a soft, dry cloth. Do not use liquid cleaners.
- Reassemble the components.
6.2 Lubrication
This machine is designed to operate without user lubrication. Do not oil any part of the machine unless specifically instructed by an authorized service center.
7. Troubleshooting
This section addresses common issues you might encounter. For problems not listed here, please contact customer support.
| Problem | Possible Cause | Solution |
|---|---|---|
| Skipped Stitches | Incorrect needle size/type, bent needle, improper threading, low tension. | Change needle, re-thread machine, adjust tension. |
| Thread Breaking | Incorrect threading, high tension, damaged needle, poor quality thread, lint in tension discs. | Re-thread, adjust tension, replace needle, use quality thread, clean tension discs. |
| Bobbin Thread Looping | Upper thread tension too loose, bobbin incorrectly inserted, lint in bobbin case. | Increase upper thread tension, re-insert bobbin correctly, clean bobbin area. |
| Machine Not Starting | Power cord not plugged in, foot controller not connected, bobbin winder spindle engaged. | Check power connections, ensure bobbin winder is disengaged. |
| Needle Breaking | Bent needle, wrong needle for fabric, pulling fabric, hitting pins, needle not fully inserted. | Replace needle, use correct needle, guide fabric gently, remove pins, ensure needle is fully inserted. |
8. Specifications
- Model Number: 861139
- Brand: Empisal
- Type: Electronic Sewing Machine
- Built-in Stitches: 100
- Buttonholes: 8 (One-step)
- Bobbin Type: Drop-in Rotary Hook
- Arm Type: Free Arm
- Needle Threader: Automatic
- Thread Cutter: Yes
- Display: Number Display Screen
- Spool Pins: Horizontal and Vertical
- Presser Foot Lift: Double Lift
- Feet Type: Clip-on
- Material: Metal, Plastic
- Item Weight: 8.48 kg
- Product Dimensions: 42D x 22W x 33H centimetres
- Power Source: Corded Electric
9. Warranty and Support
9.1 Warranty Information
This Empisal EES200 Electronic Sewing Machine comes with a 1-Year Warranty from the date of purchase. This warranty covers manufacturing defects under normal household use. It does not cover damage resulting from misuse, abuse, accident, alteration, neglect, or failure to follow the instructions for care and cleaning. Please retain your proof of purchase for warranty claims.
Spare part availability information is not available or provided at this time. For any warranty-related inquiries, please contact your retailer or authorized service center.
9.2 Customer Support
For technical assistance, service, or questions regarding your Empisal EES200 sewing machine, please contact Empisal customer support or your local authorized dealer. Contact information can typically be found on the Empisal official website or through your purchase retailer.


