1. Introduction
This manual provides detailed instructions for the safe and efficient operation of your Jesverty SPS-3010V DC Power Supply. This variable bench power supply offers precise control over voltage and current, featuring advanced encoder knobs for fine adjustments, integrated USB and Type-C quick-charge ports, and an output ON/OFF switch for enhanced convenience and safety during various electronic applications.
Key Features:
- Encoder Coarse & Fine Adjustment Knobs: Provides precise setting of voltage (0.01V resolution) and current (0.001A resolution) for accurate control.
- USB-A & USB-C 20W Quick-Charge Ports: Conveniently charge smartphones or power small electronic modules directly from the unit.
- Output ON/OFF Button: Allows for easy and safe control of power output without disconnecting loads or powering down the unit.
- Comprehensive Protection: Includes Over-Current Protection (OCP), temperature-regulated cooling fan, and OPN (Output Status Setting) for safe operation.
- Compact & Lightweight Design: Measures approximately 7.1(D)x3.6(W)x6.2(H) inches and weighs about 2.5 lbs, optimizing workbench space.
- 4-Digit LED Display: Clear and accurate display of voltage, current, and wattage.
2. Package Contents
Please verify that all items listed below are included in your package:
- 1 x Jesverty SPS-3010V DC Power Supply Unit
- 1 x Power Cord (Note: Power cords and AC input settings may vary based on region.)
- 1 set of Test Leads (Note: For long-term high current use, it is recommended to use test leads with sufficient current capacity.)
- 1 x Instruction Manual
3. Product Overview
Familiarize yourself with the front and rear panels of the Jesverty SPS-3010V DC Power Supply.

Figure 3.1: Front and Rear Panel Components
The image above displays the key components of the power supply. On the front panel, you will find the digital displays for Voltage, Current, and Power, along with control knobs for coarse and fine adjustment of both voltage and current. USB-A and USB-C quick-charge ports are also present. Buttons for OCP (Over-Current Protection) and Output control are located below the displays. The output terminals (Negative, Ground, Positive) are at the bottom. The rear panel features the cooling fan, input selectable switch (for AC voltage), AC power inlet, and a fuse box.
Front Panel Features:
- Voltage Display: Shows the set or output voltage.
- C.V. Mode Indicator: Illuminates when the unit is operating in Constant Voltage mode.
- C.C. Mode Indicator: Illuminates when the unit is operating in Constant Current mode.
- Current Display: Shows the set or output current.
- OCP Status LED: Indicates Over-Current Protection status.
- OPN Status LED: Indicates Output Status Setting (output on upon power-up).
- Power Display: Shows the calculated output wattage.
- USB-C Quick-Charge Port: 20W fast charging output.
- USB-A Quick-Charge Port: 20W fast charging output.
- OCP Setting Button: Activates/deactivates Over-Current Protection.
- Output Control Button: Toggles the main power output ON/OFF.
- Voltage Knob (Coarse): Adjusts voltage in larger increments.
- Voltage Knob (Fine): Adjusts voltage in smaller, precise increments.
- Current Knob (Coarse): Adjusts current in larger increments.
- Current Knob (Fine): Adjusts current in smaller, precise increments.
- Power Switch: Main power ON/OFF for the unit.
- Output Terminal - Black (-): Negative output terminal.
- Grounding Terminal (GND): Ground connection.
- Output Terminal - Red (+): Positive output terminal.
Rear Panel Features:
- Cooling Fan: Activates automatically to regulate internal temperature.
- Input Selectable Switch: Allows selection between AC115V and AC230V input voltage.
- AC Power Inlet: Connects the power cord to the unit.
- Fuse Box: Contains the main fuse (spare fuse inside).
4. Setup
- Unpacking and Inspection: Carefully remove the power supply from its packaging. Inspect the unit for any signs of physical damage. If damage is found, do not operate the unit and contact customer service.
- Input Voltage Selection: Before connecting the power cord, ensure the Input Selectable Switch on the rear panel is set to match your local AC mains voltage (AC115V or AC230V). Incorrect voltage selection can damage the unit.
- Power Connection: Connect the provided power cord to the AC Power Inlet on the rear panel of the power supply and then to a suitable AC power outlet.
- Initial Power On: Press the Power Switch on the front panel to turn on the unit. The LED displays will illuminate.
- Connecting Test Leads: Connect your test leads to the Output Terminals. The black terminal is negative (-), the red terminal is positive (+), and the green terminal is for grounding (GND). Ensure secure connections.
5. Operating Instructions
5.1 Adjusting Voltage and Current
The Jesverty SPS-3010V uses encoder knobs for precise adjustment:
- Voltage Adjustment:
- Rotate the V-COARSE knob to adjust the voltage value before the decimal point.
- Rotate the V-FINE knob to adjust the voltage value after the decimal point (0.01V resolution).
- Current Adjustment:
- Rotate the A-COARSE knob to adjust the current value in larger steps.
- Rotate the A-FINE knob to adjust the current value in smaller, precise steps (0.001A resolution).

Figure 5.1: Encoder Knob Operation for Precise Adjustment
The encoder knobs allow for both rapid and fine adjustments. Pressing the knob typically switches between adjusting different digits or modes, while rotating it changes the value. This provides superior precision compared to traditional potentiometers.
5.2 Output ON/OFF Control
Press the OUT button on the front panel to toggle the power output ON or OFF. This feature allows you to adjust voltage and current settings without disconnecting the load, enhancing safety and convenience.
5.3 Over-Current Protection (OCP)
The OCP function protects your connected device from excessive current. To set OCP:
- Ensure the output is OFF (OUT button LED is off).
- Press the OCP button. The OCP Status LED will illuminate.
- Adjust the desired current limit using the Current Coarse and Fine knobs.
- Press the OCP button again to confirm the setting and exit OCP setting mode.
- When the output current exceeds the set OCP limit, the unit will automatically cut off the output and trigger an alarm, protecting your device.

Figure 5.2: Over-Current Protection in Action
The OCP feature is crucial for protecting sensitive electronic components from damage due to unexpected current surges or short circuits.
5.4 USB-A & USB-C Quick-Charge Ports
The front panel includes dedicated USB-A and USB-C ports for quick charging compatible devices. These ports provide 20W fast charging and operate independently of the main DC output settings. Simply connect your device to the appropriate USB port.
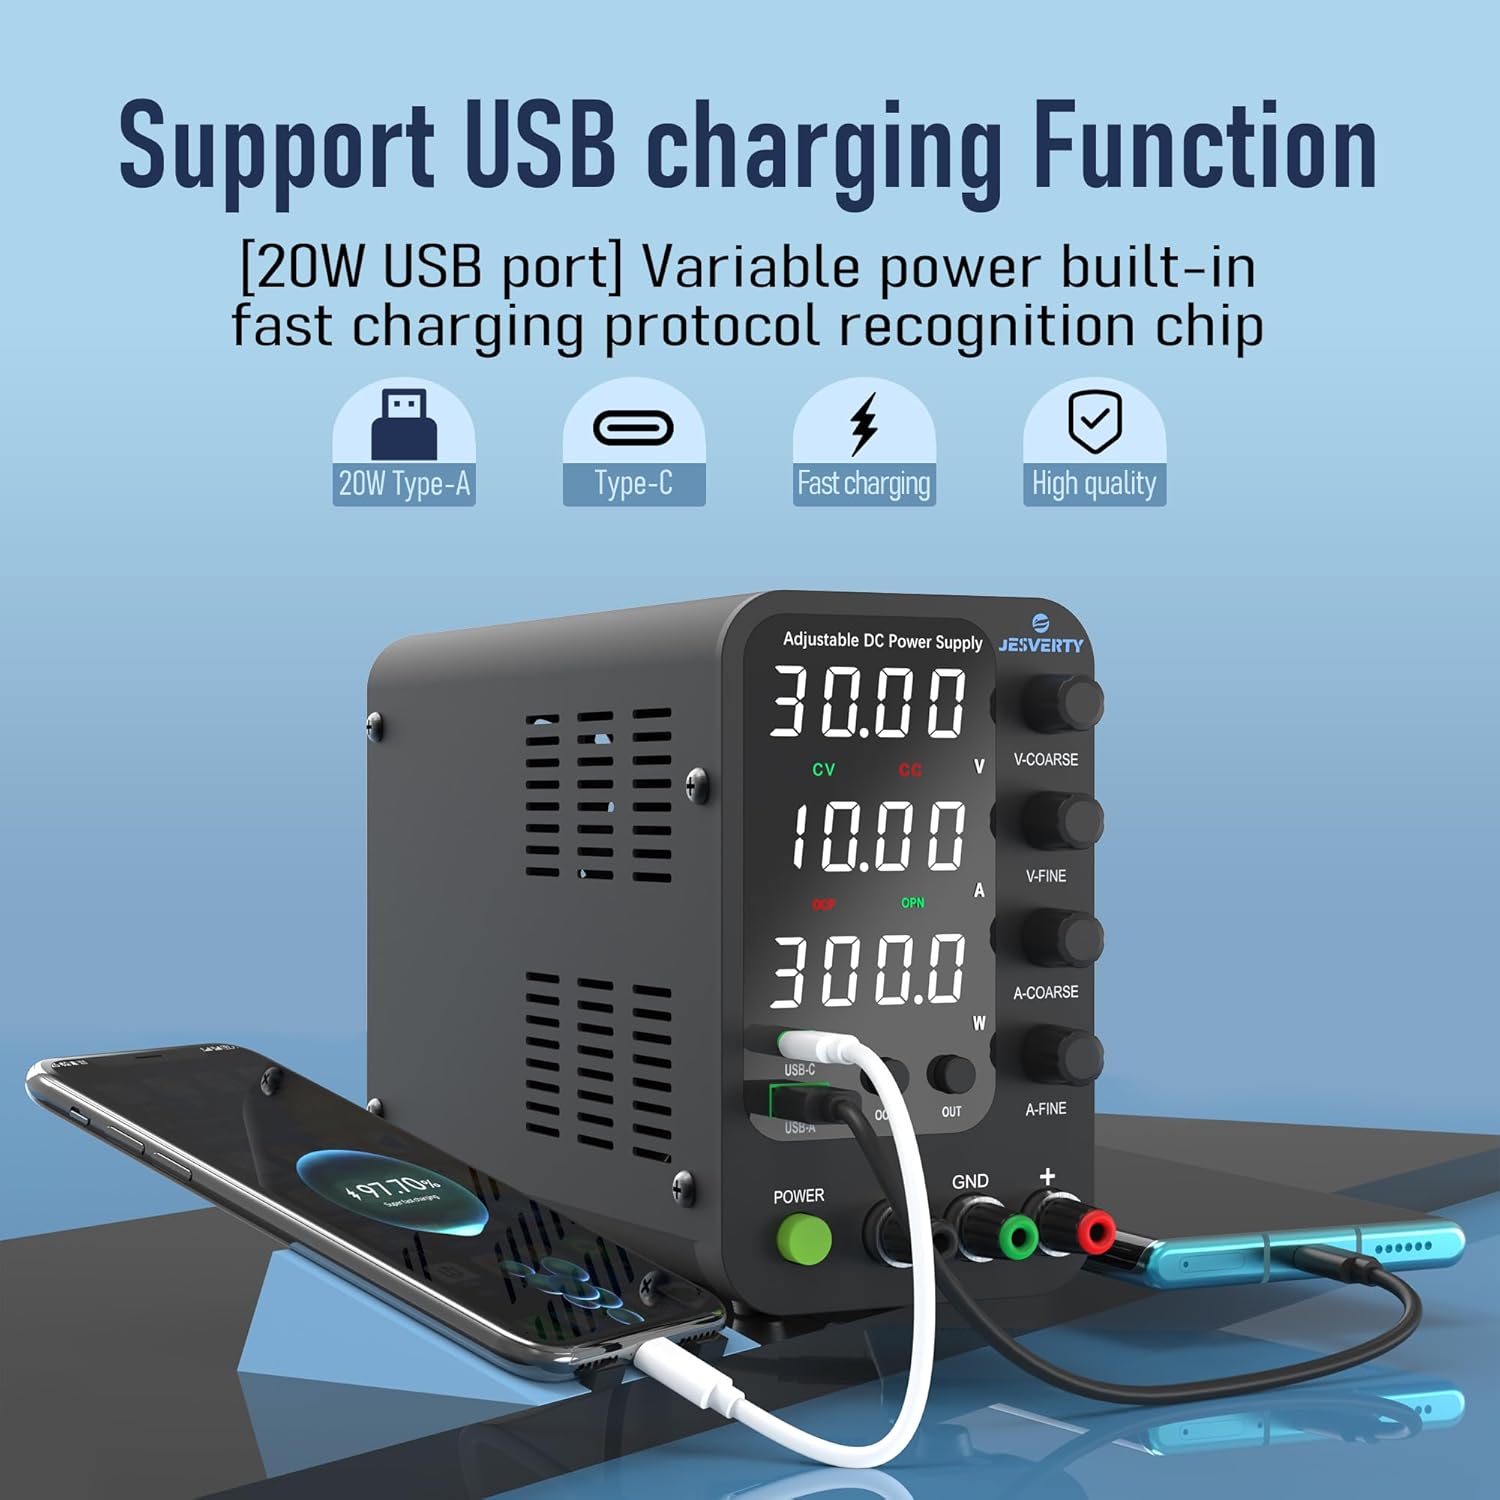
Figure 5.3: USB Charging Functionality
These integrated USB ports offer a convenient way to power or charge external devices, such as smartphones, microcontrollers like Arduino UNO, or Raspberry Pi, directly from the power supply unit.
6. Specifications
| Feature | Specification |
|---|---|
| Model Number | SPS-3010V |
| Output Voltage Range | 0-32V |
| Output Current Range | 0-10A |
| Output Wattage | 320 Watts |
| Voltage Resolution | 0.01V |
| Current Resolution | 0.001A |
| Display Type | 4-Digit LED Display |
| USB Ports | 1x USB-A, 1x USB-C (20W Quick-Charge each) |
| Input Voltage | AC115V/230V (Selectable) |
| Product Dimensions (L x W x H) | 7.09 x 3.35 x 6.1 inches (approx. 18 x 8.5 x 15.5 cm) |
| Item Weight | 3.36 pounds (approx. 1.53 kg) |
| Form Factor | Benchtop |

Figure 6.1: Product Dimensions and Weight
The compact and lightweight design of the SPS-3010V makes it suitable for various workspaces, from professional laboratories to home DIY setups.
7. Maintenance
- Cleaning: Regularly clean the exterior of the unit with a soft, dry cloth. Do not use abrasive cleaners or solvents. Ensure the cooling fan vents are free from dust and obstructions.
- Storage: When not in use for extended periods, store the power supply in a cool, dry place, away from direct sunlight and excessive humidity.
- Fuse Replacement: If the unit fails to power on, check the fuse located in the fuse box on the rear panel. Replace with a fuse of the same type and rating if necessary. Always disconnect the power cord before replacing the fuse.
- Ventilation: Ensure adequate ventilation around the unit during operation to prevent overheating. Do not block the cooling fan or air vents.
8. Troubleshooting
| Problem | Possible Cause | Solution |
|---|---|---|
| Unit does not power on. | No power from outlet; Power cord not connected; Blown fuse; Incorrect input voltage selection. | Check power outlet; Ensure power cord is securely connected; Replace fuse (see Maintenance); Verify Input Selectable Switch setting. |
| No output voltage/current. | Output is OFF; OCP activated; Loose test lead connections; Load short circuit. | Press the OUT button to turn output ON; Check OCP status LED and reset if active; Securely connect test leads; Check load for short circuits. |
| Output voltage/current is unstable. | Poor connections; Overheating; Faulty load. | Ensure all connections are secure; Check for proper ventilation; Test with a different load. |
| Cooling fan is constantly running or very loud. | High ambient temperature; Heavy load; Blocked vents. | Ensure unit is in a well-ventilated area; Reduce load if possible; Clear any obstructions from vents. |
9. Warranty and Customer Support
Jesverty provides professional technical support for its products. For any problems or questions regarding your Jesverty SPS-3010V DC Power Supply, please feel free to contact Jesverty Customer Service via Amazon message or the email address provided on the back of your instruction manual.
Please retain your purchase receipt for warranty purposes. Specific warranty terms and conditions are detailed in the included instruction manual.


