1. Introduction
This manual provides essential information for the safe and effective operation, maintenance, and troubleshooting of your VEVOR Airbrush Kit. Please read this manual thoroughly before initial use and retain it for future reference. This kit is designed for various applications including model painting, nail art, makeup spraying, graffiti painting, and body makeup.
2. Safety Instructions
- Always operate the airbrush kit in a well-ventilated area to prevent inhalation of paint fumes.
- Wear appropriate personal protective equipment (PPE), including a respirator, safety glasses, and gloves.
- Ensure the compressor is placed on a stable, level surface.
- Do not operate the compressor near flammable liquids or gases.
- Disconnect the power supply before performing any maintenance or cleaning.
- Keep children and pets away from the operating area.
- Do not exceed the maximum recommended air pressure for your airbrush.
- Regularly drain moisture from the air filter to prevent water from entering the airbrush.
3. Package Contents
Your VEVOR Airbrush Kit includes the following items:
- Airbrush Compressor with 3.5L Air Storage Tank
- 0.3mm Airbrush Set (includes toolbox, 0.3mm airbrush component, quick connector, drip pipe, wrench)
- Braided Air Hose (6 feet / 1.83 meters)
- Airbrush Holder
- Color Mixing Wheel Card
- 5 Cleaning Brushes
- 5 Cleaning Needles
- Instruction Manual
4. Product Overview
The VEVOR Airbrush Kit is designed for stable and precise airbrushing. It features a dual-fan compressor system for efficient cooling and a 3.5L air storage tank for consistent air pressure.

Figure 1: Main components of the VEVOR Airbrush Kit, including the compressor, airbrush, and accessories.
Compressor Features:
- Dual Cooling Fans: Ensures excellent cooling for extended use and protects against overheating.
- 3.5L Air Storage Tank: Provides stable air pressure output and superior atomization effect.
- Adjustable Air Pressure: Allows precise setting for different spraying effects (15-50 PSI working pressure).
- Auto Start-Stop Function: Automatically stops at a certain pressure (57 PSI) and restarts when pressure drops (43 PSI) for safer and more efficient operation.
- Low Noise Operation: Operates quietly at 47dB.
- Moisture Trap: Integrated filter to prevent water from reaching the airbrush.
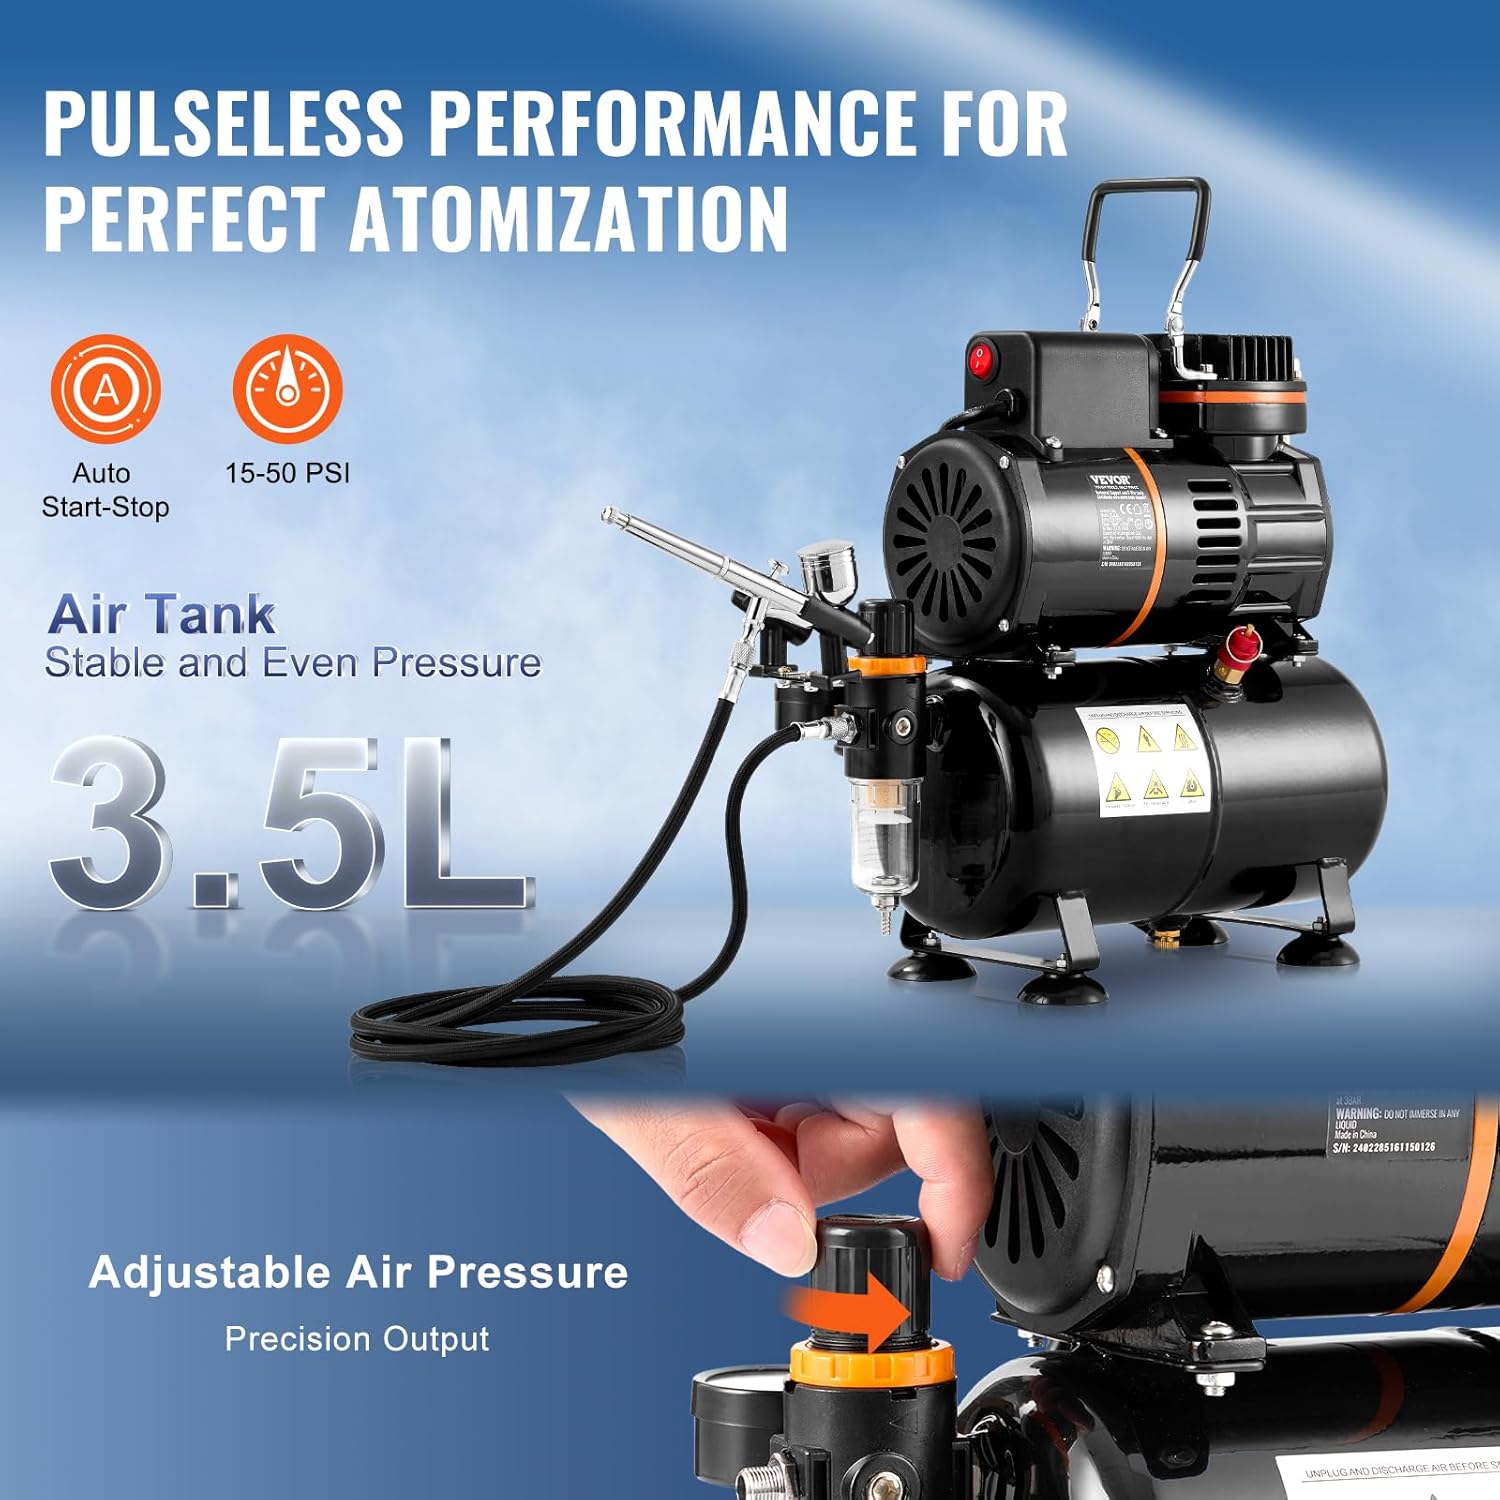
Figure 2: Close-up of the VEVOR airbrush compressor highlighting the 3.5L air tank and adjustable pressure.

Figure 3: Illustration of the dual cooling fans for enhanced durability and performance.
Airbrush Features:
- 0.3mm Tip: Ideal for small objects and detailed spraying.
- 8MAC (Micro-Air-Channel) System: Ensures high micronization spraying, excellent atomization, and precise spray control.
- Gravity Feed: Top-mounted cup for efficient paint flow.
5. Setup
- Unpack Components: Carefully remove all items from the packaging. Inspect for any damage.
- Position Compressor: Place the compressor on a stable, flat surface in a well-ventilated area.
- Attach Airbrush Holder: The airbrush holder screws onto the top of the compressor's air pressure regulator. Unscrew the orange nut, position the holder, and then screw the nut back down to secure it. This provides a convenient place to rest your airbrush during breaks.
- Connect Air Hose: Connect one end of the braided air hose to the air outlet on the compressor (typically a compression fitting, no tools required). Connect the other end to your airbrush.
- Connect Power: Plug the compressor's power cord into a suitable electrical outlet (120V).
- Adjust Air Pressure: The air pressure adjustment knob is located on the regulator. To adjust, pull the orange ring up, turn the knob to your desired PSI (refer to the gauge), and then push the orange ring back down to lock the setting.
6. Operating Instructions
- Prepare Paint: Thin your airbrush paint to the manufacturer's recommended consistency. Pour the thinned paint into the airbrush cup.
- Turn On Compressor: Flip the power switch on the compressor to the 'ON' position. The compressor will build pressure in the tank and then automatically shut off once the maximum pressure is reached.
- Test Spray: Before spraying on your project, test the spray pattern on a scrap piece of material.
- Begin Spraying:
- To start airflow, press the airbrush trigger down.
- To release paint, pull the trigger back while keeping it pressed down. The further back you pull, the more paint will be released.
- Practice controlling both the airflow and paint flow simultaneously for desired effects.
- Adjust Pressure (if needed): If the spray is too wide or too fine, adjust the air pressure using the regulator knob on the compressor (refer to Setup section for adjustment steps).
- Finish Spraying: When finished, release the trigger, turn off the compressor, and disconnect the power.

Figure 4: Examples of versatile applications for the VEVOR Airbrush Kit, including cakes, shoes, and nail art.
7. Maintenance
Proper maintenance ensures the longevity and optimal performance of your airbrush kit.
Airbrush Cleaning:
- Empty Paint Cup: After each use, empty any remaining paint from the airbrush cup.
- Flush with Cleaner: Fill the cup with an appropriate airbrush cleaner or rubbing alcohol. Spray through the airbrush until the cleaner runs clear.
- Disassemble and Clean: Carefully disassemble the airbrush nozzle, needle, and cap. Use the provided cleaning brushes and needles to remove any dried paint or residue.
- Reassemble: Reassemble the airbrush, ensuring all parts are securely fitted.
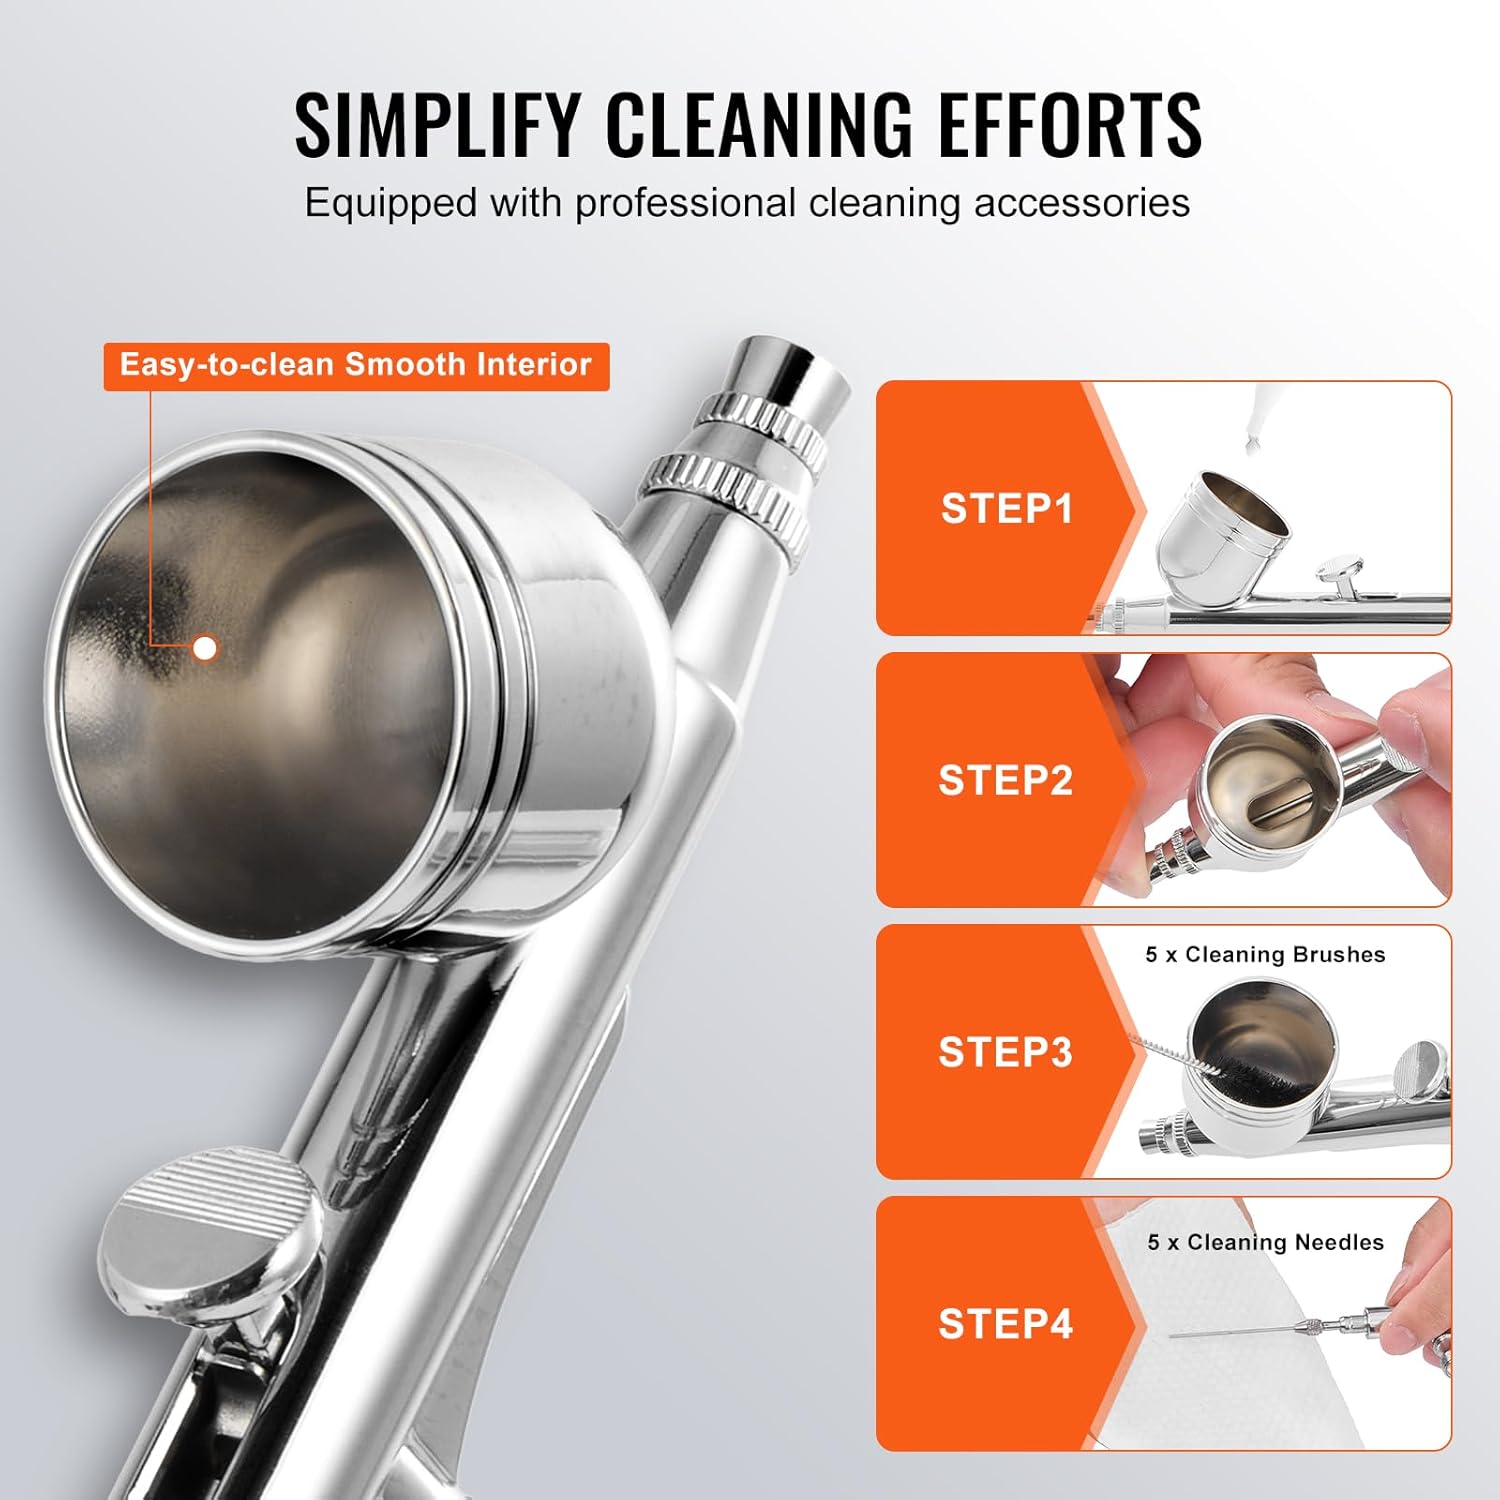
Figure 5: Visual guide for cleaning the airbrush components.
Compressor Maintenance:
- Drain Moisture Trap: Regularly check and drain any accumulated moisture from the bottom of the air filter/moisture trap. This prevents water from being sprayed with your paint.
- Clean Exterior: Wipe down the compressor exterior with a damp cloth. Do not use harsh chemicals.
- Store Properly: Store the airbrush kit in a clean, dry place when not in use.
8. Troubleshooting
| Problem | Possible Cause | Solution |
|---|---|---|
| No air from airbrush | Compressor off, hose disconnected, trigger not pressed | Check power, reconnect hose, press trigger down fully |
| No paint flow | Clogged nozzle, paint too thick, needle stuck | Clean airbrush, thin paint, check needle movement |
| Pulsating air flow | Moisture in line, low tank pressure | Drain moisture trap, allow compressor to build pressure |
| Compressor runs constantly | Air leak, pressure regulator not set correctly | Check hose connections, ensure regulator is locked |
9. Specifications

Figure 6: Detailed view of the kit's dimensions and included accessories.
| Feature | Specification |
|---|---|
| Brand | VEVOR |
| Model Number | PBJ-20B |
| Voltage | 120 Volts |
| Power Source | Corded Electric |
| Noise Level | 47 Decibels |
| Maximum Power | 0.17 Horsepower |
| Air Tank Capacity | 3.5 Liters |
| Air Flow Capacity | 23-25 Liters Per Minute |
| Hose Length | 6 Feet |
| Item Weight | 12.1 Pounds |
| Airbrush Nozzle Size | 0.3 mm |
| Cup Capacity | 9 ml / 0.3 oz |
| Dimensions (LxWxH) | 12.2 x 5.5 x 15.4 inches (310 x 140 x 390 mm) |
10. Warranty and Support
Your VEVOR Airbrush Kit is covered by VEVOR's standard product warranty. For detailed warranty information, product support, or to contact customer service, please visit the official VEVOR website or refer to the contact information provided with your purchase documentation.
For additional resources and product information, visit the VEVOR Store on Amazon.


