1. Introduction
This manual provides detailed instructions for the safe and efficient operation, installation, and maintenance of your BLITZHOME Countertop Portable Mini Dishwasher, Model BH-6-CDW. Please read this manual thoroughly before using the appliance and retain it for future reference.

Image 1.1: BLITZHOME Countertop Portable Mini Dishwasher, front view with control panel and interior visible.
2. Important Safety Instructions
To reduce the risk of fire, electric shock, or injury when using your dishwasher, follow these basic precautions:
- Read all instructions before using the appliance.
- Use the dishwasher only for its intended function.
- Do not operate the dishwasher if it has a damaged power cord or plug, if it is not working properly, or if it has been dropped or damaged.
- Connect to a properly rated, protected, and grounded power supply.
- Do not immerse the appliance, cord, or plug in water or other liquids.
- Keep children away from detergent and rinse aid.
- Ensure proper ventilation around the appliance.
- Do not attempt to repair or replace any part of your dishwasher unless specifically recommended in this manual.
- Always unplug the dishwasher before cleaning or performing maintenance.
- Use only detergents and rinse aids recommended for automatic dishwashers.
- Load sharp items so they are not likely to damage the door seal or interior.
- Do not touch the heating element during or immediately after use.
3. Package Contents
Verify that all items listed below are included in your package:
- 1x Dishwasher Unit
- 1x Measuring Cup
- 1x Fruit and Vegetable Basket
- 1x 59.06″ Drain Hose
- 1x 59.06″ Water Inlet Hose
- 1x Clamp
- 1x Suction Cup
- 1x Instruction Manual (this document)
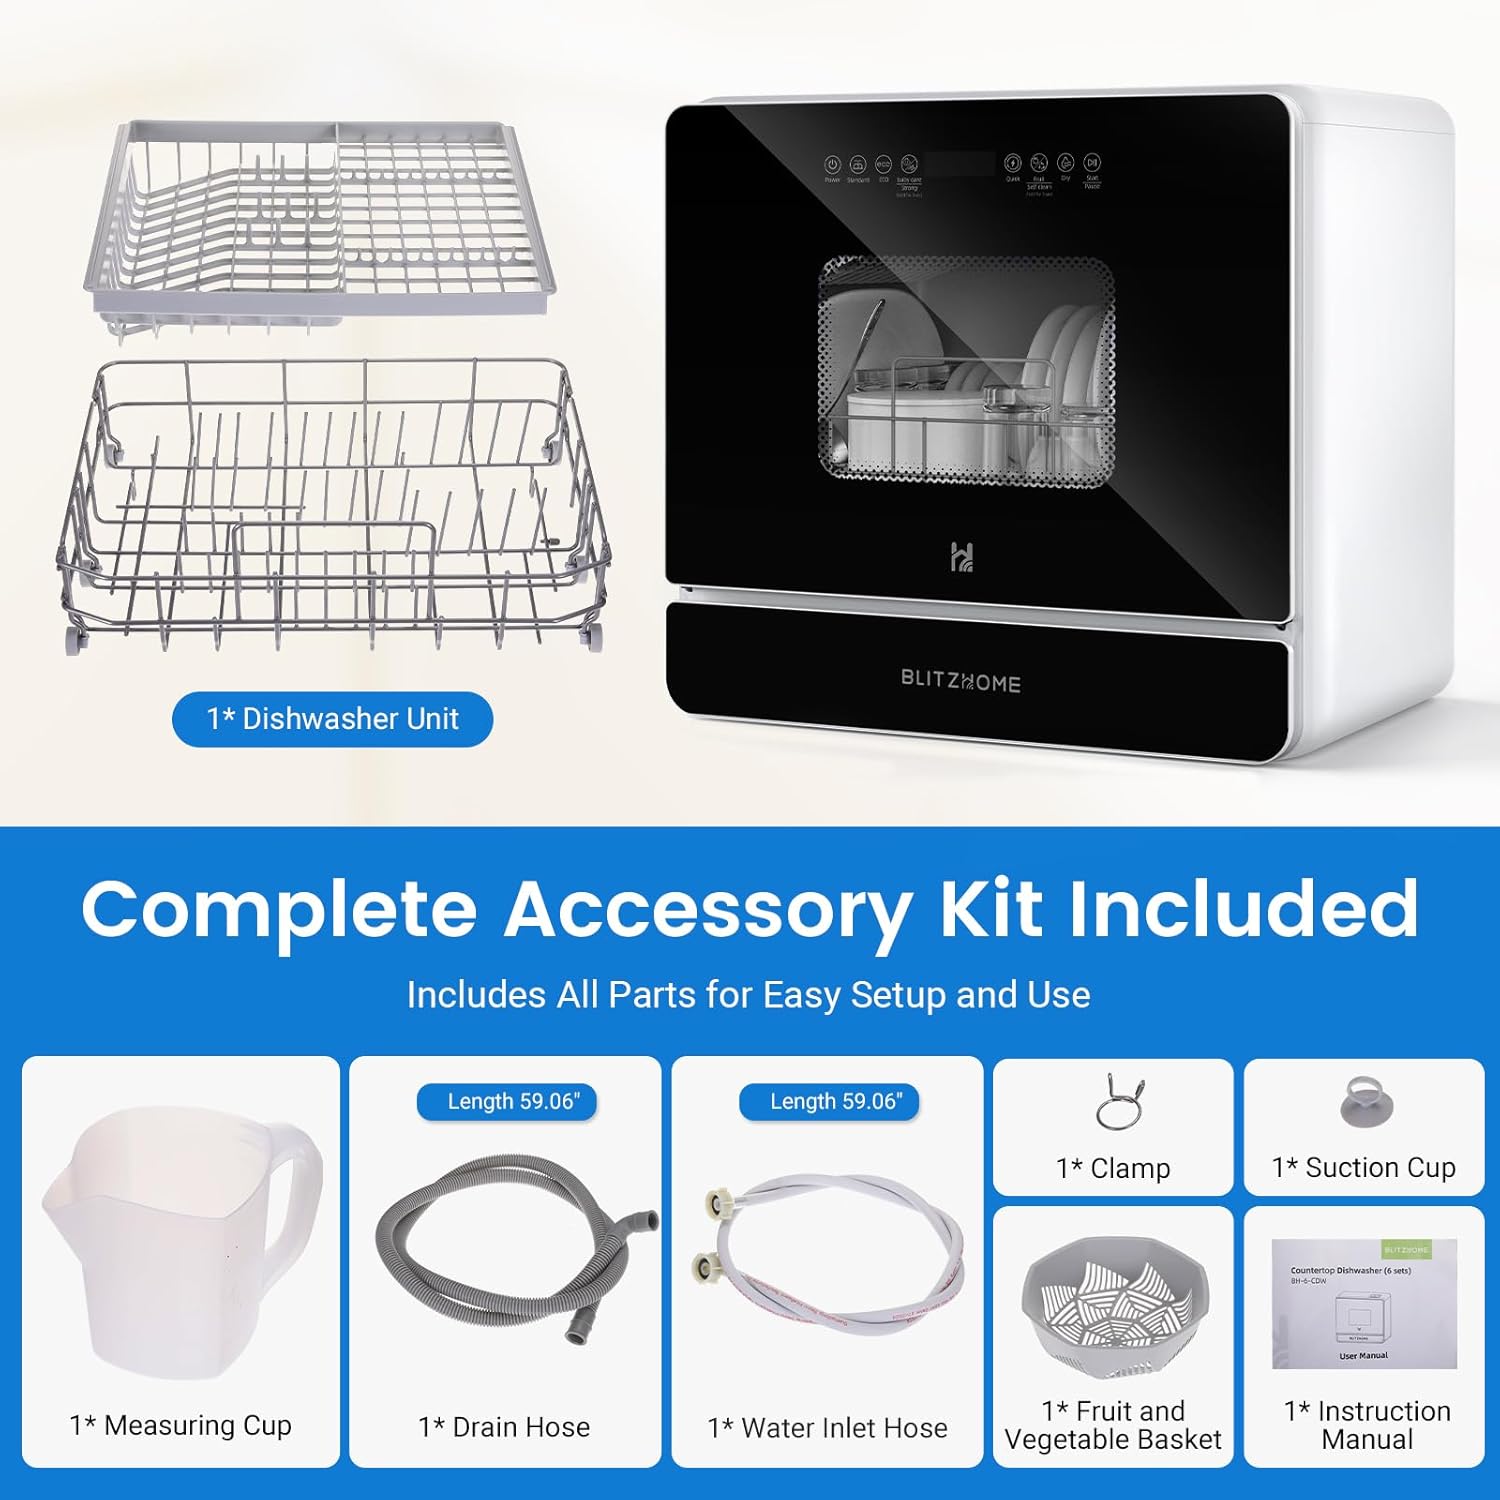
Image 3.1: Included accessories for the BLITZHOME Countertop Portable Mini Dishwasher.
4. Product Overview
4.1 Components
Familiarize yourself with the main components of your dishwasher:
- Control Panel: Touch-sensitive interface for program selection and operation.
- Dish Rack: Upper and lower racks for loading dishes, cups, and cutlery.
- Spray Arms: Three spray arms ensure 360° cleaning coverage.
- Water Inlet: Point for manual water filling or hose connection.
- Drain Outlet: Connection point for the drain hose.
- Filter Assembly: Located at the bottom of the wash tub, collects food particles.
- Detergent Dispenser: For adding dishwasher detergent.
- Water Tank: 5.2L built-in tank for manual water supply.

Image 4.1: Dishwasher interior showing dish racks and capacity. Dimensions are 21.6" (length) x 14.2" (width) x 19.5" (height).

Image 4.2: Detailed interior features including automatic LED light, removable storage rack, detachable filter, water inlet, and leak protection.
5. Setup and Installation
5.1 Placement
Place the dishwasher on a flat, stable surface. Ensure there is adequate space around the unit for ventilation and access to the water inlet/drain. The compact design allows placement in various locations such as countertops, RVs, or dorms.
5.2 Water Supply Modes
Your dishwasher supports two water supply methods:
- Tank Mode (Manual Fill): Use the included measuring cup to pour water directly into the water inlet at the top of the unit. The built-in 5.2L water tank will hold enough water for a full cycle.
- Faucet Mode (Automatic Fill): Connect the water inlet hose to a compatible faucet. Ensure the connection is secure to prevent leaks.

Image 5.1: Illustration of dual water supply options: manual tank fill and automatic faucet connection.
5.3 Drain Hose Connection
Connect the drain hose to the drain outlet on the back of the dishwasher. Secure the other end of the drain hose into a sink or a suitable drainage container using the provided clamp and suction cup.
6. Operating Instructions
6.1 Loading Dishes
Load dishes into the racks, ensuring they do not block the spray arms. Larger items can be placed in the lower rack. The top rack can be removed to accommodate plates up to 11.81 inches.

Image 6.1: Dishwasher racks with examples of loaded dishes and instructions for removing the upper rack.
6.2 Adding Detergent
Add a small amount of dishwasher detergent to the dispenser. Do not use liquid dish soap, as it can cause excessive suds.
6.3 Selecting a Wash Program
The dishwasher offers 9 wash programs. Select the appropriate program using the control panel:
- Standard (58 mins): For daily dishware with normal soil.
- ECO (88 mins): Energy-efficient cycle for normally soiled dishes.
- Baby Care (78 mins): High-temperature wash for baby bottles and items.
- Strong (98 mins): For heavily soiled pots and pans.
- Quick (28 mins): For lightly soiled dishes that need a fast wash.
- Fruit (19 mins): Gentle wash for fruits and vegetables.
- Self-Clean (28 mins): For cleaning the dishwasher interior.
- Dry (60 mins): Activates the PTC hot air drying system.
- Delayed Start (1-24H): Allows you to set a delayed start time for any wash program.

Image 6.2: Overview of the 9 wash programs and control panel interface.
6.4 Starting a Cycle
After loading dishes and selecting a program, press the "Start/Pause" button to begin the wash cycle. The dishwasher will automatically proceed through washing, rinsing, and drying phases.
6.5 Hot Air Drying and Air Refresh
The PTC hot air drying system activates for 60 minutes after a wash cycle to ensure dishes are dry. The 72-hour air refresh function circulates air to prevent odors and maintain hygiene.

Image 6.3: Visual representation of the PTC hot air drying and air refresh storage system.
6.6 Delayed Start Function
To use the delayed start function, select your desired wash program, then press the 'Delayed Start' button repeatedly to set the delay time from 1 to 24 hours. The cycle will begin automatically after the set delay.

Image 6.4: The 1-24 hour flexible delayed start feature.
7. Maintenance and Care
7.1 Cleaning the Filter Assembly
Regularly clean the filter assembly to ensure optimal performance. Twist and remove the filter from the bottom of the wash tub. Rinse it under running water to remove food particles. Reinstall securely.
7.2 Cleaning the Spray Arms
Check the spray arm nozzles for blockages. If clogged, remove the spray arms and clear any debris with a thin wire or toothpick. Rinse and reattach.
7.3 Cleaning the Exterior and Interior
Wipe the exterior of the dishwasher with a damp cloth. For the interior, run a "Self-Clean" cycle periodically with a dishwasher cleaner to remove mineral buildup and odors.
8. Troubleshooting
Refer to the table below for common issues and their solutions:
| Problem | Possible Cause | Solution |
|---|---|---|
| Dishwasher does not start | Power cord not plugged in; Door not closed properly; Program not selected. | Ensure power cord is securely plugged in; Close the door firmly; Select a wash program and press Start. |
| Dishes not clean | Improper loading; Clogged spray arms; Insufficient detergent; Filter clogged. | Reload dishes correctly; Clean spray arm nozzles; Use recommended amount of detergent; Clean the filter assembly. |
| Water not draining | Drain hose kinked or blocked; Drain filter clogged. | Check and straighten drain hose; Clean the drain filter. |
| Excessive suds | Incorrect detergent used; Too much detergent. | Use only automatic dishwasher detergent; Reduce detergent quantity. |
| Dishwasher is noisy | Dishes rattling; Foreign object in pump; Appliance not level. | Rearrange dishes; Check for and remove foreign objects; Ensure dishwasher is on a level surface. |
9. Specifications
| Feature | Detail |
|---|---|
| Brand | BLITZHOME |
| Model Name | BCD6W |
| Model Number | BH-6-CDW |
| Form Factor | Mini, Countertop |
| Dimensions (L x W x H) | 21.57 x 14.17 x 19.53 inches |
| Item Weight | 38.5 pounds (17.5 Kilograms) |
| Voltage | 120 Volts |
| Annual Energy Consumption | 950 Watts |
| Water Consumption (per cycle) | 5.2 Liters (approx. 1.37 Gallons) |
| Capacity | 5.2 Liters (internal tank) |
| Number of Wash Programs | 9 (Standard, ECO, Baby Care, Strong, Quick, Fruit, Self-Clean, Dry, Delayed Start) |
| Special Features | 2 Water Supply Modes, 24Hrs Delay Start, PTC Hot Air Drying, 72H Air Refresh Storage, 360° Spray Arms |
| Material | Stainless Steel |
| Controls Type | Touch |
| Noise Level | 56 dB |
| UPC | 695845667114 |
10. Warranty and Support
For warranty information or technical support, please refer to the contact details provided with your purchase documentation or visit the official BLITZHOME website. Keep your proof of purchase for warranty claims.
You can visit the BLITZHOME store on Amazon for more information: BLITZHOME Store


