1. Introduction
Thank you for choosing the Auronic AU3273 Compact Series Dehumidifier. This appliance is designed to effectively remove excess moisture from your indoor environment, helping to prevent mold, mildew, and musty odors. With a dehumidification capacity of 25 liters per day, it is ideal for spaces up to 50 m².
This manual provides important information regarding the safe operation, installation, maintenance, and troubleshooting of your dehumidifier. Please read it thoroughly before use and retain it for future reference.

Image 1.1: Auronic AU3273 Dehumidifier with visual representation of air circulation.
2. Safety Instructions
To ensure safe operation and prevent damage to the appliance or injury to yourself, please observe the following safety precautions:
- Always place the dehumidifier on a stable, level surface.
- Do not block the air inlet or outlet. Maintain at least 20 cm clearance around the unit.
- Ensure the power supply matches the voltage specified on the rating label.
- Do not operate the unit with a damaged power cord or plug.
- Unplug the appliance before cleaning, moving, or performing any maintenance.
- Do not use the dehumidifier in areas where flammable gases or liquids are stored.
- Keep children and pets away from the appliance during operation.
- If the unit has been tilted more than 45 degrees during transport, allow it to stand upright for at least 24 hours before plugging it in and operating. This allows the refrigerant to settle.
- Do not insert objects into the air vents.
- This appliance is for indoor use only.
3. Package Contents
Carefully unpack your Auronic AU3273 Dehumidifier and check that all items are present and in good condition. The package should contain:
- Auronic AU3273 Dehumidifier Unit
- Drain Hose for continuous drainage
- User Manual (this document)

Image 3.1: Contents of the Auronic AU3273 Dehumidifier package, showing the unit, drain hose, and manual.
4. Product Overview
4.1. Main Components
- Control Panel: Located on the top of the unit for setting functions.
- Air Inlet: Where humid air is drawn into the unit.
- Air Outlet: Where dry air is expelled.
- Water Tank: Collects condensed water. Capacity: 4 liters.
- Continuous Drain Outlet: For connecting the drain hose.
- Wheels: For easy mobility.
4.2. Control Panel Functions
The control panel provides access to all operational settings. Refer to the image below for button identification:

Image 4.1: Detailed view of the control panel with button descriptions.
- SPEED: Adjusts fan speed.
- SLEEP/RESET: Activates sleep mode or resets certain functions.
- LOCK: Engages child lock to prevent accidental changes.
- Up/Down Arrows: Adjust humidity settings or timer values.
- TIMER: Sets the operating time.
- MODE: Switches between different operating modes (e.g., Laundry Dry).
- STAND-BY (Power Button): Turns the unit On or Off.
5. Setup
5.1. Initial Placement
Place the dehumidifier in the desired location, ensuring it is on a firm, level surface. Allow at least 20 cm of space around all sides for proper airflow. The unit is equipped with wheels for easy movement.
5.2. Power Connection
Plug the power cord into a grounded electrical outlet. If the unit was tilted during transport, wait 24 hours before plugging it in.
5.3. Continuous Drainage (Optional)
For continuous operation without needing to empty the water tank, connect the included drain hose:
- Locate the continuous drain outlet on the back or side of the unit.
- Securely attach one end of the drain hose to this outlet.
- Direct the other end of the hose to a suitable drain point (e.g., floor drain, sink), ensuring it is lower than the unit's drain outlet for gravity flow.
- Ensure the hose is not kinked or blocked.
6. Operating Instructions
6.1. Power On/Off
Press the STAND-BY button to turn the dehumidifier on or off.
6.2. Setting Desired Humidity
When the unit is on, the display will show the current room humidity. Use the Up and Down arrow buttons to set your desired humidity level. The unit will operate until the set humidity is reached, then cycle on and off to maintain it.
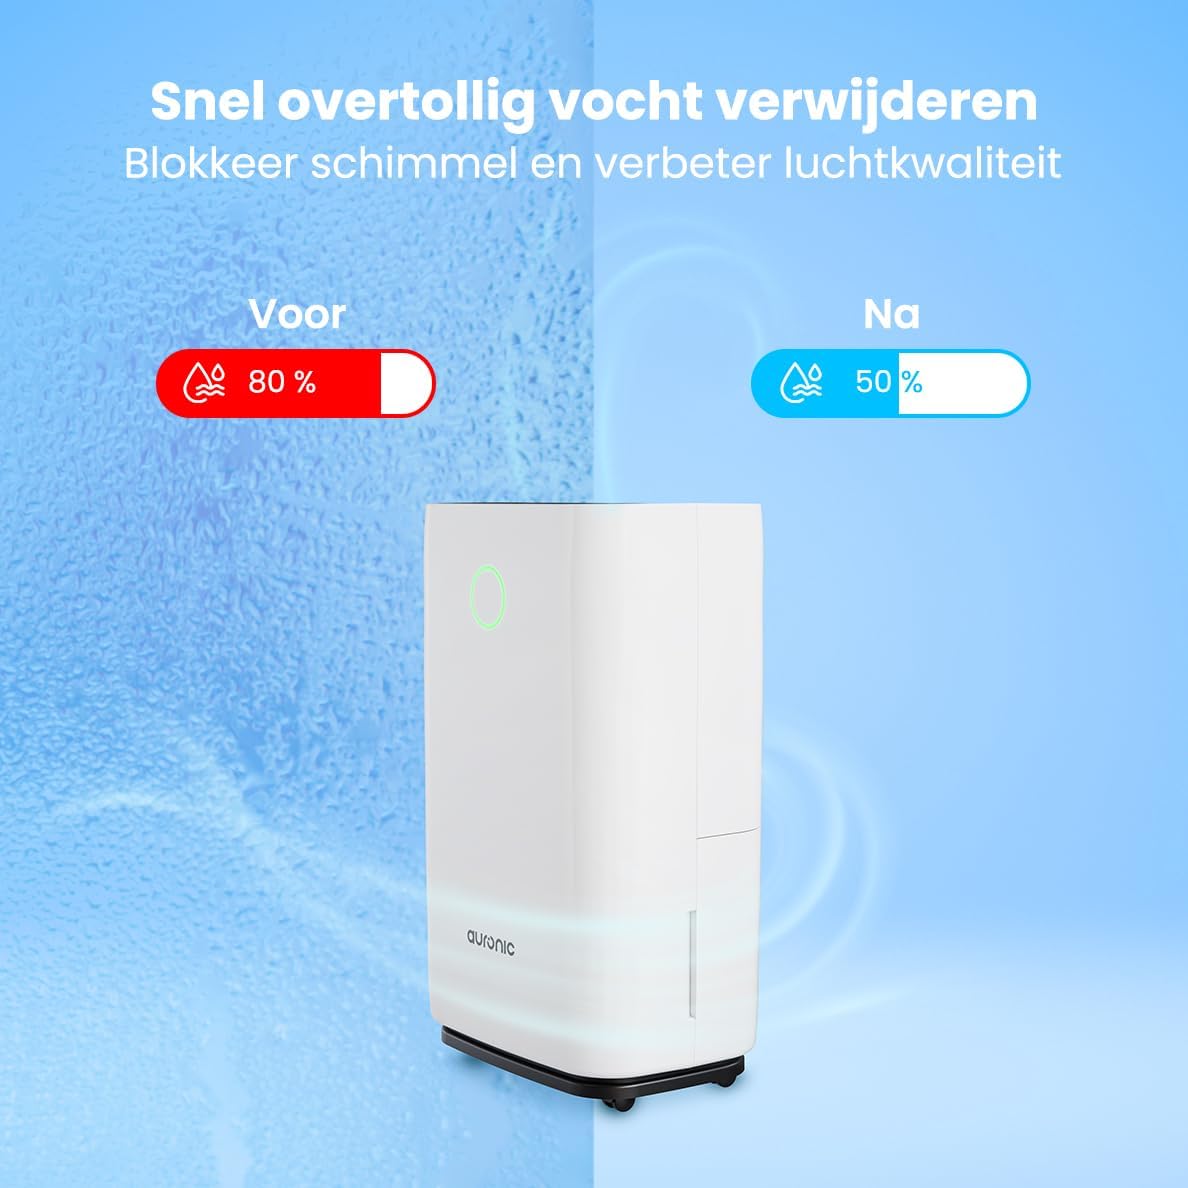
Image 6.1: Visual representation of humidity reduction from 80% to 50% using the dehumidifier.
6.3. Operating Modes
- Automatic Mode: The unit automatically adjusts its operation based on the ambient humidity.
- Laundry Dry Function: Press the MODE button to select the Laundry Dry function. This mode increases fan speed and continuous operation to accelerate the drying process of clothes. Place the dehumidifier in your laundry room for optimal results.
- Sleep Mode: Press the SLEEP/RESET button to activate sleep mode. In this mode, the display lights dim, and the fan operates at a lower speed for quieter operation, suitable for nighttime use.

Image 6.2: The dehumidifier operating quietly, suitable for use in a bedroom.
6.4. Timer Function
Press the TIMER button to set an auto-on or auto-off time. Use the Up and Down arrows to adjust the desired hours (1-24 hours). The unit will turn on or off after the set time has elapsed.
6.5. Child Lock
Press and hold the LOCK button for a few seconds to activate or deactivate the child lock. When activated, the control panel buttons will be unresponsive to prevent accidental changes.
7. Maintenance
Regular maintenance ensures optimal performance and extends the lifespan of your dehumidifier.
7.1. Emptying the Water Tank
When the water tank is full, the unit will automatically stop operating, and an indicator light will illuminate. Carefully remove the water tank from the unit, empty the collected water, and then reinsert the tank securely. Ensure the tank is properly seated to resume operation.
7.2. Cleaning the Air Filter
The air filter should be cleaned every two weeks or more frequently depending on usage and air quality. A dirty filter can reduce efficiency.
- Unplug the dehumidifier from the power outlet.
- Locate and remove the air filter (usually at the back or side).
- Clean the filter with a vacuum cleaner or wash it gently with warm, soapy water.
- Rinse thoroughly and allow the filter to air dry completely before reinstalling.
- Reinsert the dry filter and plug the unit back in.
7.3. General Cleaning
Wipe the exterior of the unit with a soft, damp cloth. Do not use harsh chemicals, abrasive cleaners, or solvents, as these can damage the surface.
8. Troubleshooting
If you encounter issues with your dehumidifier, refer to the following common problems and solutions:
- Unit does not turn on:
- Check if the power cord is securely plugged into a working outlet.
- Ensure the water tank is properly inserted and not full.
- Check if the child lock is activated.
- No water collected or low dehumidification:
- Verify that the set humidity level is lower than the current room humidity.
- Check if the air filter is clean and not blocked.
- Ensure room temperature is above 5°C (41°F), as dehumidifiers are less effective in cold conditions.
- Close doors and windows in the room to prevent humid air from entering.
- Allow a few minutes for the unit to accurately measure humidity upon startup, as initial readings may be inaccurate.
- Unit is noisy:
- Ensure the unit is on a stable, level surface.
- Check for any obstructions in the air inlet or outlet.
- Clean the air filter if it is dirty.
- Defrost function activates frequently:
- This is normal in cooler environments (e.g., below 20°C). The unit temporarily stops dehumidifying to melt any ice buildup on the coils.
If the problem persists after trying these solutions, please contact Auronic customer support.
9. Specifications
| Feature | Specification |
|---|---|
| Brand | Auronic |
| Model Number | AU3273 |
| Product Dimensions | 57 x 34 x 23 cm (H x W x D) |
| Weight | 13.6 kg |
| Color | White |
| Material | Plastic and ABS Plastic |
| Wattage | 395 watts |
| Noise Level | 45 Decibels |
| Special Features | Automatic Shut-off |
| Included Components | Manual, Drain Hose |
| Capacity (Dehumidification) | 25 Liters per day |
| Tank Volume | 4 Liters |
| Floor Area Coverage | Up to 50 m² |
| Number of Speeds | 1 |
10. Warranty and Support
For warranty information and customer support, please refer to the warranty card included with your purchase or visit the official Auronic website. If you experience any issues not covered in the troubleshooting section, please contact Auronic customer service for assistance.
Manufacturer: Auronic


