
NorthStar SAC426VWNS
NorthStar Portable Quiet Electric Air Compressor User Manual
Model: SAC426VWNS
1.5 HP, 26 Gallons, 4 SCFM @ 90 PSI
Introduction
Thank you for choosing the NorthStar Portable Quiet Electric Air Compressor. This manual provides essential information for the safe operation, maintenance, and troubleshooting of your new air compressor. Please read this manual thoroughly before operating the unit and keep it for future reference.

Figure 1: NorthStar Portable Quiet Electric Air Compressor, front view. This image shows the overall design of the compressor, including the tank, wheels, and control panel at the top.
Important Safety Information
Always follow basic safety precautions when using this product to reduce the risk of injury or damage. Read all instructions before using this air compressor.
- Electrical Safety: Ensure the power source matches the compressor's requirements. Do not operate in wet conditions. Always use a grounded outlet.
- Pressure Safety: Do not exceed the maximum operating pressure of any tool or accessory. Never attempt to repair or modify the pressure relief valve.
- Personal Protective Equipment (PPE): Always wear safety glasses or goggles when operating the compressor. Hearing protection is recommended, especially during prolonged use.
- Ventilation: Operate the compressor in a well-ventilated area to prevent heat buildup and ensure proper air intake.
- Maintenance: Disconnect power before performing any maintenance or repairs. Regularly drain moisture from the tank to prevent corrosion.
- Children and Bystanders: Keep children and bystanders away from the operating compressor.
Product Components and Identification
Familiarize yourself with the main components of your NorthStar Air Compressor.
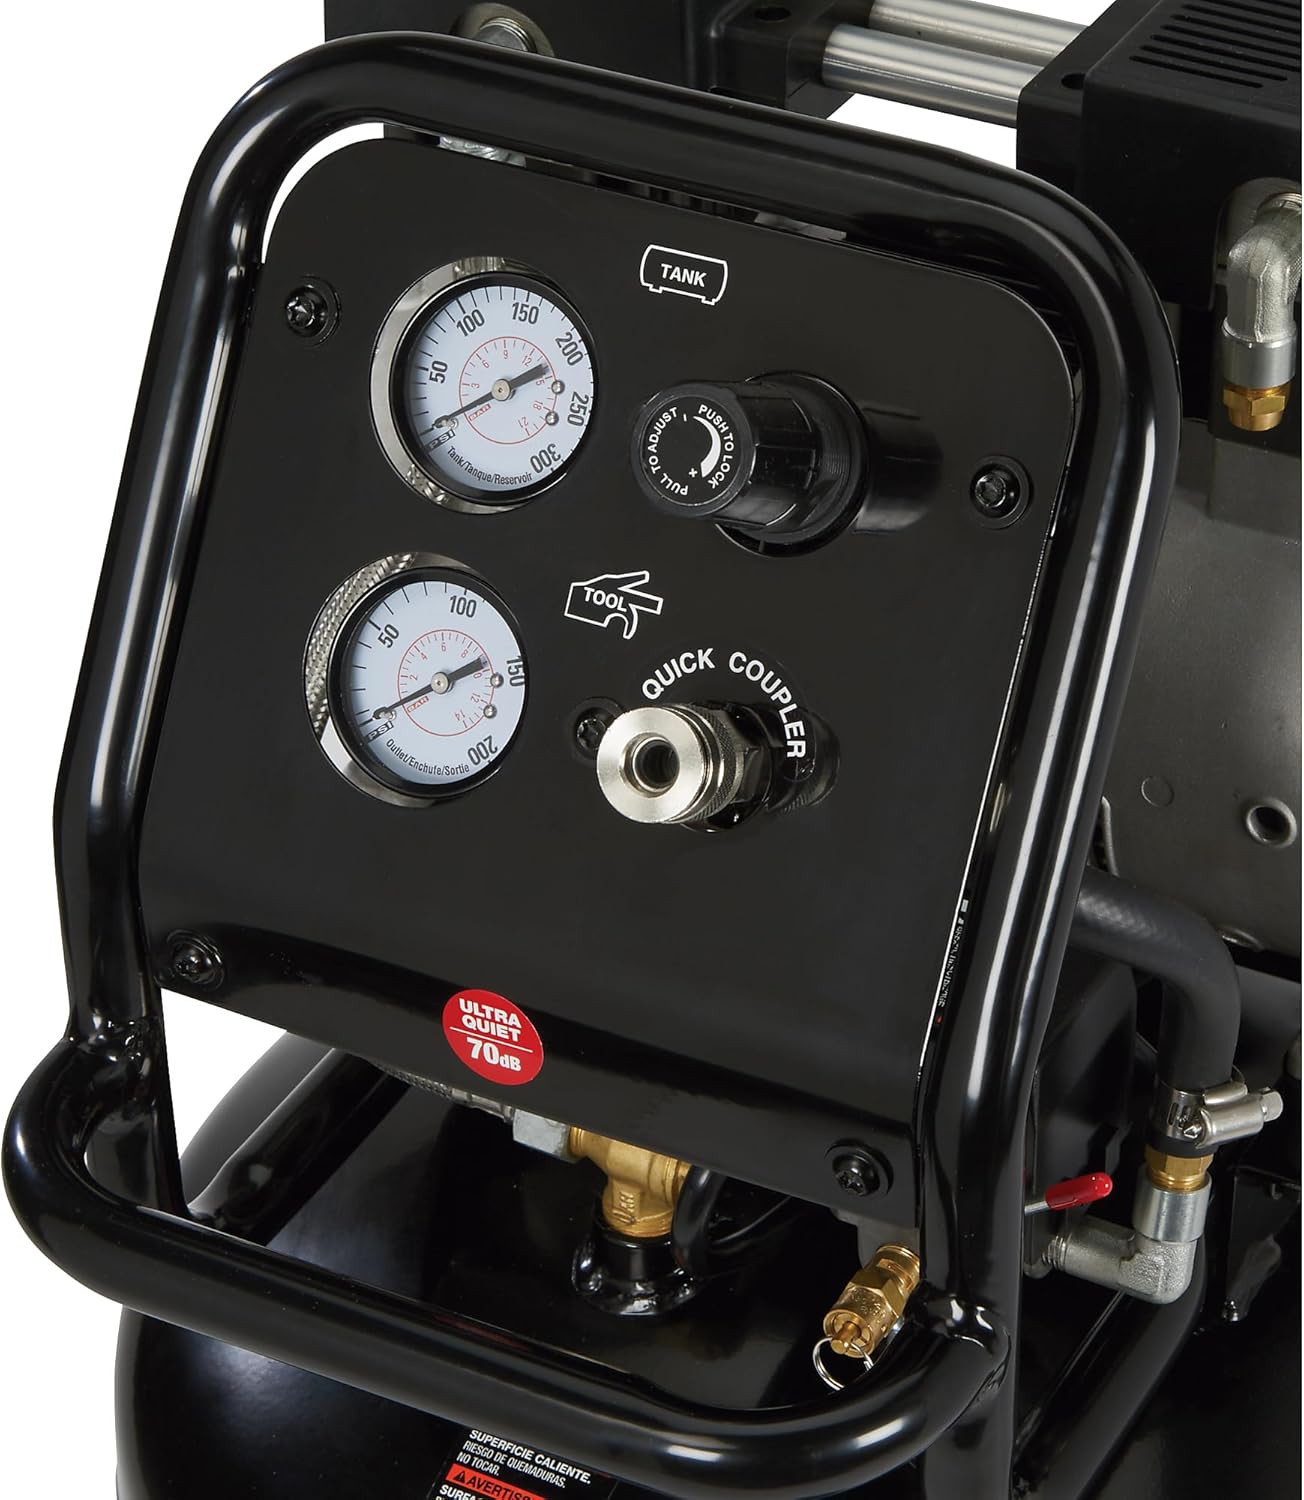
Figure 2: Control Panel. This image highlights the pressure gauges (tank and regulated), the pressure regulator knob, and the quick connect coupler for air tools.
- Tank Pressure Gauge: Displays the current air pressure inside the tank.
- Regulated Pressure Gauge: Shows the air pressure being delivered to the air tool.
- Pressure Regulator Knob: Adjusts the output air pressure. Turn clockwise to increase pressure, counter-clockwise to decrease.
- Quick Connect Coupler: For attaching air hoses and tools.
- On/Off Switch: Controls the power to the compressor motor.
- Air Tank: Stores compressed air.
- Drain Valve (Petcock): Located at the bottom of the tank for draining condensation.
- Wheels: For portability and easy movement of the unit.

Figure 3: Heavy-Duty Pneumatic Wheels. This image shows one of the durable wheels, designed for easy mobility across various surfaces.
Setup and Initial Use
- Unpacking: Carefully remove the compressor from its packaging. Inspect for any shipping damage.
- Wheel Assembly (if required): Attach the wheels to the compressor base using the provided hardware. Ensure they are securely fastened.
- Placement: Position the compressor on a firm, level surface in a clean, well-ventilated area. Maintain at least 12 inches of clearance around the unit for proper airflow.
- Power Connection: Connect the power cord to a grounded electrical outlet that meets the voltage and amperage requirements specified on the compressor's data plate.
- Break-in Period: For the first use, run the compressor with the tank drain valve open for approximately 15-20 minutes to allow the motor and pump to break in properly. This helps to seat the piston rings and ensure optimal performance.
Operating Instructions
- Starting the Compressor:
- Ensure the power cord is securely plugged in.
- Turn the On/Off switch to the "ON" position. The motor will start, and the tank pressure will begin to build.
- The compressor will automatically shut off when the maximum tank pressure is reached (175 PSI).
- Connecting Air Tools:
- Ensure the air hose and tool are rated for the desired operating pressure.
- Pull back the collar on the quick connect coupler and insert the air hose fitting. Release the collar to secure the connection.
- Adjusting Output Pressure:
- Turn the Pressure Regulator Knob clockwise to increase the regulated output pressure.
- Turn the Pressure Regulator Knob counter-clockwise to decrease the regulated output pressure.
- Monitor the Regulated Pressure Gauge to set the desired pressure for your air tool.
- Stopping the Compressor:
- Turn the On/Off switch to the "OFF" position.
- Disconnect air tools and hoses.
- Always drain the air tank after each use (see Maintenance section).
Maintenance
Regular maintenance ensures the longevity and safe operation of your air compressor. Always disconnect the power before performing any maintenance.
- Drain Air Tank Daily:
Moisture accumulates in the air tank, which can lead to rust and tank failure. Open the petcock drain valve at the bottom of the tank after each use to release accumulated condensation. Tilt the compressor slightly if needed to ensure complete drainage.

Figure 4: Motor and Pump Assembly. This image shows the fan and cooling fins of the oil-free pump, which requires minimal maintenance.
- Check for Air Leaks:
Periodically check all fittings and connections for air leaks. A simple method is to apply soapy water to connections; bubbles indicate a leak. Tighten connections as needed.
- Clean Air Filter:
Although this model features an oil-free pump, ensure the air intake filter (if present and accessible) is clean and free of debris to maintain optimal performance. Refer to the specific product diagram for filter location.
- General Cleaning:
Keep the compressor clean and free of dust and dirt. Use a damp cloth to wipe down exterior surfaces. Do not use harsh chemicals.
Troubleshooting
This section addresses common issues you might encounter with your air compressor.
| Problem | Possible Cause | Solution |
|---|---|---|
| Compressor does not start or stops unexpectedly. | No power; Thermal overload activated; Faulty switch. | Check power connection and circuit breaker. Allow motor to cool down. Contact customer support if switch is faulty. |
| Compressor runs continuously or frequently. | Air leak in tank or fittings; Check valve issue. | Check for leaks using soapy water and tighten connections. Contact customer support for check valve issues. |
| Low air pressure at outlet. | Regulator set too low; Air leak; Clogged air filter. | Adjust regulator. Check for leaks. Clean or replace air filter. |
| Excessive noise or vibration. | Loose components; Unit not on level surface. | Inspect and tighten any loose bolts or screws. Ensure unit is on a stable, level surface. |
Product Specifications
| Feature | Detail |
|---|---|
| Brand | NorthStar |
| Model Name | Portable Quiet Electric Air Compressor |
| Model Number | SAC426VWNS |
| Power Source | Corded Electric |
| Motor Horsepower | 1.5 HP |
| Tank Volume | 26 Gallons |
| Air Flow Capacity | 4 SCFM @ 90 PSI |
| Maximum Operating Pressure | 175 PSI |
| Noise Level | 70 dB |
| Item Weight | 122 Pounds |
| Color | Black |
| Special Feature | Portable |
| Included Components | (1) Air compressor |
Warranty Information
The NorthStar Portable Quiet Electric Air Compressor comes with the following warranty coverage:
- Consumer Warranty: 4 years from the date of purchase.
- Commercial Warranty: 2 years from the date of purchase.
Please retain your proof of purchase for warranty claims. For full warranty terms and conditions, refer to the documentation included with your product or contact NorthStar customer support.
Customer Support
For technical assistance, parts, or warranty inquiries, please contact NorthStar customer support. You can also visit the official NorthStar store on Amazon for more information and product resources.
Online Support: Visit the NorthStar Store on Amazon
General Amazon Customer Service: Amazon Customer Service
Ask a question about this manual
Ask about setup, troubleshooting, compatibility, parts, safety, or missing instructions. Manuals+ will review the question and use this page’s manual context to help answer it.