
1. Introduction
The BAKON BK701D is a versatile 2-in-1 soldering station, integrating both a hot air rework station and a soldering iron station. This unit is designed for precision soldering and desoldering tasks, suitable for a wide range of electronic components including SOIC, CHIP, QEP, PLCC, BGA, and SMD. It is an essential tool for mobile phone repair, laptop repair, circuit board soldering, and other electronic maintenance applications. This manual provides detailed instructions for safe operation, setup, maintenance, and troubleshooting.
2. Safety Instructions
Read all safety warnings and instructions before using this product. Failure to follow these instructions may result in electric shock, fire, or serious injury.
- Always operate the unit in a well-ventilated area to avoid inhaling fumes.
- Wear appropriate personal protective equipment, including safety glasses and heat-resistant gloves.
- Do not touch the soldering iron tip or hot air nozzle when the unit is powered on or cooling down, as they reach very high temperatures.
- Ensure the unit is placed on a stable, heat-resistant surface.
- Keep flammable materials away from the work area.
- Unplug the unit from the power outlet when not in use or before performing maintenance.
- Do not use the unit in wet or damp conditions.
- This product is rated for 110V US specification. Ensure your power supply matches this requirement.
- Ensure the hot air gun is placed in its holder when not actively in use. While the unit features automatic cooling, always verify the gun is cooling down properly to prevent accidental burns or fire hazards.
3. Package Contents
The BAKON BK701D soldering kit includes the following items:
- BAKON BK701D Main Unit (Hot Air Rework & Soldering Station)
- Soldering Iron with Cable
- Hot Air Gun with Cable
- Soldering Iron Stand with Cleaning Sponge and Brass Tip Cleaner
- 30g Soldering Wire
- 5 Soldering Tips (I/B/K/3.2D/3C)
- Solder Suction Tape (Desoldering Wick)
- Desoldering Pump
- 1 Tweezer
- 2 Hot Air Nozzles
- Power Cord (110V US specification)
4. Product Overview
The BAKON BK701D combines two essential tools for electronics work into a single compact unit. Below are images illustrating the product and its key features.

Figure 4.1: The BAKON BK701D 2-in-1 Hot Air Rework and Soldering Station, showcasing the main unit, hot air gun, soldering iron, and various included accessories like soldering wire, tips, and cleaning tools.

Figure 4.2: An overview of the station's advanced features, highlighting temperature compensation, PID temperature control for stability, Celsius/Fahrenheit conversion, and automatic cooling for safety and longevity.

Figure 4.3: A detailed diagram labeling the various controls and components of the BAKON BK701D unit, including displays, temperature adjustment buttons, heating switches, and connections for the soldering iron and hot air gun.
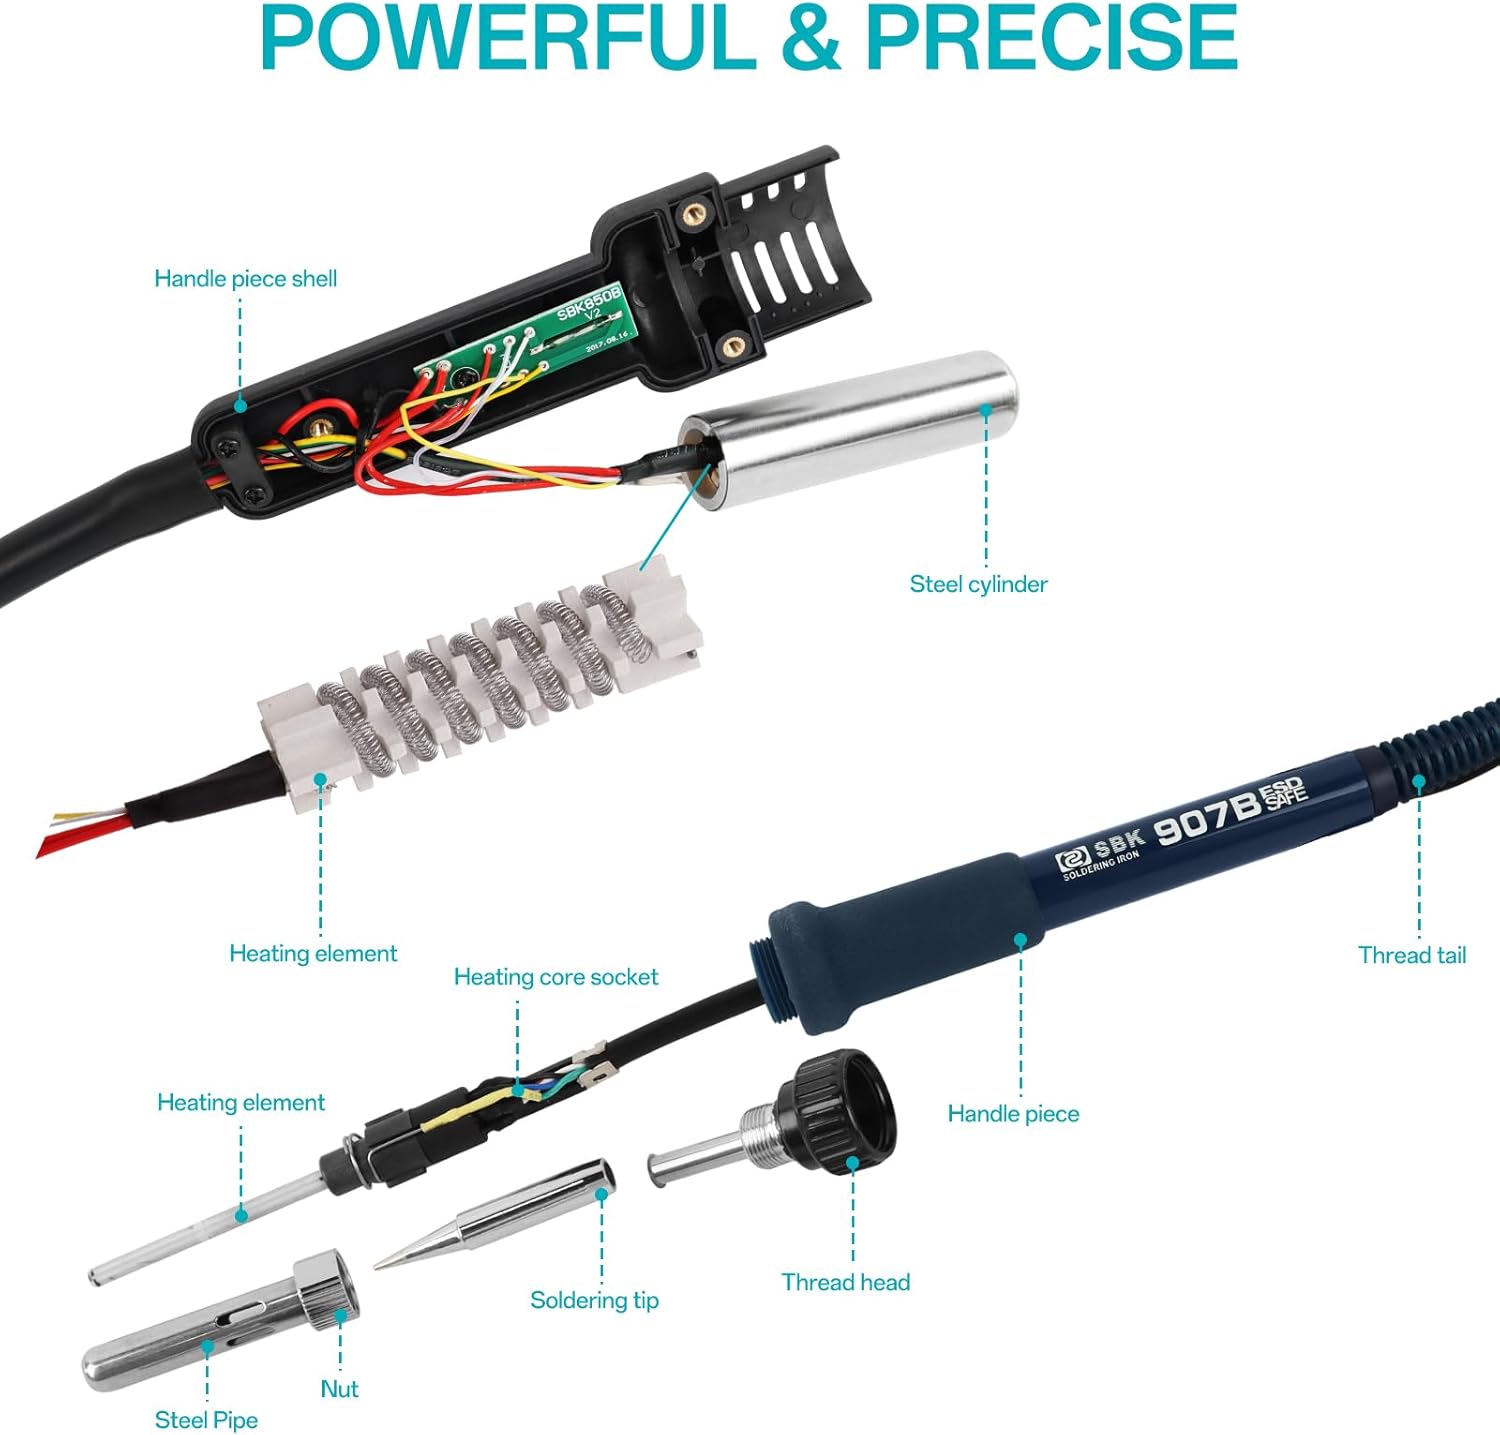
Figure 4.4: An exploded view illustrating the internal components of the soldering iron, including the handle piece, steel cylinder, heating element, heating core socket, soldering tip, and nut.

Figure 4.5: Examples of practical applications for the BK701D, such as chip dismantling, circuit board maintenance, main board welding, and general chip maintenance, demonstrating its versatility.
5. Setup
5.1 Initial Inspection
Upon unpacking, inspect all components for any signs of damage. Ensure all listed package contents are present.
5.2 Removing Transit Screws
Before initial use, locate and remove any transit screws from the bottom of the main unit. These screws are typically installed to secure internal components, such as the air pump, during shipping. Failure to remove them may cause excessive vibration or damage during operation.
5.3 Connecting Components
- Connect the soldering iron cable to the designated socket on the main unit.
- Place the soldering iron into its stand. Ensure the stand is stable and includes the cleaning sponge and brass tip cleaner.
- Connect the hot air gun cable to its designated socket on the main unit.
- Attach the desired hot air nozzle to the hot air gun.
- Plug the power cord into the main unit and then into a standard 110V AC power outlet.
6. Operating Instructions
6.1 Powering On and Temperature Unit Conversion
Press the main power switch to turn on the unit. The digital displays will illuminate. To switch between Celsius (°C) and Fahrenheit (°F), press and hold both the UP and DOWN temperature adjustment buttons simultaneously for either the soldering iron or hot air rework station while the unit is on.
6.2 Soldering Iron Operation

Figure 6.1: Demonstrates the soldering iron in operation, showing the temperature display and the process of soldering components onto a circuit board.
- Turn on the 'WORK' switch for the soldering iron section.
- Use the 'UP' and 'DOWN' buttons to set the desired temperature. The soldering iron features PID temperature control, ensuring rapid heating and stable temperature maintenance within the range of 212°F to 896°F (100°C to 480°C).
- Allow the iron to reach the set temperature. The display will show the current temperature.
- Apply solder to the joint. The iron's precise temperature control facilitates efficient soldering.
- When not in use, place the soldering iron back into its stand. The iron will automatically enter sleep mode and cool down after 10 minutes of inactivity, extending the life of the heating element.
6.3 Hot Air Rework Station Operation

Figure 6.2: Illustrates the hot air rework station in use, showing the temperature display and the application of hot air for desoldering or rework tasks on a circuit board.
- Turn on the 'WORK' switch for the rework station section.
- Use the 'UP' and 'DOWN' buttons to set the desired air temperature. The hot air gun can be adjusted from 212°F to 932°F (100°C to 500°C).
- Adjust the air volume using the dedicated adjustment button.
- Allow the hot air gun to reach the set temperature.
- Direct the hot air flow onto the component to be reworked or desoldered.
- After use, place the hot air gun back into its holder. The unit features an automatic cooling system that will continue to blow air until the nozzle temperature drops to a safe level, preventing damage to the heating element and ensuring safety.
7. Maintenance
7.1 Soldering Tip Maintenance
- Always tin the soldering tip with a small amount of solder before and after use to prevent oxidation.
- Clean the tip frequently using the brass tip cleaner or a damp sponge.
- Replace tips when they become excessively worn or corroded to maintain optimal performance.
7.2 General Cleaning
- Ensure the unit is unplugged and completely cool before cleaning.
- Wipe the main unit and handles with a soft, dry cloth. Do not use abrasive cleaners or solvents.
- Keep the air vents clear of dust and debris to ensure proper airflow and cooling.
8. Troubleshooting
- Unit does not power on: Check the power cord connection and the power outlet. Ensure the main power switch is in the 'ON' position.
- Soldering iron or hot air gun not heating: Verify that the respective 'WORK' switch is engaged and the temperature is set above the ambient temperature. Check cable connections.
- Inconsistent temperature: Ensure the soldering tip is clean and properly tinned. For the hot air gun, check for any obstructions in the nozzle or air intake. The unit features PID control for stability, but extreme environmental conditions can affect performance.
- Hot air gun does not enter standby/cool down: The hot air gun is designed with an automatic cooling system that activates when placed in its holder. If this function does not engage, ensure the holder sensor is clean and unobstructed. If the issue persists, contact customer support.
- Excessive vibration or noise: Ensure all transit screws were removed during setup. If the issue persists, internal components may require inspection by a qualified technician.
- Temperature offset adjustment: If you suspect the displayed temperature is inaccurate, the unit allows for temperature offset adjustment. Refer to the detailed instructions in the full user manual for specific steps on how to calibrate the temperature offset.
9. Specifications
| Feature | Specification |
|---|---|
| Model Number | BK701D |
| Brand | BAKON |
| Input Voltage | 110 Volts AC |
| Total Wattage | 700 watts |
| Soldering Iron Temperature Range | 212°F - 896°F (100°C - 480°C) |
| Hot Air Rework Temperature Range | 212°F - 932°F (100°C - 500°C) |
| Temperature Stability | PID Controlled |
| Display Type | LCD or LED |
| Item Weight | 9.72 pounds |
| Package Dimensions | 12.8 x 11.38 x 7.05 inches |
| Material | Copper, Glass, Paper, Wood (referring to components/packaging) |
10. Warranty and Support
10.1 Product Warranty
The BAKON BK701D Hot Air Workstation is covered by an exclusive 1-year product warranty in the U.S.A. This warranty covers defects in materials and workmanship under normal use.
10.2 Technical Support
If you encounter any problems while using this soldering kit, please do not hesitate to contact BAKON customer support. Our technical support team is available to provide 24-hour support and consultation to assist you with any questions or issues.
For support, please refer to the contact information provided with your purchase or visit the official BAKON website.