
Klutch 90260770077
Klutch Dual-Voltage MIG/Flux-Core/TIG/Stick Multi-Process 4-in-1 Welder
User Manual
Model: 90260770077
Introduction
This manual provides essential information for the safe and effective operation, setup, and maintenance of your Klutch Dual-Voltage Multi-Process Welder. This versatile 4-in-1 unit supports MIG, Flux-Core, TIG, and Stick welding processes, featuring inverter technology for lightweight design and an intuitive LCD display for simplified setup and control.
The welder is designed for a wide range of materials including steel, stainless steel, cast iron, hard surfacing, and aluminum, offering dual-voltage input (120V/230V) for broad compatibility. Please read this manual thoroughly before operating the equipment to ensure safety and optimal performance.
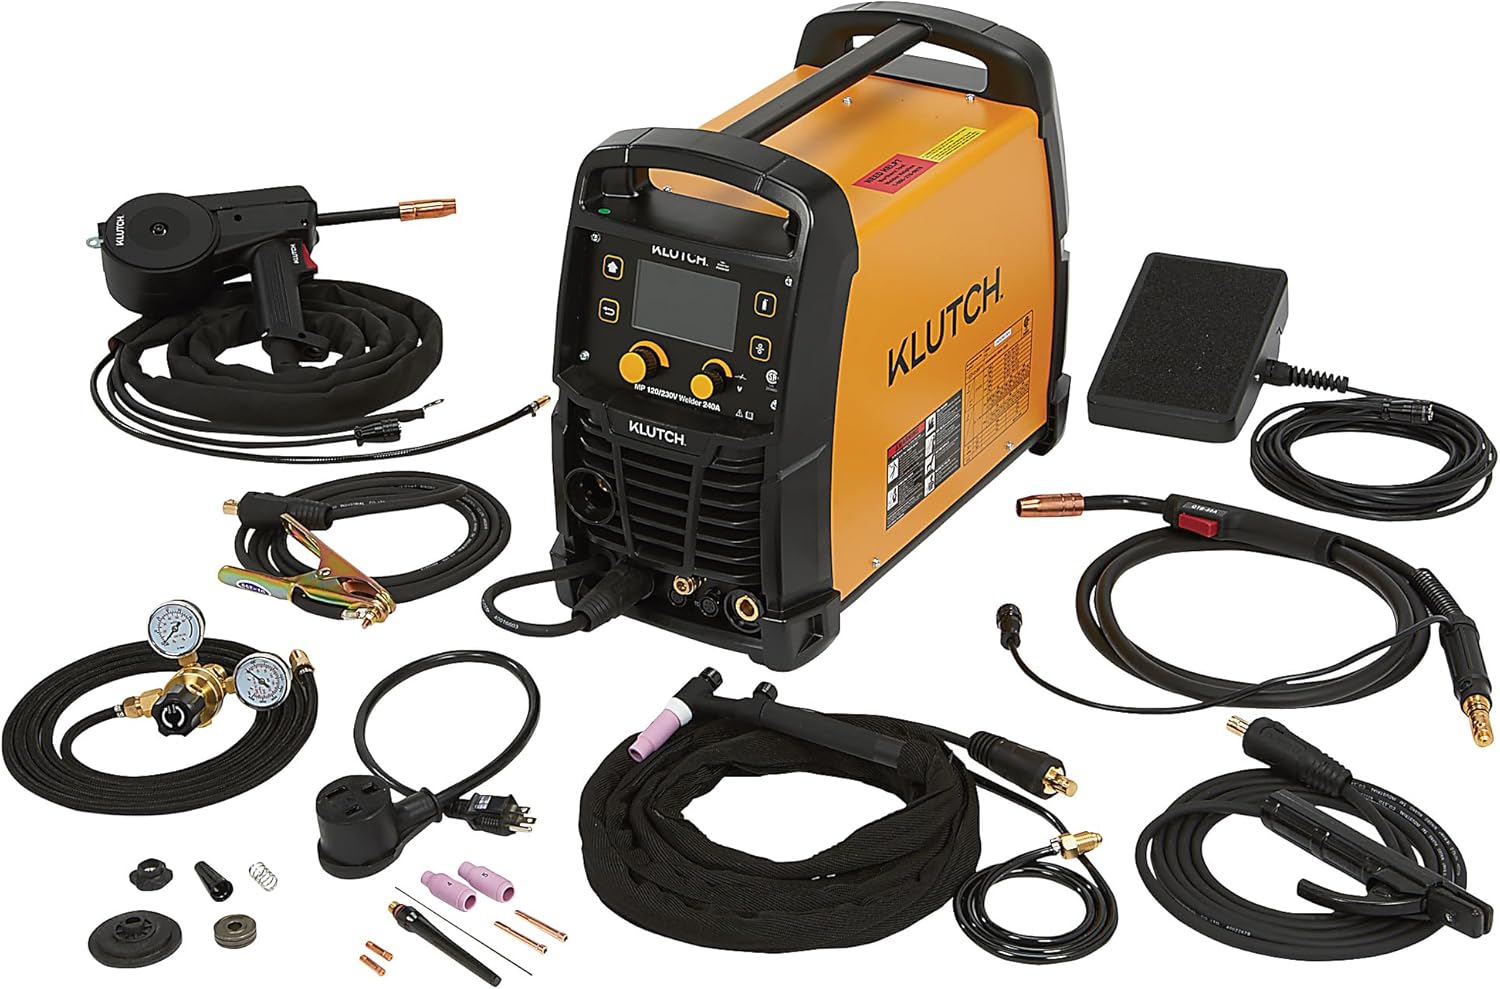
Figure 1: Klutch Dual-Voltage Multi-Process Welder with all included components, including the main unit, MIG torch, TIG torch, spool gun, electrode holder, ground clamp, regulator, and foot pedal.
General Safety Information
Welding can be hazardous. Always follow safety precautions to prevent injury or damage. This section outlines critical safety guidelines. For comprehensive safety information, refer to ANSI Z49.1 "Safety in Welding, Cutting, and Allied Processes" and your local safety regulations.
- Electric Shock Can Kill: Ensure proper grounding. Do not touch live electrical parts. Wear dry welding gloves and protective clothing.
- Fumes and Gases Can Be Hazardous: Work in a well-ventilated area. Use local exhaust or ventilation to remove welding fumes and gases.
- Welding Arcs Can Injure Eyes and Burn Skin: Wear a welding helmet with appropriate shade filter. Use protective clothing, including long sleeves, pants, and welding gloves.
- Fire and Explosion Hazard: Keep flammable materials away from the welding area. Have a fire extinguisher readily available.
- Hot Parts Can Cause Severe Burns: Allow welded materials and equipment to cool before handling.
- Magnetic Fields: Pacemaker wearers should consult their doctor before operating welding equipment.
- Cylinders Can Explode If Damaged: Secure gas cylinders properly. Do not allow welding torch or ground cable to touch cylinders.
Always disconnect power before servicing or moving the unit. Ensure all connections are secure and undamaged.
Product Overview and Components
The Klutch Multi-Process Welder is a compact and powerful unit designed for various welding applications. Understanding its components is key to proper setup and operation.
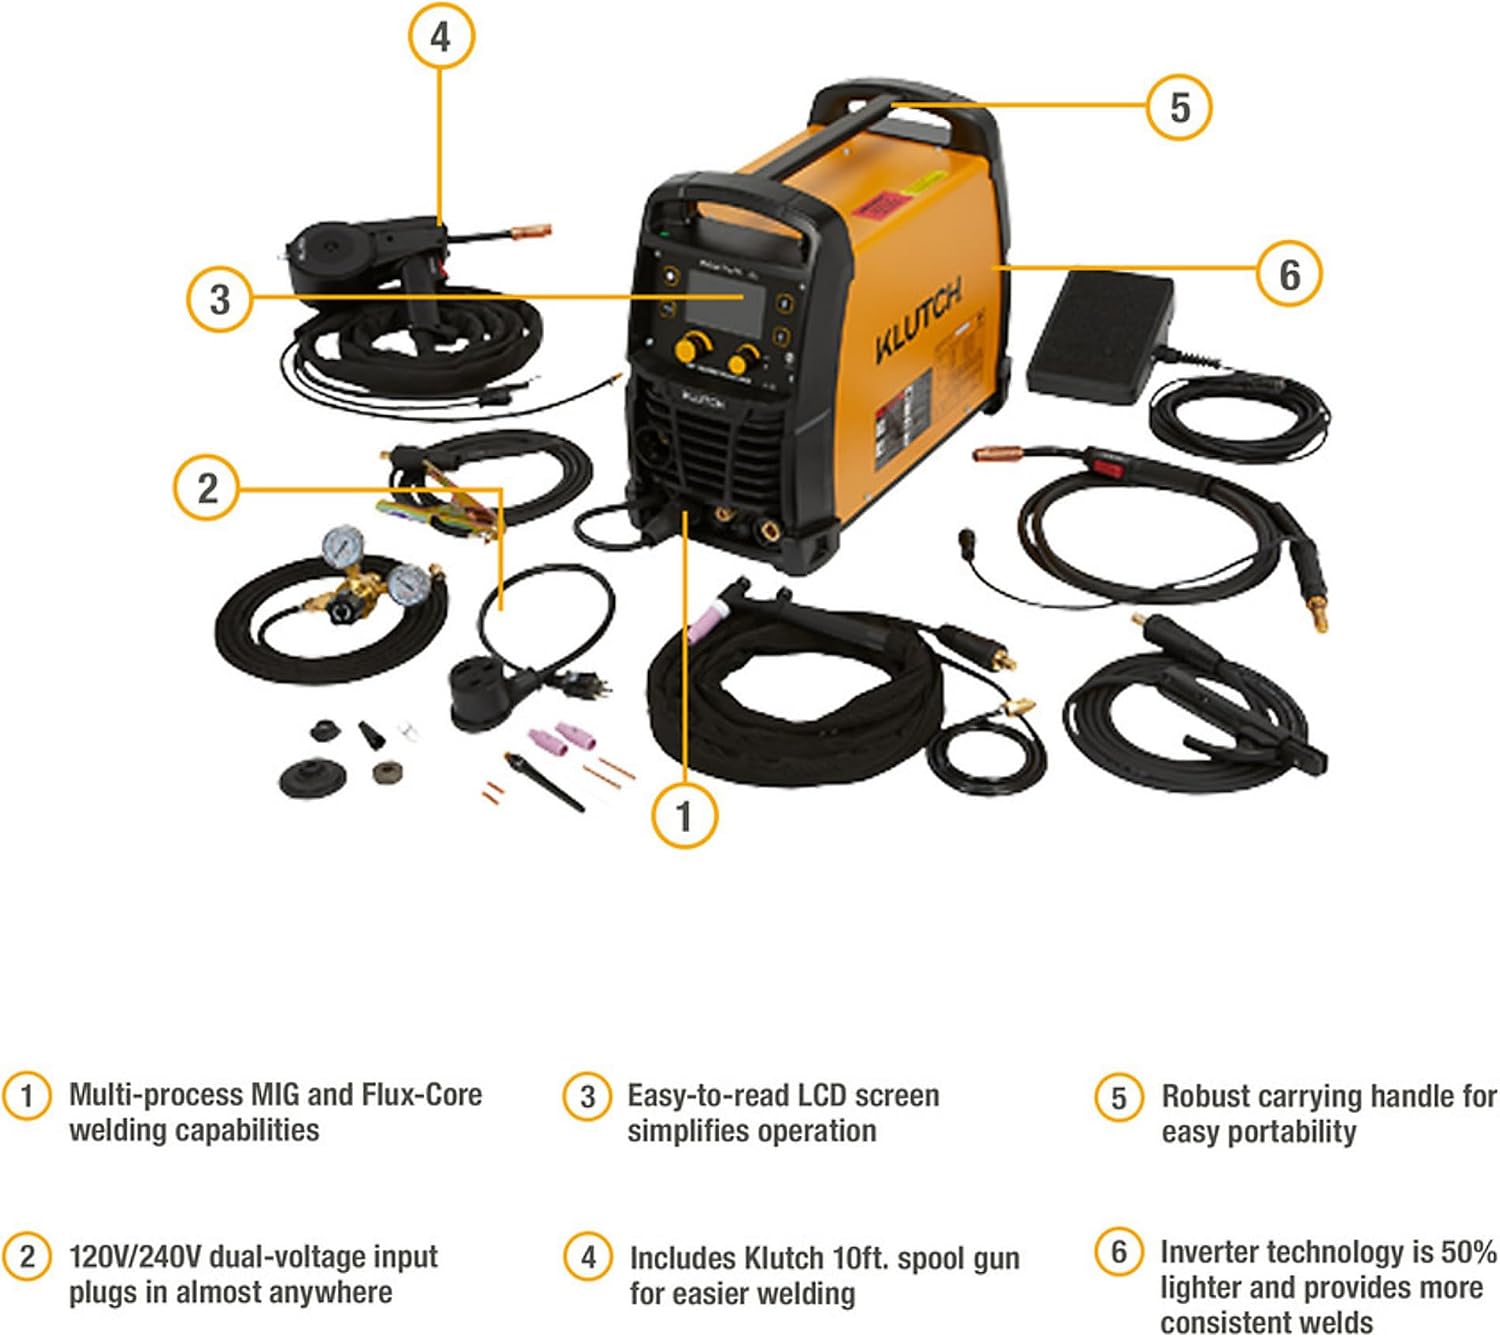
Figure 2: Key components of the Klutch Multi-Process Welder and included accessories.
- Multi-process MIG and Flux-Core welding capabilities: The core unit supports multiple welding modes.
- 120V/240V dual-voltage input: Allows connection to standard 120V or higher power 240V outlets.
- Easy-to-read LCD screen: Provides intuitive control and setup guidance.
- Includes Klutch 10ft. spool gun: For efficient aluminum welding and other applications requiring a spool gun.
- Robust carrying handle: Ensures easy portability of the unit.
- Inverter technology: Makes the unit up to 50% lighter and provides more consistent welds.
Included Components:
- (1) 10 ft MIG torch
- (1) 13 ft TIG torch
- 10 ft spool gun
- 10 ft welding cable with electrode holder
- Grounding cable with clamp
- 25 ft foot pedal
- Regulator
- 10' gas hose
- 120 V adaptor
- 2 contact tips
- 1 Flux core nozzle
- 1 drive roll
Setup
Proper setup is crucial for safe and effective welding. Follow these steps for initial installation.
1. Power Connection
The welder supports dual-voltage input (120V/230V). Use the appropriate power cable and adapter for your power source.

Figure 3: Rear panel of the welder showing the dual-voltage power input and gas input.
- Ensure the welder's power switch is in the "OFF" position.
- Connect the appropriate power cord (230V cable or 120V adapter) to the welder's power input.
- Plug the power cord into a properly grounded electrical outlet.
2. Gas Connection (for MIG/TIG)
For MIG and TIG welding, a shielding gas is required. Connect the gas regulator and hose as follows:
- Attach the gas regulator to your shielding gas cylinder.
- Connect one end of the gas hose to the regulator and the other end to the "GAS INPUT" port on the rear of the welder (refer to Figure 3).
- Ensure all connections are tight to prevent gas leaks.
3. Torch and Cable Connections
Connect the appropriate torch and cables based on the welding process you intend to use.
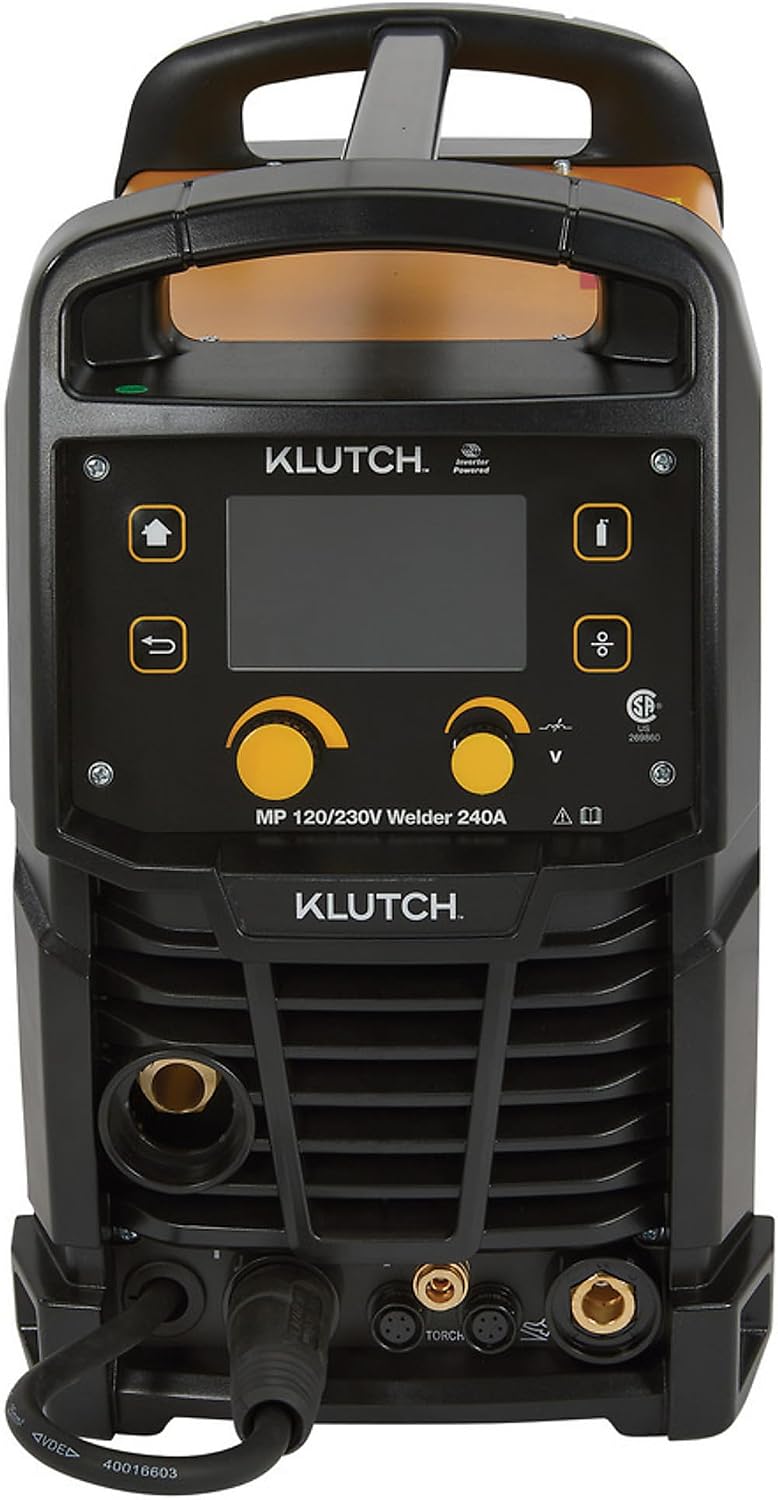
Figure 4: Front panel of the welder with connection points for MIG, TIG, and Stick welding accessories.
- MIG/Flux-Core: Connect the MIG torch to the appropriate connector on the front panel. Ensure the drive roll and contact tip are suitable for your wire size.
- TIG: Connect the TIG torch and its gas line to the designated ports. Connect the foot pedal if desired.
- Stick: Connect the electrode holder cable to the positive (+) terminal and the ground clamp cable to the negative (-) terminal (or vice-versa depending on electrode type).
- Spool Gun: Connect the spool gun cable to its dedicated port on the front panel.
- Always attach the ground clamp securely to the workpiece or work table, ensuring good electrical contact.
Operating Instructions
The Klutch Multi-Process Welder features an intuitive LCD display for easy operation and synergic settings.

Figure 5: Front panel with LCD display and control knobs for adjusting welding parameters.
1. Powering On and Initial Settings
- Turn the power switch to the "ON" position. The LCD display will illuminate.
- Use the control knobs and buttons to navigate the LCD menu.
- Select your desired welding process (MIG, Flux-Core, TIG, Stick).
- Choose the material type and thickness. The synergic settings will suggest initial parameters.
- Adjust amperage, voltage, and wire feed speed (for MIG/Flux-Core) as needed based on your specific application and material.
2. Welding Processes
- MIG Welding: Requires shielding gas. Ideal for steel, stainless steel, and aluminum (with spool gun). The unit performs MIG welding from 40-90 Amps DC (140 peak @ 120V) and 40-200 Amps DC @ 230V.
- Flux-Core Welding: Does not require external shielding gas. Suitable for outdoor use and thicker materials.
- TIG Welding: Requires shielding gas (typically Argon). Provides precise, clean welds. Use the foot pedal for fine amperage control if connected.
- Stick Welding: Uses coated electrodes. Versatile for various materials and conditions.

Figure 6: The Klutch welder in operation, demonstrating its welding capabilities.
Always perform test welds on scrap material to fine-tune settings before beginning your project.
Maintenance
Regular maintenance ensures the longevity and optimal performance of your welding machine. Always disconnect power before performing any maintenance.
- Cleaning: Periodically clean the internal components with dry, compressed air to remove dust and metal particles. Clean the exterior with a damp cloth.
- Torch and Cable Inspection: Regularly inspect all cables, torches, and connections for wear, cuts, or damage. Replace damaged components immediately.
- Contact Tips and Nozzles: For MIG/Flux-Core, regularly check and replace worn contact tips and clean or replace nozzles.
- Drive Rolls: Ensure drive rolls are clean and free of debris. Verify they are correctly sized for the welding wire being used.
- Ground Clamp: Keep the ground clamp clean and ensure it makes good electrical contact with the workpiece.
- Storage: Store the welder in a clean, dry environment when not in use.
Troubleshooting
This section provides solutions to common issues you might encounter. If problems persist, contact customer support.
| Problem | Possible Cause | Solution |
|---|---|---|
| No power to welder | Power cord unplugged; Circuit breaker tripped; Welder switch off. | Check power cord connection; Reset circuit breaker; Turn welder switch ON. |
| No arc/Poor arc starting | Poor ground connection; Incorrect settings; Worn contact tip (MIG); Contaminated electrode (Stick/TIG). | Ensure ground clamp is clean and secure; Adjust amperage/voltage; Replace contact tip; Clean/replace electrode. |
| Wire feed issues (MIG/Flux-Core) | Incorrect drive roll tension; Clogged liner; Wrong drive roll size; Wire tangled. | Adjust drive roll tension; Clean/replace liner; Verify correct drive roll size; Untangle wire spool. |
| Overload/Thermal protection activated | Exceeded duty cycle; Insufficient ventilation. | Allow welder to cool down; Ensure adequate airflow around the unit. |
| Inconsistent weld quality | Improper settings; Contaminated workpiece; Inconsistent travel speed. | Adjust parameters; Clean workpiece thoroughly; Maintain steady travel speed. |
Specifications
Technical specifications for the Klutch Dual-Voltage Multi-Process Welder, Model 90260770077.
| Feature | Detail |
|---|---|
| Manufacturer | Klutch |
| Model Number | 90260770077 |
| Item Weight | 66.8 pounds |
| Power Source | DC |
| Input Voltage | 120V/230V |
| Max Amperage | 240 Amp |
| Welding Processes | MIG, Flux-Core, TIG, Stick |
| MIG Welding Range (120V) | 40-90 Amps DC (140 peak) |
| MIG Welding Range (230V) | 40-200 Amps DC |
| Display Type | LCD |
| Included Accessories | MIG torch, TIG torch, spool gun, electrode cable, ground cable, regulator, gas hose, 120V adapter, foot pedal, contact tips, flux-core nozzle, drive roll. |
| Safety Features | Thermal overload protection, CSA approved. |
Warranty and Support
For information regarding product warranty, please refer to the warranty card included with your purchase or visit the official Klutch website. Klutch products are typically backed by a manufacturer's warranty covering defects in materials and workmanship.
If you require technical assistance, have questions about operation, or need to report a problem, please contact Klutch customer support. Support contact information can usually be found on the manufacturer's website or on your purchase documentation.
Note: No official product videos from the seller were found in the provided data.
Ask a question about this manual
Ask about setup, troubleshooting, compatibility, parts, safety, or missing instructions. Manuals+ will review the question and use this page’s manual context to help answer it.