
hygger HG153-5W
hygger Aquarium Internal Filter HG153-5W Instruction Manual
For 5-15 Gallon Tanks
1. Introduction
Thank you for choosing the hygger Aquarium Internal Filter, Model HG153-5W. This internal filter is designed for 5-15 gallon freshwater and saltwater aquariums, providing essential functions for maintaining water quality and a healthy aquatic environment. It integrates filtration, oxygenation, wave-making, and water circulation into a single compact unit. Please read this manual thoroughly before installation and operation to ensure proper use and longevity of your filter.
2. Product Components
Before proceeding with installation, please verify that all components listed below are present in your package:
- 1x Filter Unit with Sponge
- 1x Pump with Power Cord
- 4x Suction Cups
- 1x Rain Shower Pipe
- 1x Air Hose
- 1x Flat Water Outlet

3. Setup and Installation
Follow these steps to properly install your hygger internal filter:
- Assemble the Filter Unit: Ensure the biochemical sponge is correctly placed inside the filter housing.
- Attach Suction Cups: Securely attach the four suction cups to the side of the filter pump unit.
- Choose Water Outlet Mode:
- Rainfall Mode: Connect the rain shower pipe to the water outlet of the pump. This creates a gentle rainfall effect.
- Waterfall Mode: Connect the flat water outlet to the pump. This creates a dynamic waterfall effect.
- Aeration Mode: Attach the air hose to the air intake nozzle on the pump. The other end of the air hose should be positioned above the water surface.
- Position the Filter: Submerge the entire filter unit in your aquarium. Use the suction cups to firmly attach it to the inside wall of the tank, ensuring it is fully underwater.
- Connect Power: Once the filter is securely installed and fully submerged, connect the power cord to a suitable electrical outlet.

4. Operating Instructions
The hygger internal filter offers adjustable flow rate and oxygen volume to suit your aquarium's needs.
4.1. Adjustable Flow Rate
The filter features a control switch to adjust the water flow rate. Slide the switch to increase or decrease the flow, providing optimal water movement for your aquatic pets.

4.2. Oxygen Volume Adjustment
When operating in aeration mode with the air hose attached, the oxygen volume can also be adjusted. This allows you to control the amount of air bubbles introduced into the tank, enhancing oxygen levels for your fish.
5. Maintenance
Regular maintenance is crucial for the efficient operation and longevity of your filter.
5.1. Cleaning the Filter Sponge
The biochemical sponge filters debris and fish waste while cultivating beneficial bacteria. It is recommended to clean the sponge regularly, typically once every 1-2 weeks, depending on your tank's bioload. To clean:
- Unplug the filter from the power outlet.
- Carefully remove the filter unit from the aquarium.
- Disassemble the filter housing and remove the sponge.
- Rinse the sponge thoroughly with old aquarium water (from a water change) or dechlorinated tap water. Avoid using untreated tap water as it can kill beneficial bacteria.
- Reassemble the filter and place it back into the aquarium.
- Plug the filter back into the power outlet.

5.2. Replacing Filter Media
The filter cartridge is removable, allowing for customization with various filtration media such as ceramic balls, resin, or activated carbon, in addition to the biochemical sponge. These additional media are not included and can be purchased separately based on your aquarium's specific needs.

5.3. Pump Cleaning
Periodically inspect the pump impeller for any debris or blockages that may reduce performance. Disassemble the pump head and clean the impeller with a small brush if necessary.
6. Troubleshooting
If you encounter issues with your hygger internal filter, refer to the following common problems and solutions:
| Problem | Possible Cause | Solution |
|---|---|---|
| Filter not running | No power; Impeller jammed | Check power connection; Clean impeller |
| Reduced water flow | Clogged filter sponge; Blocked impeller; Air intake blocked | Clean filter sponge; Clean impeller; Clear air intake hose |
| Excessive noise | Impeller not seated correctly; Debris in impeller; Filter not fully submerged | Check impeller seating; Clean impeller; Ensure filter is fully submerged |
| Air bubbles not produced (Aeration Mode) | Air hose blocked or kinked; Air intake nozzle blocked | Check and clear air hose; Clean air intake nozzle |
7. Specifications
| Feature | Detail |
|---|---|
| Brand | hygger |
| Model Number | HG153-5W |
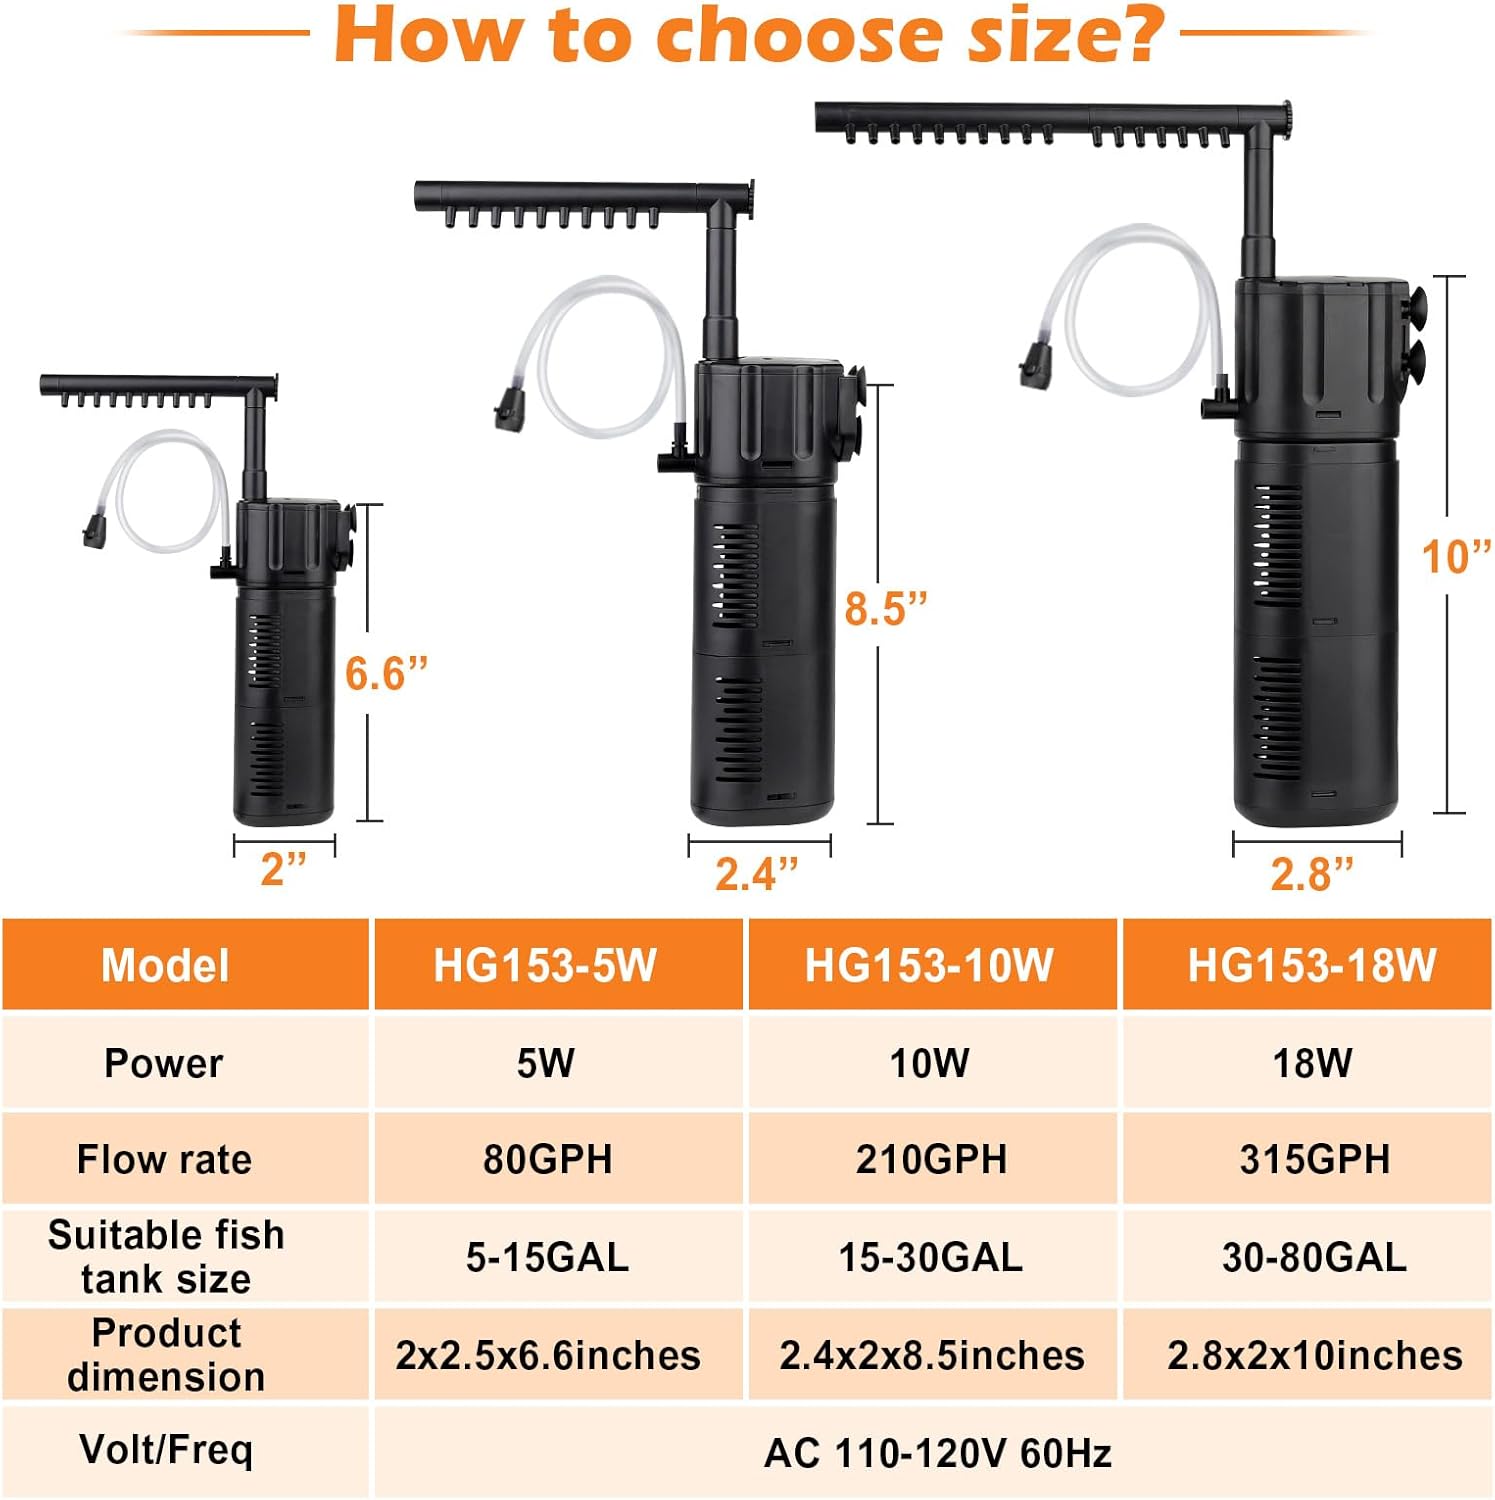
| Power | 5W |
| Flow Rate | 80 GPH |
| Suitable Tank Size | 5-15 Gallons |
| Product Dimensions | 7.56"L x 3.49"W x 2.87"H |
| Item Weight | 0.28 Kilograms (9.9 ounces) |
| Voltage | 110 Volts (AC) |
| Material | Plastic |
| Color | Black |
| Included Components | Aquarium Filter |
8. Warranty and Support
8.1. Warranty Information
This hygger Aquarium Internal Filter comes with a 2-year manufacturer's warranty. Please retain your proof of purchase for warranty claims.
8.2. Customer Support
For any questions, concerns, or assistance with your product, please contact hygger customer support. Refer to the product packaging or the official hygger website for the most current contact information.
Related documentsHG153-5W


Ask a question about this manual
Ask about setup, troubleshooting, compatibility, parts, safety, or missing instructions. Manuals+ will review the question and use this page’s manual context to help answer it.