1. Introduction
Thank you for choosing the Leikefitness Mini Stair Stepper. This compact and versatile exercise equipment is designed to provide an effective cardio and full-body workout in the comfort of your home or office. Featuring a dual hydraulic drive system, twist stepping motion, and resistance bands, it targets your lower body, core, and upper body muscles. The integrated LCD display allows you to monitor your exercise progress, including time, count, and calories burned. Please read this manual thoroughly before assembly and use to ensure safe and optimal performance of your stepper.
2. Safety Information
Your safety is paramount. Please adhere to the following guidelines:
- Consult your physician before starting any new exercise program.
- Ensure the stepper is placed on a flat, stable, non-slip surface before use.
- Keep children and pets away from the equipment during operation.
- The maximum weight capacity for this stepper is 330 lbs (150 kg). Do not exceed this limit.
- Wear appropriate athletic footwear during exercise.
- Stop exercising immediately if you feel pain, dizziness, or shortness of breath.
- Inspect the stepper for any loose or damaged parts before each use. Do not use if damaged.
- Do not place hands or feet near moving parts during operation.
- The stepper is designed for ages 14 and up.
3. Package Contents
Verify that all components are present in the package:
- Leikefitness Mini Stair Stepper (Main Unit)
- Resistance Bands (2)
- User Manual (This document)
- Required AAA Batteries for Digital Control Unit (may be pre-installed or included separately)
4. Setup and Assembly
The Leikefitness Mini Stair Stepper requires minimal assembly. Follow these steps to prepare your stepper for use:
- Unpack all components from the box and place them on a clean, flat surface.
- Ensure the stepper is stable. The base should sit firmly on the ground.
- If the digital control unit requires battery installation, open the battery compartment (usually on the underside or front of the unit) and insert the AAA batteries, observing polarity.
- Attach the resistance bands: Locate the attachment points on the front of the stepper's base. Securely clip the resistance bands to these points. Ensure they are firmly attached before use.
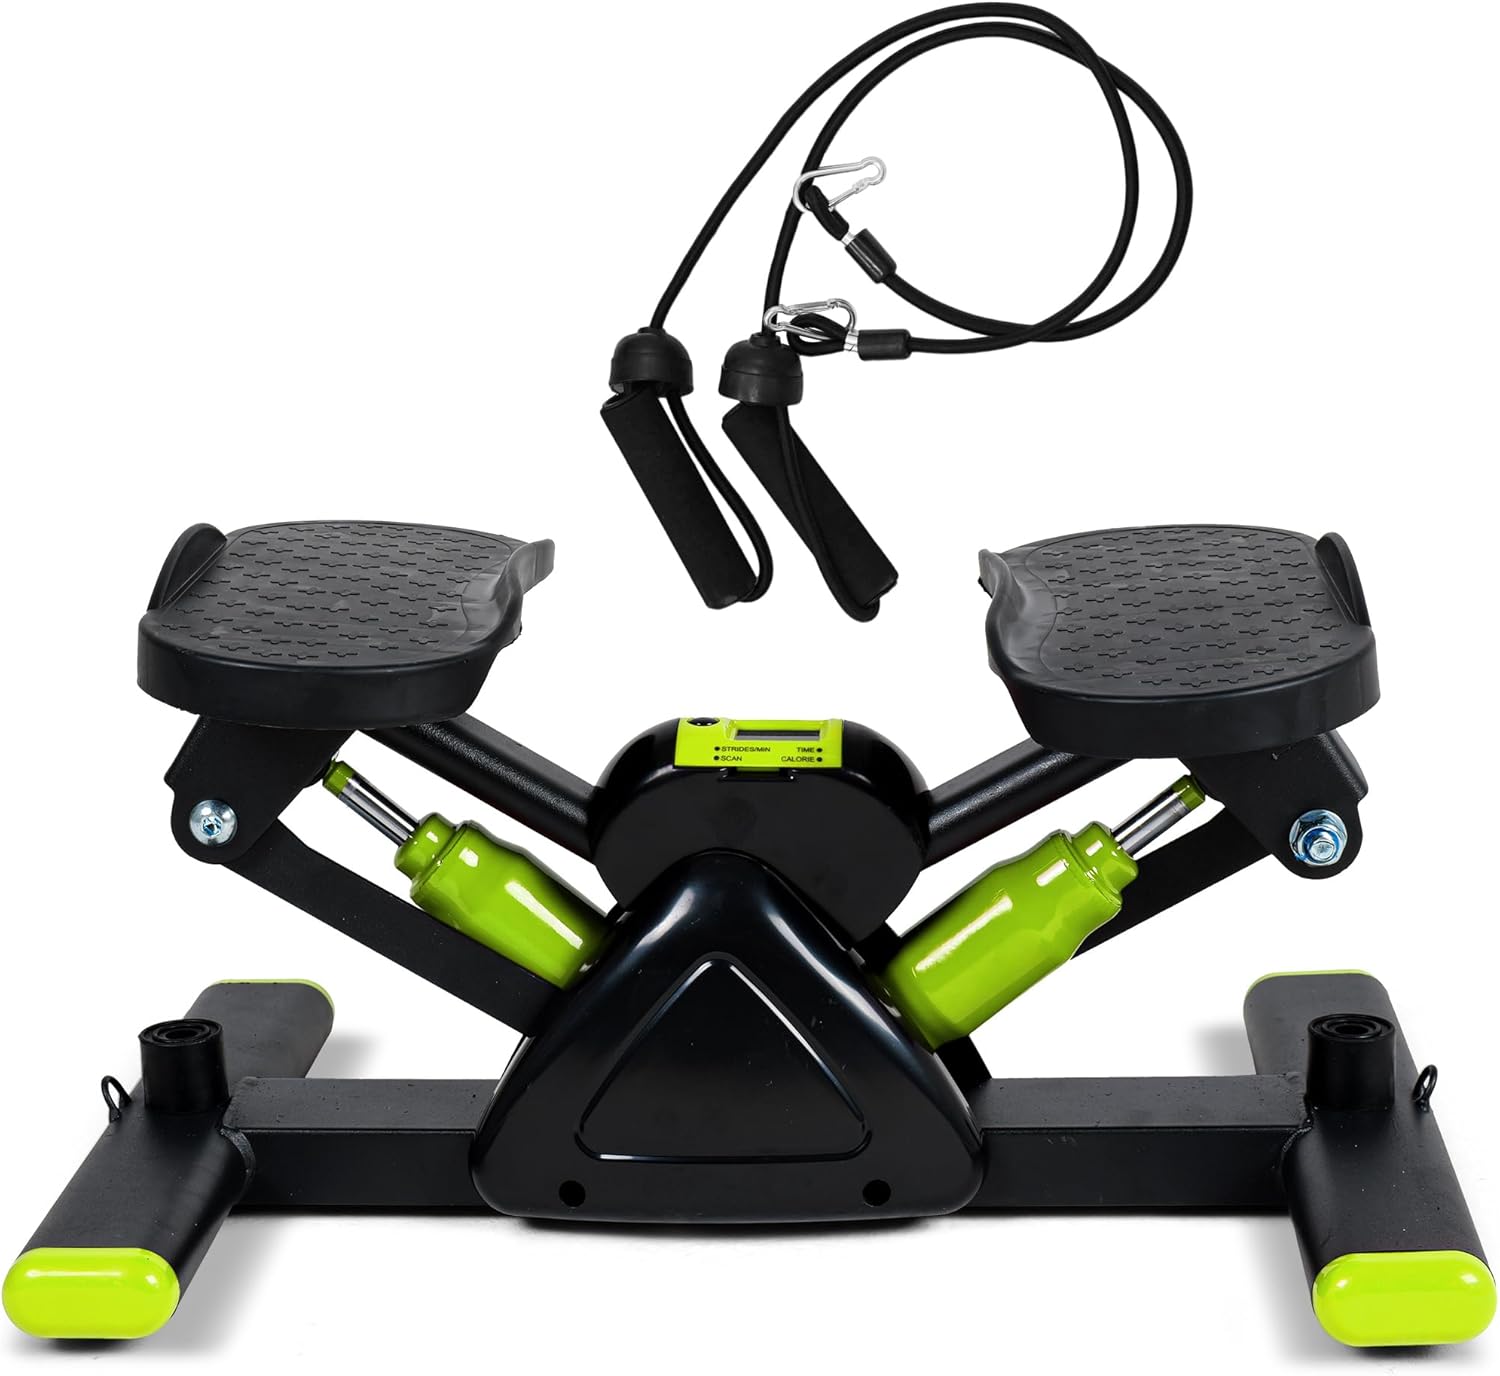
Image 1: The Leikefitness Mini Stair Stepper with its included resistance bands, ready for assembly and use.

Image 2: Detailed product dimensions of the stepper, showing its compact size: 19.69 inches long, 12.99 inches wide, and 9.84 inches high.
5. Operating Instructions
5.1 Using the Stepper
The stepper provides an up-down motion with a twist action for a comprehensive lower body and core workout.
- Step onto the pedals one foot at a time, ensuring your feet are centered and stable on the non-slip surface.
- Maintain an upright posture, keeping your back straight and core engaged.
- Begin stepping by pressing down on one pedal, allowing the other to rise. Alternate the motion smoothly. The V-shaped stepping structure provides a 38° movement angle, minimizing strain on knees and ankles.
- The stepper's hydraulic system provides resistance. The resistance is not adjustable, but the intensity of your workout can be controlled by your stepping speed and duration.

Image 3: Illustration of the two primary stepping motions: the twist step for oblique engagement and the vertical step for traditional stair climbing.

Image 4: A close-up view of the stepper's large and wide pedals, designed with an anti-skid structure to ensure safe and comfortable foot placement for various users.
5.2 Using the LCD Display
The digital LCD display unit tracks your workout data:
- TIME: Displays the duration of your current workout session.
- COUNT: Shows the total number of steps taken during the current session.
- CALORIES: Estimates the calories burned during your workout.
- REPS/MIN (Strides/Min): Indicates your current stepping speed.
- SCAN: Cycles through all display functions automatically.
Press the 'MODE' button to switch between display functions or to activate the SCAN mode. Press and hold 'RESET' to clear all data.
5.3 Using Resistance Bands
The included resistance bands allow for a full-body workout, engaging your arms, shoulders, and back while stepping.
- Ensure the resistance bands are securely clipped to the stepper's base.
- Hold one handle in each hand.
- Perform various arm exercises (e.g., bicep curls, tricep extensions, shoulder presses) while simultaneously stepping.
- Adjust your grip on the bands to increase or decrease resistance as needed.

Image 5: A user demonstrating the full-body workout potential of the stepper by simultaneously performing stepping motions and using the resistance bands for upper body engagement.
6. Maintenance
Regular maintenance ensures the longevity and smooth operation of your stepper:
- Cleaning: Wipe down the stepper with a damp cloth after each use to remove sweat and dust. Do not use abrasive cleaners or solvents.
- Lubrication: The hydraulic cylinders are generally maintenance-free. If you notice any squeaking or stiffness, a small amount of silicone-based lubricant can be applied to the pivot points, but avoid applying directly to the hydraulic rods.
- Inspection: Periodically check all bolts, nuts, and moving parts to ensure they are secure. Tighten any loose fasteners.
- Storage: Store the stepper in a cool, dry place away from direct sunlight and extreme temperatures. Its low-profile design allows for compact storage.
- Battery Replacement: Replace the AAA batteries in the LCD display when the screen dims or stops functioning.

Image 6: The stepper in use, highlighting its silent operation due to silent rubber pads and mute columns, ensuring a quiet workout environment (less than 30dB).
7. Troubleshooting
Refer to the table below for common issues and their solutions:
| Problem | Possible Cause | Solution |
|---|---|---|
| Stepper feels too stiff or difficult to move. | New unit, needs breaking in; user weight is too low. | Continue using the stepper; the hydraulic system may loosen with use. For lighter users, adding a weighted vest or backpack can increase resistance and fluidity of motion. |
| Squeaking or grinding noise during use. | Loose parts; lack of lubrication at pivot points; normal hydraulic sound. | Check and tighten all bolts and nuts. Apply a small amount of silicone-based lubricant to pivot points if necessary. Ensure the 2 mute columns on both sides are rotated for quiet operation. |
| LCD display is blank or not working. | Dead batteries; incorrect battery installation. | Replace AAA batteries, ensuring correct polarity. |
| Stepper feels unstable or wobbly. | Uneven surface; loose base components. | Ensure the stepper is on a flat, level surface. Check and tighten all screws and bolts on the base frame. |
8. Specifications
Detailed technical specifications for the Leikefitness Mini Stair Stepper:
| Feature | Detail |
|---|---|
| Model Name | US-ST6900 |
| Brand | leikefitness |
| Color | Green |
| Material | Alloy Steel |
| Product Dimensions (L x W x H) | 19.96" x 12.99" x 9.84" (50.7 cm x 33 cm x 25 cm) |
| Item Weight | 14.9 Pounds (6.76 kg) |
| Weight Limit | 330 Pounds (150 kg) |
| Included Components | Stepper, Tension Rope (Resistance Bands) |
| Display Type | Digital LCD (requires AAA batteries) |
| Movement Angle | 38° (V-shaped stepping structure) |
9. Warranty and Support
Leikefitness provides a 1-year warranty for this product, covering manufacturing defects and issues arising from normal use.
For any questions, concerns, or warranty claims regarding your Leikefitness Mini Stair Stepper, please contact customer support through your Amazon account:
- Log in to your Amazon account.
- Navigate to "Your Orders".
- Find the order ID for your Leikefitness Mini Stair Stepper.
- Click on "Contact Seller" to reach Leike Sports for assistance.
Our support team is committed to providing efficient assistance.
