1. Introduction
This manual provides detailed instructions for the installation, operation, and maintenance of your RAVINE Toilet Tank Repair Kit. This kit is designed to replace common toilet tank components, including the fill valve, 2-inch flapper, and front-mount flush handle, to restore efficient and leak-free operation to most standard toilet tanks.
2. Components Included
Your RAVINE Toilet Tank Repair Kit includes the following parts:
- Universal Toilet Fill Valve
- 2-Inch Toilet Flapper with Chain
- Front Mount Toilet Flush Handle (Chrome Finish)
- Associated hardware (washers, nuts, refill tube)
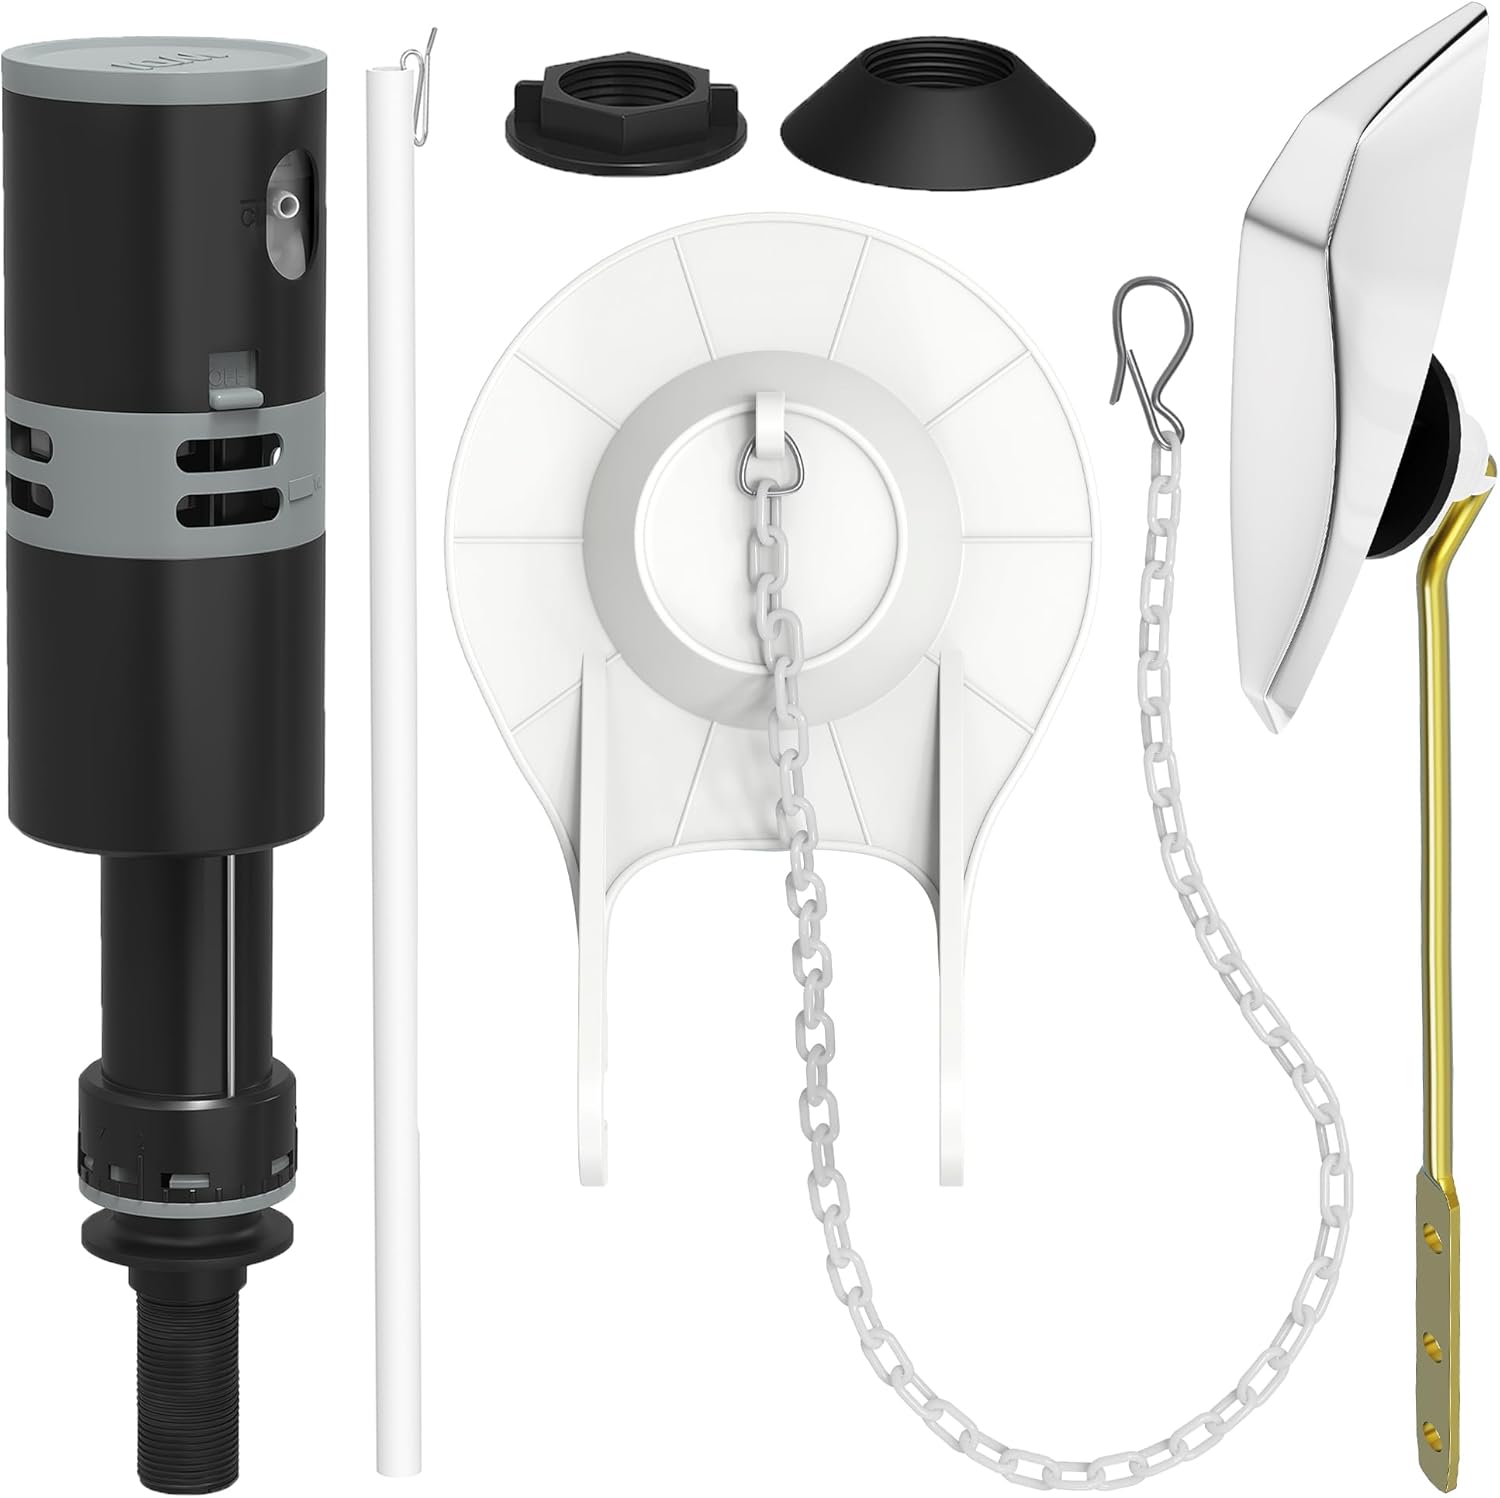
Image 2.1: All components of the RAVINE Toilet Tank Repair Kit.

Image 2.2: Individual components: Toilet Fill Valve, 2-Inch Toilet Flapper, and Chrome Front Mount Toilet Handle.
3. Setup and Installation
Follow these steps for proper installation. No specialized tools are typically required.
- Turn Off Water Supply: Locate the water supply valve at the base of the toilet and turn it clockwise until the water flow stops completely.
- Empty the Tank: Flush the toilet to drain most of the water from the tank. Hold the flush handle down until the tank is as empty as possible. Use a sponge or towel to remove any remaining water.
- Remove Old Components:
- Old Fill Valve: Disconnect the water supply line from the bottom of the fill valve. Unscrew the mounting nut from underneath the tank and remove the old fill valve.
- Old Flapper: Detach the flapper chain from the flush handle arm. Unclip the flapper ears from the overflow tube or remove the flapper from its hinge.
- Old Flush Handle: Unscrew the nut on the inside of the tank that secures the flush handle. Remove the handle from the tank.
- Install New Fill Valve:
- Insert the new fill valve into the hole at the bottom of the toilet tank.
- From underneath the tank, hand-tighten the mounting nut onto the fill valve shank. Do not overtighten.
- Connect the water supply line to the bottom of the new fill valve. Hand-tighten, then use a wrench for a quarter turn to ensure a snug fit without overtightening.
- Attach the refill tube from the fill valve to the overflow tube.

Image 3.1: The fill valve correctly positioned inside the toilet tank.
- Install New 2-Inch Flapper:
- Position the new 2-inch flapper over the flush valve opening at the bottom of the tank.
- Attach the flapper ears to the overflow tube or the designated hinge points. Ensure the flapper sits flush on the valve seat for a proper seal.

Image 3.2: The 2-inch flapper designed for a leak-proof seal.
- Install New Flush Handle:
- Insert the new chrome flush handle through the hole in the front of the toilet tank.
- Secure it with the provided nut on the inside of the tank. Hand-tighten the nut.
- Attach the flapper chain to the end of the flush handle arm. Adjust the chain length so there is a small amount of slack when the flapper is closed, but not so much that it interferes with the flush.

Image 3.3: The sleek chrome front-mount toilet handle.
- Adjust Water Level: The fill valve allows for water level adjustment. Refer to the markings inside your toilet tank for the recommended water level. Adjust the fill valve mechanism (usually a screw or clip) to set the desired water level.
- Restore Water Supply and Check for Leaks: Turn the water supply valve counter-clockwise to restore water flow to the toilet. Allow the tank to fill. Check all connections for leaks. Flush the toilet several times to ensure proper operation and water level.

Image 3.4: The installation process is designed to be straightforward for users.
4. Operating Instructions
Once installed, the RAVINE Toilet Tank Repair Kit operates like a standard toilet mechanism:
- Flushing: Press the flush handle down to activate the flapper, allowing water to flow from the tank into the bowl.
- Refilling: After flushing, the flapper will close, and the fill valve will automatically refill the tank to the preset water level. The refill tube directs a small amount of water into the bowl to replenish the trap seal.
5. Maintenance
Regular maintenance helps ensure the longevity and efficiency of your toilet repair kit:
- Fill Valve: The fill valve features a self-cleaning design to resist sediment buildup. If slow filling or noise occurs, inspect the fill valve for any visible obstructions.
- Flapper: The 2-inch flapper is chemical-resistant. Periodically check the flapper for wear, cracks, or mineral buildup that could prevent a proper seal and cause leaks. Clean with a soft brush and mild cleaner if necessary.
- General Cleaning: Avoid using harsh chemical cleaners inside the toilet tank as they can damage rubber and plastic components.
6. Troubleshooting
Refer to the following table for common issues and their solutions:
| Problem | Possible Cause | Solution |
|---|---|---|
| Toilet runs continuously | Flapper not sealing properly; water level too high; fill valve malfunction. | Check flapper for obstructions or wear. Adjust water level. Inspect fill valve for proper shut-off. |
| Slow tank filling | Low water pressure; fill valve obstruction; kinked supply line. | Check water supply valve is fully open. Inspect fill valve for debris. Ensure supply line is not kinked. |
| Noisy filling | Fill valve issue; water pressure. | Ensure fill valve is installed correctly. Check water pressure. |
| Water level too high/low | Fill valve adjustment incorrect. | Adjust the fill valve mechanism to set the desired water level. |
| Flush handle sticks or is loose | Handle nut loose; arm obstructed; chain too tight/loose. | Tighten handle nut. Ensure handle arm moves freely. Adjust flapper chain length. |
7. Specifications
Key specifications for the RAVINE Toilet Tank Repair Kit (Model RATFV):
- Brand: RAVINE
- Model Number: RATFV
- UPC: 850063451109
- Exterior Finish: Brass, Chrome
- Inlet Connection Size: 2 Inches
- Inlet Connection Type: Threaded
- Outlet Connection Size: 2 Inches
- Outlet Connection Type: Threaded
- Number of Ports: 1
- Item Weight: 1.17 pounds
- Included Components: Universal Toilet Fill Valve, 2-Inch Toilet Flapper, Front Mount Toilet Flush Handle
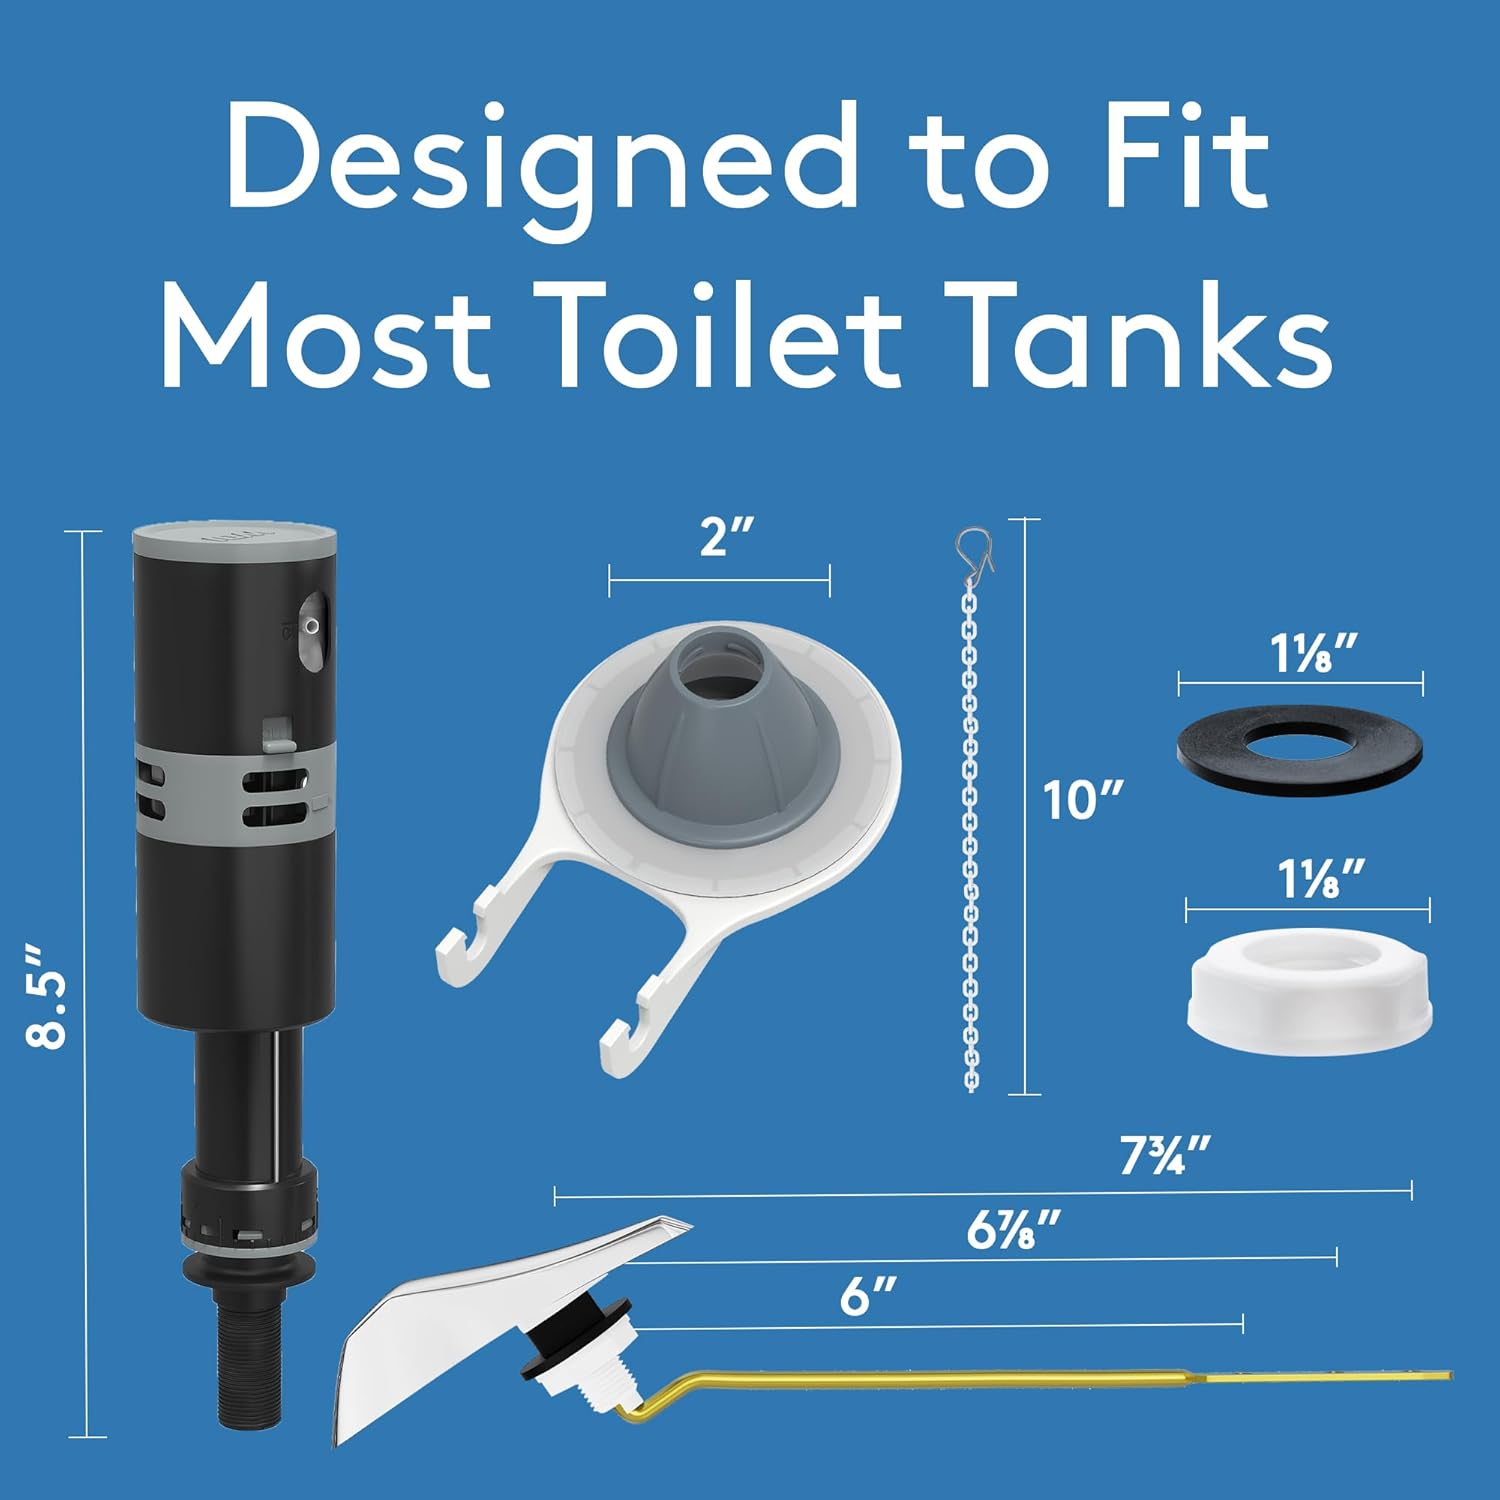
Image 7.1: Approximate dimensions of the kit components for compatibility reference.
8. Warranty and Support
For warranty information or technical support regarding your RAVINE Toilet Tank Repair Kit, please refer to the product packaging or contact RAVINE customer service directly. Contact details can typically be found on the manufacturer's website or through your point of purchase.