1. Introduction
This manual provides detailed instructions for the safe and efficient operation of your AIWA RCP3 Portable Radio Cassette Player. Please read this manual thoroughly before using the product and retain it for future reference.
The AIWA RCP3 is a versatile audio device featuring an AM/FM radio, a cassette tape player/recorder, Bluetooth 5.0 connectivity, and USB/microSD playback and recording capabilities. It also includes a microphone input and a 3.5mm stereo earphone jack for personal listening.
2. Package Contents
Verify that all items listed below are included in your package. If any items are missing or damaged, please contact your retailer.
- AIWA RCP3 Portable Radio Cassette Player (Pastel Green)
- D-size Alkaline Batteries (4-pack)
- 60-minute Cassette Tapes (5-pack)
- User Manual (this document)

Figure 2.1: Included Package Contents
3. Product Overview
Familiarize yourself with the main components and controls of your AIWA RCP3 unit.

Figure 3.1: Front View of the AIWA RCP3
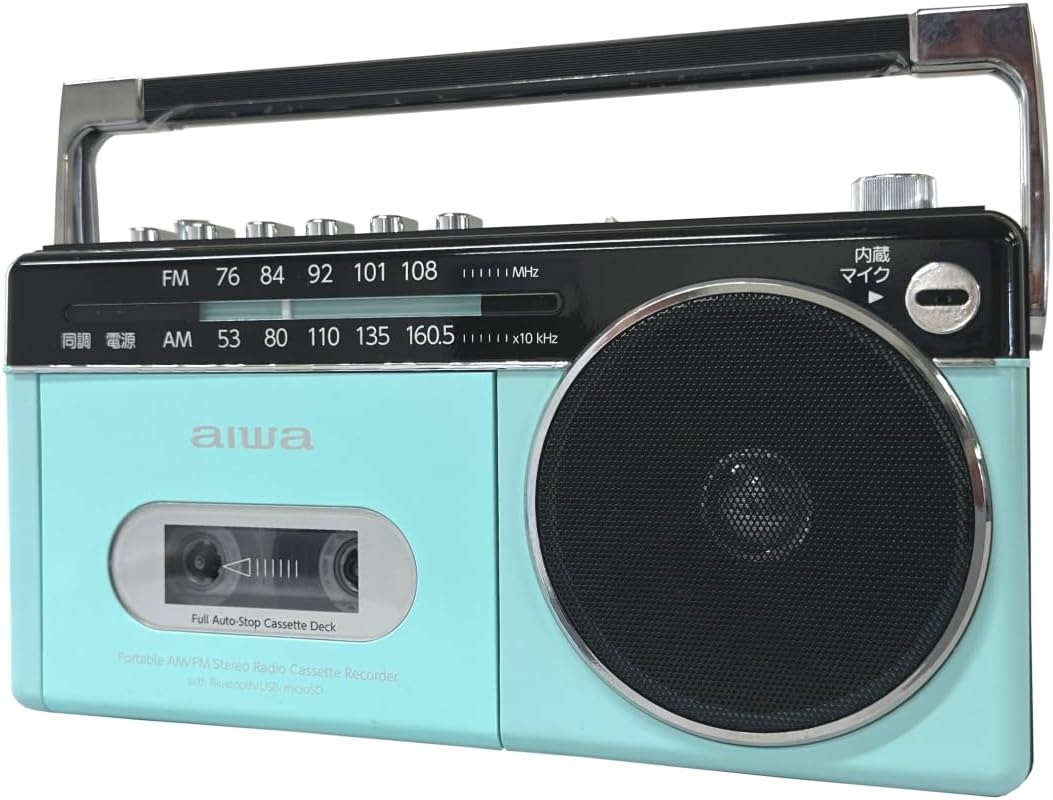
Figure 3.2: Top Controls and Rear View
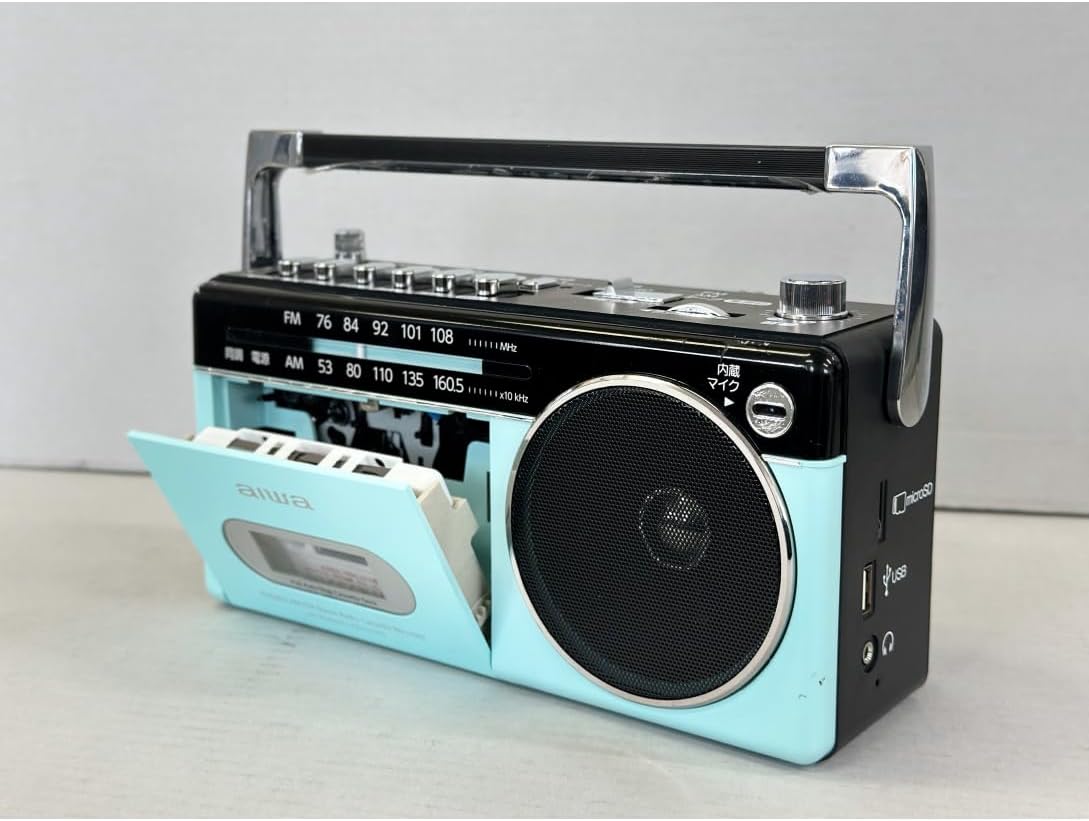
Figure 3.3: Side Ports (USB, MicroSD, Headphone)
4. Setup
4.1 Powering the Unit
The AIWA RCP3 can be powered using D-size batteries or an AC power adapter (not included).
4.1.1 Battery Installation
- Locate the battery compartment on the bottom or rear of the unit.
- Open the battery compartment cover.
- Insert four (4) D-size alkaline batteries, ensuring correct polarity (+/-) as indicated inside the compartment.
- Close the battery compartment cover securely.
4.1.2 AC Power (Adapter not included)
To use AC power, connect a compatible AC adapter (DC 6V, 1A, center positive) to the DC IN jack on the unit. Plug the adapter into a standard wall outlet. Batteries will be bypassed when AC power is connected.
5. Operating Instructions
5.1 Basic Operation
- Turn the Power/Volume knob clockwise to turn on the unit and adjust the volume.
- Use the Function Switch to select your desired mode: FM, AM, Tape, Bluetooth, USB, or microSD.
5.2 Radio Operation (AM/FM)
- Set the Function Switch to FM or AM.
- Extend the telescopic FM antenna for better FM reception. For AM, rotate the unit for optimal reception.
- Rotate the Radio Tuning knob to select your desired station. The frequency scale will indicate the current station.
5.3 Cassette Tape Operation
- Set the Function Switch to Tape.
- Press the Stop/Eject button to open the cassette compartment.
- Insert a cassette tape with the open edge facing upwards.
- Close the cassette compartment door.
- Press the Play button to start playback.
- Use Fast Forward or Rewind buttons to navigate the tape.
- Press Pause to temporarily stop playback. Press again to resume.
- Press Stop/Eject to stop playback and eject the tape.

Figure 5.1: Cassette Compartment Open
5.3.1 Recording to Cassette Tape
- Insert a recordable cassette tape.
- Select the audio source you wish to record (e.g., AM, FM, Bluetooth, USB, microSD, or Microphone).
- Press the Record button. The Play button will also engage simultaneously. Recording will begin.
- To record from the built-in microphone, ensure the Function Switch is set to Tape and press Record. Adjust Microphone Volume as needed.
- Press Stop/Eject to end recording.
5.4 Bluetooth Operation
- Set the Function Switch to Bluetooth. The unit will enter pairing mode, indicated by a flashing LED.
- On your Bluetooth-enabled device (smartphone, tablet, etc.), search for available devices.
- Select "AIWA RCP3" from the list to pair. Once paired, the LED will stop flashing.
- You can now play audio from your device through the AIWA RCP3.
5.5 USB/MicroSD Playback and Recording
- Insert a USB flash drive into the USB port or a microSD card into the microSD slot.
- Set the Function Switch to USB or microSD.
- The unit will automatically begin playing compatible audio files (e.g., MP3).
- Use the playback control buttons (Play, Pause, Fast Forward, Rewind) for navigation.
- To record to USB/microSD, select the desired input source (e.g., Radio, Cassette, Bluetooth, Microphone) and then press the Record button. The recording will be saved to the inserted USB drive or microSD card.
6. Controls and Functions
| Control | Function |
|---|---|
| Power/Volume Knob | Turns the unit ON/OFF and adjusts the audio output volume. |
| Function Switch | Selects operating mode: FM, AM, Tape, Bluetooth, USB, microSD. |
| Radio Tuning Knob | Tunes to desired AM or FM radio frequency. |
| Telescopic FM Antenna | Extend for improved FM radio reception. |
| Cassette Playback Buttons | Play, Pause, Fast Forward, Rewind, Stop/Eject. |
| Record Button | Initiates recording to cassette tape or USB/microSD. |
| Microphone Input | Connect an external microphone for recording. |
| Microphone Volume Knob | Adjusts the input level of the microphone. |
| USB Port | For USB flash drive playback and recording. |
| microSD Slot | For microSD card playback and recording. |
| 3.5mm Earphone Jack | Connect stereo earphones for private listening. |
7. Maintenance
- Cleaning: Use a soft, dry cloth to clean the exterior of the unit. Do not use abrasive cleaners or solvents.
- Cassette Deck Care: Regularly clean the tape head, pinch roller, and capstan with a cotton swab lightly dampened with isopropyl alcohol to ensure optimal sound quality and prevent tape damage.
- Storage: When not in use for extended periods, remove batteries to prevent leakage. Store the unit in a cool, dry place away from direct sunlight and extreme temperatures.
- Antenna: Handle the telescopic antenna gently to avoid bending or breaking.
8. Troubleshooting
| Problem | Possible Cause | Solution |
|---|---|---|
| Unit does not power on. | Batteries are dead or incorrectly inserted. No AC power. | Replace batteries or check polarity. Ensure AC adapter is properly connected (if used). |
| No sound from speaker. | Volume is too low. Earphones connected. Function mode incorrect. | Increase volume. Disconnect earphones. Select correct function mode. |
| Poor radio reception. | Antenna not extended. Weak signal. Interference. | Extend FM antenna. Rotate unit for AM. Move away from electronic devices. |
| Cassette tape not playing/recording. | Tape inserted incorrectly. Tape damaged. Function mode incorrect. | Re-insert tape correctly. Try a different tape. Ensure 'Tape' function is selected. |
| Bluetooth pairing fails. | Unit not in pairing mode. Device too far. | Ensure 'Bluetooth' function is selected and LED is flashing. Move device closer. |
| USB/microSD not recognized. | Incorrect format. Drive/card damaged. | Ensure files are compatible (e.g., MP3). Try a different USB drive/microSD card. |
9. Specifications
- Model: GAA4-RCP0003
- Power Source: DC 6V (4 x D-size batteries) or AC adapter (DC 6V, 1A, center positive, not included)
- Material: ABS Resin
- Dimensions (LxWxH): 8.6 x 25.2 x 12.8 cm (approximately 3.4 x 9.9 x 5.0 inches)
- Weight: Approximately 2.1 kg (4.6 lbs)
- Radio Frequencies:
- AM: 530 - 1605 KHz
- FM: 76 - 108 MHz
- Cassette Deck: Record/Playback
- Digital Media: USB Port, microSD Card Slot (Playback & Recording)
- Bluetooth: Version 5.0 Receiver Function
- Inputs: Microphone Input Terminal
- Outputs: 3.5mm Stereo Earphone Terminal
10. Safety Information
- Do not expose the unit to rain, moisture, or extreme temperatures.
- Avoid placing the unit near heat sources or in direct sunlight.
- Do not disassemble or attempt to repair the unit yourself. Refer all servicing to qualified personnel.
- Keep out of reach of children.
- Dispose of batteries properly according to local regulations.
11. Warranty and Support
This product comes with a standard manufacturer's warranty. Please refer to the warranty card included in your package for specific terms and conditions. For technical support, troubleshooting assistance, or warranty claims, please contact your retailer or the AIWA customer service department.
Keep your purchase receipt as proof of purchase for warranty purposes.


