
1. Introduction
This manual provides essential information for the safe and efficient operation of your VISION VP-621 4K Ultra HD Multimedia Projector. Please read this manual thoroughly before using the projector and retain it for future reference.
The VISION VP-621 is a versatile smart projector featuring 4K Ultra HD support, 11000 lumens brightness, 5G WiFi, Bluetooth 5.0, Auto Focus, Wireless Miracast, and an integrated Android 9.0 operating system. It is designed for various applications including home entertainment, business presentations, and educational purposes.
2. Safety Information
- Do not block the ventilation openings. Ensure adequate airflow around the projector to prevent overheating.
- Do not look directly into the projector lens when the lamp is on. The bright light can cause eye damage.
- Place the projector on a stable, level surface to prevent it from falling.
- Keep the projector away from water, moisture, and extreme temperatures.
- Use only the power adapter supplied with the projector.
- Do not attempt to open or repair the projector yourself. Refer all servicing to qualified personnel.
- Unplug the projector during lightning storms or when unused for long periods.
3. Package Contents
Verify that all items listed below are included in your package:
- VISION VP-621 Projector
- Power Cord
- Adaptor
- Remote Control
- AV Cable
- Projector Lens Cover
4. Product Overview
Familiarize yourself with the main components and interfaces of your VISION VP-621 projector.

Image: Front and side view of the VISION VP-621 projector, showcasing its compact design and lens.
4.1 Front and Top Panel
- Projection Lens: Emits the image.
- Infrared Receiver: For remote control signals.
- Control Buttons: Power, Navigation (OK, Up, Down, Left, Right), Back.
- Ventilation Grilles: For cooling the internal components.

Image: Top view of the projector highlighting the integrated control buttons for power and navigation.
4.2 Rear Panel and Connectivity Ports
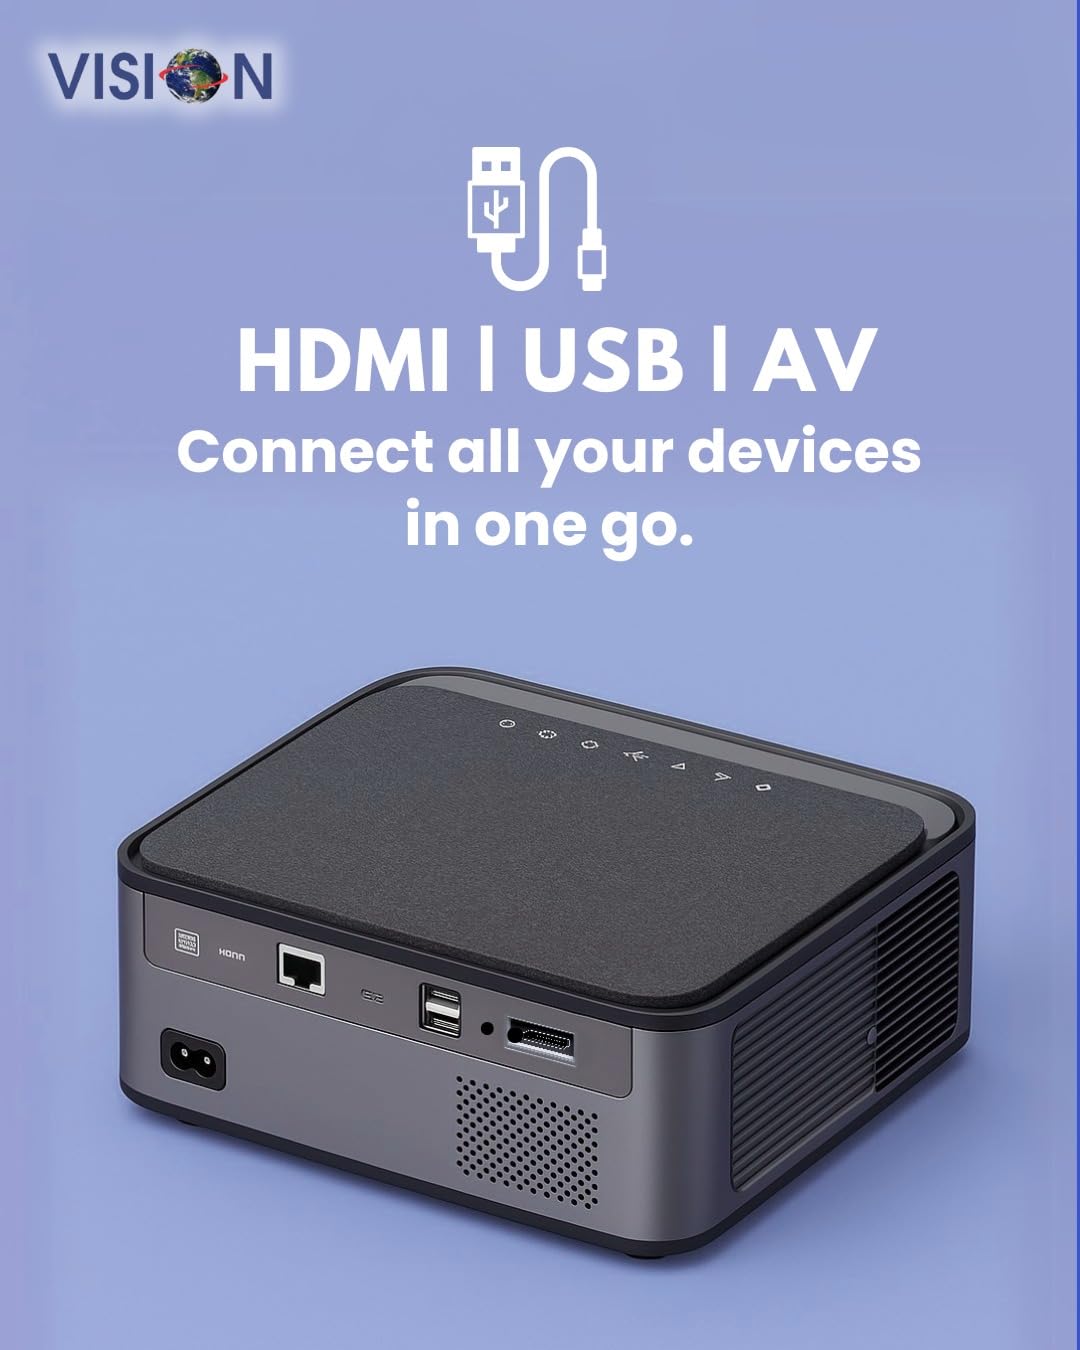
Image: Rear view of the projector displaying the various input and output ports, including HDMI, USB, and AV.
- Power Input: Connect the power adapter here.
- HDMI Port: Connect to HDMI-enabled devices (laptops, gaming consoles, streaming sticks).
- USB Ports (x2): Connect USB drives for media playback or external devices.
- AV Input: Connect to older devices using the provided AV cable.
- Audio Out (3.5mm): Connect external speakers or headphones.
- LAN Port: For wired internet connection (if available).
5. Setup
5.1 Projector Placement
Choose a flat, stable surface for the projector. Ensure there are no obstructions in front of the lens and that the ventilation grilles are clear.

Image: A projector positioned on a desk, illustrating a typical setup environment.
5.2 Power Connection
- Connect the power adapter to the projector's power input port.
- Plug the power cord into a wall outlet.
- The power indicator light on the projector will illuminate.
5.3 Initial Power On
- Press the power button on the projector or the remote control to turn it on.
- The projector will boot up and display the Android 9.0 home screen.
5.4 Focus and Keystone Adjustment
The VISION VP-621 features automatic focus and 4D keystone correction for a clear and properly aligned image.

Image: Illustrates the projector's automatic focus and keystone correction capabilities, ensuring a sharp and aligned picture.
- Auto Focus: The projector will automatically adjust the focus for a sharp image upon startup or movement.
- 4D Keystone Correction: The projector automatically corrects image distortion when placed at an angle. Manual adjustments may be available in the settings menu if needed.
6. Operating Instructions
6.1 Android 9.0 Smart OS
The integrated Android 9.0 system allows direct access to streaming services and apps.
- Navigation: Use the remote control's directional buttons and "OK" button to navigate the interface.
- App Installation: Access the Google Play Store to download and install applications like YouTube, Netflix, and Prime Video.
- Network Connection: Go to Settings > Network to connect to a 5G WiFi network or a wired LAN connection.
6.2 Connecting External Devices
HDMI Connection
- Connect an HDMI cable from your device (laptop, gaming console, Fire TV Stick) to the HDMI port on the projector.
- On the projector's home screen, select the HDMI input source.
USB Connection
- Insert a USB drive into one of the USB ports on the projector.
- The projector will typically prompt you to open the media player or file browser. If not, navigate to the file manager app on the Android home screen.
AV Connection
- Connect the provided AV cable to the AV input port on the projector and to your external device.
- Select the AV input source on the projector.
Bluetooth 5.0 Audio Output
- Go to Settings > Bluetooth on the projector.
- Enable Bluetooth and search for available devices.
- Select your Bluetooth speaker or headphones from the list to pair and connect.
Wireless Miracast (Screen Mirroring)
Miracast allows you to wirelessly mirror the screen of your compatible smartphone, tablet, or laptop.
- On the projector's home screen, select the "Miracast" or "Screen Mirroring" application.
- On your mobile device, enable screen mirroring (often found in quick settings or display settings, named "Cast," "Smart View," "Wireless Display," etc.).
- Select the projector from the list of available devices to establish the connection.
7. Maintenance
7.1 Cleaning the Projector
- Lens: Use a soft, lint-free cloth specifically designed for optical lenses. Do not use abrasive cleaners.
- Casing: Wipe the projector casing with a soft, dry cloth. For stubborn dirt, slightly dampen the cloth with water and then wipe dry.
- Ventilation: Regularly check and clean the ventilation grilles to ensure proper airflow and prevent dust buildup. Use a soft brush or compressed air.
7.2 Lamp Life
The VISION VP-621 utilizes advanced LED technology, providing an estimated lamp life of up to 50,000 hours. This significantly reduces the need for lamp replacement compared to traditional projectors.
8. Troubleshooting
| Problem | Possible Cause | Solution |
|---|---|---|
| No image displayed |
|
|
| Blurred image |
|
|
| No sound |
|
|
| Cannot connect to Wi-Fi |
|
|
9. Specifications
| Brand | VISION |
| Model Name | VP-621 AN |
| Display Technology | LCD |
| Display Type | LED |
| Brightness | 11000 Lumens |
| Image Contrast Ratio | 18000:1 Pixels |
| Native Resolution | 1920 x 1280 (Full HD) |
| Supported Resolution | Up to 4K Ultra HD |
| Aspect Ratio | 16:9, 4:3 |
| Operating System | Android 9.0 |
| Connectivity Technology | Bluetooth 5.0, HDMI, USB, Wi-Fi (5G) |
| Hardware Interface | Bluetooth 5, HDMI, USB 3.0 |
| Special Features | Built-In 3D, Built-In Cooling System, Built-In Speaker, Electric Focus, Wi-Fi Ready, Auto Focus, 4D Keystone Correction, Wireless Miracast |
| Product Dimensions | 30 x 18 x 7 cm |
| Item Weight | 8 kg |
| Lamp Life | Up to 50,000 hours |

Image: Illustrates the projector's Full HD (1920x1080) resolution capability for crisp visuals.

Image: Highlights the projector's 11000 lumens brightness, ensuring clear visuals in various lighting conditions.
10. Warranty and Support
For warranty information and technical support, please contact the manufacturer:
- Manufacturer: Scorpio Infosolutions
- Location: Delhi, India
- Phone: +91-7982647130
- Website: visionsheen.in
Please have your product model (VP-621) and purchase details ready when contacting support.


