1. Introduction
This manual provides detailed instructions for the assembly, operation, and maintenance of your YESHOMY YH-VN224 Vanity Desk. Please read this manual thoroughly before beginning assembly or use to ensure proper function and longevity of your product. Keep this manual for future reference.
2. Safety Information
- Always assemble the product on a soft, clean surface to prevent scratches.
- Ensure all screws and fasteners are securely tightened before use. Periodically check and retighten as necessary.
- Do not overload drawers or shelves. Distribute weight evenly.
- Keep electrical components (power outlet, lights) away from water or excessive moisture.
- Use the included anti-tipping device to secure the vanity to a wall, especially if children are present.
- Unplug the vanity from the power source before cleaning or performing any maintenance.
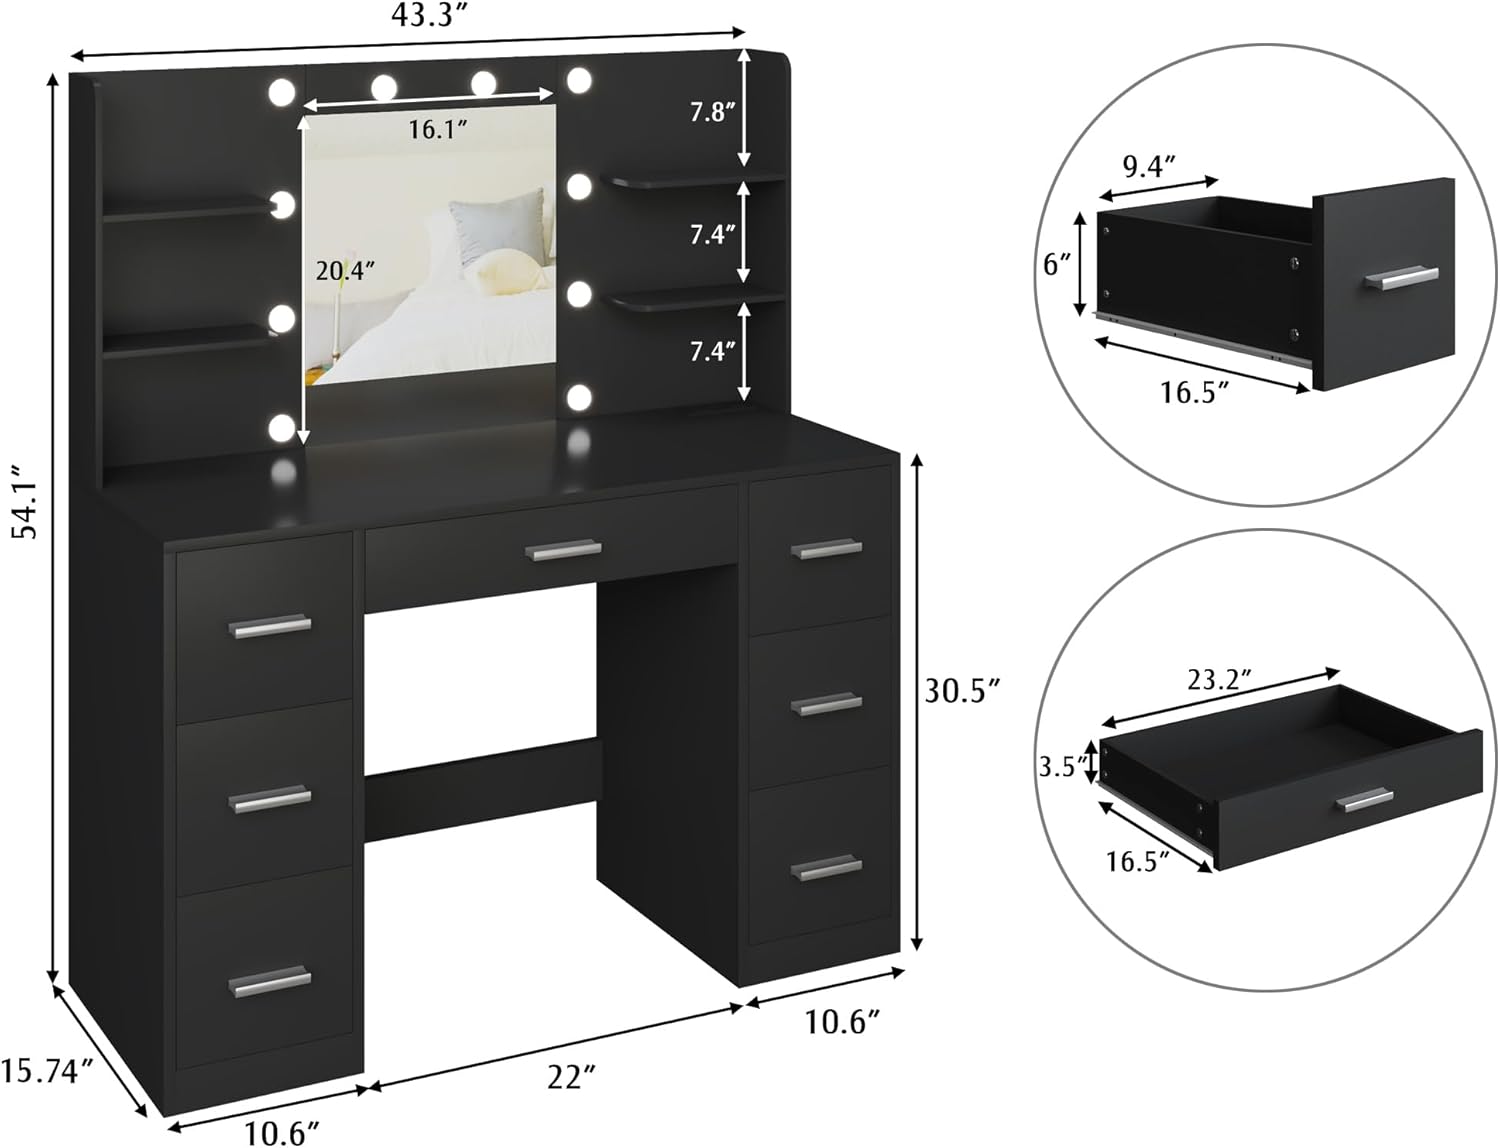
Image Description: A close-up view illustrating the installation of the anti-tipping device, showing a strap securing the vanity to a wall anchor.
3. Package Contents
Verify that all components are present before beginning assembly. If any parts are missing or damaged, contact customer support.
- Vanity Desk Panels (various sizes)
- Mirror with Integrated Lights
- Power Outlet Unit (2 AC, 2 USB)
- Drawer Slides and Handles
- Assembly Hardware (screws, dowels, cam locks, etc.)
- Anti-Tipping Device
- Instruction Manual
4. Assembly Instructions
Assembly typically requires 2-3 hours. It is recommended to have two people for certain steps. Organize all parts by their labels before starting.
4.1. Prepare the Base Units
- Identify the side panels and bottom panels for the drawer units.
- Attach drawer slides to the inner sides of the panels using the provided screws.
- Connect the panels using dowels and cam locks as indicated in the diagrams. Ensure cam locks are fully tightened.

Image Description: An image showing the partially assembled base units of the vanity desk, highlighting the structure where drawers will be installed.
4.2. Assemble the Drawers
- Assemble each drawer box using the designated panels, dowels, and screws.
- Attach the drawer handles to the front panels of each drawer.
- Insert the assembled drawers into their respective slides in the base units.

Image Description: An overhead view of the vanity desk with multiple drawers pulled open, showcasing the internal storage capacity.
4.3. Install the Desktop and Mirror Unit
- Place the main desktop panel onto the assembled base units, securing it with screws from underneath.
- Carefully position the mirror unit onto the desktop. Secure it using the provided brackets and screws.
- Attach the side shelves to the mirror unit as per the diagrams.

Image Description: A complete view of the YESHOMY vanity desk, featuring the mirror with lights, multiple drawers, and open shelves.
4.4. Connect Electrical Components
- Connect the power cable from the mirror lights to the integrated power outlet unit.
- Plug the vanity's main power cord into a standard wall outlet.

Image Description: A close-up of the built-in power strip on the vanity desk, showing two AC outlets and two USB ports, with a phone charging cable connected.
5. Operating Instructions
5.1. Mirror Lights Operation
The vanity mirror features 10 adjustable lights with three color modes and dimmable brightness.
- Power On/Off: Press the power button on the remote control to turn the lights on or off.
- Change Color Mode: Press the "Change Color" button on the remote to cycle through Cool White, Warm White, and Warm Yellow light settings.
- Adjust Brightness: Use the "Enhanced Brightness" (+) and "Dimish Brightness" (-) buttons on the remote to increase or decrease the light intensity.

Image Description: A visual representation of the vanity mirror lights displaying three distinct color temperatures: Cool White, Warm White, and Warm Yellow, with controls for brightness adjustment.
5.2. Power Outlet Usage
The integrated power strip provides convenient access to electrical power.
- AC Outlets: Two 125V/12A AC outlets are available for powering hair dryers, curling irons, or other small appliances.
- USB Ports: Two 5V/2A USB ports are available for charging mobile phones, tablets, or other USB-powered devices.
6. Maintenance
- Cleaning: Wipe the vanity desk surfaces with a dry, soft cloth. For stubborn marks, use a slightly damp cloth and immediately dry the surface. Avoid abrasive cleaners or harsh chemicals.
- Mirror Care: Clean the mirror with a glass cleaner and a lint-free cloth.
- Bulb Replacement: The mirror bulbs are replaceable. Refer to the bulb specifications for compatible replacements. Ensure the vanity is unplugged before attempting to replace bulbs.
- Hardware Check: Periodically check all screws and fasteners to ensure they remain tight. Retighten as needed to maintain stability.
7. Troubleshooting
| Problem | Possible Cause | Solution |
|---|---|---|
| Lights do not turn on. |
|
|
| Power outlets not working. |
|
|
| Drawers stick or do not close smoothly. |
|
|
8. Specifications
| Feature | Detail |
|---|---|
| Brand | YESHOMY |
| Model Number | YH-VN224 |
| Color | Pure Black |
| Material | Wood (Frame Material) |
| Product Dimensions (L x W x H) | 43.3" x 15.74" x 54.1" (15.74"D x 43.3"W x 54.1"H) |
| Item Weight | 108 pounds |
| Assembly Required | Yes |
| Included Components | Vanity desk, mirror with lights, power outlet unit |
| Power Outlet | 2 AC Outlets (125V/12A), 2 USB Ports (5V/2A) |
| Mirror Lights | 10 LED bulbs, 3 color modes (Cool White, Warm White, Warm Yellow), adjustable brightness |
| Storage | 7 drawers, open shelves |
9. Warranty and Support
For warranty information or technical support, please refer to the contact details provided with your purchase documentation or visit the official YESHOMY website. Please have your model number (YH-VN224) and purchase date available when contacting support.
Manufacturer: YESHOMY


