1. Product Overview
The Caydo 1 Color 1 Station Silk Screen Printing Press is designed for both beginners and enthusiasts in DIY T-shirt printing and other creative projects. Its robust wood structure ensures durability and stability, while the innovative hinge design and recessed base facilitate precise and efficient printing.
This screen printing press is adaptable to accommodate screen frames in three different sizes: 10x14 inches, 8x12 inches, and 6x10 inches, offering versatility for various printing needs.

Figure 1: Caydo Screen Printer Dimensions. The unit measures 18.5 x 12.99 x 2.76 inches.
2. Setup and Assembly
The Caydo Screen Printing Press is designed for user-friendly installation. All necessary parts and tools are included for a straightforward assembly process.
2.1 Unboxing and Component Identification
Carefully unbox all components. Verify that all parts listed in the instruction manual are present. The main components include the base, side supports, and hinge clamps.
2.2 Assembling the Base Structure
- Attach the side supports to the main base using the provided screws. Ensure all connections are secure.
- Install the hinge clamps onto the designated positions on the base. These clamps will hold your screen frame.
Video 1: Wood Screen Printing Table for T-Shirt DIY Printing. This video demonstrates the assembly process and basic functionality of the screen printing press.
2.3 Attaching the Screen Frame
- Place your screen printing frame into the hinge clamps.
- Tighten the screws on the hinge clamps to firmly secure the screen frame. Ensure the frame is stable and does not wobble.

Figure 2: Tightening the hinge screws to ensure the screen frame remains stable while hovering.

Figure 3: The press is suitable for 10x14 inch, 8x12 inch, and 6x10 inch screen printing frames.
3. Operating Instructions
The Caydo Screen Printing Press features an innovative hinge design and a recessed base for optimal printing results.
3.1 Preparing the Garment
- Place your T-shirt or other garment onto the recessed base. The base groove design accommodates non-printing areas and includes a centerline for precise garment alignment.
- Smooth out the garment to ensure the printing area is flat and stable.

Figure 4: The recessed base design keeps the T-shirt flat for perfect prints and features a centerline for alignment.
3.2 The Printing Process
- Lower the screen frame onto the prepared garment. The unique hinge design allows the wood frame to be lifted and hover, providing ease of use and precision.
- Apply your screen printing ink to the top edge of the screen.
- Using a squeegee, pull the ink evenly across the screen, ensuring full coverage of your design.
- Lift the screen frame using the hover function. The frame will stay in an elevated position, allowing you to remove the printed garment and place a new one without readjusting the screen.
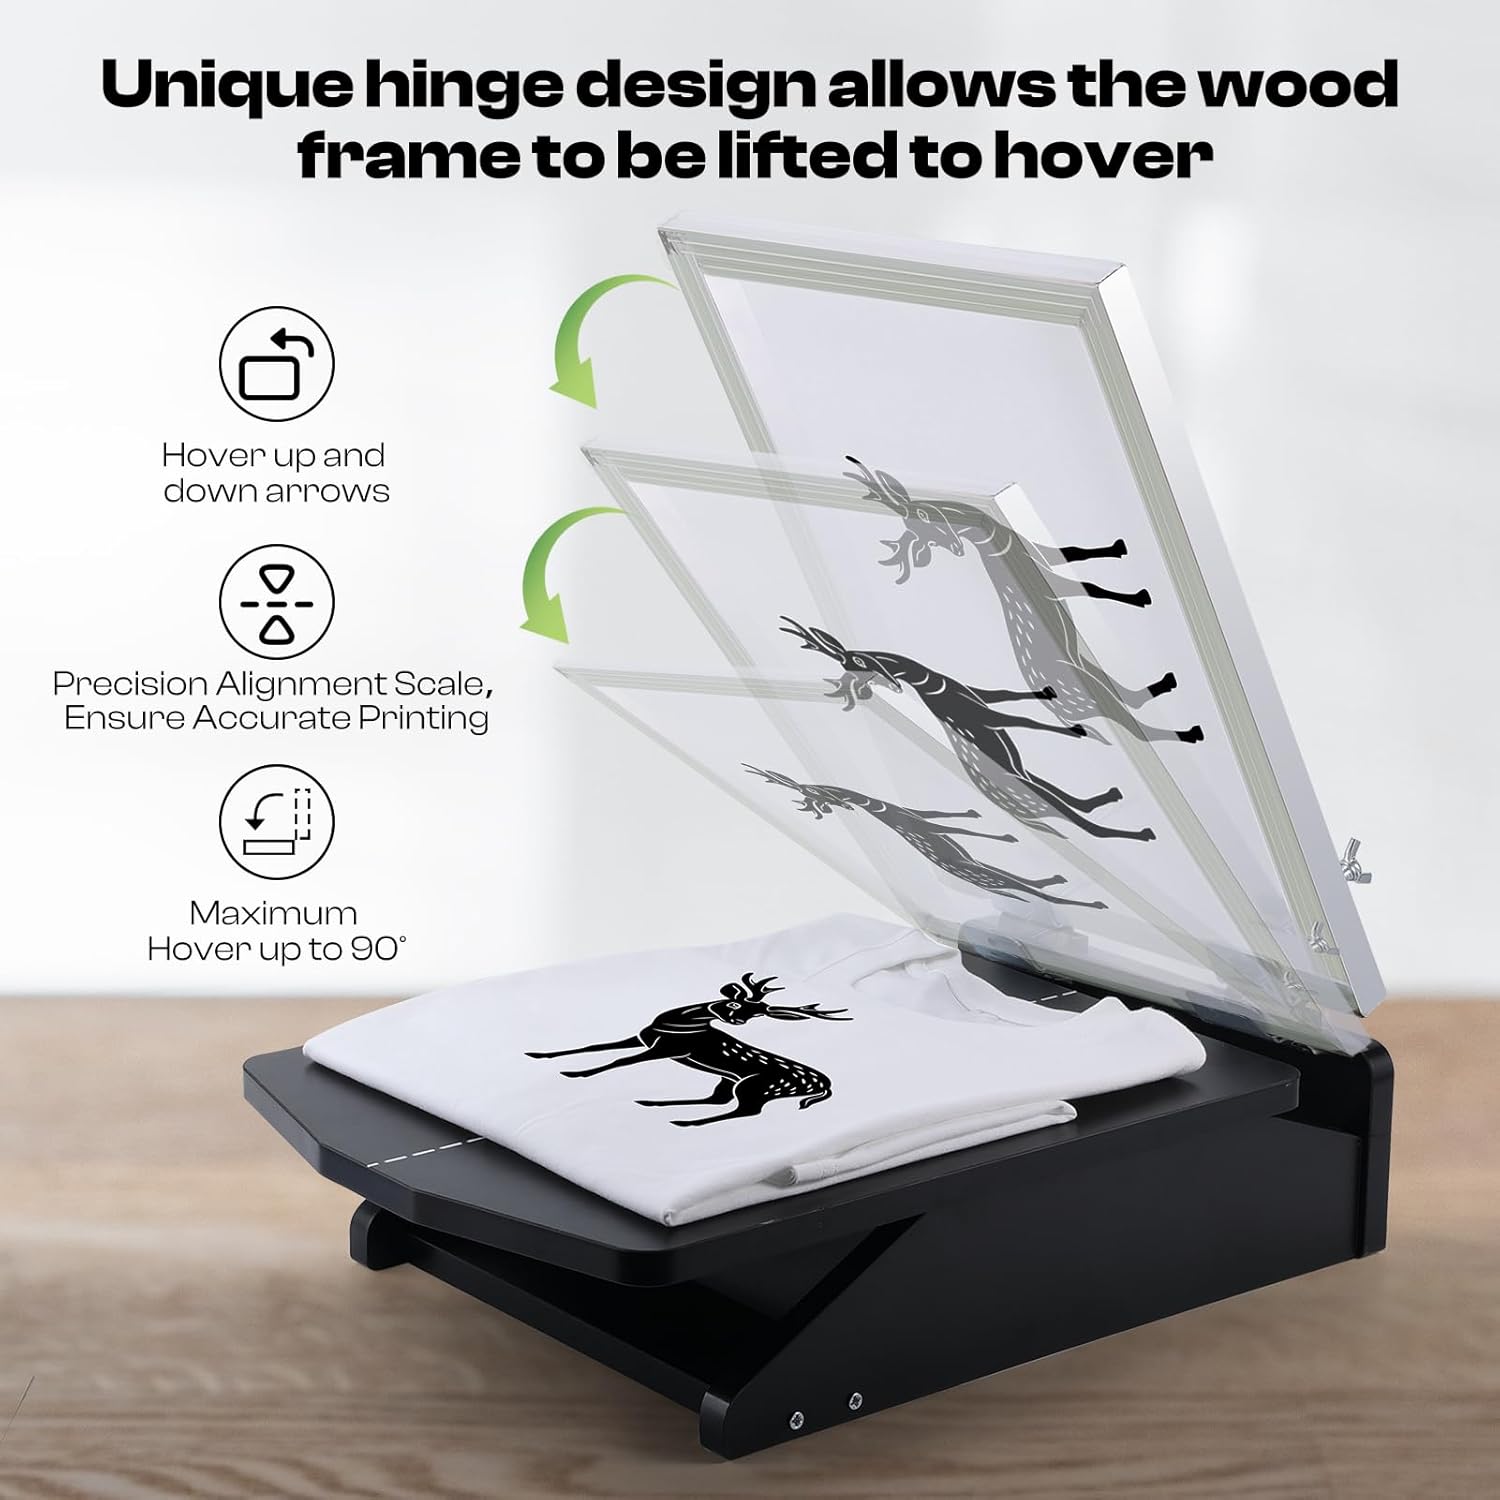
Figure 5: The innovative hinge design allows the screen frame to hover up to 90 degrees for easy garment changes and precise alignment.

Figure 6: User-friendly operation for applying ink with a squeegee.

Figure 7: Example of a finished T-shirt print using the Caydo screen printer.
Video 2: Caydo Screen Printing Press in action. This video provides a general overview of the screen printing process using the press.
4. Maintenance
Proper maintenance ensures the longevity and optimal performance of your Caydo Screen Printing Press.
4.1 Cleaning the Screen and Press
- After each use, immediately clean the screen frame and squeegee with appropriate screen cleaning solutions to prevent ink from drying and clogging the mesh.
- Wipe down the base and hinge mechanisms with a damp cloth to remove any ink residue.
4.2 Storage
Store the screen printing press in a dry, clean environment away from direct sunlight and extreme temperatures. Ensure the screen frames are clean and dry before storage.
5. Troubleshooting
If you encounter issues with your Caydo Screen Printing Press, refer to the following common troubleshooting tips:
5.1 Uneven Prints
- Cause: Insufficient or uneven ink application.
- Solution: Ensure a consistent amount of ink is applied across the screen and use firm, even pressure with the squeegee.
- Cause: Screen not flat against the garment.
- Solution: Verify the garment is smoothed out on the recessed base and the screen frame is properly secured in the clamps.
5.2 Screen Frame Instability
- Cause: Hinge screws are loose.
- Solution: Tighten the hinge screws securely to ensure the screen frame remains stable during operation.
6. Specifications
| Feature | Detail |
|---|---|
| Product Dimensions | 18.5 x 12.99 x 2.76 inches |
| Item Model Number | PR-001MK |
| Item Weight | 6.96 pounds |
| Manufacturer | Caydo |
| Compatible Frame Sizes | 10x14 inches, 8x12 inches, 6x10 inches |


