1. Introduction
This manual provides essential information for the safe and efficient operation, setup, and maintenance of your Heltec HT-SW01H+2040M25 Capacitor Storage Battery Spot Welding Machine. Please read this manual thoroughly before using the device to ensure proper function and to prevent damage or injury.
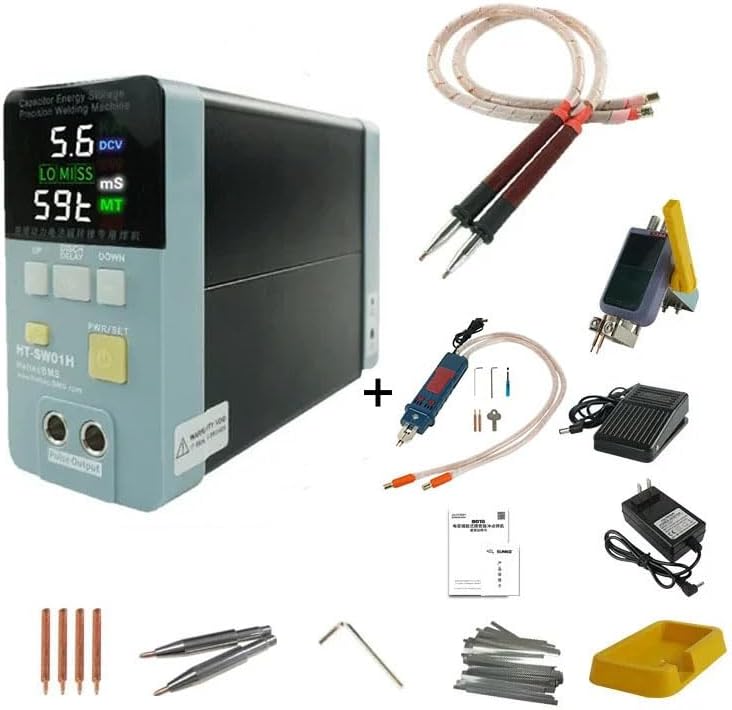
Figure 1: Heltec HT-SW01H+2040M25 Spot Welding Machine
2. Safety Information
WARNING: Improper use of this spot welding machine can result in serious injury or damage to the equipment. Always follow safety guidelines.
- Always wear appropriate personal protective equipment (PPE), including safety glasses and gloves, when operating the machine.
- Ensure the work area is well-ventilated and free from flammable materials.
- Do not operate the machine in wet conditions or with wet hands.
- Keep children and unauthorized personnel away from the operating area.
- Disconnect power before performing any maintenance or adjustments.
- The machine operates on a low voltage supply system with CE certification, designed for high safety. It is not prone to overheating, flammability, or explosion under normal operating conditions.
3. Package Contents
Verify that all items are present in the package:
- Heltec HT-SW01H+2040M25 Spot Welding Machine Unit
- Welding Pens (integrated or external, depending on configuration)
- Power Adapter
- Hex Wrenches (for adjustments)
- Spare Welding Pins
- User Manual (this document)
- Other accessories as shown in product images.
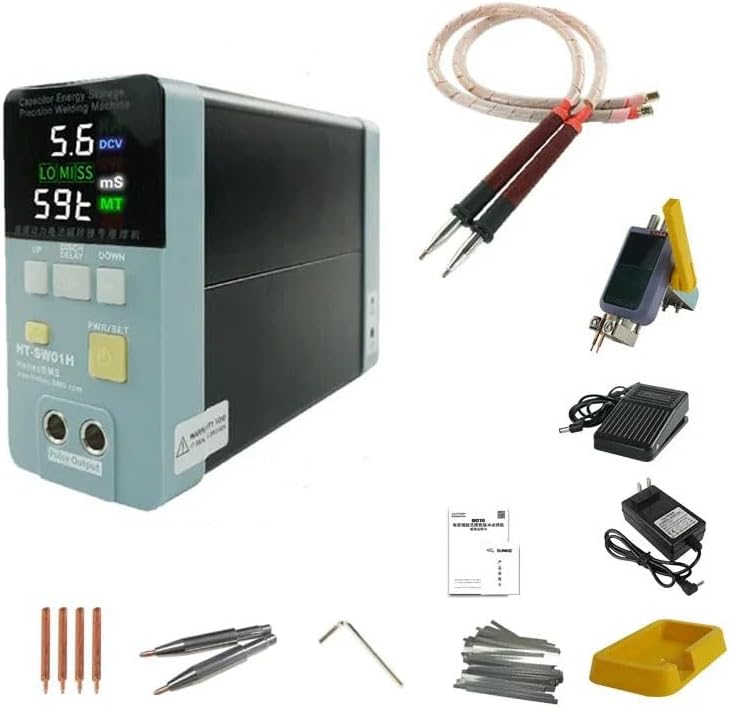
Figure 2: Typical package contents
4. Product Features
- Heat Protection: Designed for low heat generation, preventing overheating during operation.
- Comfortable Welding Pen: The welding pen remains cool, preventing hand burns during extended use.
- Stable Welding Current: Provides up to 3500A pulse current with stable output, minimizing battery damage. The actual pulse current is displayed on the LED screen.
- High-Quality Welding Spots: Produces fine, uniform, and strong welding spots without blackening, achieving industrial-grade stored energy welding quality.
- Machine Safety: Features a low voltage supply system with CE certification, ensuring high safety by preventing heat generation, flammability, and explosions.
- Reliability and Longevity: Incorporates a highly reliable internal industrial super energy storage capacitor and laser welding busbar technology for long service life and consistent welding quality.

Figure 3: Overview of key product features
5. Specifications
| Parameter | Value | Parameter | Value |
|---|---|---|---|
| Model | HT-SW01H+2040M25 | Peak Power | 21KW (HT-SW01H) |
| Peak Current | 3500A | Preloading Delay Time | 100/200/300/400/500ms |
| Voltage Output | 5-6V (DC) | Welding Thickness | 0.05mm-0.5mm (Nickel), 0.2mm (Aluminum) |
| Peak Welding Energy | 238J | Pulse Time | 0-20ms (100 grade) |
| Input Voltage | 100 Volts | Item Weight | 7.7 pounds (3.5 kg) |
| Color | Black | Dimensions (approx.) | 176mm (L) x 67mm (W) x 126mm (H) |
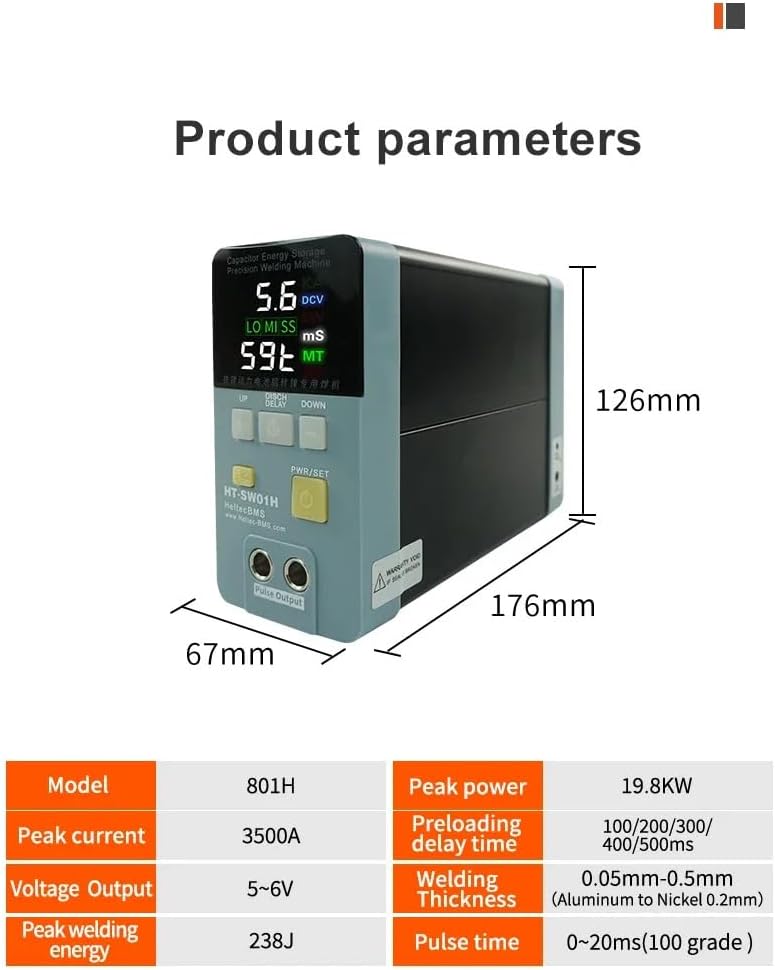
Figure 4: Detailed product parameters and dimensions
6. Setup
- Unpack: Carefully remove all components from the packaging. Inspect for any shipping damage.
- Placement: Place the welding machine on a stable, level, and non-flammable surface in a well-ventilated area.
- Connect Welding Pens: Insert the welding pens securely into the designated output ports on the front of the machine. Ensure a firm connection.
- Connect Power: Plug the power adapter into the machine's power input port, then connect the adapter to a suitable 100V AC power outlet.
- Initial Check: Before powering on, ensure all connections are secure and there are no loose wires or foreign objects near the welding tips.

Figure 5: Welding pens connected to the machine

Figure 6: External welding pen and power adapter setup
7. Operating Instructions
- Power On: Press the PWR/SET button to turn on the machine. The LED display will illuminate.
- Select Welding Mode: The machine supports different welding modes. For Aluminum to Nickel welding, press the AL/NI button (if available, indicated by a red light) to activate this dedicated mode. For Nickel to Nickel spot welding, ensure the AL/NI button is not pressed.
- Adjust Settings: Use the UP and DOWN buttons to adjust welding parameters such as pulse time and preloading delay time. The display shows the current settings and actual pulse current.
- Prepare Workpiece: Ensure the surfaces to be welded are clean and free of oxidation or contaminants.
- Perform Welding: Position the welding tips firmly against the workpiece. The machine will automatically discharge the capacitor to perform the weld. Observe the welding spot quality.
- Verify Weld Quality: A good weld should be fine, uniform, and strong. The machine is capable of welding up to 0.5mm nickel and 0.2mm aluminum.

Figure 7: Welding mode selection (Aluminum to Nickel vs. Nickel to Nickel)

Figure 8: Example of 0.2mm pure nickel welding and tensile strength test
7.1. Official Product Videos
Video 1: Demonstration of the spot welding machine in operation (0:56). This video illustrates the general usage and welding process.
Video 2: Short clip showcasing a specific welding application (0:23). This video provides a quick view of the machine's performance.
8. Maintenance
- Cleaning: Regularly clean the welding tips and the machine's exterior with a dry, soft cloth. Ensure no metal dust or debris accumulates around the welding area.
- Tip Replacement: Replace welding tips when they become worn or pitted to ensure consistent weld quality. Use the provided hex wrenches for replacement.
- Storage: Store the machine in a dry, cool place, away from direct sunlight and moisture, when not in use.
- Inspection: Periodically inspect cables and connections for any signs of wear or damage.
9. Troubleshooting
| Problem | Possible Cause | Solution |
|---|---|---|
| Machine does not power on | No power supply; faulty power adapter | Check power connection; ensure outlet is functional; test power adapter. |
| Weak or inconsistent welds | Worn welding tips; incorrect settings; dirty workpiece; poor contact | Replace welding tips; adjust pulse time/power settings; clean workpiece surfaces; ensure firm contact with welding tips. |
| Welding tips overheat | Excessive continuous use; incorrect settings | Allow machine to cool down; verify settings are appropriate for material thickness. |
| Display shows error code | Internal fault; specific issue | Refer to the manufacturer's specific error code guide or contact support. |
10. Warranty and Support
For warranty information, please refer to the documentation provided with your purchase or contact Heltec BMS directly. The product is designed for high reliability and long service life, utilizing industrial-grade components.
If you encounter any issues not covered in this manual or require technical assistance, please contact Heltec BMS customer support through their official website or the retailer where the product was purchased.
Manufacturer: heltec bms
Model Number: HT-SW01H+2040M25


