1. Introduction
Welcome to the user manual for your XIBANY Motorized Scooter Dual Drive Controller Kit. This manual provides essential information for the proper installation, operation, and maintenance of your controller kit. Please read this manual thoroughly before attempting any installation or operation to ensure safe and efficient use of the product.
This kit is designed to provide reliable control for motorized scooters, featuring a dual-drive system for enhanced performance. Adherence to these instructions will help ensure the longevity and optimal functionality of your device.
2. Product Overview
The XIBANY Dual Drive Controller Kit includes two brushless controllers, an instrumentation unit, and necessary wiring. This system is engineered for simple operation and features exquisite workmanship, contributing to a long service life. Constructed from high-quality materials, the components are sturdy and durable, designed to directly replace older parts if needed.

Figure 2.1: Complete XIBANY Dual Drive Controller Kit, showing two controllers, instrumentation, and wiring.
2.1 Key Components
- Dual Brushless Controllers: Two units (labeled A and B) manage the power distribution to the scooter's motors.
- Instrumentation Unit: A handlebar-mounted display and control unit for monitoring and adjusting settings.
- Wiring Harness: Connectors and cables for integrating the components into the scooter's electrical system.
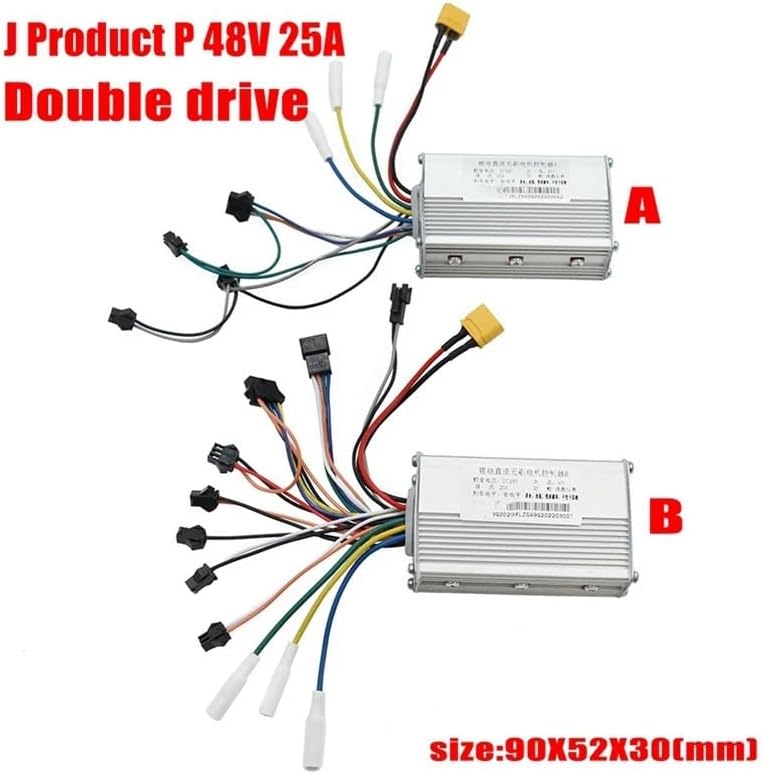
Figure 2.2: Individual controllers (A and B) with approximate dimensions of 90x52x30mm.

Figure 2.3: Close-up view of the instrumentation unit, featuring a display and control buttons.
3. Setup and Installation
Installation of the XIBANY Dual Drive Controller Kit requires careful attention to wiring and connections. It is recommended that installation be performed by individuals with experience in scooter electronics or by a qualified technician.
3.1 Wiring Connections
- Controller Placement: Mount the two controllers securely within the scooter's frame, ensuring they are protected from moisture and physical damage.
- Motor Connections: Connect the motor phase wires and Hall sensor wires from each motor to the corresponding controller (Controller A for front drive, Controller B for rear drive, or as per scooter design).
- Battery Connection: Connect the main power cables from the battery to both controllers. Ensure correct polarity (positive to positive, negative to negative).
- Instrumentation Unit: Connect the instrumentation unit to the designated port on one of the controllers or a central wiring harness.
- Additional Connections: Connect any additional components such as brake levers, throttle, lights, or other accessories according to your scooter's wiring diagram. The kit includes a 'No Hall wire' for specific motor types; consult your motor's specifications if unsure.

Figure 3.1: Example of the wiring harness, showing various connectors for system integration.
Important: Always disconnect the battery before performing any wiring or installation work to prevent electrical shock or damage to components.
4. Operating Instructions
Once the controller kit is correctly installed, operating your scooter involves using the handlebar-mounted instrumentation unit.
4.1 Powering On/Off
- Press and hold the power button on the instrumentation unit to turn the system on or off.
- The display will illuminate, showing current speed, battery level, and other relevant information.
4.2 Adjusting Settings
- Use the 'MODE' button to cycle through different display modes or settings.
- The system supports adjustable voltage from 36V to 60V. Specific adjustment procedures may vary; refer to your scooter's overall manual or consult a technician for advanced settings.

Figure 4.1: Instrumentation unit indicating a voltage adjustment range of 36V-60V. The image also shows the back of the unit with its cover removed.
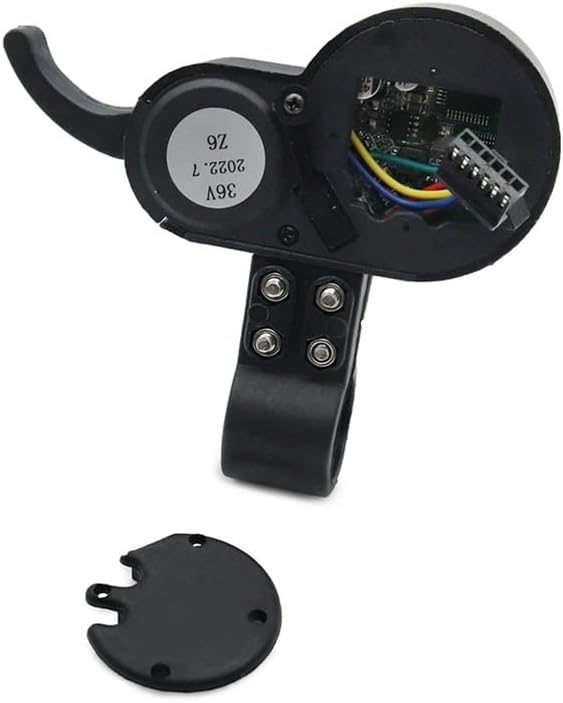
Figure 4.2: Detailed view of the instrumentation unit's internal components from the rear, with the protective cover detached.
5. Maintenance
Regular maintenance ensures the longevity and reliable performance of your XIBANY controller kit.
- Keep Clean: Periodically clean the controllers and instrumentation unit with a dry, soft cloth. Avoid using water or harsh chemicals.
- Check Connections: Regularly inspect all wiring connections to ensure they are secure and free from corrosion or damage. Loose connections can lead to intermittent operation or component failure.
- Environmental Protection: Ensure the controllers are protected from direct exposure to water, extreme temperatures, and excessive vibrations.
- Professional Inspection: Consider having a qualified technician inspect your scooter's electrical system annually, especially if you notice any unusual behavior.
6. Troubleshooting
If you encounter issues with your XIBANY Dual Drive Controller Kit, refer to the following basic troubleshooting steps:
| Problem | Possible Cause | Solution |
|---|---|---|
| Scooter does not power on | Loose battery connection, discharged battery, faulty power button | Check battery connections, charge battery, inspect instrumentation unit wiring. |
| Motor not responding | Loose motor or controller wiring, faulty motor, controller issue | Verify all motor and controller connections. If issue persists, professional diagnosis may be required. |
| Inconsistent power delivery | Poor wiring connection, controller overheating, battery issue | Inspect all wiring for secure connections. Ensure controllers have adequate ventilation. Check battery health. |
| Display not working | Loose display cable, faulty display unit | Check the connection between the display and the controller. |
For issues not covered here or if troubleshooting steps do not resolve the problem, please contact XIBANY customer support or a certified scooter repair technician.
7. Specifications
| Feature | Detail |
|---|---|
| Brand | XIBANY |
| Model Name | XIBANY001 |
| Color | 48V (referring to voltage compatibility) |
| Controller Type | Dual Drive Brushless Controller |
| Voltage Compatibility | 48V (also compatible with 36V-60V adjustable) |
| Current Rating | 25A (per controller) |
| Material | ABS+Metal |
| Item Weight | 50 Grams (controllers), 1.76 ounces (total package) |
| Package Dimensions | 1.18 x 0.79 x 0.39 inches |
| Assembly Required | No (referring to the kit itself, installation into scooter is required) |
| Number of Pieces | 1 (kit) |
| Recommended Uses | Urban commuting, recreational riding |
8. Warranty and Support
The XIBANY Dual Drive Controller Kit comes with a Limited Warranty. For specific details regarding warranty coverage, duration, and terms, please refer to the documentation provided with your purchase or contact XIBANY customer service directly.
For technical support, troubleshooting assistance, or warranty claims, please reach out to XIBANY customer support through their official website or the contact information provided at the point of purchase. When contacting support, please have your product model number (XIBANY001) and purchase details readily available.