
Introduction
The FEELWORLD T10 is a high-performance 10.1-inch full HD touch monitor designed for professional camera and video applications. It features a robust aluminium housing, ensuring durability and suitability for various shooting environments. The T10 supports up to 4K@60Hz HDMI input and output, providing a comprehensive suite of monitoring and composition tools essential for precise video production.
A notable feature is the integrated F970 external install and power kit located on the rear, allowing for the attachment of accessories such as wireless transmission systems or LED lights. This design streamlines your setup by reducing cable clutter, making it an ideal solution for director monitoring or for 1st ACs performing focus pulling in film crews. Its versatility also makes the T10 an excellent choice for large-scale events, live performances, and TV program productions, especially when used with jib cranes.
Product Overview
Key Features
- 3D LUT Support: The T10 supports 3D LUT Log to Rec.709 conversion and allows for user 3D LUT uploads, enhancing color accuracy and workflow flexibility.
- Durable Aluminium Housing: Constructed with a robust aluminium housing, the monitor is designed for durability and stability in diverse shooting conditions.
- Enhanced Protection: Features a new design with high-rebound rubber protection at all four corners, providing superior collision protection and shock absorption.
- High-Resolution IPS Panel: Equipped with an extremely high-resolution 10.1-inch IPS panel, it delivers excellent detail and accurately reflects original colors with a wide viewing angle.
- Intuitive Touch Screen Interface: The innovative touch screen LCD user interface offers incredible control, allowing for simple tap and swipe gestures to access important monitoring functions without relying solely on physical buttons.
Components and Views
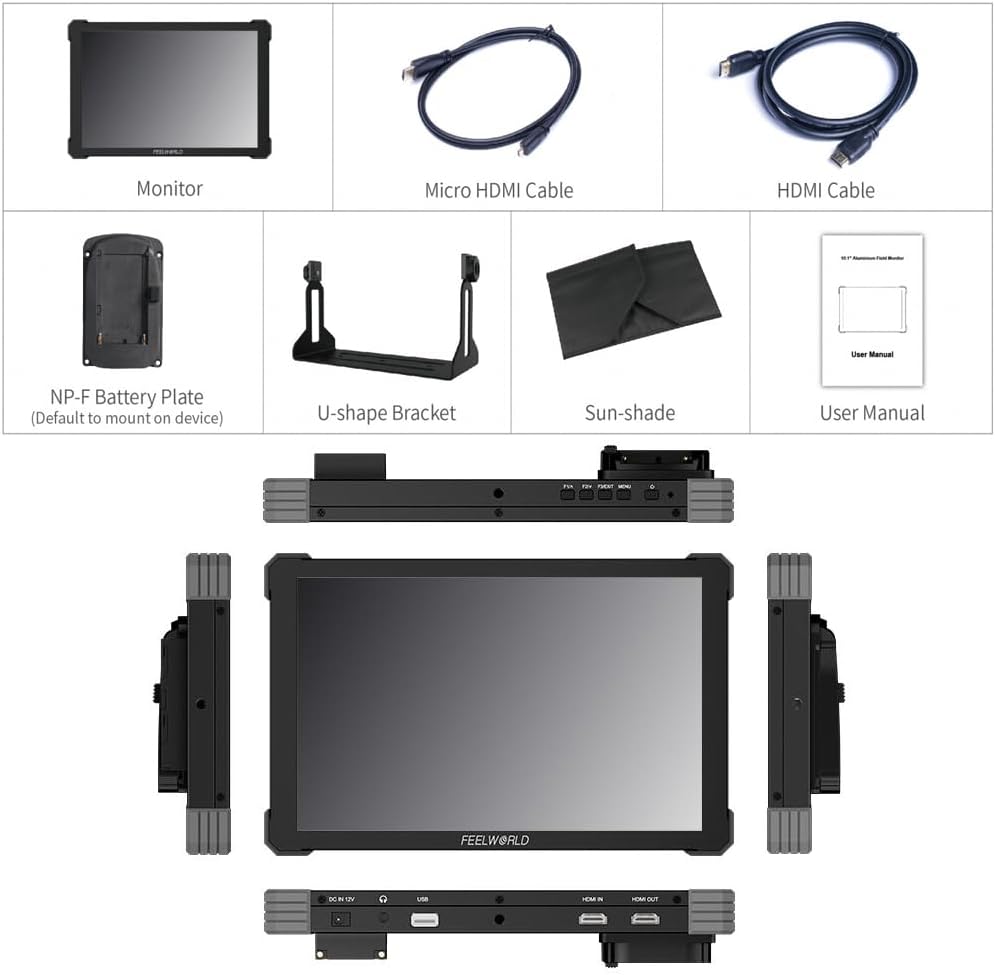


Setup
- Unpacking: Carefully remove the FEELWORLD T10 monitor and all accessories from the packaging. Verify that all components listed in Figure 1 are present.
- Powering the Monitor:
- DC Power: Connect the provided DC power adapter to the "DC IN 12V" port on the monitor and plug it into a power outlet.
- Battery Power: Attach a compatible NP-F series battery (e.g., NP-F970, NP-F750, NP-F550) to the NP-F battery plate on the rear of the monitor. Ensure it clicks securely into place.
- Mounting:
- U-shape Bracket: Attach the U-shape bracket to the monitor using the designated mounting points. This bracket allows for tabletop placement or attachment to various stands.
- Other Mounting Options: The monitor features standard mounting threads for compatibility with camera rigs, magic arms, or other professional mounting solutions.
- Connecting Video Source:
- Connect your camera or video source to the "HDMI IN" port on the monitor using the provided HDMI or Micro HDMI cable.
- If needed, connect another display or recorder to the "HDMI OUT" port for loop-through functionality.
- Attaching Sun-shade: For outdoor use or bright environments, attach the sun-shade to the monitor to reduce glare and improve screen visibility.
Operating Instructions
Power On/Off
Press and hold the power button (usually located on the side or top of the monitor) for a few seconds to turn the monitor on or off. The FEELWORLD logo will appear during startup.
Basic Navigation (Touch Screen & Buttons)
The T10 offers both touch screen and physical button control for navigation.
- Touch Screen: Tap icons or swipe to navigate menus and adjust settings. The touch interface is designed for intuitive control.
- Function Buttons (F1, F2, F3): These customizable buttons allow quick access to frequently used functions. Refer to the on-screen menu to assign specific tools (e.g., Peaking, False Color, Histogram) to these buttons.
- Menu Button: Typically, a dedicated menu button or a long press on a function button will bring up the main menu.

Monitoring Functions
The T10 provides a comprehensive set of monitoring tools:
- Waveform: Displays the luminance levels of your video signal.
- Vector Scope: Shows the color information and saturation.
- Histogram: Illustrates the distribution of tones in your image.
- Peaking Focus Assist: Highlights in-focus areas for precise focusing.
- False Color: Helps in setting correct exposure by displaying different exposure levels as distinct colors.
- Zebra Exposure: Indicates overexposed areas with zebra stripes.
- Center Marker & Aspect Ratio Markers: Aids in framing and composition.
- Anamorphic Mode: De-squeezes anamorphic footage for proper viewing.
- Image Flip: Flips the image horizontally or vertically.
- Zoom: Magnifies a portion of the image for detailed inspection.
- 3D LUT: Apply custom or pre-loaded 3D LUTs for color grading and monitoring.
Access these functions through the main menu or by assigning them to the customizable function buttons for quick toggling.
Specifications
| Feature | Detail |
|---|---|
| Product Dimensions | 6.37 x 9.92 x 0.94 inches |
| Item Weight | 2.88 pounds |
| Manufacturer | FEELWORLD |
| ASIN | B0DCS5D17G |
| Date First Available | August 10, 2024 |
| Standing Screen Display Size | 10.1 Inches |
| Aspect Ratio | 1.60:1 |
| Resolution | 1920 x 1200 Pixels |
| Brand | FEELWORLD |
| Screen Size | 10.1 Inches |
| Resolution (Input) | Up to 4K DCI 2160p (4K@60Hz HDMI) |
| Screen Surface Description | Glossy |
Maintenance
- Cleaning the Screen: Use a soft, lint-free cloth specifically designed for electronics screens. For stubborn smudges, lightly dampen the cloth with distilled water or a screen-cleaning solution. Avoid harsh chemicals or abrasive materials.
- Cleaning the Housing: Wipe the aluminium housing with a soft, dry cloth. If necessary, a slightly damp cloth can be used, but ensure no moisture enters the ports or openings.
- Storage: When not in use, store the monitor in a dry, cool place, away from direct sunlight and extreme temperatures. Use the original packaging or a protective case to prevent dust and physical damage.
- Battery Care: If using battery power, follow the manufacturer's guidelines for battery charging and storage to prolong battery life. Remove batteries if the monitor will not be used for an extended period.
- Port Protection: Keep all ports (HDMI, USB, DC IN) free from dust and debris. Use port covers if available.
Troubleshooting
| Problem | Possible Cause | Solution |
|---|---|---|
| Monitor does not power on. | No power, low battery, or faulty power connection. |
|
| No video signal. | Incorrect HDMI connection, incorrect input selected, or source issue. |
|
| Touch screen unresponsive. | Software glitch or temporary issue. |
|
| Image appears distorted or incorrect colors. | Incorrect color settings, LUT applied, or faulty cable. |
|
Warranty and Support
FEELWORLD products are designed for reliability and performance. For specific warranty terms and conditions, please refer to the warranty card included with your product or visit the official FEELWORLD website.
If you encounter any issues not covered in this manual or require technical assistance, please contact FEELWORLD customer support. Keep your purchase receipt and product serial number handy for faster service.
FEELWORLD Official Website: www.feelworld.cn (Note: This is a placeholder URL, please refer to actual product documentation for official support links.)