
1. Introduction
Thank you for choosing the YXJPP HO52-50M Handheld Digital Oscilloscope Multimeter. This device is a versatile, portable tool combining the functions of a digital oscilloscope and a true RMS multimeter. It features a compact design, a clear TFT true color display, and automatic measurement capabilities, making it suitable for electronics development, education, and field service. This manual provides essential information for the safe and effective operation of your device.
2. Product Overview
Familiarize yourself with the components and controls of your HO52-50M device.
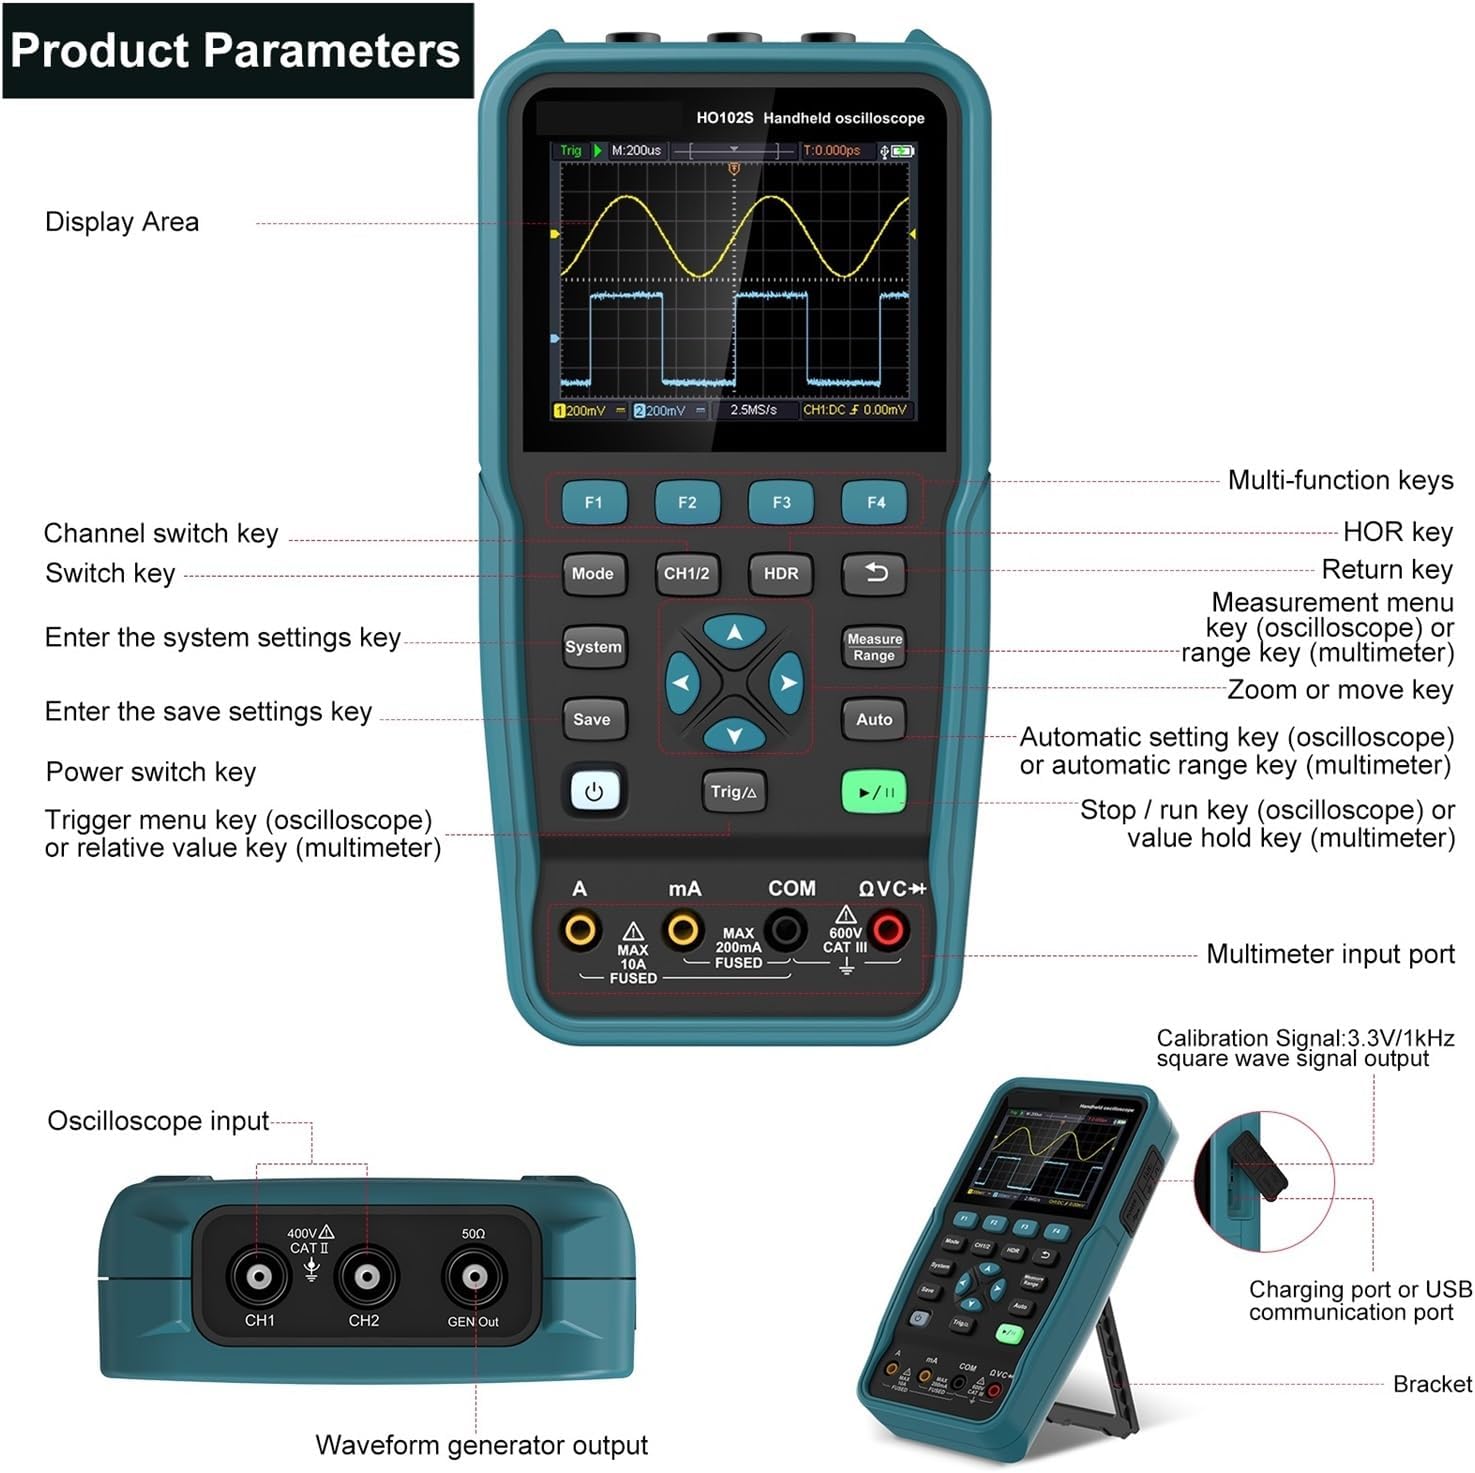
Figure 2.1: Device Layout and Controls
This image illustrates the front panel, side ports, and rear stand of the HO52-50M. Key features include the display area, function keys (F1-F4), navigation buttons, system and save keys, power switch, trigger/delta key, automatic measurement key, stop/run key, multimeter input ports (A, mA, COM, QVC+), oscilloscope input channels (CH1, CH2), waveform generator output (GEN Out), charging port, and USB communication port.

Figure 2.2: Device Dimensions and Key Features
This image highlights the compact dimensions of the HO52-50M (approximately 10cm wide, 20cm high, 3.5cm deep) and reiterates key features such as one-click storage, automatic measurement, dual channel +100MHz bandwidth, and a sample rate of 250MSa/s (Single CH) / 125MSa/s (Dual CH).
3. Setup
Follow these steps to prepare your device for first use.
- Charging the Device: Connect the device to a standard USB power adapter using the provided USB cable. The charging indicator will show the charging status. Ensure the device is fully charged before initial use for optimal battery life.
- Power On/Off: Press and hold the Power button (usually marked with a circle and vertical line symbol) to turn the device on or off.
- Initial Language Setting: Upon first power-on, you may be prompted to select a language. Use the navigation keys to select your preferred language and confirm.
- Self-Calibration: For accurate measurements, it is recommended to perform a self-calibration periodically. Refer to the 'System Settings' section in the operating instructions for details on how to initiate self-calibration.
4. Operating Instructions
The HO52-50M operates in two primary modes: Oscilloscope and Multimeter.
4.1 Oscilloscope Mode
This mode is used for observing and analyzing waveforms.
- Entering Oscilloscope Mode: Press the Mode button to switch to Oscilloscope mode if not already active.
- Connecting Probes: Connect oscilloscope probes to the CH1 or CH2 input ports. Ensure probes are properly calibrated (e.g., 1X/10X switch on probe matches setting on device).
- Adjusting Vertical Scale (Volts/Div): Use the navigation keys (Up/Down) to adjust the vertical sensitivity (Volts per division) for the selected channel.
- Adjusting Horizontal Scale (Time/Div): Use the navigation keys (Left/Right) to adjust the horizontal time base (Time per division).
- Trigger Settings: Press the Trig/Δ button to access trigger settings. Adjust trigger level, edge type (rising/falling), and mode (Auto, Normal, Single) to stabilize the waveform.
- Automatic Measurement: Press the Auto button for automatic waveform setup and display of key parameters like frequency, peak-to-peak voltage, and RMS.
- Saving Waveforms: Press the Save button to store the current waveform data.
4.2 Multimeter Mode
This mode is used for precise electrical measurements.
- Entering Multimeter Mode: Press the Mode button to switch to Multimeter mode.
- Connecting Test Leads: Insert the red test lead into the appropriate input jack (e.g., VΩC+ for voltage/resistance/capacitance, mA for milliamps, A for amps) and the black test lead into the COM jack.
- Selecting Measurement Function: Use the Measure Range button or navigation keys to cycle through available multimeter functions (e.g., DC Voltage, AC Voltage, Resistance, Capacitance, Diode Test, Continuity, Current).
- Taking Measurements: Apply the test leads to the circuit or component under test. The measurement will be displayed on the screen.
- True RMS: The device supports True RMS measurements for AC voltage and current, providing accurate readings for non-sinusoidal waveforms.
4.3 Waveform Generator Output
The HO52-50M includes a built-in waveform generator.
- Connecting Output: Connect a BNC cable from the GEN Out port to the input of the circuit or device you wish to test.
- Accessing Generator Settings: Refer to the system menu or dedicated function keys (if available) to configure the waveform type (e.g., sine, square), frequency, and amplitude.
- Calibration Signal: The device provides a 3.3V/1kHz square wave signal output for calibration purposes.
5. Maintenance
Proper care ensures the longevity and accuracy of your device.
- Cleaning: Use a soft, damp cloth to clean the exterior of the device. Do not use abrasive cleaners or solvents. Ensure the device is powered off and disconnected from all power sources before cleaning.
- Storage: Store the device in a cool, dry place away from direct sunlight, extreme temperatures, and high humidity. If storing for extended periods, ensure the battery is partially charged (around 50%) to prevent deep discharge.
- Probe Care: Inspect oscilloscope probes and multimeter test leads regularly for damage. Replace any damaged accessories immediately to ensure safety and accurate measurements.
- Battery: The device has a built-in, non-demountable battery. Do not attempt to replace the battery yourself.
6. Troubleshooting
Refer to this section for solutions to common issues.
- Device will not power on:
- Ensure the battery is sufficiently charged. Connect the device to a power source and allow it to charge for at least 30 minutes before attempting to power on again.
- Verify the power button is pressed and held for the required duration.
- No waveform displayed in Oscilloscope mode:
- Check if the probe is correctly connected to the input channel and the circuit under test.
- Adjust the vertical (Volts/Div) and horizontal (Time/Div) scales. The waveform might be off-screen.
- Adjust the trigger level. If the trigger level is set too high or too low, the waveform may not stabilize or appear.
- Ensure the probe's 1X/10X switch matches the setting on the oscilloscope.
- Inaccurate Multimeter readings:
- Ensure test leads are correctly inserted into the appropriate jacks for the measurement type.
- Check test leads for damage or poor connections.
- Perform a self-calibration if available in the system settings.
- Screen is frozen or unresponsive:
- Try pressing and holding the power button for 10-15 seconds to force a restart.
- If the issue persists, contact customer support.
7. Specifications
Key technical specifications for the YXJPP HO52-50M.
- Model Number: HO52
- Digital Channels: 2
- Bandwidth: Less than 60MHz (Specific variant HO52-50M implies 50MHz)
- Real Time Sampling Rate: 250MSa/s (Single Channel), 125MSa/s (Dual Channel)
- Max Waveform Capture Rate: 1,000,000wfm/s
- Record Length: 8K
- Display Size: 3.0 - 4.9 Inches (TFT True Color Display)
- Display Resolution: 320*240 Pixels
- Battery: Non-demountable
- Connectivity: USB (for charging and data communication)
- Multimeter Functions: True RMS measurement
- Waveform Generator Output: 3.3V/1kHz square wave calibration signal
8. Warranty and Support
For warranty information and technical support, please refer to the documentation provided with your purchase or contact the manufacturer directly. Keep your purchase receipt as proof of purchase for warranty claims.
Manufacturer: YXJPP