1. Safety Instructions
Read and understand all instructions before operating the KATOOL KT-X90 Mid Rise Scissor Lift. Failure to follow safety guidelines may result in serious injury or property damage.
- Ensure the lift is placed on a stable, level surface before operation.
- Always verify the vehicle's weight does not exceed the lift's 8000 Lbs capacity.
- Use appropriate personal protective equipment (PPE) during operation.
- Ensure all hydraulic connections are secure and free from leaks.
- The lift requires a wire no smaller than 11 AWG for electrical connection.
- Connect the lift directly to a power source; avoid relying on wall sockets.
- During initial setup, do not fully extend the platform while bleeding hydraulic fluid. This can cause the lift to become stuck at maximum height and damage internal components. Only extend to full height when loaded or supporting a vehicle.
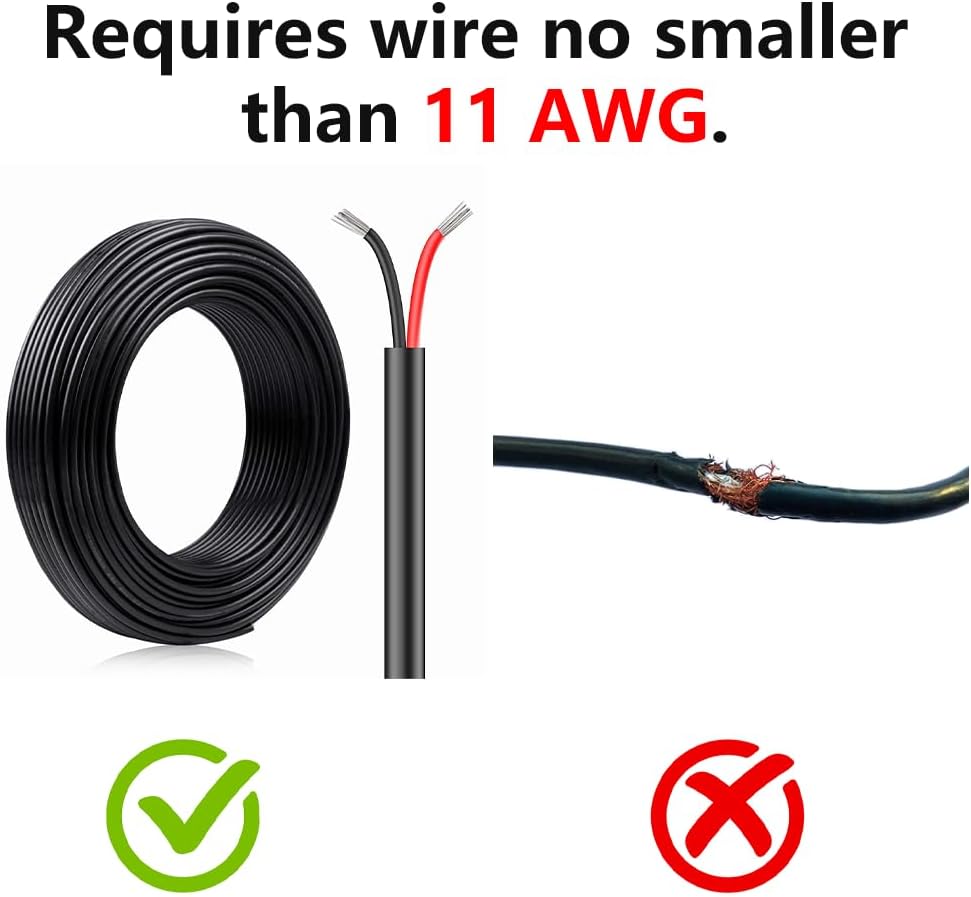
This image illustrates the recommended wire gauge (11 AWG) for connecting the lift, emphasizing the importance of using the correct wire size to ensure safe and efficient operation.

This image shows the correct method of connecting the lift to a power source, highlighting that a direct connection is required for safety and optimal performance, avoiding standard wall sockets.

This image displays a critical warning about the initial setup process, advising against fully extending the lift platform during hydraulic fluid bleeding to prevent the lift from getting stuck or damaging internal components.
2. Product Overview & Specifications
The KATOOL KT-X90 is a mid-rise scissor lift designed for vehicle maintenance and repair, offering an 8000 Lbs lifting capacity and electric release for ease of use.
Key Features:
- Mid Rise Scissor design for versatile use.
- 8000 Lbs lifting capacity for various vehicles.
- Max lifting height of 47.2 inches (1200mm) and min lift height of 4.3 inches (110mm).
- Suitable for SUVs, mini trucks, and low-profile cars.
- Electric release for effortless operation.

This image provides a comprehensive view of the KATOOL KT-X90 Mid Rise Scissor Lift, showcasing its main components and various accessories included for operation and maintenance.
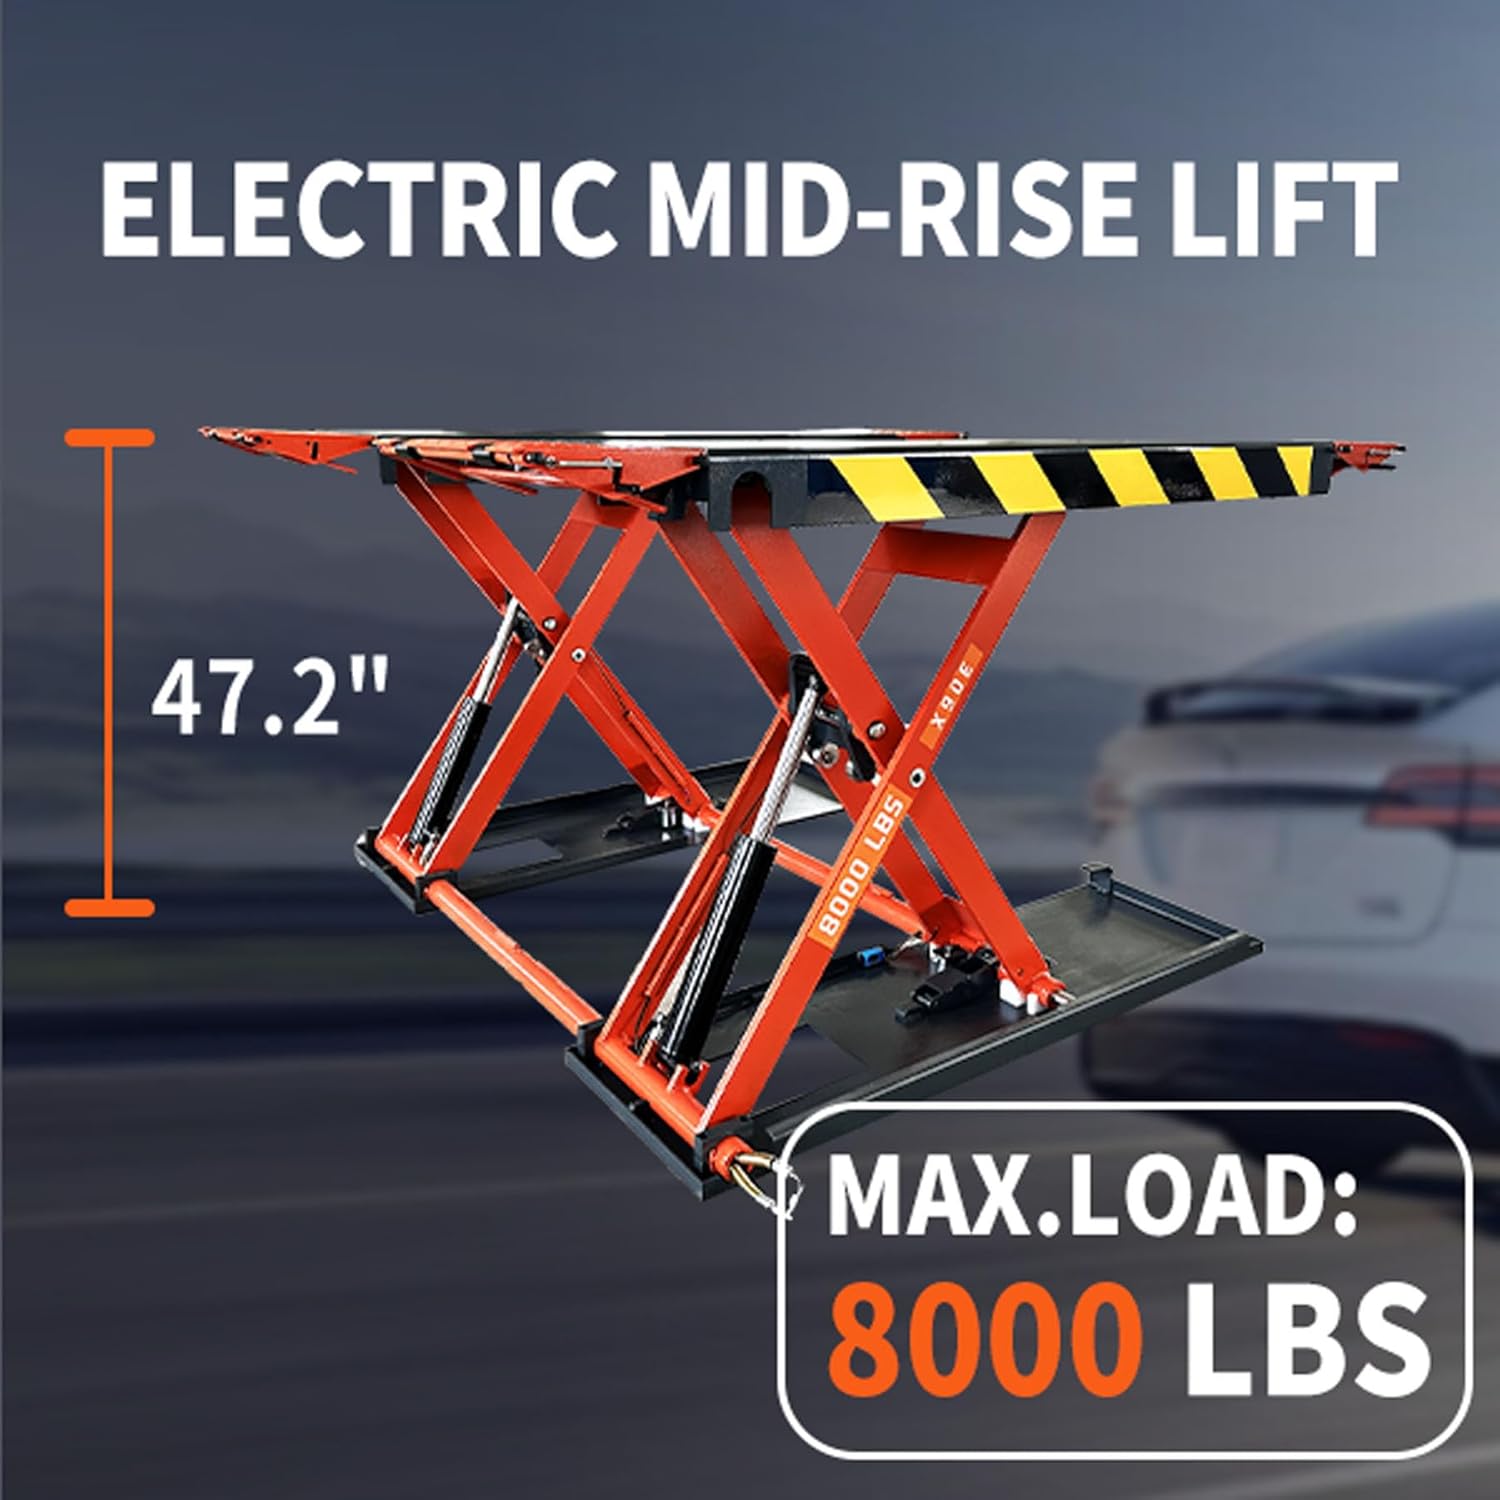
This image visually emphasizes the key performance metrics of the KATOOL KT-X90 lift: its impressive 47.2-inch maximum lifting height and robust 8000 Lbs maximum load capacity, ideal for various vehicle types.
Technical Specifications:
| Specification | Value |
|---|---|
| Load Capacity | 8000 Pounds |
| Max Lifting Height | 47.2 inches (1200mm) |
| Min Lift Height | 4.3 inches (110mm) |
| Width between platforms | 32.2 inches (820mm) |
| Total Length | 81.5 inches (2070mm) |
| Platform Width | 20.1 inches (530mm) |
| Lifting Time | 30 seconds |
| Motor | 110 V/220, 60 HZ, 1 PH |
| Item Weight | 1658 pounds |
| Product Dimensions (L x W x H) | 78 x 67 x 9 inches |
| Material | Alloy Steel |
3. Setup & Installation
Follow these steps to properly set up your KATOOL KT-X90 Mid Rise Scissor Lift.
3.1 Unpacking and Initial Assembly
- Carefully unpack all components and verify against the packing list.
- Place the two lift platforms on a flat, level surface.
- Connect the hydraulic lines between the two platforms and to the power unit. Ensure all connections are tight and secure.

This image shows a close-up of the hydraulic line connections on the lift, illustrating how to properly secure the hoses to ensure a leak-free system.
3.2 Power Unit Connection
- Connect the power unit to a dedicated 110V/1PH power source using an 11 AWG wire or larger.
- Do not use extension cords or wall sockets for primary power connection.

This image provides an internal view of the lift's control box, detailing the arrangement of electrical components such as the transformer, AC contactor, time relay, intermediate relay, and bridge rectifier, which are crucial for the lift's electric operation.
3.3 Bleeding Hydraulic System (Initial Setup)
Before first use, the hydraulic system must be bled to remove any trapped air. Refer to the troubleshooting section for detailed instructions on the exhaust method of the lift.
3.4 Placing Vehicle Support Pads
- Position the adjustable lifting pads under the vehicle's designated lifting points.
- Ensure the pads are securely seated and provide stable support.
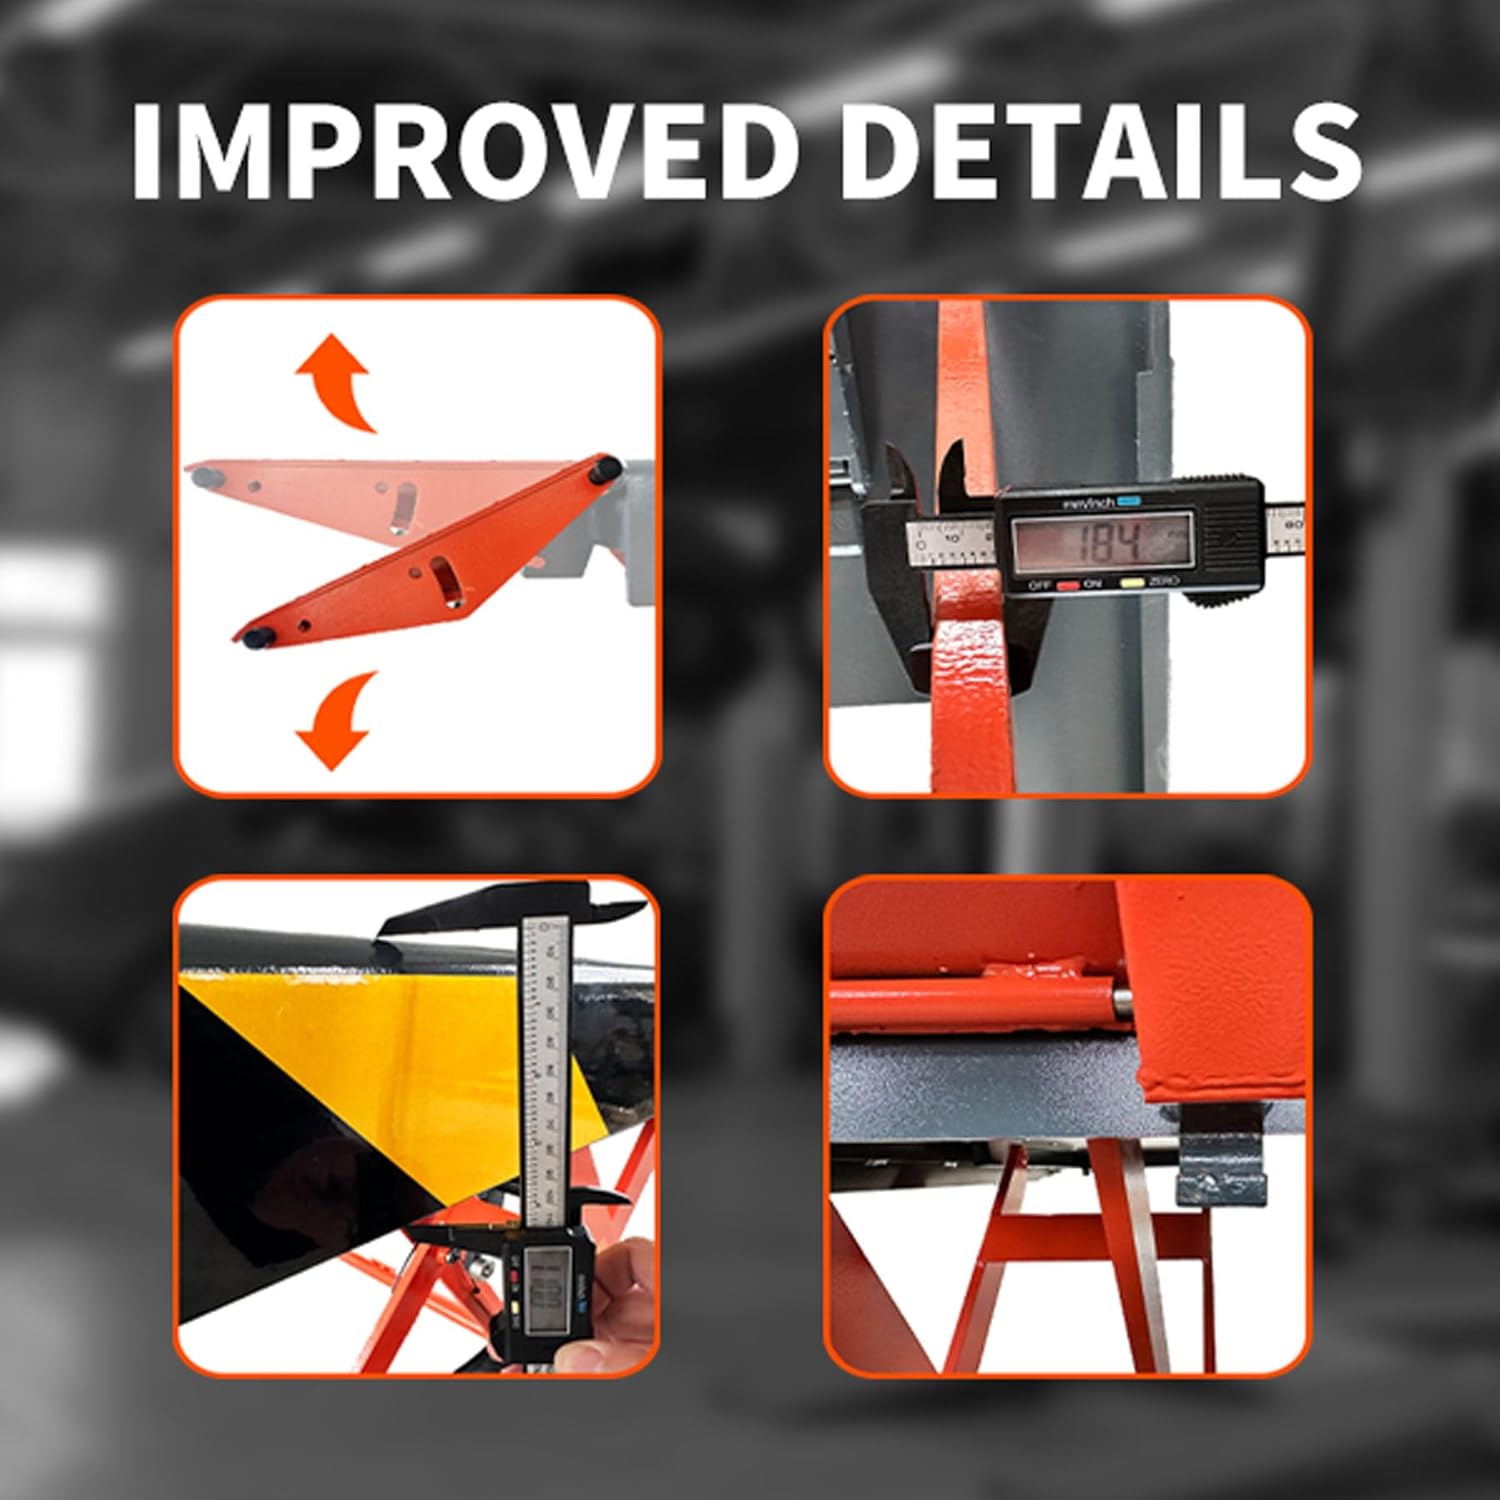
This image highlights the adjustable lifting pads and other refined details of the KATOOL KT-X90, demonstrating features designed for enhanced stability and user convenience during vehicle lifting.
3.5 Setup and Operation Video Guide
Watch this video for a visual guide on setting up and operating your KATOOL KT-X90 Mid Rise Scissor Lift.
This video provides a comprehensive demonstration of the KATOOL KT-X90 Mid Rise Scissor Lift, covering the quick connection of hydraulic lines, proper placement of adjustable pads, and the simple, single-handed operation. It also illustrates the significant amount of workspace available under a lifted vehicle, enhancing efficiency for maintenance tasks.
This video demonstrates the quick connect method for hydraulic lines, placement of adjustable pads, and single-handed operation of a portable car lift, showcasing its ease of use and the ample workspace it provides for home garage and shop applications.
4. Operating Instructions
Operating the KATOOL KT-X90 is straightforward with its electric control system.
4.1 Lifting the Vehicle
- Position the vehicle centrally on the lift platforms, ensuring the lifting points align with the pads.
- Using the control panel or remote, press and hold the UP button to raise the lift.
- Once the desired height is reached, release the UP button.
- Press the LOCK button to engage the mechanical safety locks. Always ensure the locks are fully engaged before working under the vehicle.

This image displays the control panel of the KATOOL KT-X90 Scissor Lift, featuring clearly labeled buttons for 'UP', 'DOWN', and 'LOCK' functions, along with a power switch for intuitive operation.
4.2 Lowering the Vehicle
- Ensure all tools and personnel are clear from under the vehicle.
- Slightly raise the lift by pressing the UP button to disengage the safety locks.
- Press and hold the DOWN button to lower the vehicle slowly and steadily.
- Once the lift is fully lowered, release the DOWN button.
5. Maintenance
Regular maintenance ensures the longevity and safe operation of your KATOOL KT-X90 Scissor Lift.
- Hydraulic Fluid Check: Regularly inspect the hydraulic fluid level using the oil window on the power unit. Ensure the fluid is within the recommended range. Use ISO 46# Hydraulic Oil.
- Leak Inspection: Periodically check all hydraulic lines, fittings, and cylinders for any signs of leaks. Address any leaks immediately.
- Structural Inspection: Inspect the lift's frame, scissor mechanisms, and safety locks for any signs of wear, damage, or corrosion. Replace worn or damaged parts promptly.
- Cleaning: Keep the lift clean from dirt, debris, and excessive grease to prevent interference with moving parts.
6. Troubleshooting
This section provides solutions to common issues you might encounter with your KATOOL KT-X90 Scissor Lift.
6.1 Lift Appears Uneven or Does Not Lift Smoothly
If the lift platforms are uneven or the lifting motion is not smooth, air may be trapped in the hydraulic system.
- Exhaust Method (Bleeding Air):
- Prepare the lift and install the tubing.
- Press the lift button to lift the lift.
- If the lift appears uneven, remove the tubing and hold the joint with a sharp tool until oil is released.
- Repeat for the other tubing.
- Connect the tubing and continue lifting.
- When the lift reaches its peak, continue to hold down the lift button for about 10 seconds to ensure all air is discharged.
- After the operation, use a tool to open the safety lock teeth.
- Press and hold the drop button after gently prying the indicated position with a crowbar.
- The equipment should be assisted by heavy weights (about 80kg) when falling to ensure complete air discharge.
This video provides a detailed guide on how to perform the exhaust method for the car lift. It covers preparing the lift, installing tubing, addressing uneven lifting by removing tubing and releasing oil, repeating the process for both sides, reconnecting tubing, and ensuring complete air discharge by holding the lift button at peak height. It also shows how to open safety locks and assist the lift with heavy weights during descent to fully discharge air, ensuring smooth and stable operation.
6.2 Lift Motor Works but Lift Does Not Raise
If the motor runs but the lift does not raise, check the following:
- Clean Collector Valves: Remove the collector valve on top of the lift's motor. Use a vulcanizer to flush debris from the valve hole. Reinstall the valve after cleaning.
- Check for Insufficient Fluids: Observe the oil window on the power unit. If the hydraulic oil level is low, add ISO 46# Hydraulic Oil until it reaches the recommended level.
- Check Motor Wiring: Remove the motor cover and inspect the internal wiring for any burnt or damaged connections.
- Check Solenoid Coil: Remove the solenoid coil above the motor. Check if the indicator light is on when operating the lift. Place a ferrous tool inside the coil to check for magnetism during operation.
This video addresses common problems where the car lift motor operates but the lift fails to raise. It provides solutions such as cleaning the collector valves, checking for insufficient hydraulic fluid, inspecting motor wiring for damage, and verifying the functionality of the solenoid coil.
6.3 Lift Cannot Be Lowered
If the lift cannot be lowered, check the following:
- Check Solenoid Coil: As described in section 6.2, ensure the solenoid coil is working correctly.
- Insufficient Weight: The lift requires a certain amount of weight (at least 26 kg) to fall properly. Ensure there is sufficient load on the lift.
- Single Side Cannot Fall: If one side of the lift cannot fall, remove the oil pipe and quick connector on the motor, then discharge the oil inside the lift.
This video addresses common problems where the car lift motor operates but the lift fails to raise. It provides solutions such as cleaning the collector valves, checking for insufficient hydraulic fluid, inspecting motor wiring for damage, and verifying the functionality of the solenoid coil. It also covers troubleshooting scenarios where the lift cannot be lowered, including checking the solenoid coil, ensuring sufficient weight on the lift, and addressing issues if only one side of the lift fails to descend.
7. Warranty & Support
For warranty information, technical support, or replacement parts, please contact KATOOL customer service. Keep your purchase receipt and product model number (KT-X90) readily available when contacting support.


