
Rii RK909ST
Contents
Rii RK909 Wired Mechanical Gaming Keyboard User Manual
Model: RK909ST
Introduction
This user manual provides comprehensive instructions for the setup, operation, maintenance, and troubleshooting of your Rii RK909 Wired Mechanical Gaming Keyboard. Please read this manual thoroughly before using the product to ensure optimal performance and longevity.
Safety Information
- Keep the keyboard away from liquids and excessive moisture.
- Avoid extreme temperatures.
- Do not attempt to disassemble or repair the keyboard yourself. Refer to the support section for assistance.
- Use only the provided Type-C cable for connection.
Package Contents
Please verify that all items are present in the package:
- 1 x Rii RK909 Mechanical Gaming Keyboard
- 1 x Type-C Cable
- 1 x User Manual (this document)
- 2 x Spare Blue Switches
- 2 x Keycap Pullers (different materials)
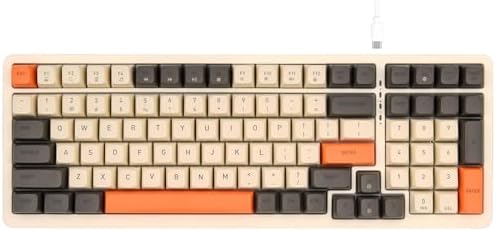
Image: The Rii RK909 Mechanical Gaming Keyboard, showcasing its full layout and the connected Type-C cable.
Setup
- Connect the Keyboard: Insert the Type-C end of the provided cable into the charging port on the keyboard and the USB-A end into an available USB port on your computer.

Image: Side view of the keyboard highlighting the Type-C charging port and overall dimensions.
- System Compatibility: The keyboard is compatible with IBM PC, Win XP, Win7, Win8, Win10, Mac, Windows, Chrome, and Linux systems.
- To switch between Mac and Windows systems, press the FN + WIN keys simultaneously.
- Adjustable Stand: For ergonomic comfort, extend the adjustable stands located on the underside of the keyboard.

Image: The underside of the keyboard, showing the adjustable stand in an extended position and the non-slip mat.
Operating Instructions
Backlight Modes
The Rii RK909 features 20 backlight display modes based on a fixed rainbow backlight. You can switch between these modes and adjust brightness:
- To switch backlight modes, press Fn + INS.
- To increase backlight brightness, press Fn + ↑ (Up Arrow).
- To decrease backlight brightness, press Fn + ↓ (Down Arrow).

Image: The keyboard displaying various LED backlight effects and illustrating the Fn key combinations for adjusting brightness and switching modes.
Multimedia Keys and Shortcuts
The keyboard includes 12 hot shortcuts accessible via the Function (Fn) key combinations:
| Key Combination | Function |
|---|---|
| Fn + F1 | My PC |
| Fn + F2 | Search |
| Fn + F3 | Calculator |
| Fn + F4 | Media Player |
| Fn + F5 | Previous Track |
| Fn + F6 | Next Track |
| Fn + F7 | Play/Pause |
| Fn + F8 | CD Stop |
| Fn + F9 | Mute |
| Fn + F10 | Volume Down |
| Fn + F11 | Volume Up |
| Fn + F12 | Key Lock |

Image: Close-up of the keyboard's function row, detailing the multimedia key descriptions and their corresponding Fn key combinations.
Maintenance
Cleaning the Keyboard
To maintain the keyboard's appearance and functionality, regular cleaning is recommended:
- Disconnect the keyboard from your computer before cleaning.
- Use a soft, lint-free cloth slightly dampened with water or a mild cleaning solution.
- Avoid spraying liquids directly onto the keyboard.
- For dust and debris between keys, use compressed air.
DIY Customization (Keycap and Switch Replacement)
The Rii RK909 keyboard is designed for easy customization:
- Detachable Magnetic Bezel: The keyboard features magnetic bezels that can be easily removed or changed to customize its appearance.

Image: The keyboard with its detachable magnetic frame partially lifted, illustrating how it can be removed for customization or cleaning.
- Keycap Replacement: Use the provided keycap puller to carefully remove keycaps for cleaning or replacement.
- Switch Replacement: The keyboard uses blue mechanical switches. Use the provided switch puller to replace individual switches if needed. Two spare blue switches are included in the package.

Image: A close-up view of the keyboard's keys, highlighting the blue mechanical switches beneath the keycaps.
Troubleshooting
| Problem | Possible Cause | Solution |
|---|---|---|
| Keyboard not responding. | Loose cable connection, incorrect USB port, driver issue. | Ensure the Type-C cable is securely connected to both the keyboard and the computer. Try a different USB port. Restart your computer. |
| Backlight not working or dim. | Backlight turned off or brightness set to minimum. | Press Fn + ↑ to increase brightness. Press Fn + INS to cycle through backlight modes. |
| Keys not registering or double-typing. | Debris under keycap/switch, faulty switch. | Remove the keycap and use compressed air to clean around the switch. If the issue persists, consider replacing the switch with a spare. |
| Keyboard not recognized on Mac/Windows. | Incorrect system mode selected. | Press FN + WIN to toggle between Mac and Windows compatibility modes. |
Specifications
| Feature | Detail |
|---|---|
| Model Number | RK909ST |
| Brand | Rii |
| Connectivity | Wired (USB-C) |
| Switch Type | Blue Mechanical Switches |
| Number of Keys | 100 |
| Backlight | 20 Modes LED Backlighting (Rainbow fixed) |
| Compatibility | IBM PC, Win XP/7/8/10, Mac, Windows, Chrome, Linux, Smartphones |
| Product Dimensions | 15.2 x 5.4 x 1.6 inches (38.6 x 13.7 x 4.1 cm) |
| Item Weight | 2.46 pounds (1.11 kg) |
| Special Features | Ergonomic Design, Detachable Magnetic Bezel, Hot-swappable switches (with included spares) |
Warranty and Support
Rii is committed to providing professional after-sales service. If you encounter any problems with your Rii RK909 Mechanical Gaming Keyboard, please do not hesitate to contact our customer support team. We will spare no effort to assist you.
For support, please refer to the contact information provided on the product packaging or the official Rii website.
Ask a question about this manual
Ask about setup, troubleshooting, compatibility, parts, safety, or missing instructions. Manuals+ will review the question and use this page’s manual context to help answer it.