1. Introduction
The SINGER M1000 Mending Machine is designed for light to medium weight fabrics, offering portability and ease of use for basic mending and garment repairs. This manual provides essential information to help you operate and maintain your machine effectively.
2. Important Safety Information
Always follow basic safety precautions when using electrical appliances to reduce the risk of fire, electric shock, or injury to persons.
- Read all instructions before using the machine.
- Keep the machine away from water or wet surfaces.
- Unplug the machine from the electrical outlet when not in use, when servicing, or when changing accessories.
- Do not allow children to operate the machine unsupervised.
- Use the machine only for its intended purpose as described in this manual.
- Never operate the machine if it has a damaged cord or plug, if it is not working properly, or if it has been dropped or damaged.
3. Package Contents
Verify that all items are present in your package:
- SINGER M1000 Mending Machine
- All-Purpose Foot
- Transparent Class 15 Bobbins
- Extra Needle
- Manual Needle Threader
- Power Cord

Image: The SINGER M1000 Mending Machine in blue, shown with its power cord, foot pedal, bobbins, and other accessories.
4. Machine Overview
Familiarize yourself with the main components of your SINGER M1000 Mending Machine.

Image: This image highlights key features: the Easy Stitch Selection dial, a visual representation of 32 stitch applications, and the Reverse Lever for securing stitches.
- Stitch Selection Dial: Located on the front of the machine, used to choose desired stitch patterns.
- Reverse Lever: Engages reverse stitching to secure seams.
- Top Drop-in Bobbin: Provides easy access for bobbin insertion and monitoring thread supply.
- Free Arm: Accessible by removing the accessory compartment, ideal for sewing cuffs and hems.
- LED Light: Illuminates the sewing area for better visibility.
5. Setup
5.1 Power Connection
Connect the power cord to the machine and then to a suitable electrical outlet. Ensure the foot pedal is also connected.
5.2 Winding the Bobbin
- Place an empty Class 15 transparent bobbin onto the bobbin winder spindle.
- Follow the threading guides for bobbin winding, typically indicated by dashed lines or numbers on the machine.
- Engage the bobbin winder and press the foot pedal to start winding.
- Stop when the bobbin is full and trim the thread.
5.3 Threading the Machine
Proper threading is crucial for correct stitch formation. Follow the numbered threading guides on the machine carefully.
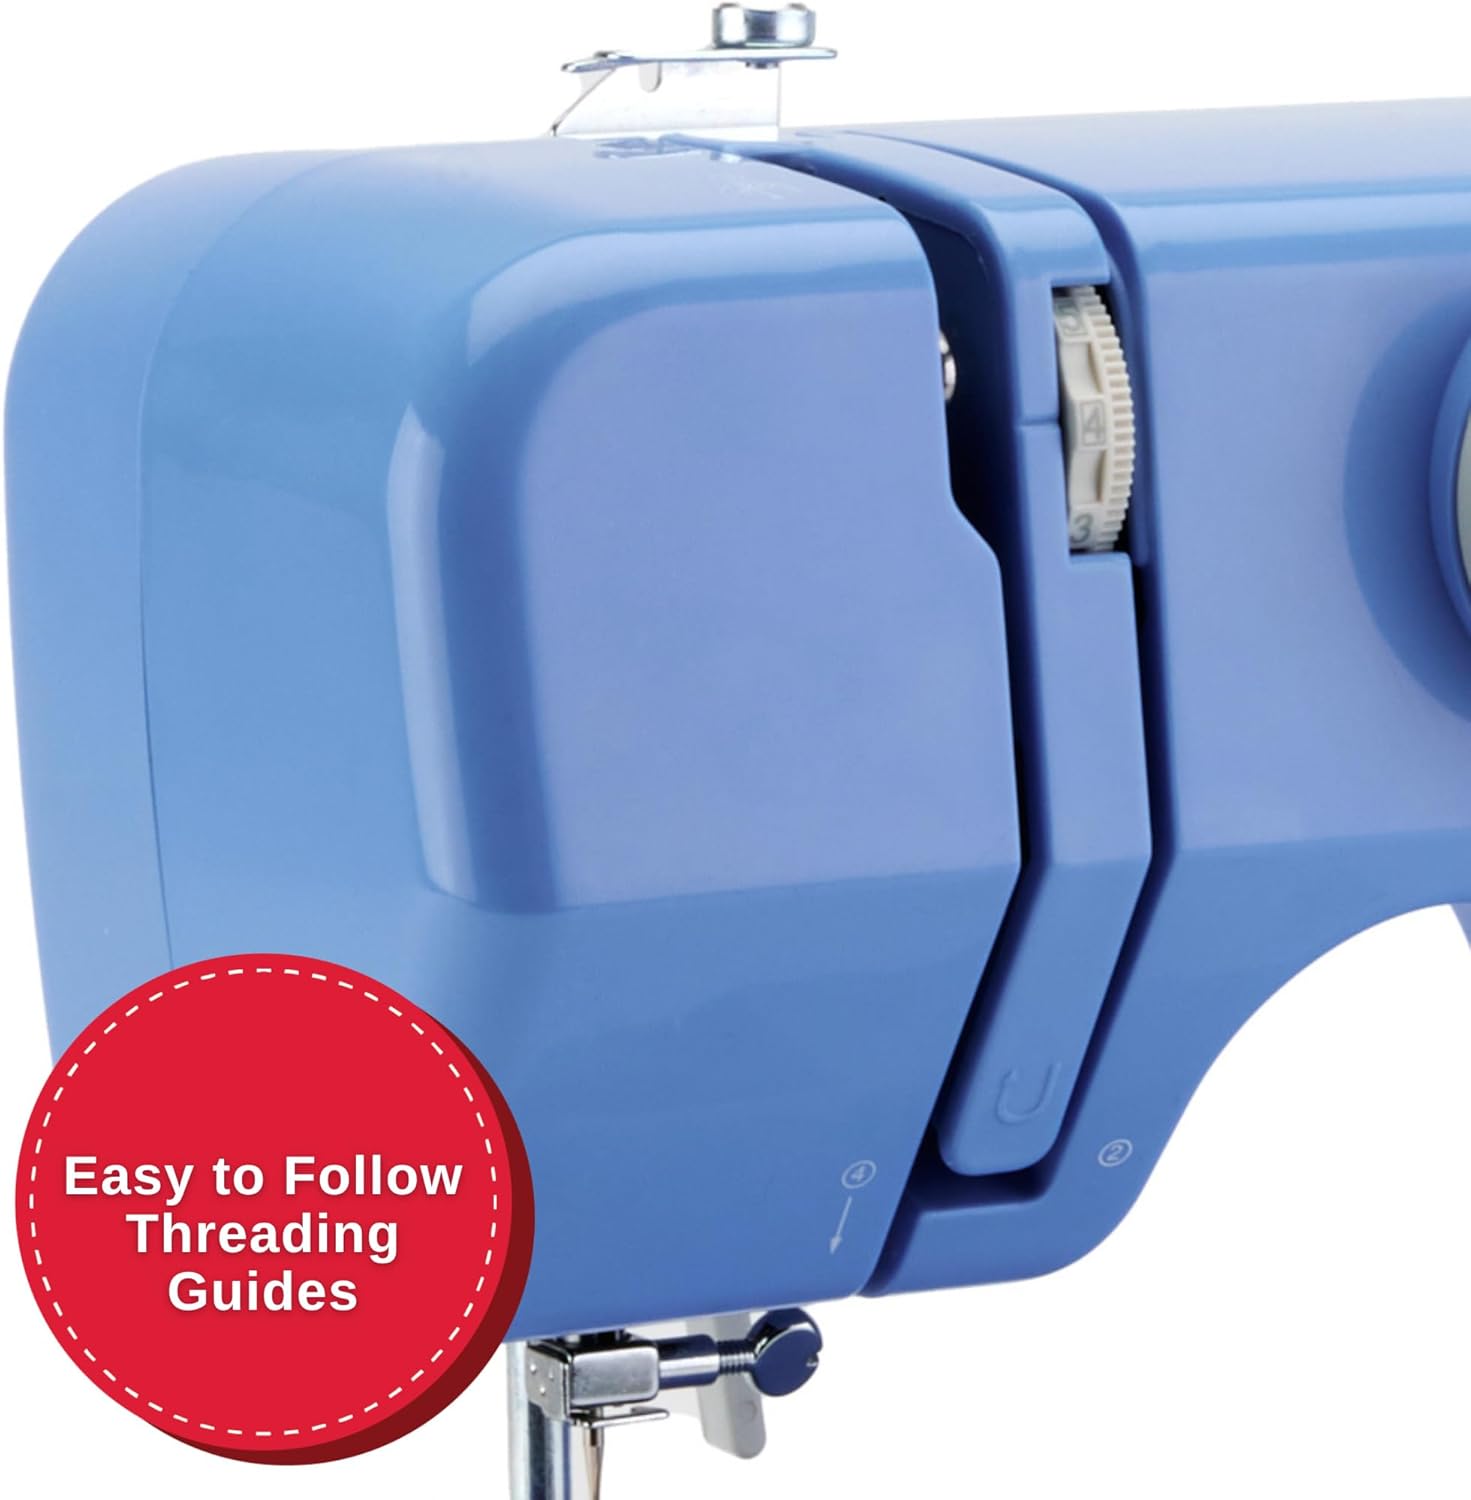
Image: A detailed view of the machine's side, illustrating the clear, numbered threading guides to ensure correct upper thread path.
- Raise the presser foot lifter.
- Place a spool of thread on the spool pin.
- Guide the thread through the upper threading path, following the numbered steps or arrows.
- Thread the needle from front to back.
- Insert the wound bobbin into the top drop-in bobbin case.
- Pull the bobbin thread up through the needle plate opening.

Image: A close-up showing the transparent cover of the top drop-in bobbin, indicating easy access and visibility of the bobbin thread supply.
6. Operating Instructions
6.1 Stitch Selection
Turn the Stitch Selection Dial to choose one of the 32 available stitch applications. The machine automatically sets the optimal stitch width and length for the selected stitch.
- Straight Stitch: For basic seams and topstitching.
- Zigzag Stitch: For finishing raw edges, appliqué, and decorative purposes.
- Multi-step Zigzag: Suitable for elastic insertion and seam finishing.
- Blind Hem Stitch: For creating invisible hems.
6.2 Starting to Sew
- Place your fabric under the presser foot.
- Lower the presser foot.
- Gently press the foot pedal to begin sewing. The machine operates at a single speed.
6.3 Using the Reverse Lever
To secure the beginning and end of a seam, press and hold the Reverse Lever while sewing. Release the lever to continue sewing forward.
6.4 Free Arm Sewing
Remove the accessory compartment to expose the free arm. This feature is useful for sewing small, tubular items such as cuffs, pant hems, and necklines.
6.5 Adjustable Thread Tension
The machine's tension control allows you to adjust the balance between the upper and bobbin threads. Proper tension ensures a smooth, even stitch. Adjust as needed based on fabric type and thread thickness.
7. Maintenance
Regular maintenance ensures optimal performance and longevity of your sewing machine.
- Cleaning: Periodically clean lint and dust from the bobbin area and feed dogs using a small brush. Always unplug the machine before cleaning.
- Needle Replacement: Replace needles regularly, especially if they become bent or dull, to prevent skipped stitches and fabric damage.
- Bobbin Type: Use only SINGER Class 15 Transparent bobbins for best results.
8. Troubleshooting
This section addresses common issues you might encounter. For more complex problems, refer to the official SINGER support resources.
| Problem | Possible Cause | Solution |
|---|---|---|
| Skipped Stitches | Incorrectly threaded needle, bent needle, wrong needle size for fabric. | Re-thread the machine, replace the needle, use appropriate needle for fabric type. |
| Thread Breaking | Incorrect tension, poor quality thread, improperly wound bobbin, burr on needle plate. | Adjust tension, use good quality thread, re-wind bobbin, check for burrs. |
| Fabric Not Feeding | Presser foot not lowered, feed dogs clogged with lint. | Lower presser foot, clean feed dogs. |
| Machine Runs Slowly / Stops | Overload (too thick fabric), motor issue, internal jam. | Ensure fabric is suitable for the machine (light to medium weight). If problem persists, contact support. |
9. Specifications
- Model: M1000
- Dimensions: 5.1"D x 11.5"W x 9.4"H
- Weight: 5.5 pounds (2.5 kg)
- Stitch Applications: 32
- Bobbin Type: Class 15 Transparent
- Sewing Space (Needle to Tower): 4.25 inches
- Power: Included power cord

Image: The SINGER M1000 Mending Machine, illustrating its compact dimensions of 11.5 inches width and 9.5 inches height, highlighting its portability.
10. Warranty and Support
The SINGER M1000 Mending Machine comes with a warranty (1 year / 25 years, as per product description). For detailed warranty information and to register your product, please visit the official SINGER website.
For additional support, tutorials, and troubleshooting guides, download the free Creativate app:

Image: A mobile phone displaying the Creativate app, which offers a user manual, quick start guide, tutorials, and troubleshooting assistance for SINGER machines.
Download the app:
You can also download the PDF user manual directly: SINGER M1000 User Manual PDF


