1. Introduction
Thank you for choosing the Latband Solar Shed Light. This advanced solar-powered light features 198 ultra-bright LEDs, delivering up to 1200 lumens of illumination. Designed for both indoor and outdoor use, it includes a high-sensitivity motion sensor, five distinct lighting modes, and a convenient remote control. With its IP65 waterproof rating and durable construction, this light is ideal for various applications such as sheds, garages, patios, and workshops. This manual provides essential information for safe installation, operation, and maintenance of your new solar light.
2. Safety Information
- Initial Charge: Before first use, ensure the solar light is charged in direct sunlight for 6-8 hours.
- Power Button: Always turn on the power button located next to the motion sensor when using the light for the first time.
- Installation: Install the solar panel in a location that receives maximum direct sunlight throughout the day for optimal charging.
- Eye Protection: Do not stare directly into the LED light source when it is illuminated, as it can cause eye strain or damage.
- Water Immersion: While the light is IP65 waterproof, avoid submerging it in water.
- Children and Pets: Keep the product and its components out of reach of children and pets.
- Disposal: Dispose of batteries and electronic components according to local regulations.
3. Product Components
The Latband Solar Shed Light system includes the following main components:
- Solar Panel: For charging the internal battery.
- Light Fixture: Contains 198 LEDs, motion sensor, and power/mode switch.
- Remote Control: For adjusting modes, brightness, and timer settings.
- Extension Cord: A 16.5-foot (5m) cable connecting the solar panel to the light fixture.
- Mounting Hardware: Screws and expansion column hinges for installation.
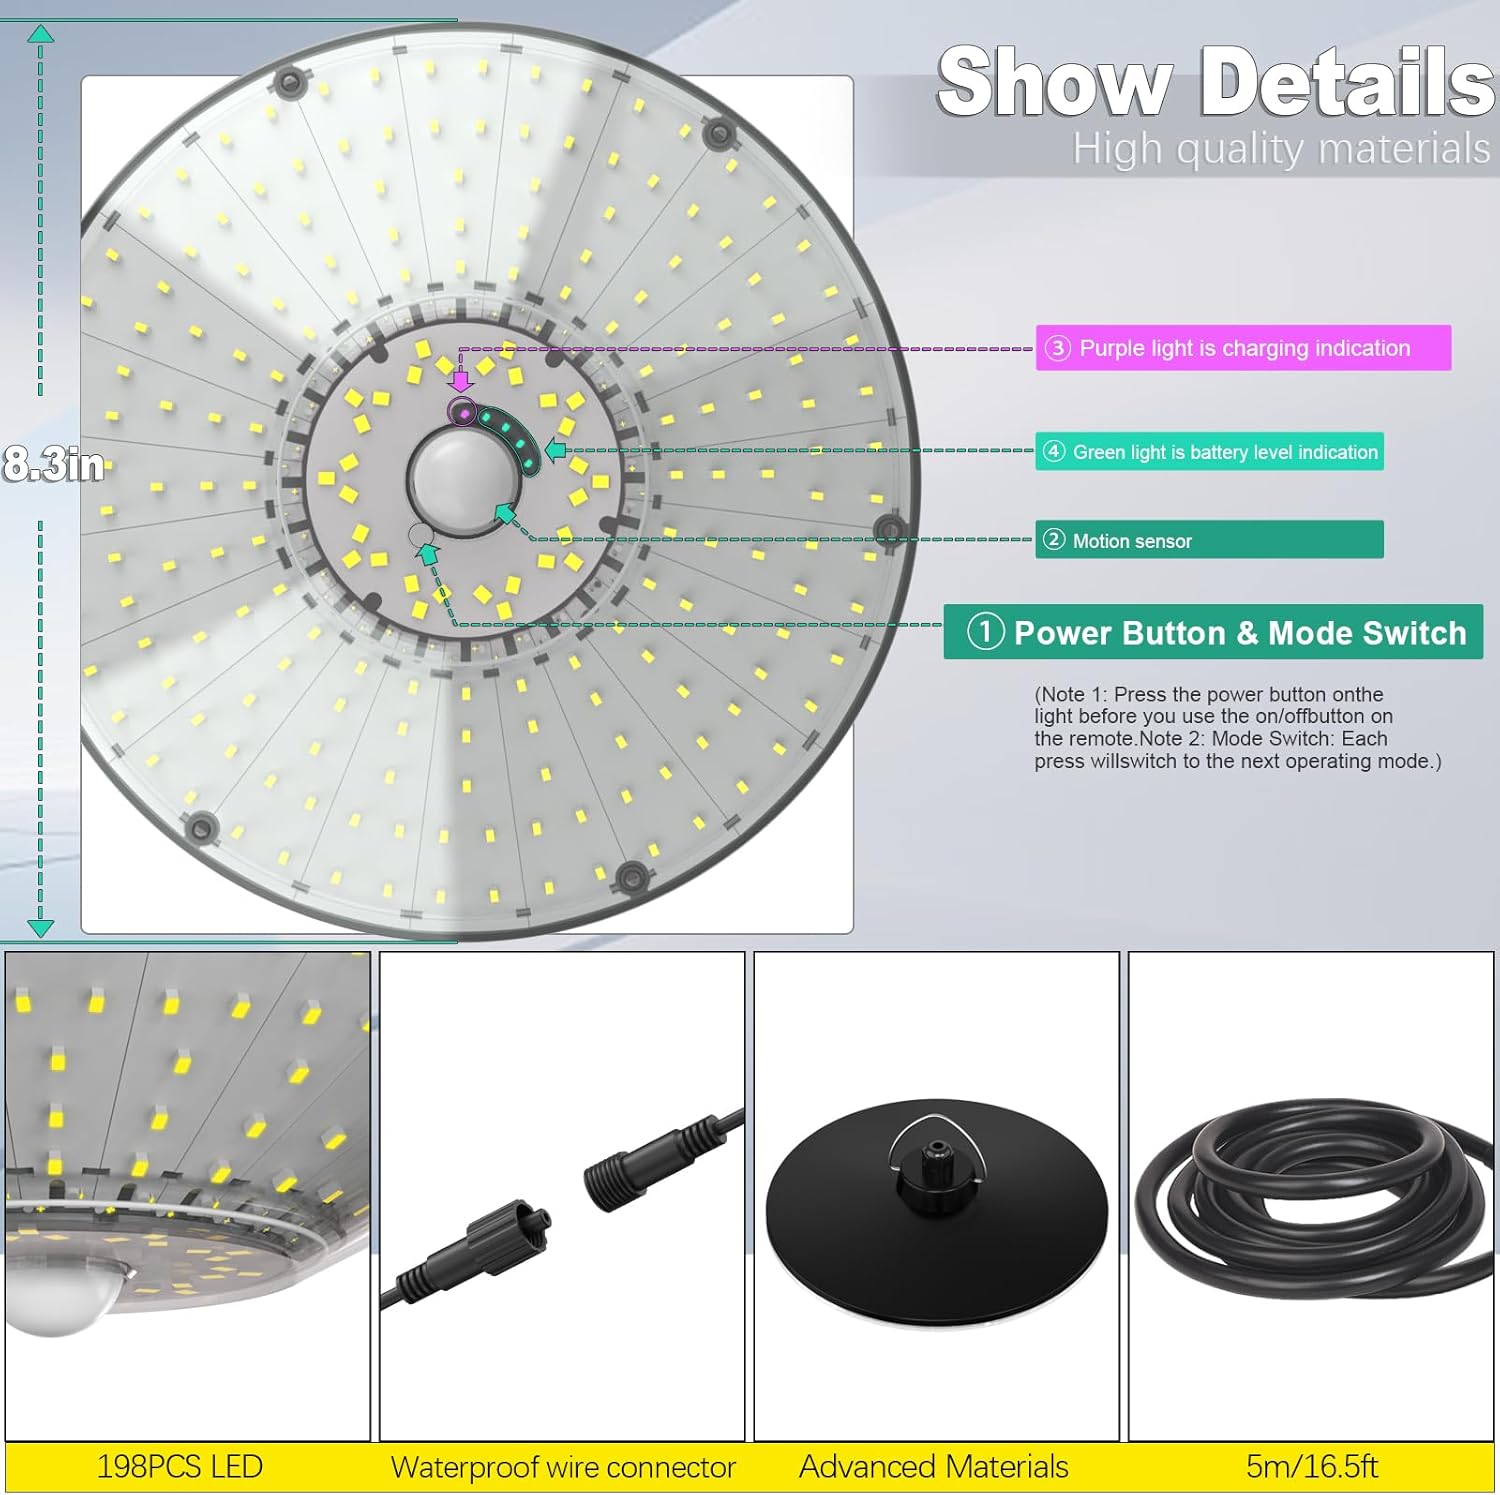
Figure 3.1: Product Components and Details
4. Setup and Installation
Follow these steps for proper installation of your solar shed light:
- Charge the Solar Panel: Before installation, place the solar panel in direct sunlight for 6-8 hours to ensure the internal battery is fully charged.
- Select Installation Location: Choose a location for the solar panel that receives maximum direct sunlight throughout the day. For the light fixture, select an area where illumination is desired, ensuring the 16.5-foot extension cord can reach the solar panel.
- Mount the Solar Panel:
- Drill 2-3 suitable holes at the chosen location for the solar panel.
- Insert the expansion column hinges into the drilled holes.
- Secure the solar panel bracket using screws.
- Adjust the angle of the solar panel to optimize sun exposure.
- Connect the Light Wires: Connect the wire from the solar panel to the wire from the light fixture using the waterproof wire connector. Ensure a secure connection.
- Mount the Light Fixture: The light fixture can be hung using its metal hanging ring or attached to a hook.
- Activate the Light: Locate the power button next to the motion sensor on the light fixture and press it to turn the light on for the first time.

Figure 4.1: Installation Steps
5. Operating Instructions
Your Latband Solar Shed Light offers versatile operation through its integrated power button and remote control.
5.1 Power Button & Mode Switch
The power button located next to the motion sensor on the light fixture serves two functions:
- First Use: Press to turn the light on.
- Mode Switching: Subsequent presses will cycle through the available lighting modes.
5.2 Remote Control Functions
The included remote control provides convenient access to all lighting features:
- Mode Switch: Select from 5 distinct lighting modes.
- Brightness Adjustment: Use the "+/-" buttons to set brightness to 100%, 75%, 50%, or 25%.
- Timer Setting: Set the light to operate for a specific duration (2H, 4H, or 6H).
5.3 Lighting Modes
The light features 5 lighting modes, triggered by its high-sensitivity motion sensor:

Figure 5.1: Understanding the 5 Lighting Modes
- Mode 1: Keeps lights dimmed, brightens to full intensity when motion is detected. This mode only works at night.
- Mode 2: Stays off initially, turns on to full intensity when any motion is detected. This mode only works at night.
- Mode 3: Continuous illumination at night, automatically turned on and always on. This mode only works at night.
- Mode 4: Activates and stays off, turns on to full intensity when any motion is detected. This mode works both day and night.
- Mode 5: Always on all day long. Automatically switches to Mode 4 when the battery remaining is 60%, and will cycle until the next day.
5.4 Timer Settings
The remote control allows for specific timer settings:
- 2H: Light stays on for 2 hours at 70% brightness.
- 4H: Light stays on for 4 hours at 60% brightness.
- 6H: Light stays on for 6 hours at 50% brightness.
5.5 Battery Reminder & Indicators
The lamp body is designed with visual indicators for battery status:
- Purple Light: Indicates the unit is currently charging.
- Green Light: Indicates the current power level of the battery.
6. Maintenance
To ensure optimal performance and longevity of your Latband Solar Shed Light, follow these maintenance guidelines:
- Cleaning the Solar Panel: Regularly wipe the solar panel with a soft, damp cloth to remove dust, dirt, and debris. A clean panel ensures efficient charging.
- Cleaning the Light Fixture: Clean the light fixture and motion sensor lens periodically to maintain clear light output and sensor sensitivity.
- Weather Resistance: The light is IP65 waterproof and made of corrosion-resistant ABS plastic, designed to withstand extreme weather conditions such as rain, snow, and heat. No special weather-proofing maintenance is required beyond ensuring connections remain secure.
- Battery Care: The built-in 5000mAh rechargeable battery is designed for long-term use. Ensure the light receives adequate sunlight for daily charging.

Figure 6.1: Weather Resistance Features
7. Troubleshooting
If you encounter issues with your solar shed light, refer to the following common problems and solutions:
| Problem | Possible Cause | Solution |
|---|---|---|
| Light does not turn on at night. | Power button is off. Insufficient solar charge. Solar panel is dirty or obstructed. | Ensure the power button next to the motion sensor is pressed ON. Relocate solar panel to an area with more direct sunlight. Clean the solar panel surface. |
| Light runtime is shorter than expected. | Insufficient solar charge. Frequent motion detection (in motion sensor modes). Cold weather affecting battery performance. | Ensure solar panel receives 6-8 hours of direct sunlight daily. Consider using a mode with less frequent full brightness activation if not needed. Battery performance can be reduced in extreme cold; this is normal. |
| Motion sensor is not detecting movement. | Sensor is obstructed. Sensor range/angle issues. Light is in a mode that doesn't use motion sensing. | Clear any obstructions from the sensor lens. Ensure the light is positioned correctly for desired detection area (120° wide angle, up to 28 ft). Switch to Mode 1, 2, 4, or 5 (which incorporates Mode 4) for motion detection. |
| Remote control is not working. | Remote battery is dead. Obstruction between remote and light. Remote not pointed at the light's receiver. | Replace the remote control battery. Ensure clear line of sight to the light fixture. Point the remote directly at the light fixture. |
8. Specifications
| Feature | Detail |
|---|---|
| Brand | Latband |
| Model Name | A04-01 |
| Part Number | A04 |
| Power Source | Solar Powered |
| Light Source Type | LED (198 LEDs) |
| Brightness | 1200 Lumens (Max) |
| Battery | 5000mAh Lithium Polymer (included) |
| Voltage | 6.5 Volts |
| Water Resistance Level | IP65 Waterproof |
| Material | Plastic (Corrosion-resistant ABS) |
| Product Dimensions | 12"L x 4"W x 4"H |
| Item Weight | 2.77 pounds |
| Special Features | Motion Sensor, Timer, Remote Control |
| Included Components | Remote Control |
| Control Method | Remote, Motion Sensor with Manual Buttons |
| Light Color | Cool White |
| UPC | 767461533279 |
9. Warranty and Support
For any warranty claims, technical support, or inquiries regarding your Latband Solar Shed Light, please contact the seller or manufacturer directly through your purchase platform. Keep your purchase receipt as proof of purchase.


