1. Introduction
This manual provides essential information for the installation, operation, and maintenance of your YNIGYSCEK Carburetor Kit. This kit is designed as a replacement part for various Ryobi and Homelite 2-cycle gasoline-powered outdoor equipment, including string trimmers and blowers. Please read these instructions carefully before attempting any installation or maintenance to ensure proper function and safety.
2. Safety Information
Always prioritize safety when working with fuel systems and small engines. Failure to follow safety precautions can result in serious injury or property damage.
- Disconnect Spark Plug: Before performing any service or maintenance, always disconnect the spark plug wire to prevent accidental starting.
- Fuel Handling: Work in a well-ventilated area. Do not smoke or use open flames near gasoline. Store fuel in approved containers.
- Eye Protection: Wear safety glasses or goggles to protect your eyes from fuel, debris, or other hazards.
- Gloves: Wear appropriate gloves to protect your hands from fuel and sharp edges.
- Engine Cool Down: Allow the engine to cool completely before working on the carburetor or fuel system. Hot engine components can cause burns.
- Professional Assistance: If you are unsure about any step or procedure, consult a qualified service technician.
3. Package Contents
Verify that all components listed below are present in your package:
- 1 x Carburetor
- 2 x Gaskets
- 2 x Primer Bulbs
- 1 x Spark Plug
- 1 x Fuel Filter
- 1 x Service Card (for general information)
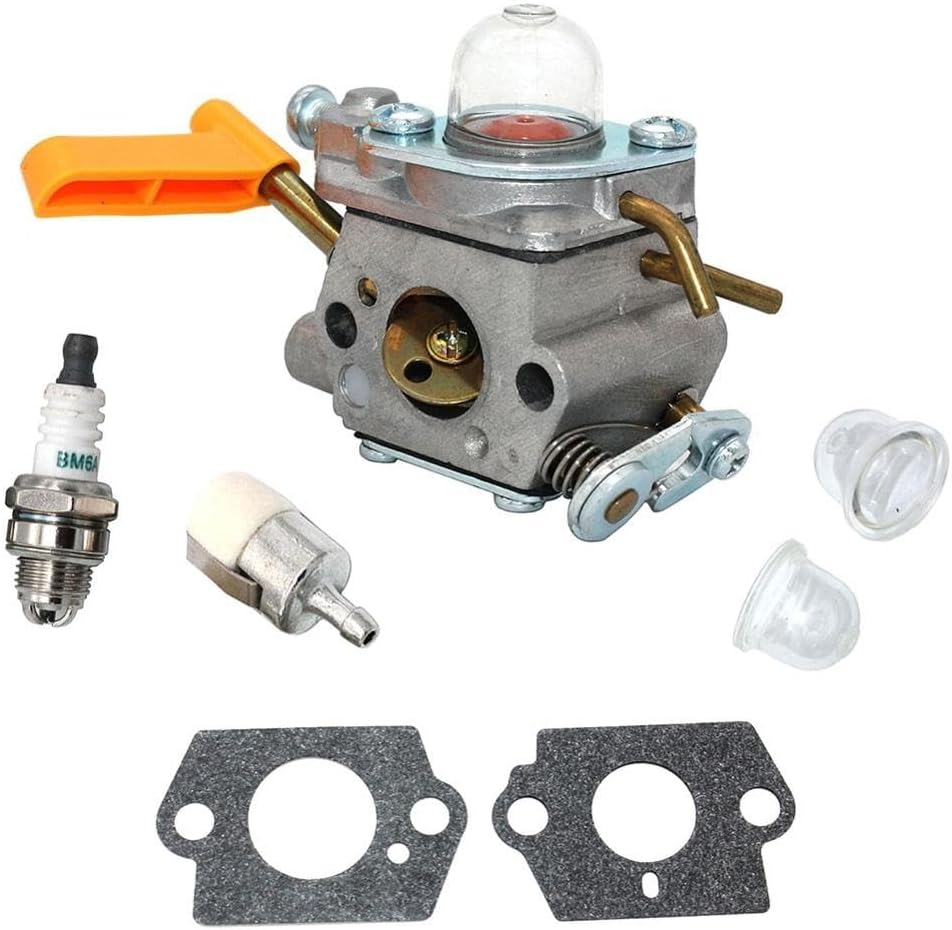
Image 1: Complete YNIGYSCEK Carburetor Kit showing all included components.
4. Compatibility
This carburetor kit is compatible with a wide range of Ryobi and Homelite 2-cycle engines. Please cross-reference your equipment's model number with the list below to confirm compatibility. This kit replaces ZAMA C1U-H60D, C1U-H60E, and C1U-H60 carburetors, as well as Homelite/Ryobi part numbers 3074504, 308054003, 308054013, 308054004, 308054008, 308054012, 308054015, 308054028, 308054034, 308054043, 985624001.
Compatible Ryobi Models:
- 26cc Trimmer Models: RY26500, RY26520, RY26540, RY26901, RY26921, RY26941
- 30cc Trimmer Models: RY29550, RY30120, RY30140, RY30160, RY30220, RY30240, RY30260, RY30522, RY30542, RY30562
- Hedge Trimmer: RY39500
- Backpack Blower: RY09600, RY09701
- Pole Pruner Models: RY52014, RY52502, RY52504, RY52903, RY52905
- Other Ryobi Models: RY30000, RY30000A, RY30000B, RY30002, RY30002A, RY30002B, RY30021A, RY30041A, RY30963, RY30943, RY30923, BC30 (RY30160), RY30260B, RY30004, RY30004A, RY30004B, RY30004D, RY30061A, RY30530, RY30550, RY30570, RY30931, RY30951, RY30971, RY52001, RY52001A, RY26500 CS30, RY28000, RY28020, RY28040, RY28060, RY09053, RY09800
Compatible Homelite Models:
- UT20002, UT20002A, UT20003A, UT20004A, UT20004B, UT20006, UT20022, UT20022A, UT20023A, UT20024, UT20024A, UT20024B, UT20026, UT20042A, UT20046, UT20043A, UT20044A, UT20044B, UT-21004, UT21006, UT-21044, UT21046, UT22600, UT22650, UT-29005, UT29007, UT-29045, UT29047, UT32600, UT32601, UT32601A, UT32605, UT32650, UT32651, UT32651A, UT32655
- 25cc EZ Reach String Trimmer: UT20042A, UT20043A
- 25cc Trim 'N Edge String Trimmer: UT20022, UT20022A, UT20023-A
- 25cc TrimLite String Trimmer: UT20002, UT20002A, UT20003A
5. Setup and Installation
Replacing a carburetor requires mechanical aptitude. If you are not comfortable performing this procedure, it is recommended to seek professional assistance. The following steps are general guidelines; specific procedures may vary slightly depending on your equipment model.
- Preparation:
- Ensure the engine is cool.
- Disconnect the spark plug wire.
- Drain any fuel from the fuel tank into an approved container.
- Clean the area around the carburetor to prevent dirt from entering the engine.
- Remove Old Carburetor:
- Locate the carburetor, typically mounted between the air filter and the engine.
- Carefully disconnect the fuel lines, throttle linkage, and choke linkage from the old carburetor. Note their positions for reassembly.
- Remove the mounting bolts or nuts securing the carburetor to the engine.
- Remove the old carburetor and any old gaskets.
- Install New Carburetor:
- Install new gaskets on both sides of the carburetor, ensuring they are correctly aligned.
- Mount the new carburetor onto the engine, securing it with the mounting bolts/nuts. Do not overtighten.
- Reconnect the fuel lines, throttle linkage, and choke linkage to their correct positions on the new carburetor. Ensure fuel lines are securely attached and not kinked.
- Replace the old fuel filter with the new one provided in the kit.
- Replace the old primer bulbs with the new ones if they are worn or cracked.
- Replace the old spark plug with the new one provided. Ensure it is tightened to the manufacturer's specifications.
- Final Checks:
- Double-check all connections for security.
- Refill the fuel tank with the appropriate fuel mixture (if applicable for 2-cycle engines).
- Reconnect the spark plug wire.

Image 2: Close-up view of the carburetor, highlighting fuel line connections and linkages.
6. Operating (Post-Installation)
After installation, follow these steps to start your equipment:
- Prime the Carburetor: Press the primer bulb several times until fuel is visible in the bulb and flows freely, indicating the carburetor is filled with fuel.
- Choke: Set the choke lever to the FULL CHOKE position (cold start).
- Start Engine: Pull the starter rope firmly until the engine attempts to start or 'pops'.
- Half Choke: Move the choke lever to the HALF CHOKE position.
- Restart: Pull the starter rope again until the engine starts and runs.
- Run: Once the engine is running smoothly, move the choke lever to the RUN position. Allow the engine to warm up for a few moments before use.
If the engine does not start after several attempts, refer to the Troubleshooting section.
7. Maintenance
Regular maintenance helps ensure the longevity and performance of your carburetor and engine.
- Fuel Filter: Inspect and replace the fuel filter periodically (e.g., annually or every 25 hours of use) to prevent contaminants from reaching the carburetor.
- Air Filter: Ensure the air filter is clean and free of debris. A dirty air filter can restrict airflow and affect carburetor performance.
- Spark Plug: Inspect the spark plug for wear or fouling. Replace it as needed to ensure efficient ignition.
- Fuel Quality: Always use fresh, clean fuel mixed to the manufacturer's specifications for 2-cycle engines. Stale fuel can cause carburetor issues.
- Storage: Before long-term storage, drain the fuel system or use a fuel stabilizer to prevent gum and varnish buildup in the carburetor.
8. Troubleshooting
If your equipment experiences issues after carburetor replacement, consider the following common problems and solutions:
| Problem | Possible Cause | Solution |
|---|---|---|
| Engine will not start | No fuel reaching carburetor | Check fuel lines for kinks, ensure fuel filter is clean, prime carburetor. |
| Engine starts then dies | Improper choke setting, fuel starvation | Adjust choke, check fuel flow, ensure primer bulb is working. |
| Engine runs rough or stalls | Air leak, fuel mixture issue, dirty air filter | Check carburetor mounting for tightness, inspect gaskets, clean/replace air filter. |
| Fuel leaks from carburetor | Improperly seated gaskets, damaged fuel lines, float needle issue | Re-check gasket installation, inspect fuel lines for cracks, consult a professional for internal carburetor issues. |
| Primer bulb not filling with fuel | Clogged fuel filter, kinked fuel line, faulty primer bulb | Replace fuel filter, inspect fuel lines, replace primer bulb. |
9. Specifications
General specifications for the YNIGYSCEK Carburetor Kit:
- Product Dimensions: 1.18 x 0.79 x 0.39 inches (Carburetor only, approximate)
- Item Weight: 1.76 ounces (Carburetor only, approximate)
- Manufacturer: YNIGYSCEK
- Replaces ZAMA Models: C1U-H60D, C1U-H60E, C1U-H60

Image 3: Additional view of the YNIGYSCEK Carburetor Kit components.
10. Warranty and Support
For warranty information and customer support regarding your YNIGYSCEK Carburetor Kit, please refer to the service card included in your package or contact the seller directly through your purchase platform. Keep your proof of purchase for any warranty claims.


